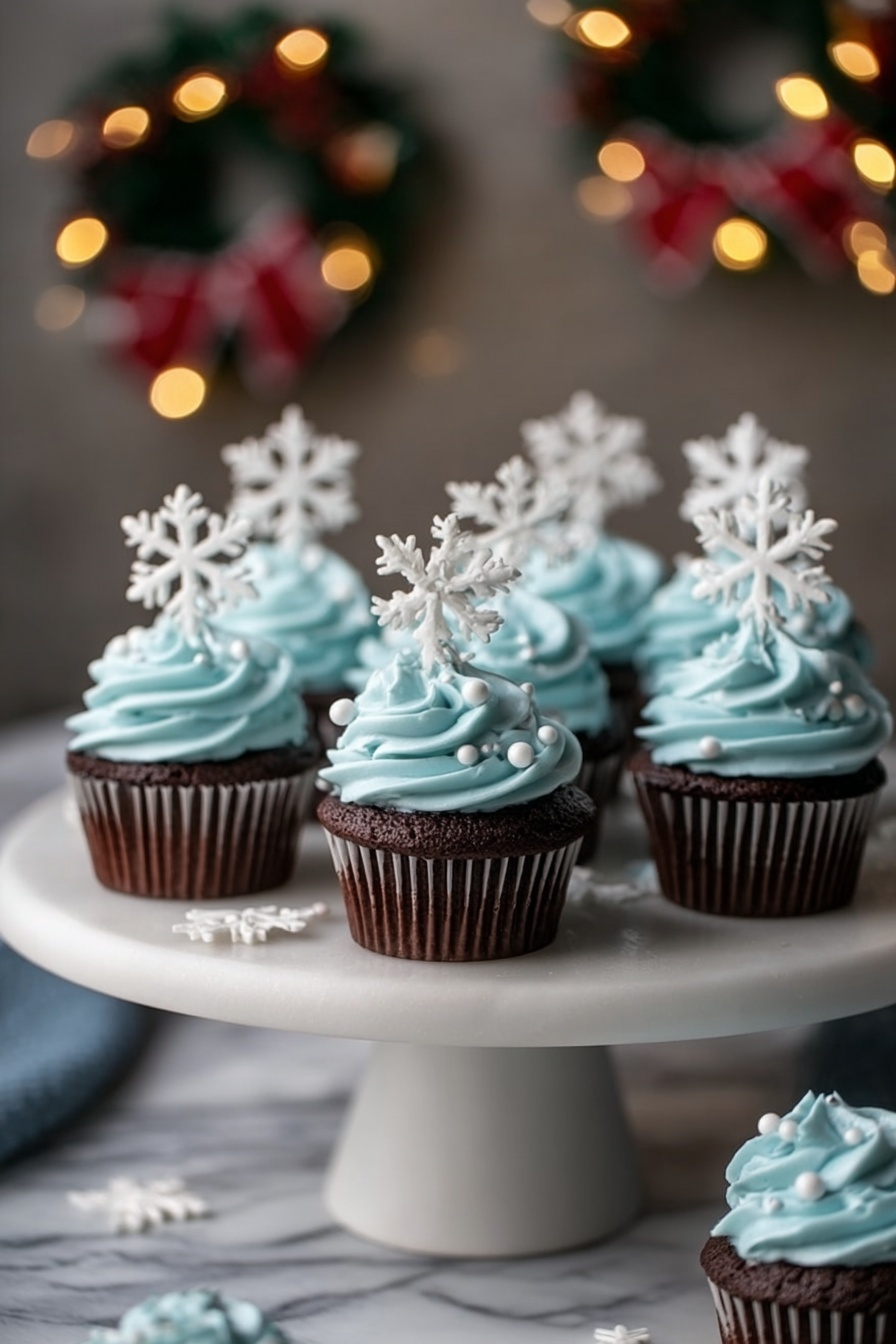
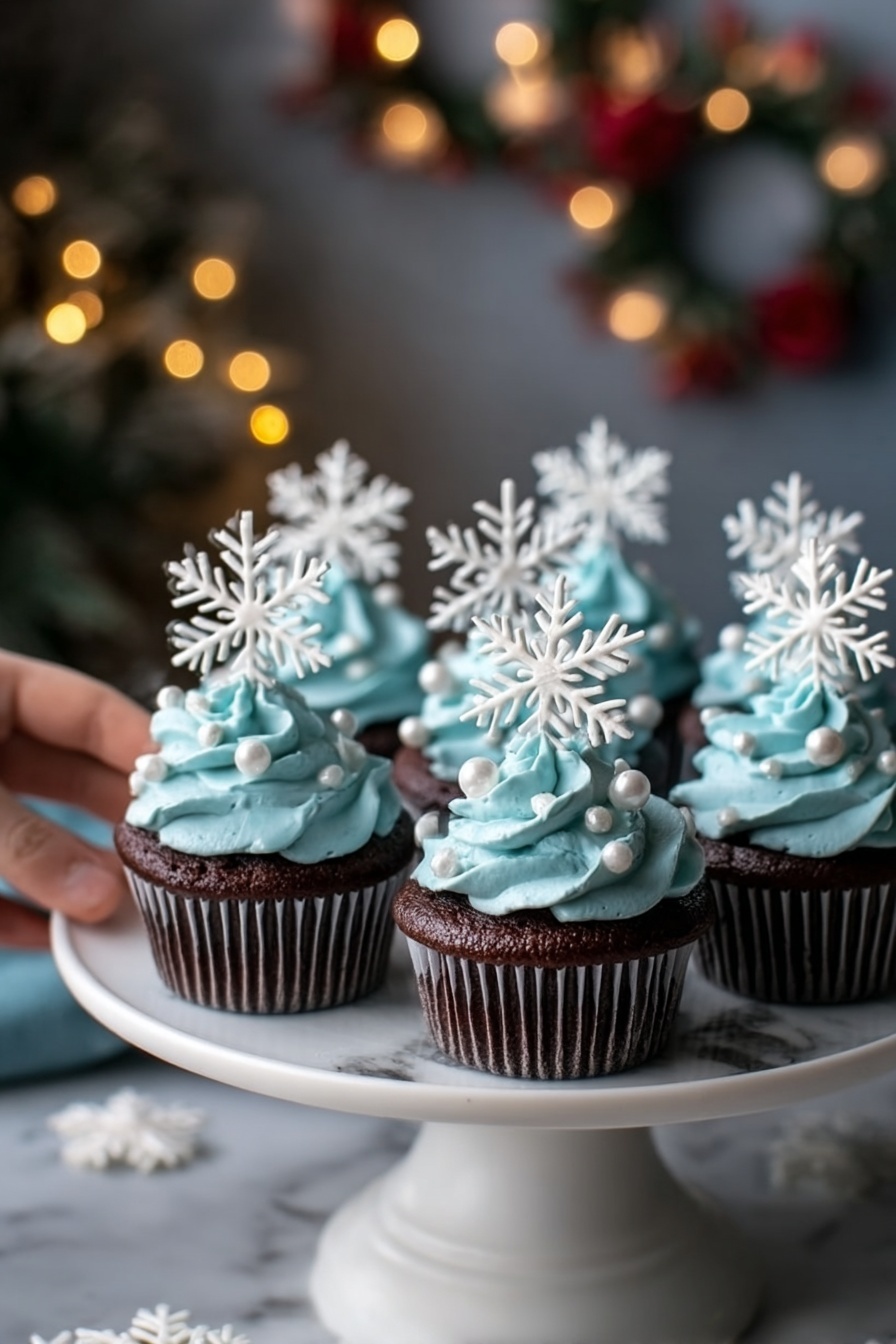
If you’re on the hunt for a dessert that perfectly captures the magic of winter, I have something truly special for you. My Winter Wonderland Chocolate Cupcakes with Snowflake Frosting Recipe is a fan-freaking-tastic way to warm up chilly days and impress anyone who digs rich chocolate paired with a dreamy, snowy frosting. Trust me, once you try this recipe, you’ll want to make it every holiday season—or honestly, any day you just want a bit of winter whimsy on your dessert plate.
Why You’ll Love This Recipe
- Perfect winter vibe: The subtle blue frosting with snowflake decorations instantly transports you to a cozy snowy day.
- Decadently chocolatey: These cupcakes are moist, rich, and satisfy even the deepest chocolate cravings.
- Frosting that’s fluffy and silky: The snowflake buttercream is creamy, light, and easy to pipe beautifully.
- Impress without stress: I’ve included my best tips so you can make these look bakery-level — without the fuss.

Ingredients You’ll Need
Let’s talk ingredients—these are simple pantry staples that work harmoniously to create a cupcake that’s rich yet tender, with that classic chocolate depth complemented by a smooth, pretty buttercream frosting. I recommend using good quality cocoa powder and real butter—the flavor difference shines through.
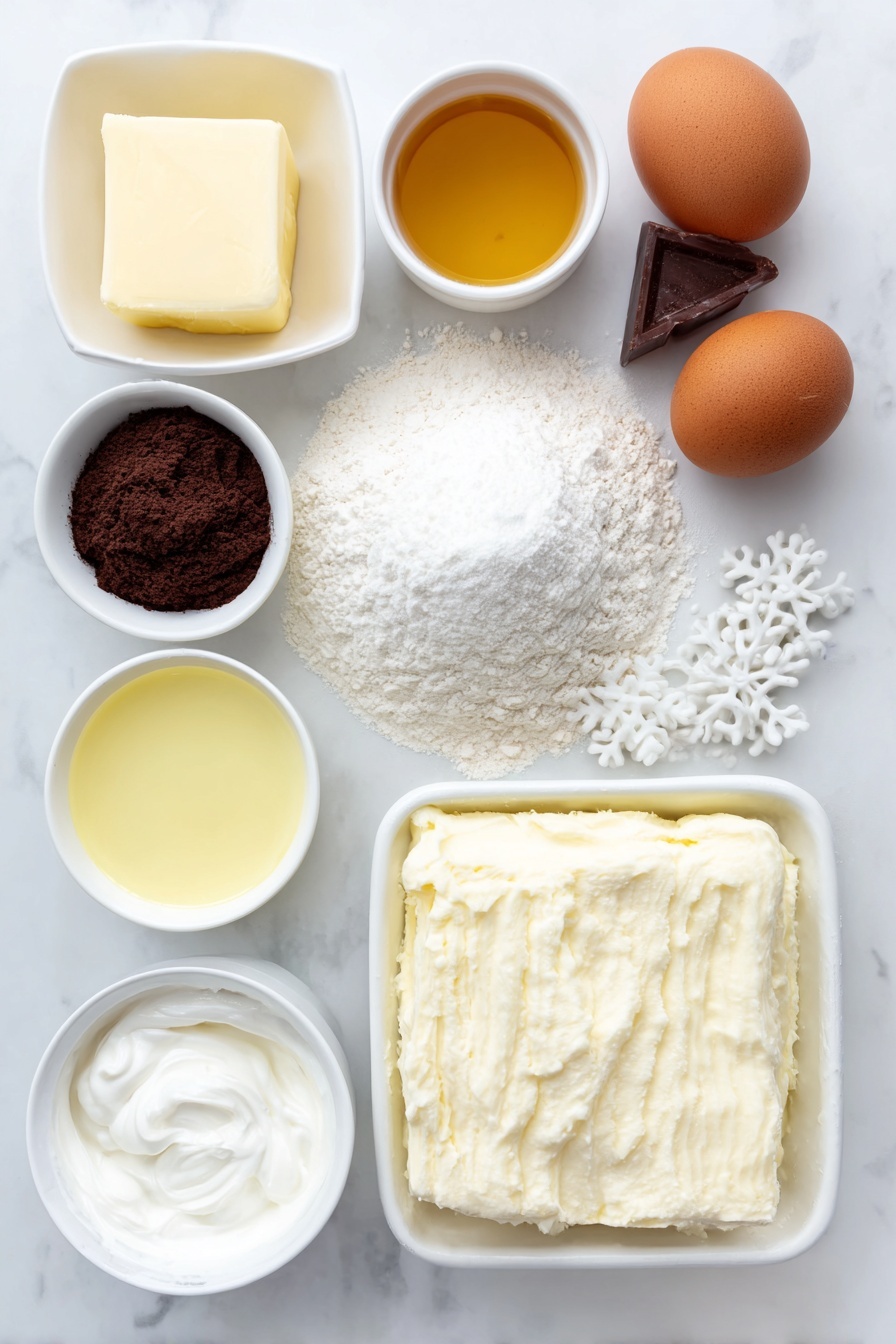
- All-purpose flour: Provides structure, be sure to spoon and level to avoid a dense cupcake.
- Unsweetened cocoa powder: Choose Dutch-processed for a richer, less acidic chocolate flavor.
- Baking powder and baking soda: These work together to give your cupcakes that perfect lift and crumb.
- Salt: Balances the sweetness and enhances the chocolate notes.
- Unsalted butter: Room temperature is key for smooth mixing and optimal texture.
- Granulated sugar: Sweetens and helps with the cupcake’s tenderness.
- Eggs: Provide richness and help bind everything together.
- Vanilla extract: Boosts overall flavor and rounds out the chocolate.
- Buttermilk: Adds moisture and a slight tang, keeping cupcakes soft and fresh.
- Powdered sugar: Powers the silky, smooth frosting—sift it for best results.
- Heavy cream: Lightens the buttercream and makes it spreadable; can adjust amount for frosting consistency.
- Blue gel food coloring: For that cool, wintery hue without watering down your frosting.
- Edible snowflake toppers: Can be store-bought or homemade, these add the signature winter wonderland look.
- Silver, white, or mixed edible pearls: Add sparkle and texture—my secret to that frosty finish.
Variations
I love how versatile this Winter Wonderland Chocolate Cupcakes with Snowflake Frosting Recipe is—you can easily tweak it to suit your mood or dietary needs. Play around with it and make it your signature winter treat!
- Chocolate Peppermint Twist: Add ½ teaspoon peppermint extract to the batter and sprinkle crushed candy canes on the frosting for an extra festive kick—I did this last Christmas and my whole family went crazy for it.
- Gluten-Free Version: Substitute the all-purpose flour with a 1:1 gluten-free baking blend. Just be sure to check your baking powder is gluten-free too.
- Vegan Option: Swap butter for vegan margarine, use a plant-based milk mixed with 1 tbsp vinegar for buttermilk, and replace eggs with flax eggs. I’ve tested these swaps with good success—just watch the baking time closely as it can vary.
- Rainbow Snowflakes: For a colorful party, tint the frosting in pastel blues and whites, then mix and match snowflake toppers in different hues for a whimsical effect.
How to Make Winter Wonderland Chocolate Cupcakes with Snowflake Frosting Recipe
Step 1: Prepping the Batter
Start by preheating your oven to 350°F (175°C) and lining a 12-cup muffin tin with cupcake liners—this helps the cupcakes bake evenly and makes cleanup a breeze. Next, whisk together the dry ingredients: all-purpose flour, unsweetened cocoa powder, baking powder, baking soda, and salt. This step ensures everything is evenly distributed and prevents any bitter cocoa clumps sneaking in.
Step 2: Creaming Butter and Sugar
In a large bowl, beat your room temperature butter and granulated sugar until the mixture is light, fluffy, and pale. This usually takes about 3-5 minutes with a hand or stand mixer. I learned the hard way that rushing this step results in dense cupcakes—patience here really pays off! Then, add the eggs one at a time, beating well after each addition to keep your batter smooth. Stir in the vanilla extract for that warm, cozy base flavor.
Step 3: Combining Dry and Wet Ingredients
Now, gently alternate adding your dry ingredient mix with the buttermilk into your butter mixture—starting and ending with the dry ingredients. Mix on low speed just until everything comes together; overmixing can make the cupcakes tough, and nobody wants that. The batter should be smooth and luscious, not dense or lumpy.
Step 4: Baking
Divide the batter evenly among your cupcake liners—filling about two-thirds full for a perfect dome top. Bake for 18-20 minutes, or until a toothpick poked in the center comes out clean. Here’s a little pro tip: start checking at 18 minutes to avoid overbaking. After baking, let the cupcakes cool completely on a wire rack before frosting; frosting warm cupcakes can cause melting and sadness.
Step 5: Making the Snowflake Buttercream Frosting
While the cupcakes cool, beat your room temperature butter until creamy and smooth—about 2 minutes on medium speed. Slowly add powdered sugar, one cup at a time, mixing on low speed to avoid a powdered sugar cloud explosion. Once all sugar is combined, add heavy cream and vanilla, then crank the mixer up to medium-high and beat for 3-5 minutes until fluffy and luscious. Add blue gel food coloring little by little to achieve that perfect winter blue—trust me, a few drops go a long way.
Step 6: Decorating
Transfer your blue buttercream into a piping bag fitted with a large star tip. I love swirling generous stars on top of each cupcake for that cloud-like, snowy mountain look. Then, add your edible snowflake toppers and scatter silver, white, or mixed edible pearls around for that frosty, wintery magic. It feels a bit like frosting art, and my kids adore helping with this part.
Pro Tips for Making Winter Wonderland Chocolate Cupcakes with Snowflake Frosting Recipe
- Room Temperature Ingredients: I learned that making sure butter, eggs, and buttermilk are at room temperature helps everything blend seamlessly, yielding the lightest cupcakes.
- Don’t Overmix: Overmixing the batter activates gluten and toughens your cupcakes, a common mistake I made early on.
- Use Gel Food Coloring: Gel concentrates color without adding extra liquid, so your frosting stays thick and pipeable.
- Cool Before Frosting: Frosting warm cupcakes causes melting and runoff; patience here leads to picture-perfect results.
How to Serve Winter Wonderland Chocolate Cupcakes with Snowflake Frosting Recipe
Garnishes
I always stick with edible snowflake toppers and a sprinkle of silver or white edible pearls because it feels so festive and wintery, but you could also use a dusting of powdered sugar to mimic fresh snow, or even shimmering edible glitter if you’re going for sparkle. A little goes a long way to make your cupcakes look professionally done.
Side Dishes
These cupcakes pair wonderfully with a warm cup of peppermint tea or a mug of hot cocoa for a cozy winter dessert party. I also love serving them alongside simple vanilla bean ice cream or fresh berries to balance the rich chocolate.
Creative Ways to Present
For holiday gatherings, I’ve arranged the cupcakes in a circle to look like a frosted wreath, complete with additional snowflake sprinkles and a dusting of powdered sugar. Another favorite is presenting them in a festive cupcake tower with blue and silver ribbon to amplify that winter wonderland vibe—guests always comment on how magical it looks!
Make Ahead and Storage
Storing Leftovers
I wrap leftover cupcakes individually in plastic wrap and store them in an airtight container in the refrigerator. This keeps them fresh for up to 3 days. Just bring them to room temperature before serving for the best texture and flavor.
Freezing
Freeze unfrosted cupcakes by placing them on a baking sheet to freeze solid, then transfer to a freezer-safe container or bag for up to 3 months. For frosted cupcakes, freezing is trickier but possible if tightly wrapped. I usually freeze the cupcakes and frost them fresh when ready to serve—it keeps everything tasting fresh and the frosting perfect.
Reheating
To enjoy leftover cupcakes as if freshly baked, let them come to room temperature first. If you want them a little warm, pop them in a microwave for 10-15 seconds—just enough to soften without melting the frosting. It’s a small trick that works every time!
FAQs
-
Can I make the Winter Wonderland Chocolate Cupcakes with Snowflake Frosting Recipe dairy-free?
Absolutely! Swap the butter with a dairy-free margarine or coconut oil and use a plant-based milk (like almond or oat) mixed with a little vinegar to mimic buttermilk. For the frosting, use dairy-free butter and a non-dairy cream alternative. The texture will be slightly different but still delicious.
-
Can I use regular food coloring instead of gel?
You can, but gel food coloring is better because it adds vibrant color without thinning your frosting. Regular liquid food coloring can make your buttercream runny, which makes piping and decorating trickier.
-
How do I keep my cupcakes moist?
Using buttermilk in the batter adds tenderness and moisture. Also, avoid overbaking—check your cupcakes a couple of minutes before the timer to ensure they don’t dry out. Cooling them properly before frosting also helps maintain moisture.
-
Can I make these cupcakes ahead for a party?
Definitely. You can bake cupcakes up to 2 days ahead and keep them refrigerated, then frost them the day of your party for the freshest look and taste. If you’re short on time, freezing the unfrosted cupcakes also works well.
Final Thoughts
Winter Wonderland Chocolate Cupcakes with Snowflake Frosting Recipe is truly one of my favorite ways to bring a little holiday magic into the kitchen. I love how the rich chocolate pairs with the light, pretty blue buttercream—it’s like a little snowy celebration in every bite. Plus, it’s approachable enough to make with friends or family, who’ll no doubt be impressed by your winter baking skills. So go ahead, whip these up and turn any day into a winter wonderland—you’ll thank me later!
Print
Winter Wonderland Chocolate Cupcakes with Snowflake Frosting Recipe
- Prep Time: 25 minutes
- Cook Time: 20 minutes
- Total Time: 45 minutes
- Yield: 12 servings
- Category: Dessert
- Method: Baking
- Cuisine: American
- Diet: Vegetarian
Description
These Winter Wonderland Chocolate Cupcakes are a festive treat featuring moist, rich chocolate cupcakes topped with a fluffy, blue-tinted snowflake buttercream frosting. Perfect for holiday celebrations, the cupcakes are decorated with edible snowflake toppers and shimmering pearls to create a magical winter scene.
Ingredients
Chocolate Cupcakes:
- 1 cup all-purpose flour
- ½ cup unsweetened cocoa powder
- 1 tsp baking powder
- ½ tsp baking soda
- ¼ tsp salt
- ½ cup unsalted butter, room temperature
- ¾ cup granulated sugar
- 2 large eggs
- 1 tsp vanilla extract
- ½ cup buttermilk
Buttercream Frosting:
- 1 cup unsalted butter, room temperature
- 4 cups powdered sugar
- 2-3 tbsp heavy cream
- 1 tsp vanilla extract
- Blue gel food coloring (as needed)
Decorations:
- Edible snowflake toppers (store-bought or homemade)
- Silver, white, or mixed edible pearls
Instructions
- Preheat the oven: Preheat your oven to 350°F (175°C) and line a 12-cup muffin tin with cupcake liners to prepare for baking the cupcakes.
- Combine dry ingredients: In a medium bowl, whisk together the all-purpose flour, unsweetened cocoa powder, baking powder, baking soda, and salt until evenly mixed.
- Cream butter and sugar: In a separate large bowl, beat the room temperature unsalted butter and granulated sugar together until the mixture becomes light and fluffy, creating a smooth base for the batter.
- Add eggs and vanilla: Add the eggs one at a time to the creamed butter and sugar, beating well after each addition, then stir in the vanilla extract for flavor.
- Mix in dry ingredients and buttermilk: Gradually add the dry ingredients to the wet mixture, alternating with the buttermilk, starting and ending with the dry ingredients. Mix just until combined to avoid overmixing and ensure tender cupcakes.
- Bake the cupcakes: Divide the batter evenly among the cupcake liners and bake in the preheated oven for 18-20 minutes, or until a toothpick inserted into the center comes out clean. Remove from the oven and allow cupcakes to cool completely before frosting.
- Prepare buttercream frosting: In a large bowl, beat the room temperature unsalted butter until creamy and smooth. Gradually add powdered sugar one cup at a time while mixing on low speed. Add heavy cream and vanilla extract, then increase the mixer speed to medium-high and beat for 3-5 minutes until the frosting is light and fluffy.
- Add color to frosting: Mix in a few drops of blue gel food coloring into the frosting, stirring until the color is evenly distributed and reaches your desired shade of winter blue.
- Decorate the cupcakes: Transfer the colored buttercream frosting to a piping bag fitted with a large star tip. Pipe a swirl of frosting onto each cooled cupcake. Top each with an edible snowflake and scatter silver, white, or mixed edible pearls around the frosting for a frosty winter effect.
Notes
- Ensure cupcakes are fully cooled before frosting to prevent melting the buttercream.
- You can adjust the consistency of the frosting by adding more heavy cream (for thinner) or powdered sugar (for stiffer) if needed.
- Store cupcakes in an airtight container at room temperature for up to 2 days or refrigerate for longer freshness.
- Bring refrigerated cupcakes to room temperature before serving for best flavor and texture.
- For a dairy-free version, substitute butter with vegan butter and use a dairy-free milk alternative in place of buttermilk.
Nutrition
- Serving Size: 1 cupcake
- Calories: 320
- Sugar: 30g
- Sodium: 150mg
- Fat: 18g
- Saturated Fat: 11g
- Unsaturated Fat: 6g
- Trans Fat: 0g
- Carbohydrates: 36g
- Fiber: 2g
- Protein: 4g
- Cholesterol: 55mg

