
If you’re looking for a sweet, adorable treat that’s perfect for sharing love (and Oreos) this holiday, then you’re going to adore this Valentine’s Day Oreo Pops Recipe. I absolutely love how these pops come together quickly, plus they look festive and taste just like a little chocolatey hug on a stick. Trust me, once you try making these, you’ll want to keep them around for every occasion—not just Valentine’s Day!
Why You’ll Love This Recipe
- Quick and Easy: You can whip these up in just about 25 minutes, making them a great last-minute gift or treat.
- Kid-Friendly Fun: Decorating these pops turns into a delightful activity everyone can join in on.
- Customizable: Use different chocolates and sprinkles to match your Valentine’s theme perfectly.
- No-Bake Treat: No oven required, so you can enjoy making these any time of year.

Ingredients You’ll Need
The magic behind this Valentine’s Day Oreo Pops Recipe is all in the simple ingredients that play so nicely together — creamy Oreo centers, luscious chocolate coatings, and sprinkles that add that festive pop. Here’s a little tip: Grab some candy melts in red or pink to drizzle, it makes the presentation next-level adorable.
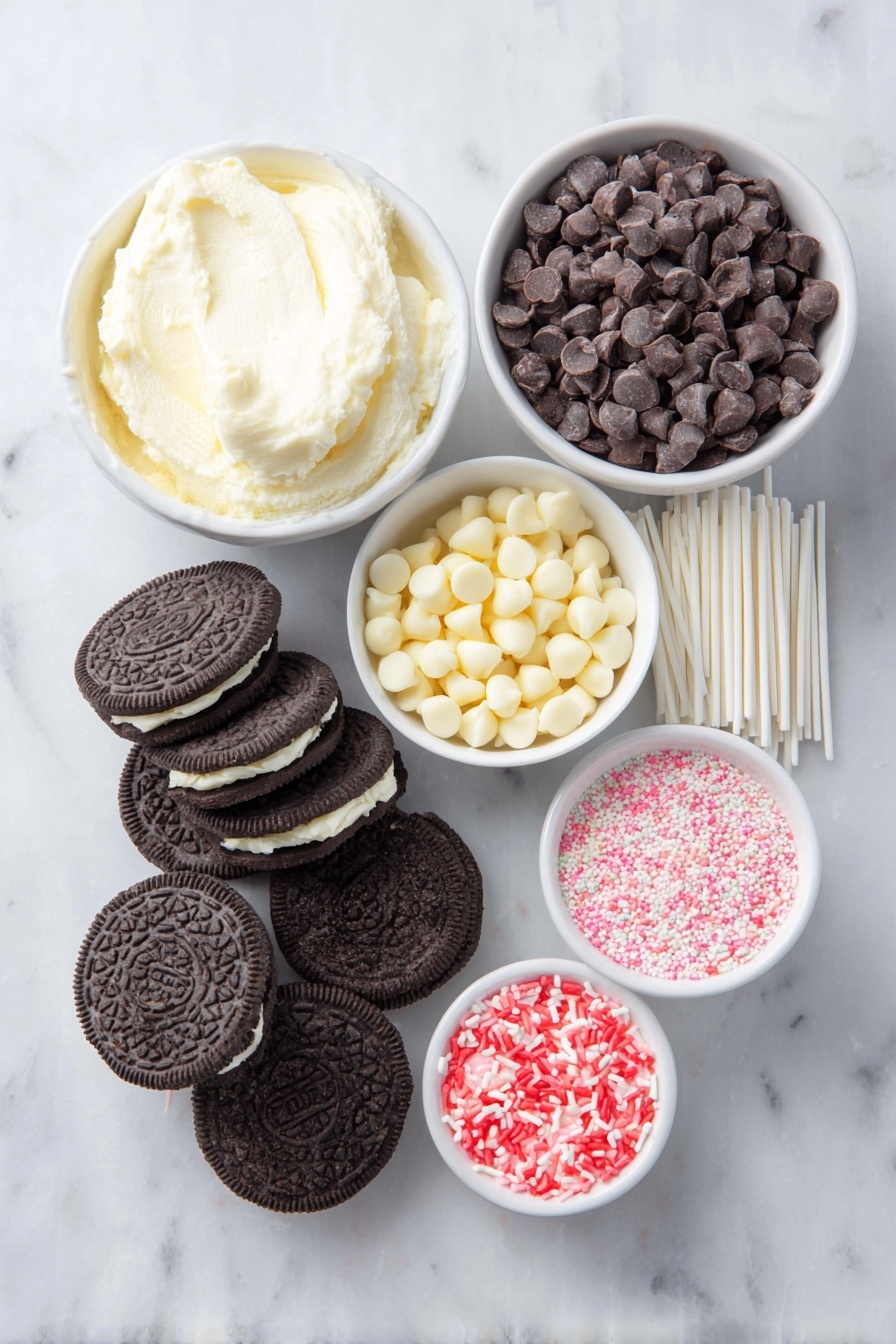
- Oreo cookies: The classic choice here, but double-stuffed Oreos work great too if you want a thicker cream layer.
- White chocolate chips or white candy melts: I prefer candy melts for coating because they melt smoothly and harden nicely at room temp.
- Milk or dark chocolate chips or candy melts: Use whichever flavor you or your valentine prefers—dark brings a richer flavor, milk is sweeter and kid-friendly.
- Lollipop sticks: Essential for these pops! Make sure you get sturdy sticks to avoid breakage.
- Valentine’s Day sprinkles: This is your fun decorating moment–choose hearts, glitter, or anything red and pink!
- Red or pink candy melts: For drizzling and an extra dash of Valentine’s Day vibes.
Variations
This Valentine’s Day Oreo Pops Recipe is a fantastic canvas for your creativity. I love mixing up the chocolates and decorations based on who I’m making them for—kids adore colorful sprinkles, while adults might enjoy a drizzle of dark chocolate and a sprinkle of sea salt for contrast.
- Flavor Twists: I’ve tried swapping white chocolate for peanut butter candy melts—it adds a delicious nutty surprise that’s always a hit.
- Dietary Mods: For dairy-free friends, I use vegan-friendly candy melts and Oreos, which still turn out perfectly.
- Extra Fancy: Adding mini heart candies or edible glitter ups the festive factor, making them almost too pretty to eat.
How to Make Valentine’s Day Oreo Pops Recipe
Step 1: Separate and Stick Your Oreos
Carefully twist apart each Oreo cookie so that the cream stays mostly on one side—that’s important, so your stick can stick securely. Gently insert a lollipop stick straight into the cream side of the Oreo. If it feels loose, dip the base of the stick in a little melted chocolate before pushing it in, kind of like superglue but delicious. Then, carefully press the other half of the cookie back on top. I found that doing this slowly helps avoid breaking the cookie. Once done, pop the Oreo pops in the freezer for 5 minutes — this chilling step helps the chocolate shell set nicely later.
Step 2: Melt and Prepare Your Chocolate
While your Oreo pops chill, melt your white chocolate and milk or dark chocolate separately according to the package instructions. Whether you go with a microwave or double boiler, just be sure to stir frequently to keep the chocolate smooth and prevent burning. You want glossy, silky melted chocolate for the best coating.
Step 3: Dip and Decorate Like a Pro
Grab one Oreo pop at a time and dip it carefully into the melted chocolate, turning to get a complete, even coat. Hold it over the bowl so the extra chocolate drips off nicely before you lay it on parchment paper to dry. Immediately after dipping, sprinkle on your Valentine’s Day sprinkles or drizzle red/pink candy melts on top. That drizzle step is my favorite—it adds a professional touch and vibrant color that makes these pops irresistible.
Step 4: Let Them Set and Serve
Let your Oreo pops sit out at room temperature until the chocolate hardens, or pop them in the fridge to speed up the process if you’re in a hurry. Once set, you can wrap them in cellophane as cute gifts or display them on a pretty platter for your Valentine’s celebration. Either way, the look on everyone’s faces when they bite into one is priceless!
Pro Tips for Making Valentine’s Day Oreo Pops Recipe
- Secure Sticks: Using a dab of melted chocolate before inserting sticks helps prevent wobbly pops.
- Chill Twice: Freezing the pops before and after dipping guarantees crisp, clean coatings.
- Temperature is Key: Don’t overheat your chocolate—too hot and it won’t harden properly.
- Decorate Quickly: Sprinkles need to go on right after dipping, or they won’t stick well.
How to Serve Valentine’s Day Oreo Pops Recipe

Garnishes
I usually go for playful garnishes like pink and red heart sprinkles, edible glitter, or tiny candy pearls. Sometimes I drizzle contrasting candy melts in zigzags for a fancy look. These little touches not only jazz them up visually but add a fun texture surprise when you bite in.
Side Dishes
These Oreo pops pair wonderfully with a simple cup of coffee or a glass of cold milk. For Valentine’s brunch or dessert tables, I love setting them alongside fresh strawberries or a small bowl of whipped cream for dipping extras. The contrast of fresh fruit really balances the sweetness.
Creative Ways to Present
One year, I arranged my pops in a cute mason jar filled with pink and white candy beads—turned out like a bouquet! You can also wrap each pop in cellophane tied with a ribbon for gifting or place them standing upright in foam blocks covered in decorative paper for a Valentine’s Day party centerpiece.
Make Ahead and Storage
Storing Leftovers
I like to keep leftover Oreo pops in an airtight container in the fridge. They stay fresh and chocolate-coated pops maintain their crisp shell for up to a week—perfect if you want to prepare ahead or enjoy a treat later.
Freezing
You can freeze these pops wrapped individually in plastic wrap and stored in a freezer bag. When you’re ready, just thaw them in the fridge for a couple of hours to keep the texture perfect—my go-to when making large batches ahead of a party.
Reheating
Since these don’t really need reheating, if the chocolate gets a little soft, just set them at room temperature to firm back up. Avoid microwaving, as it can melt the chocolate and make them messy.
FAQs
-
Can I use other cookies instead of Oreos for this recipe?
Absolutely! While Oreos are classic for these pops because of their sturdy texture and cream filling, you can experiment with similar sandwich cookies. Just make sure the cookie isn’t too crumbly to hold the stick securely.
-
What if I don’t have candy melts? Can I use regular chocolate?
You can use regular chocolate chips, but candy melts have stabilizers that make them easier to work with and help the chocolate harden smoothly at room temperature. If using regular chocolate, temper it carefully and store pops in the fridge to prevent melting.
-
How long do the Oreo pops stay fresh?
Stored in an airtight container in the fridge, Oreo pops stay fresh for about one week. Make sure they’re fully set before storing so the coating doesn’t become sticky or soft.
-
Can I make these in advance for a party?
Yes! These make-ahead treats are perfect for parties. Make and dip them a day or two before, store in the fridge, and add last-minute decorations if needed. Just be sure to package them well to avoid smudging the chocolate.
Final Thoughts
Making this Valentine’s Day Oreo Pops Recipe has become one of my favorite traditions because it’s not only delicious but also a joyful way to share a bit of creative love with friends and family. Whether you’re a dessert pro or a total beginner in the kitchen, these pops are foolproof and fun. So grab your Oreos, melt some chocolate, and get ready to make a treat that will have everyone going crazy—you’re going to love it just as much as I do!
Print
Valentine’s Day Oreo Pops Recipe
- Prep Time: 25 minutes
- Cook Time: 0 minutes
- Total Time: 25 minutes
- Yield: 12 Oreo pops
- Category: Dessert
- Method: No-Cook
- Cuisine: American
Description
Celebrate Valentine’s Day with these fun and delicious Oreo Pops. These treats feature classic Oreo cookies dipped in smooth white and milk chocolate, decorated with festive sprinkles and colorful candy melts. Perfect for gifting or sharing at your Valentine’s Day celebration, these Oreo Pops are easy to make and sure to impress.
Ingredients
Oreo Pops
- 12 Oreo cookies
- 12 lollipop sticks
Chocolate Coating
- 1 cup white chocolate chips or white candy melts
- 1 cup milk or dark chocolate chips or candy melts
- Red or pink candy melts (for drizzling)
Decoration
- Valentine’s Day sprinkles
Instructions
- Separate the Oreos: Carefully twist Oreo cookies apart, keeping the cream on one side to prepare for inserting the stick.
- Insert sticks: Gently insert a lollipop stick into the cream side of each Oreo. If needed, add a small amount of melted chocolate to secure the stick in place. Place the other half of the cookie back on top and gently press together without breaking the cookie.
- Freeze for stability: Place the Oreo pops in the freezer for 5 minutes to firm up. This makes dipping easier and less messy.
- Melt chocolates: Melt the white chocolate chips and milk/dark chocolate chips separately according to package directions, ensuring smooth and lump-free dipping chocolate.
- Dip the Oreo pops: Dip each Oreo pop into the melted chocolate, fully covering the cookie. Allow any excess chocolate to drip off back into the bowl to prevent clumps.
- Decorate: Lay the dipped pops on a parchment-lined baking tray. While the chocolate is still wet, sprinkle Valentine’s Day sprinkles on top or drizzle with melted red or pink candy melts for a festive touch.
- Set the chocolate: Let the Oreo pops set completely at room temperature, or place in the refrigerator for faster solidifying.
- Serve and gift: Wrap the Oreo pops in cellophane for gifting or arrange them on a platter for your Valentine’s Day party display.
Notes
- Use double-stuffed Oreos for easier stick insertion and more cream to hold the stick securely.
- Get creative with decorations by using colored chocolates, edible glitter, or heart-shaped candy pieces.
- Ensure chocolate is completely melted and smooth to avoid uneven coating on the pops.
- Freezing the Oreo pops before dipping helps prevent the cookies from breaking.
Nutrition
- Serving Size: 1 Oreo pop
- Calories: 220
- Sugar: 20g
- Sodium: 140mg
- Fat: 12g
- Saturated Fat: 7g
- Unsaturated Fat: 4g
- Trans Fat: 0g
- Carbohydrates: 26g
- Fiber: 1g
- Protein: 2g
- Cholesterol: 5mg


