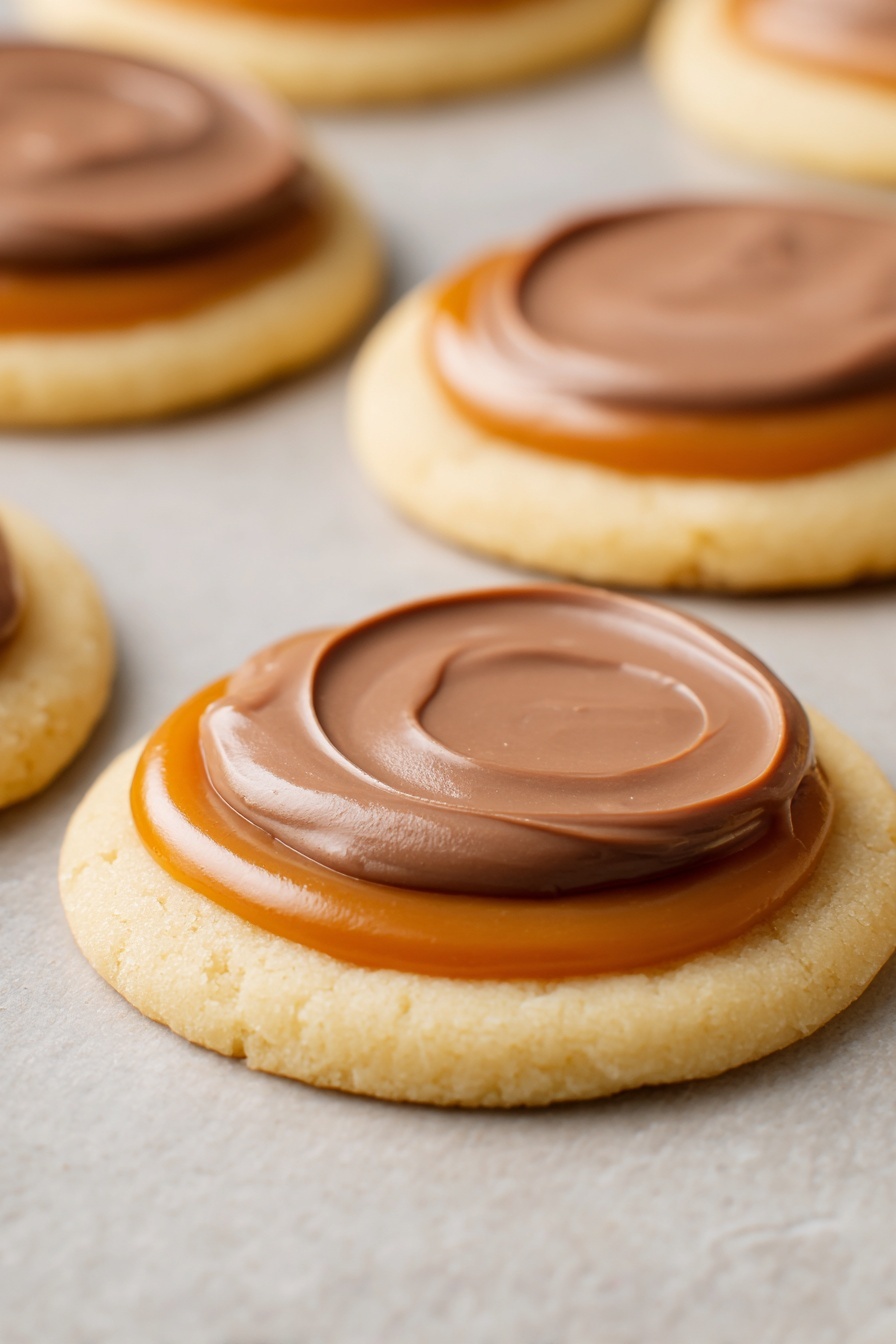
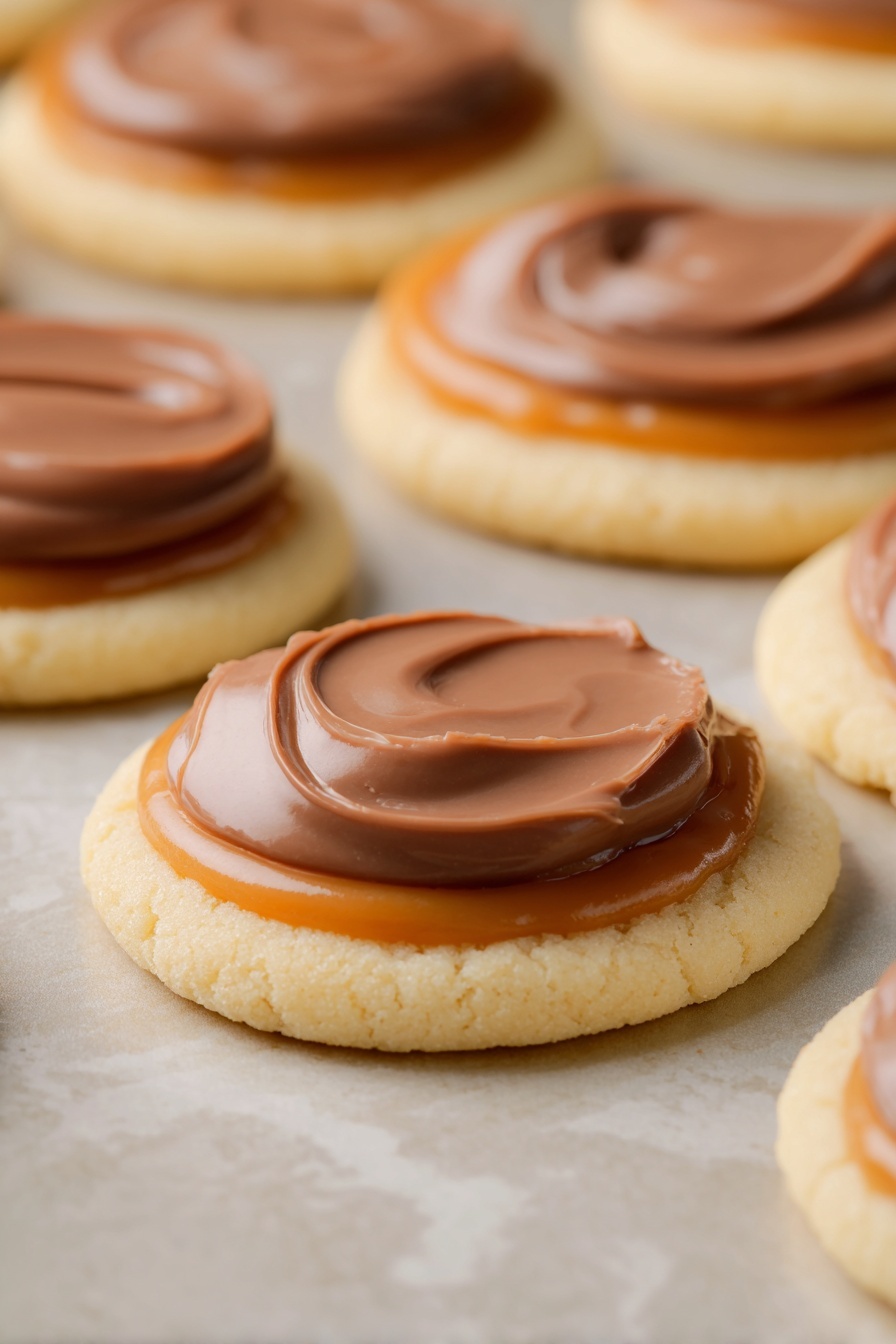
If you’re anything like me and have a serious sweet tooth, you are going to absolutely adore this Twix Cookie Cups Recipe. Imagine crisp, buttery cookie cups filled with gooey caramel and topped with smooth milk chocolate — every bite is a little chocolate-caramel heaven. I first tried making these for a friends’ potluck and let me tell you, they vanished in no time. I’m excited to share all my tips with you so your batch turns out just as spectacular!
Why You’ll Love This Recipe
- Easy to Make: You’ll find the steps straightforward, even if you’re not a baking pro.
- Perfect Balance: The combo of buttery cookie, rich caramel, and creamy chocolate is irresistible.
- Great for Sharing: These cups come out pretty and individual-sized, perfect for parties or gifting.
- Customizable: You can easily tweak flavors or toppings to suit your cravings.

Ingredients You’ll Need
Each ingredient in this Twix Cookie Cups Recipe plays a key role in building layers of flavor and texture. From the rich, salted butter to the silky caramel, these ingredients come together to create a snack that’s both nostalgic and fresh. Here’s what you want to grab before diving in:
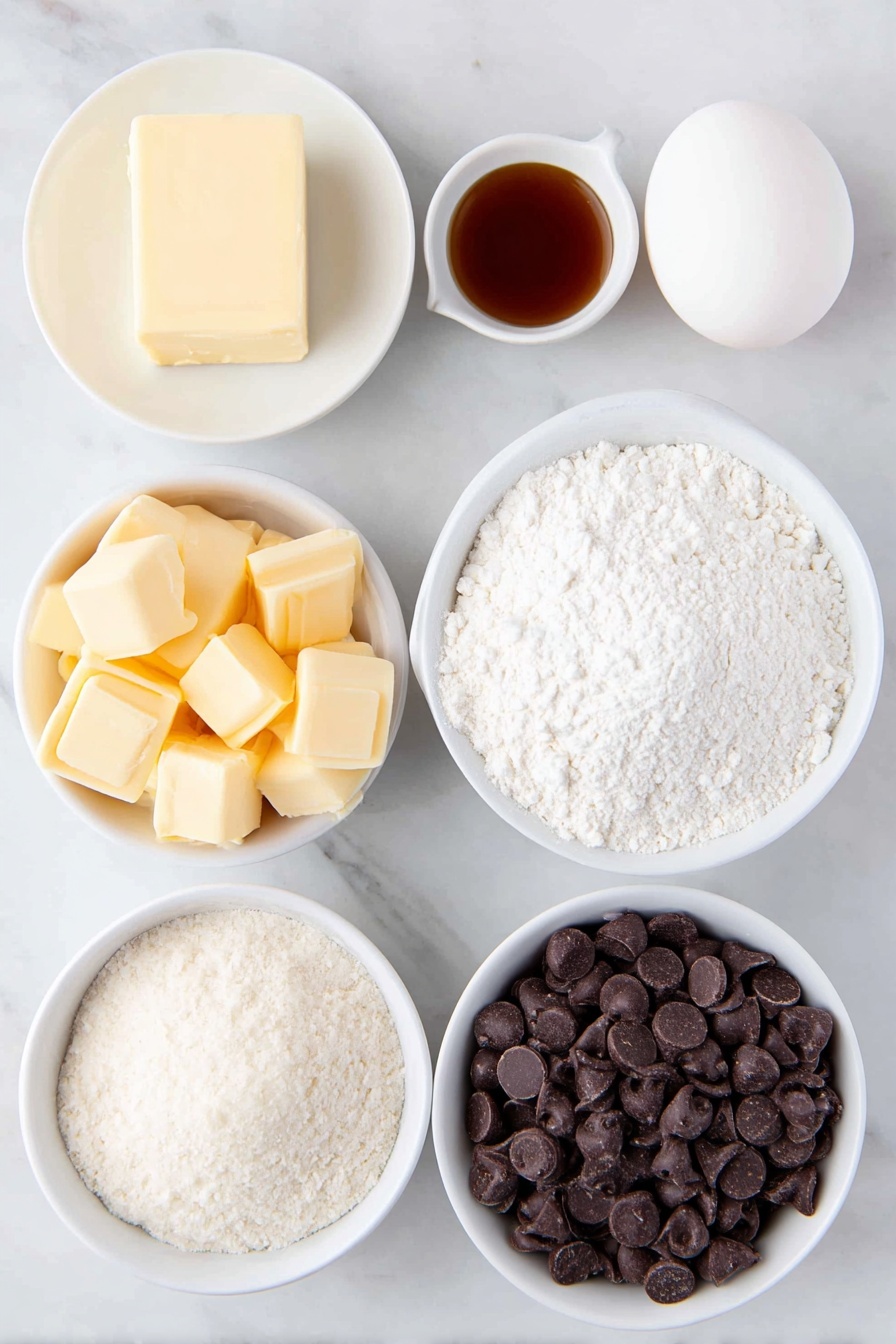
- Salted butter: Use good-quality butter for that rich, creamy base in your cookie dough.
- Granulated sugar: Adds sweetness and helps with the cookie’s slightly crisp texture.
- Vanilla extract: Enhances all the flavors with a warm, cozy aroma.
- Egg white: Helps bind the dough without adding too much richness or weighing it down.
- All-purpose flour: Provides structure — be careful not to overmix for tender cookies.
- Baking powder: Gives just enough lift so your cookie cups puff up nicely.
- Carmels: The heart of this recipe — soft, chewy, and melty goodness.
- Milk: Mixed in with caramel for smoothness and easier spreading.
- Milk chocolate chips: For that final luscious chocolate coat that seals it all together.
Variations
I love how customizable these Twix Cookie Cups are. Over time, I’ve experimented with a few variations that have made the recipe even better depending on my mood or the occasion. Don’t hesitate to make it your own!
- Use dark chocolate: For a slightly less sweet and more intense chocolate flavor, swap the milk chocolate chips with dark chocolate.
- Nut additions: Sprinkle crushed pecans or almonds on top of the caramel before the chocolate hardens — my family goes crazy over this little crunch boost.
- Salt it up: A tiny pinch of flaky sea salt on top of the chocolate adds an irresistible salty-sweet contrast.
- Gluten-free option: Substitute the flour with a gluten-free 1:1 baking blend and watch how delicious it still turns out.
How to Make Twix Cookie Cups Recipe
Step 1: Cream Your Butter and Sugar
Start by softening your butter — room temperature is key here. Then, use a mixer to cream the butter and sugar together until the mixture looks light and fluffy. This step is essential because it creates tiny air pockets that make your cookies tender yet crisp. If you mix too little, the texture can be dense; too much, and you risk over-aerating the dough.
Step 2: Add Egg White and Vanilla
Next, stir in the egg white and vanilla extract. I like to add these ingredients one at a time, making sure they fully combine before moving on. The egg white helps the dough bind without making it too heavy, while vanilla adds that classic warm flavor we all crave in cookies.
Step 3: Incorporate Flour and Baking Powder
Now it’s time to add your dry ingredients. Mix the flour and baking powder together before slowly adding them to your butter mixture. Stir gently but thoroughly — overmixing develops gluten, which means tougher cookies, so stop as soon as everything looks combined.
Step 4: Cut and Bake the Cookie Cups
Roll your dough out on a lightly floured surface until it measures about 1/4 to 1/2 inch thick. Use a round cookie cutter to punch out circles — I usually go for about 2-inch diameter for perfect bite-sized cups. Transfer these circles to an ungreased baking sheet; don’t crowd them. Bake at 350°F for about 6 to 8 minutes until cookies puff up and lose their glossy sheen. Pull them early to avoid overbrown edges because you want them soft and cup-shaped.
Step 5: Prepare and Add the Caramel Filling
While the cookies cool on a wire rack, melt your caramels with the milk in the microwave. I usually nuke them for 1 minute, stirring at the 30-second mark to make sure they melt evenly — patience here pays off with a silky texture. Spoon a few teaspoons onto each cookie and spread to almost cover the top. Then pop the cookie cups in the fridge for 10 to 15 minutes until the caramel is firm to the touch.
Step 6: Melt and Spread the Chocolate
Finally, melt your milk chocolate chips in 30-second bursts in the microwave, stirring between each interval until fully smooth. Spread a thin layer of melted chocolate over the chilled caramel layer on each cookie. Let these chill for a bit longer until the chocolate sets — this final step locks in all those layers and finishes off your delicious Twix Cookie Cups.
Pro Tips for Making Twix Cookie Cups Recipe
- Don’t Overbake the Cookies: I learned the hard way that even a minute too long makes the cookie cups hard instead of tender — watch for puffiness and loss of gloss.
- Use Room-Temperature Butter: It blends much easier with sugar, giving you that perfect creamy texture for your dough.
- Microwave Caramels Gently: Heating in short intervals keeps the caramel smooth and prevents scorching.
- Cool the Caramel Before Chocolate: Rushing this step can cause your chocolate to mix in with hot caramel and ruin the layered look and texture.
How to Serve Twix Cookie Cups Recipe
Garnishes
I usually keep things simple and let the cookie cup flavors shine, but sometimes I sprinkle a pinch of flaky sea salt on top of the chocolate for that fancy salty-sweet finish. Crushed nuts or a drizzle of white chocolate also make stunning garnishes if you want to get creative or impress guests.
Side Dishes
Pairing these Twix Cookie Cups with a nice cup of coffee or cold milk is my go-to combo — it balances all the sweetness beautifully. For a party, they also go well alongside fruit platters or salty snacks to mix up the taste experience.
Creative Ways to Present
One time, I arranged these cookie cups in a pretty tart pan lined with parchment paper, then wrapped the whole thing in clear cellophane to give as a gift — it looked so professional and saved me a ton of wrapping hassle. They also look adorable served on a tiered dessert stand for special occasions like birthday parties or holiday gatherings.
Make Ahead and Storage
Storing Leftovers
These cookie cups keep well in an airtight container in the fridge for up to a week. I personally store them in a single layer so the chocolate topping doesn’t get damaged. Just bring them to room temperature before serving for that perfect chewy texture.
Freezing
If you want to make these ahead, you can freeze the cookie cups. Wrap them individually in plastic wrap, then place in a freezer-safe container. They keep well for up to 2 months. When you’re ready, thaw them overnight in the fridge for best texture.
Reheating
I usually skip reheating to keep that crisp-tender cookie texture, but if you must, a few seconds in the microwave (about 10 seconds) can soften the caramel center—just watch closely so the chocolate doesn’t melt and get messy.
FAQs
-
Can I use store-bought Twix bars instead of caramels in the Twix Cookie Cups Recipe?
While it’s tempting to cut corners, I don’t recommend using whole Twix bars because they’re already pre-coated with chocolate and have a biscuit base that can make the texture uneven. Using unwrapped caramels allows you to get that smooth, creamy caramel filling without extra crunch or bitterness. If you want the cookie cups to taste like Twix bars, the combination of caramel, cookie, and chocolate coating in this recipe is your best bet.
-
How thick should I roll out the dough for the cookie cups?
I found that rolling the dough to about 1/4 to 1/2 inch thick works perfectly. If it’s too thin, your cookie cups might be too fragile and won’t hold the caramel well. Too thick, and they’ll lose that nice crisp base and feel dense. Using the right thickness helps the cookie keep its shape while baking and holding those delicious fillings.
-
Why is the egg white used instead of a whole egg in this recipe?
The egg white adds just the right amount of binding to hold the dough together without making it overly rich or cakey. Since this recipe aims for a buttery, crisp cookie cup, using the whole egg can sometimes weigh down the dough and change the texture. I like how the egg white keeps things light and allows the cookie to puff up just right.
-
Can I make these cookie cups vegan or dairy-free?
Absolutely! You’ll want to use vegan butter or margarine instead of salted butter, and replace milk chocolate chips with dairy-free or vegan chocolate chips. For the caramel, look for dairy-free caramel candies or make your own using coconut milk and coconut sugar. Just keep in mind that texture and flavor might vary slightly, but they’ll still be delicious!
-
How do I prevent the chocolate from melting into the caramel layer?
The key is to let the caramel layer chill thoroughly in the fridge until it firms up before spreading the melted chocolate. If the caramel is still warm, the chocolate will melt into it and ruin the distinct layers. Patience here makes all the difference — I usually wait at least 15 minutes or until the caramel feels solid to the touch.
Final Thoughts
I absolutely love how this Twix Cookie Cups Recipe turns out every single time — it’s my go-to when I want something that feels like a special treat but is easy enough to whip up on a weeknight or for a party. When I first made them, I was surprised at how the cookie cups captured all the classic elements of a Twix bar but with a homemade buttery twist. I’m confident that you’ll have just as much fun making and eating these as I have. Give them a try, and I bet they’ll become a favorite in your kitchen, too!
Print
Twix Cookie Cups Recipe
- Prep Time: 10 minutes
- Cook Time: 10 minutes
- Total Time: 40 minutes
- Yield: 24 cookie cups
- Category: Dessert
- Method: Baking
- Cuisine: American
Description
Delight in these Twix Cookie Cups, a perfect blend of buttery cookie crust, creamy caramel, and rich milk chocolate topping. These bite-sized treats combine all the flavors of a classic Twix bar in a fun, easy-to-make cookie cup form, ideal for parties or sweet snacks.
Ingredients
Cookie Cups
- 1/2 cup (111g) salted butter
- 1/2 cup (115g) granulated sugar
- 1 tsp vanilla extract
- 1 egg white
- 1 1/2 cups (228g) all-purpose flour
- 1 tsp baking powder
Carmel Layer
- 20 caramels, unwrapped
- 1 tbsp milk
Chocolate Topping
- 2 cups (400g) milk chocolate chips
Instructions
- Preheat and cream butter and sugar: Preheat your oven to 350°F (175°C). In a mixing bowl, cream together the salted butter and granulated sugar until light and fluffy.
- Add egg and vanilla: Mix in the egg white and vanilla extract until the mixture is well combined and smooth.
- Add dry ingredients: Stir in the all-purpose flour and baking powder thoroughly to form a smooth cookie dough.
- Shape the cookies: Roll out the dough on a flat surface to about 1/4 to 1/2 inch thickness. Use a round cookie cutter to cut out cookie circles and place them on an ungreased baking sheet.
- Bake the cookie cups: Bake the cookie dough circles in the preheated oven for 6-8 minutes until they are puffy and no longer glossy. Remove from oven and transfer them to a wire rack to cool completely.
- Prepare caramel layer: While cookies are cooling, microwave the unwrapped caramels with milk for 1 minute, stirring after 30 seconds. Continue stirring until the caramel mixture is smooth and creamy.
- Assemble caramel on cookies: Spoon a few teaspoons of the warm caramel onto each cooled cookie, spreading it to cover almost the entire cookie surface. Place the cookies in the refrigerator for 10 to 15 minutes until the caramel is completely cold and set.
- Melt chocolate chips: Melt the milk chocolate chips in 30-second intervals, stirring in between, until fully melted and smooth.
- Top with chocolate: Spread a small amount of melted chocolate onto each caramel-topped cookie. Allow the chocolate layer to cool and set before serving.
Notes
- Ensure cookies are completely cooled before adding caramel to prevent melting.
- Use milk chocolate chips for the classic Twix flavor, but dark chocolate can be substituted for a richer taste.
- For easier caramel spreading, warm caramel slightly but avoid overheating to prevent burning.
- Store finished cookie cups in an airtight container in the refrigerator to maintain texture and freshness.
- These cookie cups can also be stored at room temperature if consumed within a day.
Nutrition
- Serving Size: 1 cookie cup
- Calories: 180
- Sugar: 14g
- Sodium: 90mg
- Fat: 9g
- Saturated Fat: 5g
- Unsaturated Fat: 3g
- Trans Fat: 0g
- Carbohydrates: 22g
- Fiber: 1g
- Protein: 2g
- Cholesterol: 15mg


