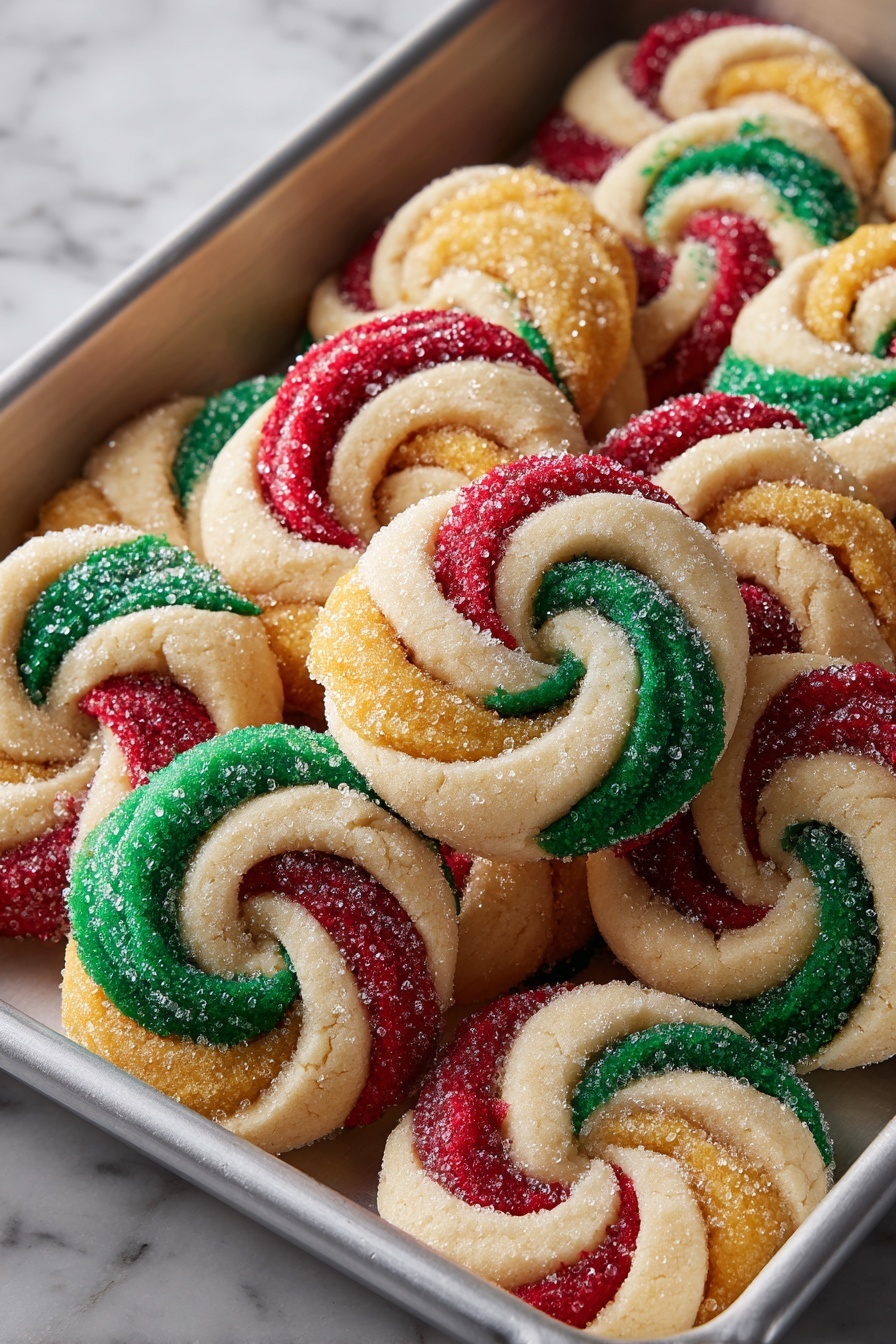
If you’re looking for a cookie recipe that brings together classic holiday vibes with a little playful twist, you’re going to love my Twisted Christmas Cookies with Festive Icing Recipe. These cookies are not just pretty to look at—they’re buttery, tender, and so much fun to make with all the swirling shapes and colorful icing. Trust me, once you try this recipe, it’s going to be your go-to for bringing joy (and sweetness) to your holiday gatherings!
Why You’ll Love This Recipe
- Festive Flavors: Almond extract and orange zest add a gorgeous twist that’s subtle but so warming and festive.
- Perfect Texture: These cookies turn out tender yet sturdy enough to hold the icing and decorations beautifully.
- Fun and Customizable: You can switch up the shapes, colors, and toppings to match your holiday vibe or family favorites.
- Icing That Shines: The meringue-based icing dries glossy and smooth, so your cookies look professionally decorated.

Ingredients You’ll Need
These ingredients are the backbone of your festive cookie session. Each one works together to create those melt-in-your-mouth cookies with that perfect holiday flavor punch. When shopping, pick the freshest butter you can find and sift your powdered sugar for the smoothest icing results.
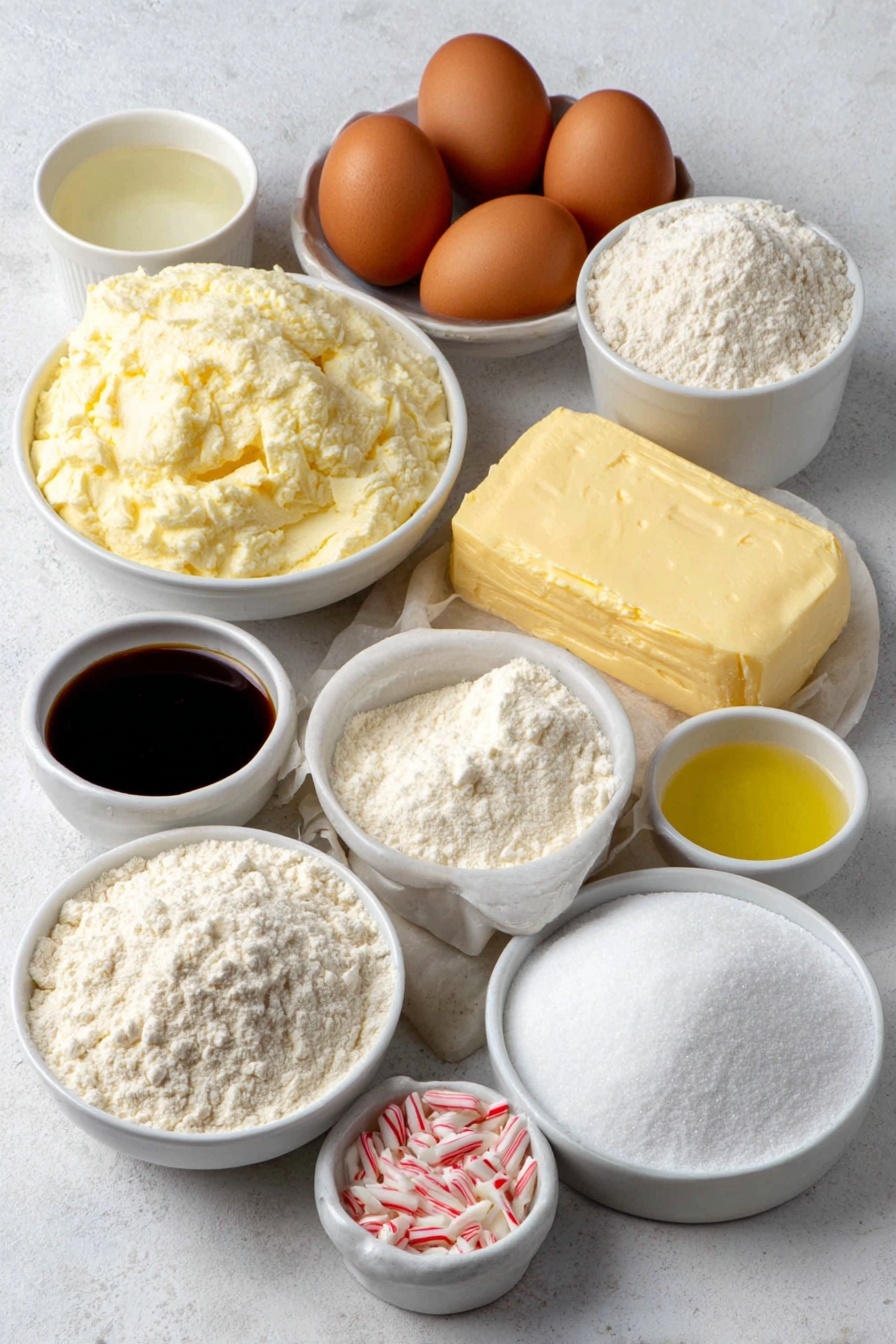
- White sugar: I use granulated white sugar because it creams well with butter, giving you a fluffy dough base.
- Butter: Make sure it’s softened but not melted—that helps achieve that perfect creamy consistency.
- Eggs: They bind everything together and add moisture for tender cookies.
- Vanilla extract: Adds warmth and depth to the dough’s flavor.
- Almond extract: The secret festive lift—I promise it’s subtle but makes a huge difference.
- Orange zest: Totally optional but I swear it adds a fresh brightness that wakes up your taste buds.
- Plain flour: The structure of the cookies, so measure carefully for the right dough texture.
- Meringue powder: Essential for that dreamy glossy icing that dries just right.
- Water: Keeps the icing smooth and spreadable.
- Lemon juice: Balances the sweetness of the icing with a touch of tang.
- Powdered sugar: Make sure it’s sifted to avoid lumps in your icing.
- Gel food coloring: Choose your favorite festive colors—red, green, gold, and white work beautifully.
- Sprinkles, edible glitter, crushed candy canes: For that extra holiday sparkle and crunch!
Variations
The great thing about the Twisted Christmas Cookies with Festive Icing Recipe is how easy it is to personalize. I’ve tried adjusting things here and there and love how just a little tweak can make this recipe truly your own.
- Gluten-Free Version: I swapped out the plain flour for a gluten-free blend once, and it worked surprisingly well with no major texture changes.
- Flavor Boost: Sometimes I add a pinch of cinnamon or nutmeg to the dough for an extra layer of Christmas warmth.
- Decorating Styles: You could go rustic with simple icing swirls or get fancy with multiple colors and patterns—my family always loves the crazy ones I try!
- Vegan Adaptation: I haven’t tested vegan butter and egg substitutes here, but I imagine the method would stay the same if you find good-quality replacements.
How to Make Twisted Christmas Cookies with Festive Icing Recipe
Step 1: Cream Butter and Sugar Until Fluffy
Start by beating together the softened butter and white sugar in a big bowl—this is where the magic begins. You want to mix it until it’s nice and fluffy; it’ll take about 3-5 minutes with an electric mixer. This step is key because it traps air into the dough, making your cookies tender but light. If you skimp here, your cookies might feel a bit dense.
Step 2: Add the Eggs, Extracts, and Zest
Next, crack in the eggs, then add both vanilla and almond extracts plus the orange zest if you’re using it. I love this combo because the almond extract is like this pine-needle whisper that screams Christmas, while the orange zest keeps it fresh and bright. Beat these together until smooth—don’t rush this, because a well-mixed dough is happy dough.
Step 3: Incorporate the Flour Gradually
Slowly add your plain flour in batches to the wet ingredients. This helps avoid that dreaded cloud of flour flying everywhere. Mix gently until everything comes together into a dough—if it feels crumbly or a bit dry, a tablespoon of milk will bring it right to the perfect consistency. Remember, the dough should be rollable but not sticky.
Step 4: Roll Out and Cut Your Cookies
Flour your work surface lightly and roll the dough to about a quarter-inch thickness. This thickness makes sure the cookies bake evenly and hold shape well. Then go wild with cookie cutters—think Christmas trees, stars, mittens—whatever makes you smile. Placing your cutouts on parchment-lined trays prevents sticking and makes cleanup a breeze.
Step 5: Chill and Bake
I’m a big fan of chilling the cut cookies for 10 to 15 minutes before baking—it helps keep those lovely shapes sharp and stops the dough from spreading too much. Pop them in a 350°F (175°C) oven for 10-12 minutes, just until the edges start turning golden. Be careful not to overbake; your cookies will continue to firm up a bit as they cool.
Step 6: Mix and Color the Festive Icing
While the cookies cool completely, whip up your icing by combining the meringue powder, lemon juice, and water. Gradually beat in your sifted powdered sugar until it shines and forms glossy peaks. If it’s too stiff, add water a teaspoon at a time. Now divide that luscious icing into bowls and add your gel colors—red, green, gold, and white are my go-to festive combo. It’s like edible magic!
Step 7: Decorate and Let Set
This is the fun part—decorate your cookies with your colored icing plus sprinkles, edible glitter, or crushed candy canes for texture. I love using a piping bag for details, but a small spoon or even a toothpick works wonders for swirling and smudging patterns. Let your masterpieces dry in a cool spot until the icing is firm, usually a few hours.
Pro Tips for Making Twisted Christmas Cookies with Festive Icing Recipe
- Don’t Skip Chilling: Chilling the dough and cut cookies helps keep your fun twisted shapes crisp and less likely to lose definition in the oven.
- Beat Butter and Sugar Well: I learned that the fluffier the creaming stage, the softer your cookies turn out—worth the extra few minutes!
- Use Gel Colorings: Gel colors pack a punch and keep your icing vibrant without thinning it out like liquid dyes do.
- Don’t Overbake: Those golden edges indicate perfect doneness—overbaking dries them out and ruins the tender bite.
How to Serve Twisted Christmas Cookies with Festive Icing Recipe
Garnishes
I typically top my cookies with crushed candy canes for a festive crunch, and edible gold glitter for that wow-factor sparkle. These little finishing touches make the cookies look festive and feel special—perfect for gifting or setting out for Santa.
Side Dishes
Pair these cookies with a glass of eggnog or hot cocoa—both are tried-and-true festive companions that bring comfort and joy during chilly winter evenings. If you’re serving at a holiday party, a cheese platter with nuts and dried fruit balances all that sweetness beautifully.
Creative Ways to Present
One year, I layered these cookies in a clear glass jar with red and green tissue paper and a cute ribbon for gifting—people loved how decorative they looked before even tasting. For a party, try arranging them on a festive platter with little bunches of fresh holly or pine needles for a rustic-chic vibe that wows every time.
Make Ahead and Storage
Storing Leftovers
I store leftover cookies in an airtight container at room temperature, layering them between parchment paper to keep the icing safe. They stay fresh and tasty for up to a week, so you can enjoy your hard work well after the baking frenzy is over.
Freezing
If you want to make these well ahead of time, you can freeze the baked cookies without icing—wrap them tightly in plastic wrap and place in freezer bags. When ready, thaw at room temperature before decorating. I found freezing decorated cookies tricky, as the icing can get damaged, so I recommend decorating fresh after thawing.
Reheating
These cookies don’t actually need reheating, but if you like them gently warmed, pop them in a low oven (about 300°F) for just a few minutes—not long enough to melt the icing but enough to release that fresh-baked aroma.
FAQs
-
Can I use regular egg whites instead of meringue powder for the icing?
Yes, you can! Fresh egg whites work for royal icing, but meringue powder is a safer and more convenient option because it’s pasteurized and shelf-stable—plus, it makes the icing easier to whip into stiff peaks and keeps it from cracking as it dries.
-
How do I prevent the cookie shapes from spreading too much?
Chilling the cut cookies on the baking sheets before popping them in the oven is your best bet. Also, be sure your dough isn’t too warm or soft when cutting. The cold dough holds shape better and helps those twisted designs stay crisp and defined.
-
What if my icing is too runny or too thick?
If it’s too runny, add a bit more powdered sugar, a tablespoon at a time, until it thickens up. If it’s too thick, add water very slowly—like a few drops—to loosen it without making it watery. The consistency should be thick enough to hold shape but smooth enough to spread easily.
-
Can I make these cookies with kids?
Absolutely! The rolling, cutting, and decorating are super fun for kids. Just be sure to supervise around the oven and use safe utensils for applying the icing. It’s a great activity to bring the family together during the holidays.
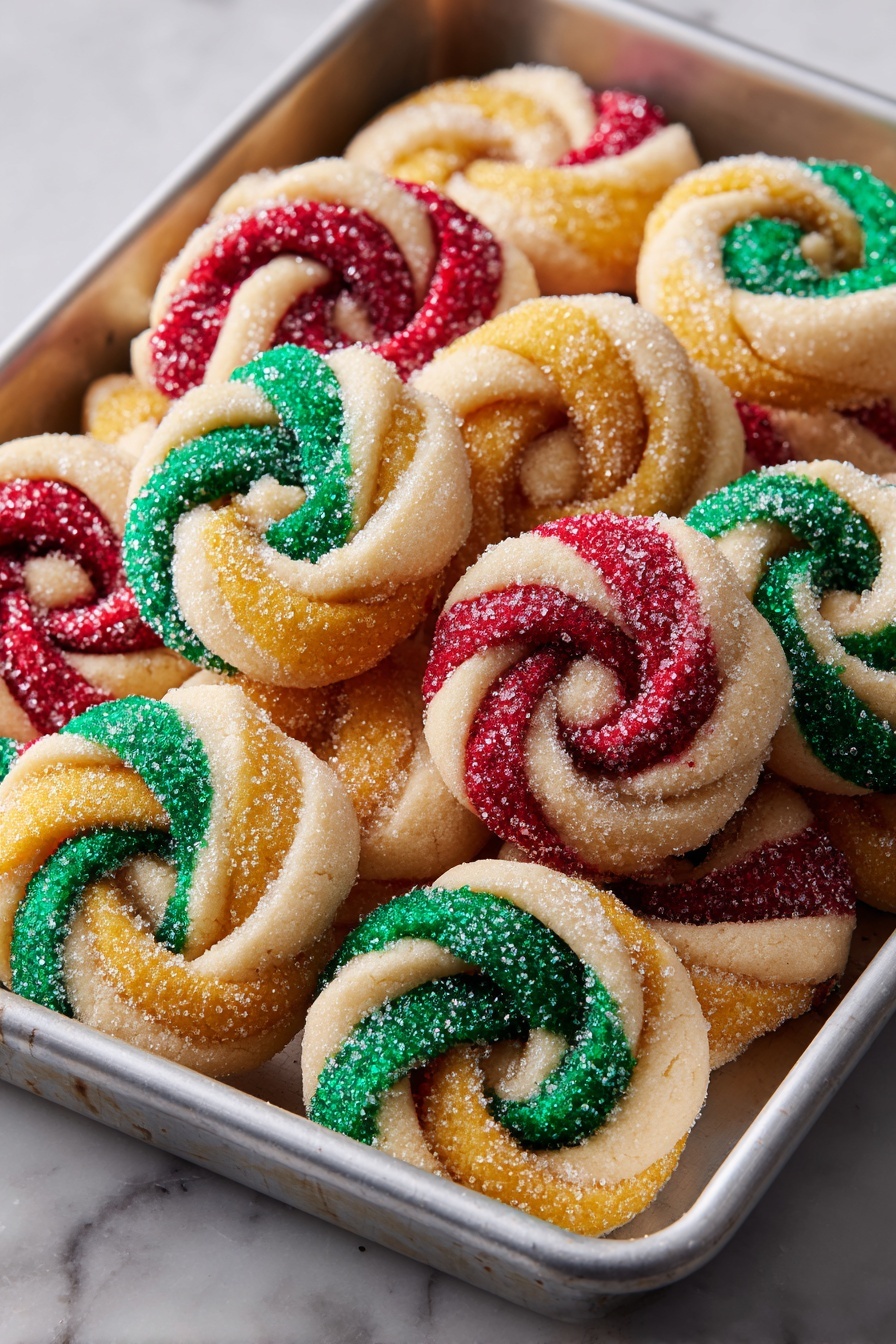
Final Thoughts
I absolutely love how the Twisted Christmas Cookies with Festive Icing Recipe turns out every single time. There’s something so satisfying about seeing plain dough transform into beautiful, colorful holiday treats that everyone can enjoy. When I first tried this recipe, I was amazed by the easy-to-make icing—it really takes the cookies from sweet to spectacular. If you’re looking to create some festive joy (and maybe impress a few neighbors), these cookies are the way to go. Pull out your rolling pin and get ready for some holiday magic right in your own kitchen—you won’t regret it!
Print
Twisted Christmas Cookies with Festive Icing Recipe
- Prep Time: 50 mins
- Cook Time: 24 mins
- Total Time: 1 hr 14 mins
- Yield: Approximately 60 cookies, depending on cutter size
- Category: Dessert
- Method: Baking
- Cuisine: American
Description
These Twisted Christmas Cookies are a festive and delightful treat perfect for holiday celebrations. Featuring a buttery, crisp texture with hints of almond and orange zest, they’re beautifully decorated with colorful royal icing and festive toppings like edible glitter and crushed candy canes.
Ingredients
For the Cookies:
- 1 cup white sugar
- 14 oz (400g) butter, softened
- 2 eggs
- 2 tsp vanilla extract
- 1 tsp almond extract (for a festive flavor lift)
- Zest of 1 orange (optional, for brightness)
- 6 cups plain flour
For the Icing:
- 6 tbsp meringue powder
- 8 tbsp water
- 2 tsp lemon juice
- 7 cups powdered sugar, sifted
- Extra water (for thinning)
- Gel food coloring (red, green, gold, white)
- Sprinkles, edible glitter, or crushed candy canes (for topping)
Instructions
- Preheat the Oven: Preheat your oven to 350°F (175°C). Prepare 2-3 baking sheets by lining them with parchment paper to prevent sticking and ensure even baking.
- Make the Cookie Dough: In a large bowl, cream together the softened butter and white sugar until the mixture is light and fluffy. Then add the eggs, vanilla extract, almond extract, and optional orange zest, mixing until the batter is smooth and well combined.
- Add Flour and Form Dough: Gradually incorporate the plain flour into the wet mixture, stirring continuously until a dough forms. If the dough feels too dry or crumbly, add a tablespoon of milk to bring it together into a workable consistency.
- Roll and Cut Shapes: Roll the dough out on a lightly floured surface to about ¼-inch thickness. Use your choice of festive cookie cutters — such as trees, stars, or mittens — to cut out shapes from the rolled dough.
- Chill the Dough: Place the cut-out cookies on prepared baking sheets and chill them in the refrigerator for 10 to 15 minutes. This helps the cookies retain their shape during baking.
- Bake the Cookies: Bake the cookies in the preheated oven for 10 to 12 minutes until the edges are just starting to turn golden. Remove from the oven and allow them to cool completely on wire racks before decorating.
- Prepare the Icing: In a bowl, whisk together the meringue powder, lemon juice, and water until combined. Gradually beat in the sifted powdered sugar until the icing becomes glossy and thick. Adjust the consistency by adding more water if needed to make it easier to pipe or spread.
- Decorate the Cookies: Divide the icing into separate bowls and tint each one using gel food coloring to achieve festive shades like red, green, gold, and white. Decorate the cooled cookies with the colored icing and add sprinkles, edible glitter, or crushed candy canes as desired for extra holiday flair. Allow the icing to set completely before serving or storing.
Notes
- Chilling the dough before baking helps maintain the cookie shapes and prevents spreading.
- If you don’t have almond extract, you can omit it or substitute with additional vanilla extract, but almond adds a nice festive flavor.
- Use gel food coloring to avoid thinning the icing with added liquid.
- Store decorated cookies in an airtight container to keep them fresh.
- These cookies can be made a day ahead and decorated the next day to save time during the busy holiday season.
Nutrition
- Serving Size: 1 cookie (based on 60 cookies)
- Calories: 110
- Sugar: 9g
- Sodium: 45mg
- Fat: 6g
- Saturated Fat: 4g
- Unsaturated Fat: 1.5g
- Trans Fat: 0g
- Carbohydrates: 14g
- Fiber: 0.3g
- Protein: 1g
- Cholesterol: 20mg


