
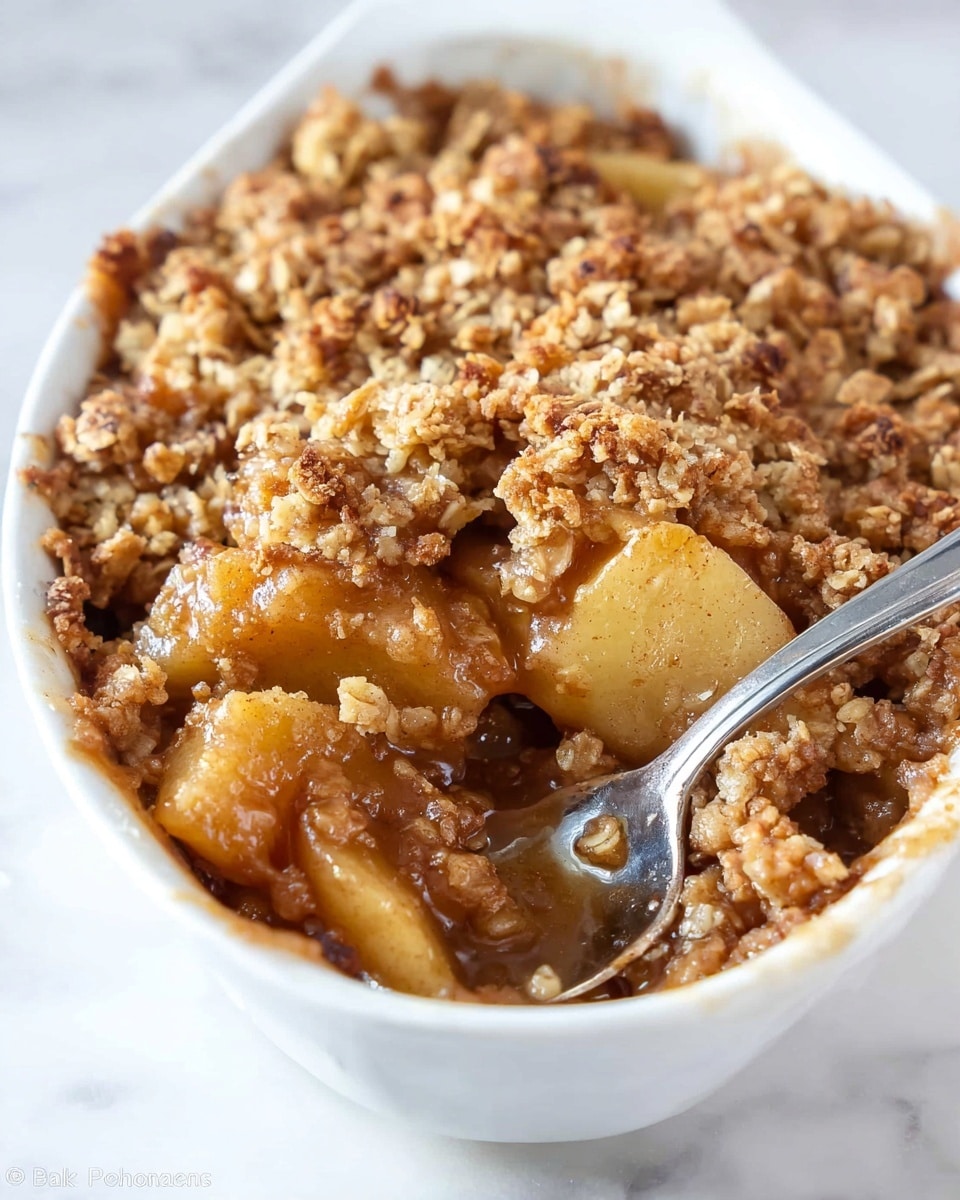
I absolutely love how this The Best Apple Crisp Recipe turns out every single time – warm, comforting, and loaded with fresh apple flavor. It’s one of those desserts that feels like a big, cozy hug, perfect for chilly nights or anytime you want a little homemade sweetness without fuss. You’ll find that this apple crisp is not too sweet, with just the right touch of cinnamon and a buttery, crunchy topping that makes each bite delightful.
What makes this recipe truly special is how simple and forgiving it is, even if you’re not a seasoned baker. When I first tried it, I was amazed at how easily it came together and how my family went crazy for it – it’s become a staple in my kitchen during apple season. Whether you’re making it for an everyday dessert or a holiday gathering, The Best Apple Crisp Recipe’s balance of tender apples and crispy oat topping will leave everyone asking for seconds.
Why You’ll Love This Recipe
- Simple Ingredients: You’ll probably already have everything in your pantry, making it super easy to whip up.
- Perfect Texture: Juicy baked apples paired with a buttery crisp topping that’s crunchy without being hard.
- Versatile Dessert: Great on its own or topped with ice cream, cream, or even yogurt for any occasion.
- Crowd-Pleaser: My family goes crazy for this, and I’m pretty sure yours will too!

Ingredients You’ll Need
Each ingredient plays a crucial role in creating that perfect harmony of flavor and texture in The Best Apple Crisp Recipe. From the tartness of fresh apples to the warm notes of cinnamon and vanilla, together with a crisp topping made from oats and brown sugar, these ingredients blend beautifully.
- Fresh apples: Choose tart varieties like Granny Smith or a mix for that perfect balance between sweet and tangy.
- Granulated white sugar: Adds just enough sweetness to the juicy filling without overpowering.
- Cinnamon: The warm spice essential for that cozy, classic apple crisp flavor.
- Vanilla extract: A small splash lifts the flavor, giving the apples a subtle depth.
- All-purpose flour: For the topping’s structure, helping bind the oats and sugar together.
- Old fashioned oats: Provides that lovely chewy texture and crunch in the topping.
- Brown sugar: Packed and sweet, it caramelizes slightly during baking for a rich flavor.
- Salt: Just a pinch to balance and enhance the sweetness and spice.
- Butter: Melted, it brings everything together and creates that crisp, golden topping we all crave.
Variations
I love recommending you make this recipe truly your own — it’s flexible! Over time, I’ve played around with different add-ins and tweaks, and the best part is they all still turn out amazing. Feel free to get creative!
- Add nuts: I often toss chopped walnuts or pecans into the topping for an extra crunch and a nutty flavor boost.
- Use different spices: Try adding a pinch of nutmeg or ground ginger to mix things up; these warm spices complement the apples beautifully.
- Make it gluten-free: Swap the all-purpose flour for almond flour or a gluten-free blend—just make sure to adjust texture as needed.
- Mix fruits: Pears or berries work great alongside the apples for a fun twist on the classic.
How to Make The Best Apple Crisp Recipe
Step 1: Prepare the Oven and Dish
Start by preheating your oven to 350°F (175°C). While it warms up, grab a deep dish pie plate or a large baking dish and grease it well with butter or cooking spray. This ensures the crisp doesn’t stick and helps with easy serving later on. I like using butter for that slight flavor boost.
Step 2: Mix the Apple Filling
In a large bowl, toss your sliced apples with the granulated sugar, cinnamon, and vanilla extract. Make sure every apple slice is nicely coated – this helps the sugars and spices seep in while baking, producing that juicy, flavorful filling you’re craving. I usually give it a gentle stir with my hands; it’s a little kitchen therapy!
Step 3: Make the Crisp Topping
In a separate bowl, combine the flour, oats, brown sugar, salt, and cinnamon. Pour in your melted butter and stir everything until the mixture looks crumbly and well coated. The butter brings all those dry ingredients together — don’t be tempted to add too much, or you’ll lose that crisp texture. I’ve learned the hard way that melted butter spreads the topping evenly and bakes up perfectly!
Step 4: Assemble and Bake
Pour the apple mixture into your prepared baking dish and spread it evenly. Then sprinkle the crisp topping evenly over the apples — the uniform layer is key for that golden, crunchy crust. Pop it into the oven and bake for 45 to 60 minutes until you see the fruit bubbling and the topping turns a lovely golden brown. You’ll know it’s done when the apples are tender but not mushy.
Step 5: Cooling and Serving
Once out of the oven, give it at least 15 minutes to cool slightly — this helps the filling set so it’s easier to scoop and the flavors marry beautifully. I love serving it warm with a big scoop of vanilla ice cream on top for that classic combo you’ll never get tired of.
Pro Tips for Making The Best Apple Crisp Recipe
- Use Tart Apples: I’ve found that tart apples like Granny Smith hold their shape better and balance the sweetness beautifully.
- Slice Apples Evenly: Cutting apples into same-sized slices helps them cook uniformly, preventing some pieces from getting mushy while others stay hard.
- Don’t Overmix the Topping: Stir until crumbly but avoid overworking it, which can make the topping dense instead of crisp.
- Watch Baking Time: Keep an eye after 45 minutes—oven temps vary, and you want golden topping without burning.
How to Serve The Best Apple Crisp Recipe
Garnishes
I always reach for vanilla ice cream as my go-to garnish—it melts softly into the warm crisp and adds that creamy touch I adore. Whipped cream is another great choice if you prefer something lighter, and a sprinkle of toasted nuts on top can add extra texture and flavor that really impresses guests.
Side Dishes
When serving, I like pairing this apple crisp with a simple cup of hot coffee or spiced tea to balance the sweetness. For brunches, it’s delightful alongside creamy yogurt or even a scoop of ricotta cheese to elevate the experience.
Creative Ways to Present
For special occasions, I love serving The Best Apple Crisp Recipe in individual ramekins—everyone gets their own perfectly portioned treat, and they look so charming. You can also layer warm crisp with whipped cream and caramel sauce in clear glasses for a stunning trifle-style dessert everyone will talk about.
Make Ahead and Storage
Storing Leftovers
Any leftovers store beautifully covered in the fridge for up to 3 days. I usually put mine in an airtight container, and when I dig in later, the flavors taste even better as they’ve had more time to meld.
Freezing
Freezing works well too if you want to prep ahead. I recommend assembling the crisp, but not baking it, then freezing the unbaked dish wrapped tightly with foil and plastic wrap. When ready to eat, thaw overnight in the fridge and bake just as usual, adding a few extra minutes if needed.
Reheating
To reheat leftovers, I pop them in a 350°F oven for about 15 minutes to restore that crisp topping and warm filling perfectly. Avoid microwaving if you want to keep the topping crunchy—it tends to make it soggy.
FAQs
-
Can I use frozen apples for The Best Apple Crisp Recipe?
Yes, you can use frozen apples, but be aware that they release more moisture during baking, which might make the filling a bit more watery. To counter this, try thawing and draining excess liquid before mixing with sugar and spices. Also, reduce any added liquid in the recipe or increase the thickener slightly if needed.
-
What’s the best type of apples to use for apple crisp?
Tart, firm apples like Granny Smith, Honeycrisp, or Braeburn work great because they hold their shape and offer a nice tang that balances the sweetness. Mixing different types can add complexity and texture, just make sure they’re not overly sweet or mushy when cooked.
-
Can I make the topping ahead of time?
Absolutely! You can prepare the crumb topping a day in advance and refrigerate it in an airtight container. Just stir it again before sprinkling on the apples to break up any clumps and then bake as directed.
-
How do I know when The Best Apple Crisp Recipe is done baking?
You’ll want to see bubbly juices around the edges and a golden brown topping. The apples should be tender when pierced with a fork but still hold some shape. Usually, 45-60 minutes does the trick depending on your oven.
Final Thoughts
This recipe holds a special place in my heart, not just because it’s delicious but because of the simple joys it brings to my family table. The Best Apple Crisp Recipe is one of those few desserts that feels like home—warm, comforting, and easy to pull off. I really hope you give it a try and watch it become your go-to fall dessert as it did mine. Trust me, once you make this apple crisp, you’ll find yourself reaching for it again and again!
Print
The Best Apple Crisp Recipe
- Prep Time: 10 minutes
- Cook Time: 45 minutes
- Total Time: 55 minutes
- Yield: 8 servings
- Category: Dessert
- Method: Baking
- Cuisine: American
Description
This classic apple crisp recipe features a tender, cinnamon-spiced apple filling topped with a buttery, oat-studded crumb topping. Baked to golden perfection, it’s a perfect comforting dessert to enjoy warm, especially when paired with vanilla ice cream.
Ingredients
Filling:
- 5 cups fresh apples, sliced
- 1/2 cup granulated white sugar
- 1/2 teaspoon cinnamon
- 1 teaspoon vanilla extract
Topping:
- 1/2 cup all purpose flour
- 1/3 cup old fashioned oats
- 2/3 cup packed brown sugar
- 1/4 teaspoon salt
- 1/2 teaspoon cinnamon
- 1/4 cup (1/2 stick) butter, melted
Instructions
- Preheat and prepare dish: Preheat your oven to 350 degrees Fahrenheit. Grease a deep dish pie plate or a large baking dish with butter or cooking spray and set it aside.
- Prepare apple filling: In a large bowl, combine the sliced apples with granulated sugar, cinnamon, and vanilla extract. Mix thoroughly until the apples are evenly coated. Pour this mixture into the prepared baking dish.
- Make the topping: In a separate medium bowl, mix the flour, oats, brown sugar, salt, and cinnamon. Pour in the melted butter and stir until the mixture is well coated and crumbly.
- Assemble and bake: Sprinkle the crumb topping evenly over the apple filling in the baking dish. Bake in the preheated oven for 45 to 60 minutes, or until the apples are soft and the topping is golden brown.
- Cool and serve: Remove the apple crisp from the oven and allow it to cool slightly before serving. It tastes best when served warm with a scoop of vanilla ice cream on top.
Notes
- Use a mix of tart and sweet apples (such as Granny Smith and Gala) for better flavor and texture.
- Ensure the butter is melted but not too hot before mixing it with the dry ingredients to get clumps that bake into a crisp topping.
- This dessert can be made ahead and reheated before serving.
- For a gluten-free version, substitute the all-purpose flour with a gluten-free flour blend.
- Store leftovers in the refrigerator for up to 3 days and reheat gently in the oven.
Nutrition
- Serving Size: 1 slice (1/8 of recipe)
- Calories: 280
- Sugar: 28g
- Sodium: 150mg
- Fat: 10g
- Saturated Fat: 6g
- Unsaturated Fat: 3g
- Trans Fat: 0g
- Carbohydrates: 45g
- Fiber: 4g
- Protein: 2g
- Cholesterol: 20mg


