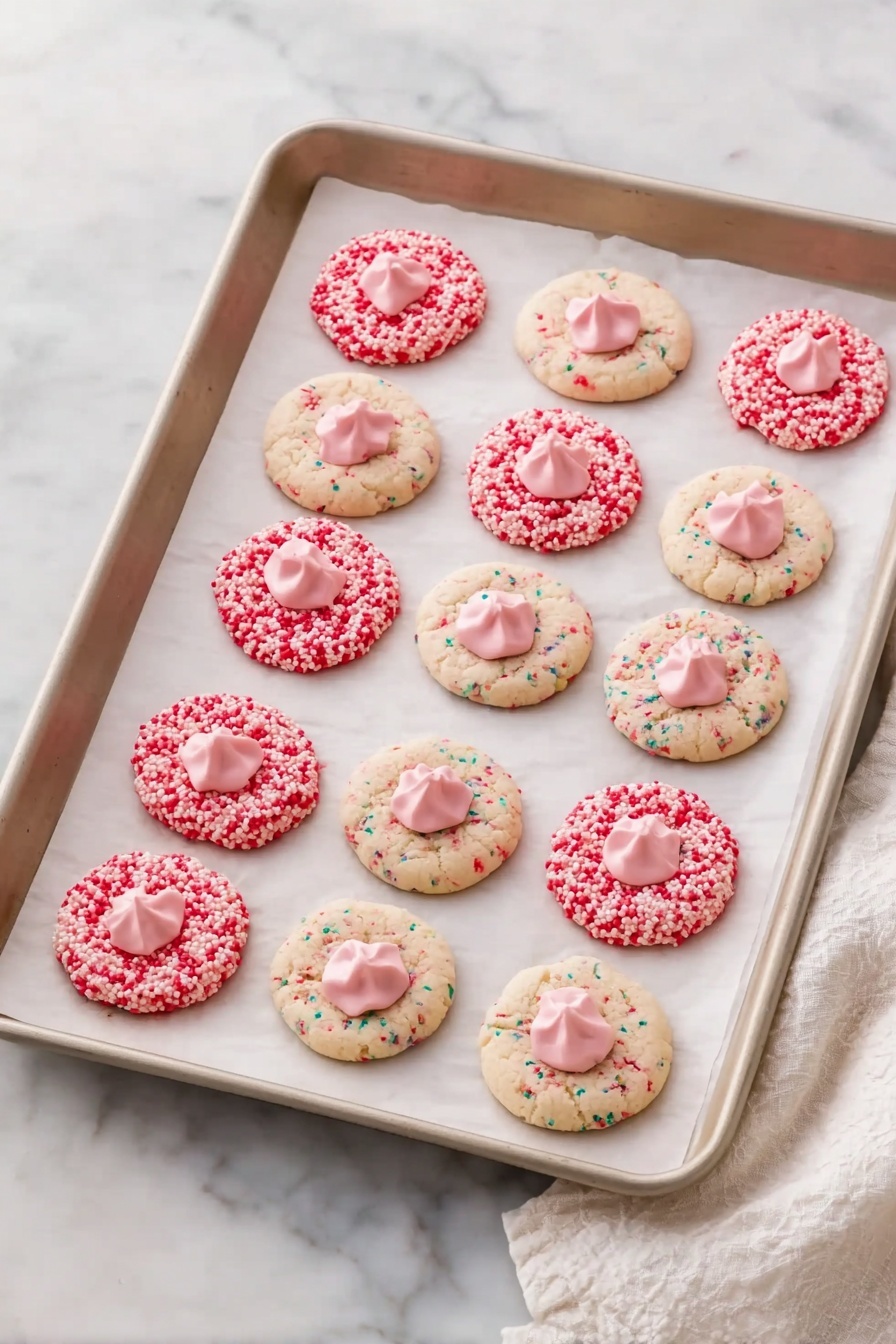
If you’re on the lookout for a cookie that’s both adorable and absolutely delicious, you’re in the right place. I’m excited to share my Strawberry Kiss Cookies Recipe with you—a fun twist on classic sugar cookies that’s soft, festive, and loaded with that signature strawberry-flavored Hershey’s Kiss right in the center. Trust me, these cookies turn out beautifully soft with a sweet strawberry surprise that just melts in your mouth. I first stumbled upon this idea as a Valentine’s Day treat, but honestly, they’re perfect any time you want to bring a little joy to your kitchen and delight your family or friends.
Why You’ll Love This Recipe
- Soft, But Not Too Sweet: The cream cheese paired with Funfetti mix balances flavor and texture perfectly.
- Quick and Simple: Only a few ingredients and less than an hour from start to finish.
- Kid-Friendly Fun: Rolling in colored sugar or non-pareils makes baking interactive and festive.
- That Oh-So Cute Kiss Topping: The strawberry Hershey’s Kiss adds charm and a burst of fruity flavor in every bite.

Ingredients You’ll Need
These ingredients come together so nicely that you’ll find the cookie dough easy to work with, and the flavors just pop. I always recommend grabbing the cream cheese ahead of time so it’s nice and soft—it makes mixing a breeze.
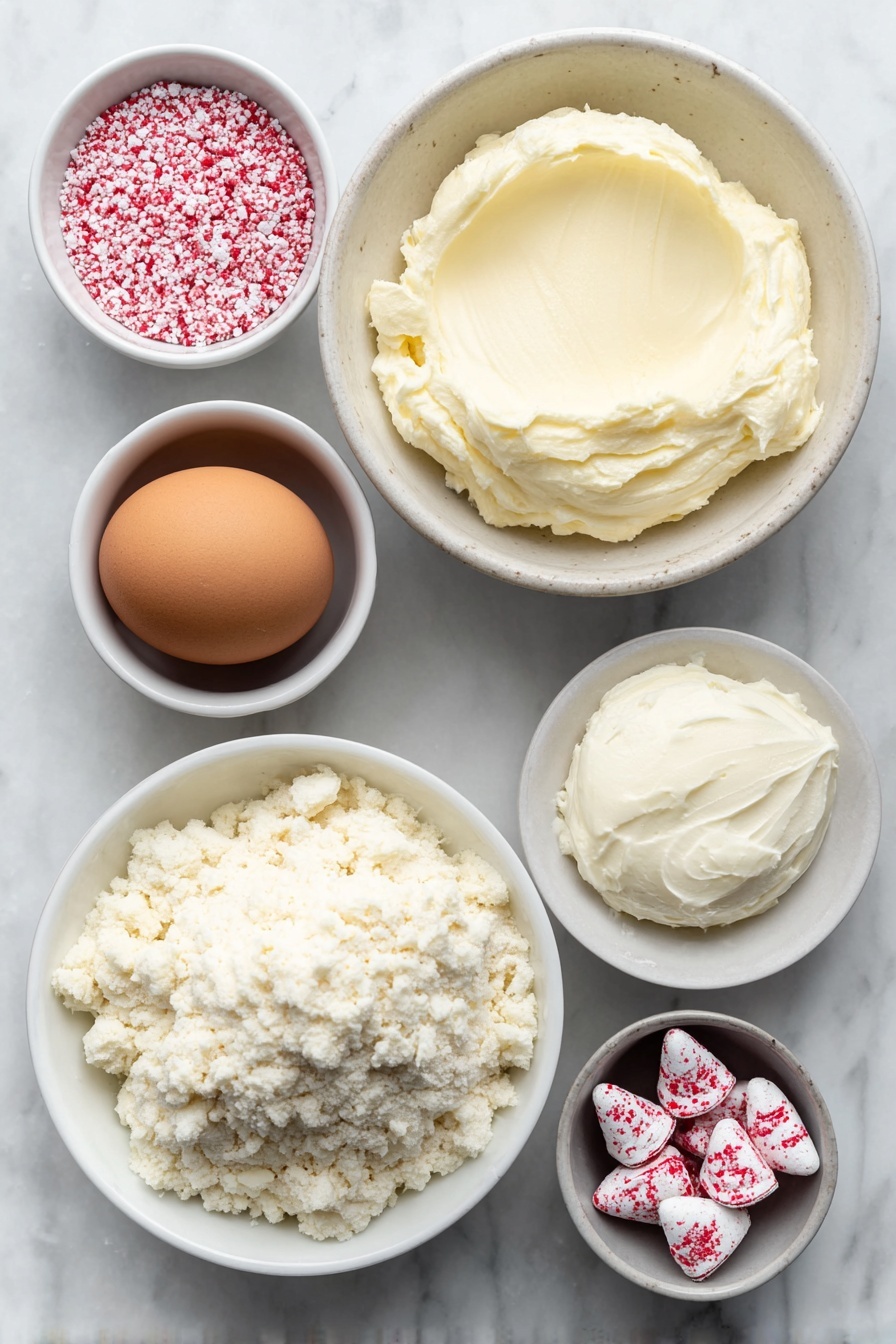
- Funfetti sugar cookie mix: This is the base that gives the cookies their classic soft texture and a subtle vanilla sweetness.
- Cream cheese: Softened cream cheese adds richness and keeps the cookies tender.
- Egg: Helps bind everything together for the perfect dough consistency.
- Pink or white sanding sugar or non-pareils: These add that extra sparkle and a pleasant crunch outside—plus, they’re fun to roll the dough balls in!
- Hershey’s Strawberry Ice Cream Cone Kisses: The star ingredient that makes these cookies unforgettable with a fresh, strawberry burst right on top.
Variations
One of my favorite things about this Strawberry Kiss Cookies Recipe is how flexible it is. I encourage you to play around with toppings and mix-ins to make it your own—after all, cookies are personal, right?
- Chocolate Chip Twist: I once swapped the Funfetti for chocolate chip cookie mix and used regular milk chocolate Kisses—everyone loved the chocolaty vibe!
- Gluten-Free Option: Try using a gluten-free sugar cookie mix; just make sure it handles cream cheese well for that soft texture.
- Festive Sprinkles: For holidays, switch out sanding sugar for theme-colored sprinkles, adding a dash of personality to every bite.
- Different Kiss Flavors: Don’t limit yourself to strawberry—experiment with caramel or mint Kisses for unique flavor experiences.
How to Make Strawberry Kiss Cookies Recipe
Step 1: Prep Your Space and Ingredients
I always start by preheating my oven to 375°F and lining a baking sheet with parchment paper—that way, things run smoothly once the dough is ready without any last-minute scramble. Soften your cream cheese to room temperature while you get everything else ready; this little step makes mixing so much easier.
Step 2: Mix the Dough to Soft Perfection
In a large bowl, combine the Funfetti sugar cookie mix, softened cream cheese, and egg. I like using a sturdy spatula or my hands for this part because the dough should come together into a soft, smooth ball. Don’t rush it—if it feels sticky, no worries, a quick chill in the fridge will help later on.
Step 3: Roll and Coat Each Cookie
Pour your sanding sugar or non-pareils into a shallow bowl. Then, scoop the dough using about a 1½ tablespoon measure—you want each cookie ball to be uniform for even baking. Roll each scoop into a smooth ball, then gently roll it in the sugar or sprinkles. This coating gives a delicate crunch and bursts of color I just adore.
Step 4: Chill if Needed, Then Arrange for Baking
If your dough feels too sticky when rolling, pop it in the fridge for 30 to 60 minutes—this is a trick I discovered after some sticky messes early on! Place your cookie balls about 1½ inches apart on your parchment-lined baking sheet so they have space to bake evenly without merging.
Step 5: Bake & Add That Irresistible Kiss
Bake the cookies for 8 to 12 minutes—you’re looking for edges to be set but centers to remain soft, like that perfect chewy bite. Once they’re out, let them cool for 3 to 5 minutes, and then gently press a Hershey’s Strawberry Ice Cream Cone Kiss right into the center of each cookie. This step is key: if you want a firmer Kiss that holds its shape, cool the cookies a little before pressing. But if you love the gooey melted center, press the Kiss immediately after baking while still warm.
Step 6: Cool and Serve
Let the cookies cool completely so the Kiss sets up nicely, or enjoy these beauties warm and melty for a real treat. Either way, they disappear quickly in my house!
Pro Tips for Making Strawberry Kiss Cookies Recipe
- Cream Cheese Temperature: Let the cream cheese come fully to room temp for easy folding and no lumps in the dough.
- Rolling Trick: If your hands get sticky while shaping the dough, dip them in sanding sugar or lightly oil them for smooth rolling.
- Don’t Skip Chilling: Chilling sticky dough makes shaping much less frustrating and the cookie texture improves dramatically.
- Pressing Kisses: Wait a few minutes after baking to press the Chocolate Kisses unless you want the centers melty and soft.
How to Serve Strawberry Kiss Cookies Recipe

Garnishes
I love adding a little extra pink sanding sugar on top of the cookie balls before baking for that sparkle, but after pressing in the Kiss, sometimes a tiny fresh strawberry slice or a mint leaf adds a beautiful, fresh contrast when serving at parties.
Side Dishes
These cookies pair perfectly with a cold glass of milk or a warm mug of herbal tea—something subtle so the strawberry Kiss flavor shines. For a festive brunch, try serving alongside fresh fruit salad or a light yogurt parfait.
Creative Ways to Present
For Valentine’s Day, I arrange Strawberry Kiss Cookies in a heart shape on a large platter, or place them in cute cupcake liners inside a decorative tin. Wrapping a small stack with a pretty ribbon also makes a charming homemade gift.
Make Ahead and Storage
Storing Leftovers
I keep leftover Strawberry Kiss Cookies in an airtight container at room temperature for up to 3 days, but honestly, they rarely last that long in my house. Keeping them sealed helps preserve that soft, tender texture, especially with the cream cheese in the dough.
Freezing
If you want to freeze these cookies, I recommend freezing the dough balls raw rather than baked cookies. Place them on a baking sheet lined with parchment to freeze until firm, then transfer to a freezer bag. When you’re ready, bake directly from frozen, adding a minute or two to the baking time.
Reheating
To reheat, I pop a cookie or two in the microwave for about 10 seconds—it’s just enough to soften the cookie again and revive the melted Kiss without making the cookie soggy. Oven warming at low heat for a few minutes works well too if you want to keep the cookie edges a little crisp.
FAQs
-
Can I use regular sugar cookie mix instead of Funfetti?
Absolutely! Regular sugar cookie mix will work fine; just keep in mind the Funfetti adds extra color and a bit of festive charm. You’ll still get that delicious soft texture and buttery flavor either way.
-
What can I substitute if I don’t have Hershey’s Strawberry Kisses?
If you can’t find the strawberry-flavored Hershey’s Kisses, try strawberry-flavored candy melts or even a small fresh strawberry pressed into the cookie center after baking. Alternatively, classic milk chocolate Kisses still create a delightful cookie.
-
Why do I need to soften the cream cheese first?
Softened cream cheese blends more smoothly into the dough, preventing lumps and ensuring the cookies keep a tender texture. I learned that rushing this step can lead to uneven dough that’s tricky to shape.
-
How do I prevent the Kisses from melting too much?
Let the cookies cool a few minutes before pressing in the Kisses to stop the chocolate from fully melting and losing shape. If you want a melty center, press immediately after baking, but for firmer topping, the brief cooling step is key.
Final Thoughts
I absolutely love how this Strawberry Kiss Cookies Recipe brings a little sparkle to my baking routine—and I know you’ll feel the same. It’s that perfect mix of simple ingredients, fun hands-on prep, and a charming finish that feels special without being complicated. Whether you’re baking for kids, a sweetheart, or just as a treat for yourself, these cookies have become a family favorite in my home. Give them a try—you’ll be so glad you did, and I bet these become one of your go-to recipes for festive smiles and happy taste buds.
Print
Strawberry Kiss Cookies Recipe
- Prep Time: 10 minutes
- Cook Time: 8–12 minutes
- Total Time: 48 minutes
- Yield: 16–18 cookies
- Category: Baking
- Method: Baking
- Cuisine: American
Description
Strawberry Kiss Cookies are a soft and delightful treat perfect for Valentine’s Day or any special occasion. These funfetti sugar cookies are enriched with cream cheese for extra softness and topped with a Hershey’s Strawberry Ice Cream Cone Kiss, creating a delightful combination of flavors and textures. The cookies are coated in sweet sanding sugar or colorful non-pareils for a festive look and a subtle crunch.
Ingredients
Cookie Dough
- 1 (16 oz) bag Funfetti sugar cookie mix
- 4 oz cream cheese, softened
- 1 large egg
Topping and Decoration
- ½ cup pink or white sanding sugar or non-pareils
- 18 Hershey’s Strawberry Ice Cream Cone Kisses
Instructions
- Preheat Oven: Preheat your oven to 375°F (190°C) and line a baking sheet with parchment paper to prevent sticking and ensure easy cleanup.
- Make Dough: In a large bowl, combine the funfetti sugar cookie mix, softened cream cheese, and egg. Mix thoroughly until a soft dough forms, which will be slightly sticky but manageable.
- Prepare Sugar Coating: Pour the sanding sugar or non-pareils into a shallow bowl, which will be used to coat the cookie dough balls for a decorative, sweet crust.
- Scoop and Roll Dough: Using a 1½ tablespoon cookie scoop, portion out the dough and roll each portion between your hands to form smooth balls. Then roll each ball in the sanding sugar or non-pareils until fully coated.
- Chill If Needed: If the dough feels too sticky to handle easily, place it in the refrigerator for 30 to 60 minutes to firm up before scooping and rolling.
- Arrange for Baking: Place the sugar-coated dough balls on the prepared baking sheet, spacing them about 1½ inches apart to allow room for spreading during baking.
- Bake Cookies: Bake in the preheated oven for 8 to 12 minutes, until the edges look set but the centers remain soft. This ensures a tender center and slightly firm edges.
- Add Kisses: After removing the cookies from the oven, let them cool for 3 to 5 minutes to avoid melting the chocolates too much. Then, gently press a Hershey’s Strawberry Ice Cream Cone Kiss into the center of each cookie.
- Cool and Serve: Allow the cookies to cool completely on the baking sheet, or if you prefer, enjoy them warm with soft, melted centers.
Notes
- Use room temperature cream cheese to ensure smooth mixing and a tender dough.
- If the dough is sticky, chilling it will make it easier to handle and shape.
- Coating your hands with sanding sugar when rolling will prevent sticking and add extra sparkle.
- For firm centers, allow cookies to cool slightly before pressing the Hershey’s Kisses into them.
- If you enjoy soft, melted centers, press the Kisses immediately after baking while cookies are hot.
Nutrition
- Serving Size: 1 cookie
- Calories: 150
- Sugar: 12g
- Sodium: 120mg
- Fat: 6g
- Saturated Fat: 3.5g
- Unsaturated Fat: 2g
- Trans Fat: 0g
- Carbohydrates: 22g
- Fiber: 0.5g
- Protein: 2g
- Cholesterol: 25mg


