
If you’re looking to wow your friends and family this holiday season, I can’t recommend this Stained Glass Candy Cookies Recipe enough! These cookies are pure magic with their colorful, translucent centers that catch the light just like stained glass windows. I remember the first time I made them, my kids were absolutely mesmerized, and honestly, so was I. The best part? They’re easier to make than they look, and once you get the hang of it, you’ll find yourself baking them all year round. So grab your cookie cutters and some hard candies, and let’s dive into this fan-freaking-tastic recipe together.
Why You’ll Love This Recipe
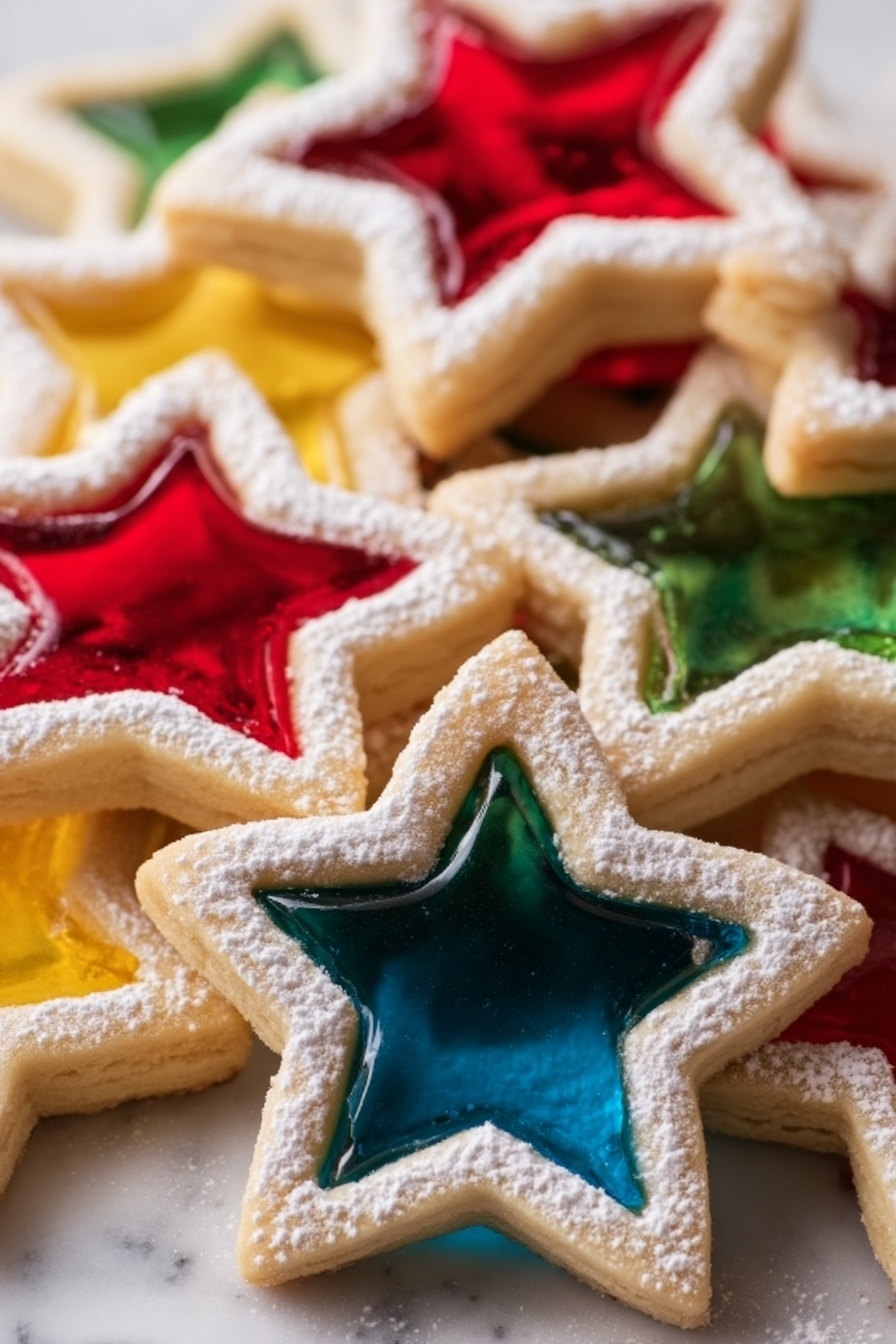
- Stunning Presentation: The translucent candy centers create a jewel-like effect that’s irresistibly eye-catching.
- Fun for All Ages: Kids love helping to crush the candies and fill the cookie centers, making baking a fun family activity.
- Simple Ingredients: You likely have most ingredients already, and hard candies come in so many flavors and colors.
- Versatile and Festive: Perfect for holiday gifts, parties, or even hanging as festive ornaments.

Ingredients You’ll Need
All the ingredients for this Stained Glass Candy Cookies Recipe come together beautifully, giving you a rich buttery dough complemented by colorful candy centers. I always recommend using good-quality unsalted butter and fresh candies for the best taste and appearance.
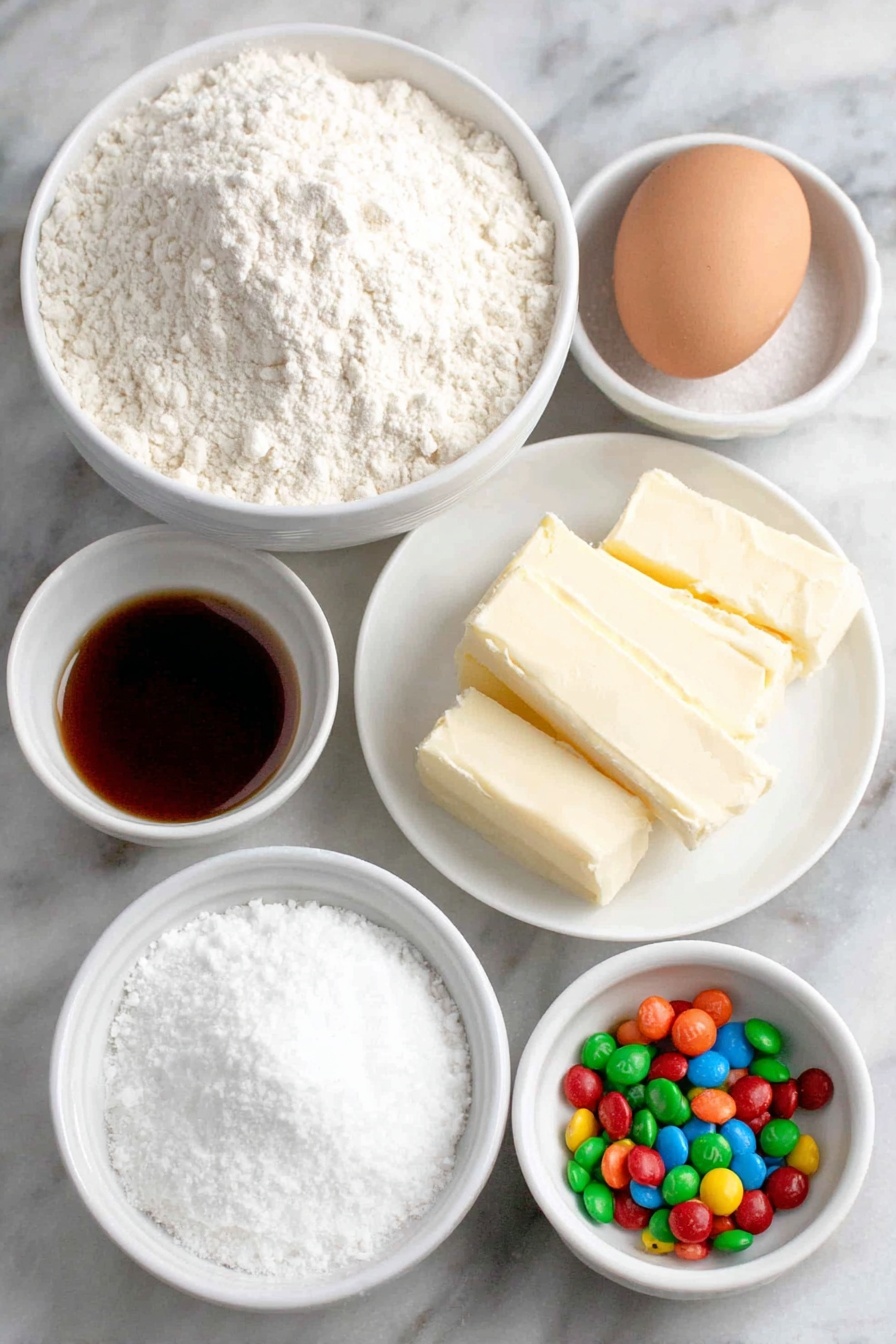
- All-purpose flour: Gives your cookies just the right texture and structure, so they hold their shape during baking.
- Baking powder: Helps the cookie dough rise slightly, making it light and tender.
- Salt: A pinch balances the sweetness and enhances the flavors.
- Unsalted butter: Using softened butter is crucial for creaming with sugar to create that perfect dough.
- Granulated sugar: For sweetness and a slight crunch in the cookie.
- Egg: Acts as a binder and adds moisture to the dough.
- Vanilla extract: Classic flavor that deepens the overall taste of the cookie.
- Almond extract (optional): Adds a nice twist and pairs wonderfully with vanilla, but you can skip it if you prefer.
- Assorted hard candies (like Jolly Ranchers or Life Savers): Choose your favorite colors and flavors to create the stained glass effect. Crushing them yourself keeps the centers bright and glossy.
- Powdered sugar: Just for a light dusting after baking—adds a touch of festive elegance.
- Ribbon or string (optional): If you want to turn your cookies into beautiful holiday ornaments.
Variations
I love how versatile this Stained Glass Candy Cookies Recipe is—you can easily customize it depending on your mood or occasion. Whether you want to change up the flavor profile or make it dietary-friendly, there’s a way to make it your own.
- Extract swaps: I’ve swapped the vanilla and almond extracts for peppermint or lemon extract to give these cookies a fresh twist during the holidays.
- Gluten-free version: Use a gluten-free all-purpose flour blend in place of regular flour—I did this once for a friend and honestly, no one could tell the difference!
- Different candy combos: Play with mixing fruit-flavored candies or sticking to just one color for a more subtle stained glass effect.
- Mini cookie shapes: Using smaller cutters creates adorable bite-sized cookies, which work great for gifting or kids’ parties.
How to Make Stained Glass Candy Cookies Recipe
Step 1: Prepare the Dough Like a Pro
Start by whisking together your all-purpose flour, baking powder, and salt—this ensures they’re evenly distributed and your cookies bake perfectly. Then cream your softened butter and sugar in a large bowl using an electric mixer until the mixture is light and fluffy, about 2 to 3 minutes. This part makes a huge difference in texture, so don’t rush it! Next, beat in your egg and extracts (vanilla and optional almond), scraping down the sides so nothing’s left behind. Gradually add your dry mix, combining gently until just incorporated—if you overmix here, your cookies could turn tough. Once your dough looks like a cohesive ball, wrap it in plastic and pop it in the fridge for at least an hour. Trust me, this chilling step is key—it helps the dough firm up and keeps your cookie shapes crisp when baking.
Step 2: Crush and Separate Your Candy Colors
While your dough chills, grab those hard candies and divide them by color into small ziplock bags. Using a rolling pin or meat mallet, gently crush the candies until they’re broken down but still chunky enough to hold shape—think: coarse sand. This texture helps your melted candy centers hold vibrant color and prevents them from turning too runny inside. This step has saved me on more than one occasion from sticky, uneven cookie centers!
Step 3: Roll, Cut, and Fill with Candy Magic
Preheat your oven to 350°F (175°C) and line baking sheets with parchment paper. On a floured surface, roll your chilled dough to about a ¼-inch thickness—don’t roll thinner or your cookies might bake too crisp and crumble. Use a large star-shaped cutter (or your favorite shape) to cut out cookies, then use a smaller cutter of the same shape to cut out the centers. Carefully transfer these to your sheets and spoon crushed candy pieces into the cut-out centers, filling them full but not overstuffed—remember, the candy will melt and spread! This part can get a little sticky, so I always keep a damp towel nearby to wipe my hands.
Step 4: Bake and Cool with Patience
Bake your cookies for around 8 to 10 minutes, just until the edges turn a light golden and your candy centers are melted and bubbly. Don’t overbake—those candy centers can brown and lose that stunning translucent shine. Once out of the oven, let the cookies cool on the baking sheet for about 5 to 10 minutes until the candy hardens. Then gently transfer them to a cooling rack to cool completely. This cooling part can feel like forever because they look so gorgeous, but it’s worth the wait to avoid breaking the candy centers.
Step 5: Add the Final Touches
Once fully cooled, dust the cookies lightly with powdered sugar—it adds a delicate snow-kissed look that my family adores. If you want to hang your cookies as ornaments, poke a small hole near the top with a straw while the cookies are still warm (but handle carefully!) and thread a pretty ribbon or string through once fully cooled. This trick turns these treats into unforgettable holiday décor and gifts.
Pro Tips for Making Stained Glass Candy Cookies Recipe
- Don’t Skip Dough Chilling: I’ve learned the hard way that chilling the dough helps prevent spreading so the candy centers stay neat and defined.
- Crush Candy Wisely: Crushing candies to the right size (not powder, not big chunks) ensures they melt evenly without becoming a mess.
- Keep an Eye in the Oven: Candy centers can bubble quickly – check cookies early to avoid browning or burning your stained glass.
- Cooling Patience: Cooling cookies on the baking sheet first helps the candy harden securely, so resist the urge to move them too soon!
How to Serve Stained Glass Candy Cookies Recipe
Garnishes
I like to keep it simple here—just a light dusting of powdered sugar really adds a festive, elegant touch without overshadowing those colorful candy centers. Sometimes, I sprinkle a little edible glitter for holiday parties, which my guests absolutely love. If you’re gifting, a simple ribbon tied around a cookie stack adds charm without fuss.
Side Dishes
Since these cookies are a treat on their own, I often pair them with a cozy cup of hot cocoa or a spiced chai latte—perfect for chilly afternoons. For holiday gatherings, they’re a fantastic addition to a dessert platter alongside peppermint bark, sugar cookies, and maybe some roasted nuts.
Creative Ways to Present
One of my favorite holiday traditions is turning these stained glass cookies into tree ornaments by threading ribbons through the holes and hanging them on the Christmas tree. They make your tree smell amazing and guests always ask if they can eat the decorations! Another idea is packaging a few cookies in a clear cellophane bag tied with a festive bow—perfect for neighbor gifts or party favors.
Make Ahead and Storage
Storing Leftovers
I store leftover stained glass cookies in an airtight container at room temperature, layered between parchment paper to prevent sticking. They keep beautifully for up to a week, though I rarely have leftovers that last that long! Just make sure they’re completely cooled before storing to keep the candy centers firm.
Freezing
You can freeze the cookie dough itself, wrapped tightly in plastic wrap and frozen for up to two months. When you’re ready to bake, thaw it overnight in the fridge, then proceed as usual. I don’t recommend freezing the baked cookies because the candy centers can become sticky or cloudy when thawed.
Reheating
Since these are best enjoyed fresh, I usually skip reheating. But if you want to soften them a bit, a few seconds in a microwave (10-15 seconds) works—just be careful not to overdo it or the candy will melt and lose its shape. Let them cool completely before eating.
FAQs
-
Can I use any type of hard candy for the stained glass centers?
Yes! You can use popular hard candies like Jolly Ranchers, Life Savers, or even certain mints. Just make sure they’re brightly colored and clear for the best stained glass effect. Avoid candies with opaque or coated surfaces because they won’t create that beautiful translucent look.
-
Why do I need to chill the dough before baking?
Chilling the dough firms up the butter, which helps the cookies keep their shape and stop them from spreading too much during baking. This results in crisp edges and well-defined cookie shapes that hold the candy centers perfectly.
-
How do I prevent the candy from bubbling over?
Filling the centers just enough so candy doesn’t overflow is key. Also, baking at 350°F and keeping a close eye during the 8-10 minute bake time helps. If you notice candy bubbling too aggressively, you can tent your cookies with foil midway to slow the process.
-
Can I make these cookies ahead of time for the holidays?
Absolutely! Prepare the dough in advance and refrigerate for up to two days or freeze it longer. Bake your cookies a day or two before your event, and store them in an airtight container. They stay fresh and stunning, ready to impress on game day.
Final Thoughts
I absolutely love how this Stained Glass Candy Cookies Recipe brings a little sparkle and joy to my kitchen and celebrations. They’re one of those recipes that feels special and festive but is surprisingly straightforward to master. Whether you’re making them with family, gifting them to friends, or simply treating yourself, these cookies never fail to put a smile on everyone’s face. Give them a try—I guarantee once you see that glowing candy center, you’ll be hooked just like I am!
Print
Stained Glass Candy Cookies Recipe
- Prep Time: 30 minutes
- Cook Time: 10 minutes
- Total Time: 40 minutes
- Yield: 20 servings
- Category: Dessert
- Method: Baking
- Cuisine: American
Description
These vibrant Stained Glass Cookies feature a delightful combination of buttery sugar cookie dough and colorful melted hard candy centers, perfect for festive occasions or holiday decorations. With a crisp edge and a stunning translucent candy window, they are both visually striking and delicious.
Ingredients
For the Cookies:
- 2 ¾ cups all-purpose flour
- 1 teaspoon baking powder
- ¼ teaspoon salt
- 1 cup (2 sticks) unsalted butter, softened
- 1 cup granulated sugar
- 1 large egg
- 1 teaspoon vanilla extract (or almond extract for a twist)
- ½ teaspoon almond extract (optional)
For the Stained Glass:
- Assorted hard candies (like Jolly Ranchers or Life Savers), separated by color and crushed
For Decorating:
- Powdered sugar (for dusting)
- Ribbon or string (if hanging as ornaments)
Instructions
- Prepare the Dough: In a medium bowl, whisk together the flour, baking powder, and salt. In a separate large mixing bowl, use an electric mixer to cream the softened butter and sugar until light and fluffy, about 2-3 minutes. Add in the egg, vanilla extract, and almond extract if using, mixing thoroughly and scraping down the sides as necessary. Gradually incorporate the dry ingredients into the wet, mixing just until combined to avoid overworking the dough. Shape the dough into a disk, wrap it in plastic wrap, and chill in the refrigerator for at least 1 hour or up to 2 days to help the cookies hold their shape during baking.
- Prepare the Candies: While the dough chills, organize your hard candies by color into separate ziplock bags. Use a rolling pin or meat mallet to crush the candies into small pieces—not too fine, but small enough to melt evenly. Set aside for later use.
- Shape the Cookies: Preheat the oven to 350°F (175°C) and line two baking sheets with parchment paper. On a floured surface, roll out the chilled dough to about ¼-inch thickness. Using a large star-shaped cookie cutter or your preferred shape, cut out the cookies. Then, using a smaller cookie cutter of the same shape, cut out the centers of each cookie to create a window. Carefully transfer to prepared baking sheets.
- Fill the Centers: Spoon the crushed candy into each cookie center hole, filling completely but avoiding overfilling to ensure even melting and no overflow.
- Bake and Cool: Bake for 8-10 minutes until the cookie edges are lightly golden and the candy centers have fully melted. Allow the cookies to cool on the baking sheets for 5-10 minutes so the candy centers harden. Then, transfer the cookies to a wire rack to cool completely.
- Dust and Decorate: Once cooled, lightly dust the cookie edges with powdered sugar for a festive finish. If making holiday ornaments, poke a small hole at the top of each cookie while still warm using a straw, then thread ribbon or string through the hole after the cookies have cooled.
Notes
- Chilling the dough is essential for preventing the cookies from spreading too much while baking.
- Use separate bags to crush candies by color to avoid mixing colors in the stained glass centers.
- Be careful not to overfill the candy centers to prevent candy overflow onto the baking sheet.
- These cookies make beautiful edible decorations or gifts.
- Store cookies in an airtight container at room temperature to maintain freshness.
Nutrition
- Serving Size: 1 cookie
- Calories: 150
- Sugar: 15g
- Sodium: 70mg
- Fat: 7g
- Saturated Fat: 4g
- Unsaturated Fat: 3g
- Trans Fat: 0g
- Carbohydrates: 20g
- Fiber: 0.5g
- Protein: 2g
- Cholesterol: 30mg


