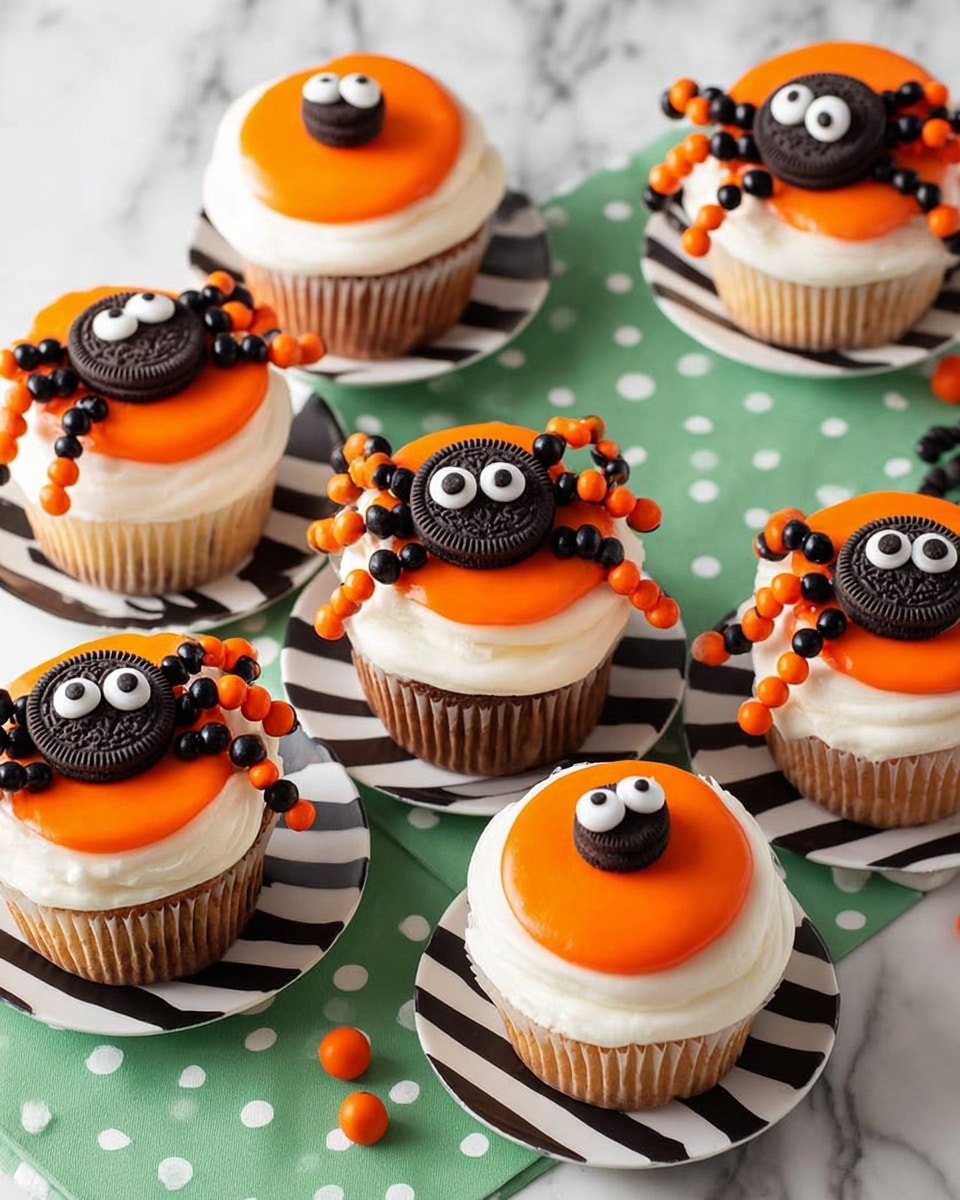
If you’re looking to add a little creepy charm to your Halloween treats, you’ve got to try this Spooky Halloween Spider Cupcakes Recipe. It’s one of those fun projects that’s surprisingly simple but looks like you spent hours on it. I absolutely love how these cupcakes come together — they’re chocolatey, festive, and those little spider decorations? So adorable and just a little spooky. Whether you’re baking for a kids’ party or just want to thrill your friends, you’ll find that making these spiders crawl right onto your dessert table is easier (and more fun) than you think.
Why You’ll Love This Recipe
- Super Easy to Make: Even if you’re a beginner, the step-by-step decorating won’t overwhelm you.
- Fun for All Ages: Kids love getting hands-on with the spider decorations, and adults enjoy the chocolatey cupcake base.
- Eye-Catching Presentation: Your guests will be wowed by the cute but spooky spider design perched on each cupcake.
- Flexible Ingredients: You can easily swap frostings or decorations to suit what you have on hand or dietary needs.

Ingredients You’ll Need
For this Spooky Halloween Spider Cupcakes Recipe, I like using a rich chocolate cupcake base paired with three different colors of frosting because it really makes the spider details pop. The candy eyeballs add a playful touch and are totally worth picking up if you want that authentic spider look.
- Chocolate Cupcakes: You can go from scratch or use your favorite boxed mix; just make sure they cool completely before decorating.
- White Frosting: This creates the smooth base on your cupcake that helps the spider’s body really stand out.
- Orange Frosting: Perfect for the spider’s body to give it that Halloween glow.
- Black Frosting: Great for piping the spider’s legs, making the details striking.
- Candy Eyeballs: Adds personality and makes your spiders truly come alive.
- Mini Chocolate Sandwich Cookies: These form the spider’s head and add a crunchy texture contrast.
- Cornstarch: A neat trick I learned to smooth out the frosting dots for the legs.
Variations
I love switching things up with this Spooky Halloween Spider Cupcakes Recipe depending on who I’m baking for. Don’t be afraid to get creative — Halloween is all about having fun with your treats!
- Peanut Butter Lovers: I once swapped the chocolate cupcakes for peanut butter ones, and the orange frosting pairs surprisingly well with that nutty flavor.
- Allergy-Friendly: Use dairy-free and gluten-free cupcake mixes if you’re baking for friends with restrictions; the decorating steps stay the same.
- Colorful Spiders: Swap the orange frosting for purple or green to create funky spiders if you want something less traditional but still festive.
- Mini Version: I’ve made bite-sized cupcakes before — makes them perfect for classroom parties or buffet tables.
How to Make Spooky Halloween Spider Cupcakes Recipe
Step 1: Bake Your Chocolate Cupcakes and Let Them Cool
Follow your favorite chocolate cupcake recipe or box instructions, then set them on a wire rack to cool completely — this is key because frosting will melt and slide off if the cupcakes are still warm. I usually bake mine about 18-20 minutes, then let them hang out for a solid 30-40 minutes before moving on. Patience here really pays off when it’s decorating time!
Step 2: Frost with White to Create a Smooth Base
Using a round piping tip, apply white frosting onto each cupcake. Don’t stress about perfection here — just get an even layer so the spider’s body will really pop. Once piped, use a small offset spatula to smooth it out nicely. This base layer gives the spider contrast that makes the colors come alive.
Step 3: Pipe the Spider’s Body with Orange Frosting
With a piping bag fitted with a round tip, pipe a small orange circle right in the center of each cupcake. I aim for about the size of a half dollar coin — big enough to be the main body but not so large it swallows the cupcake’s face. If you don’t have orange frosting, a mix of red and yellow will do the trick.
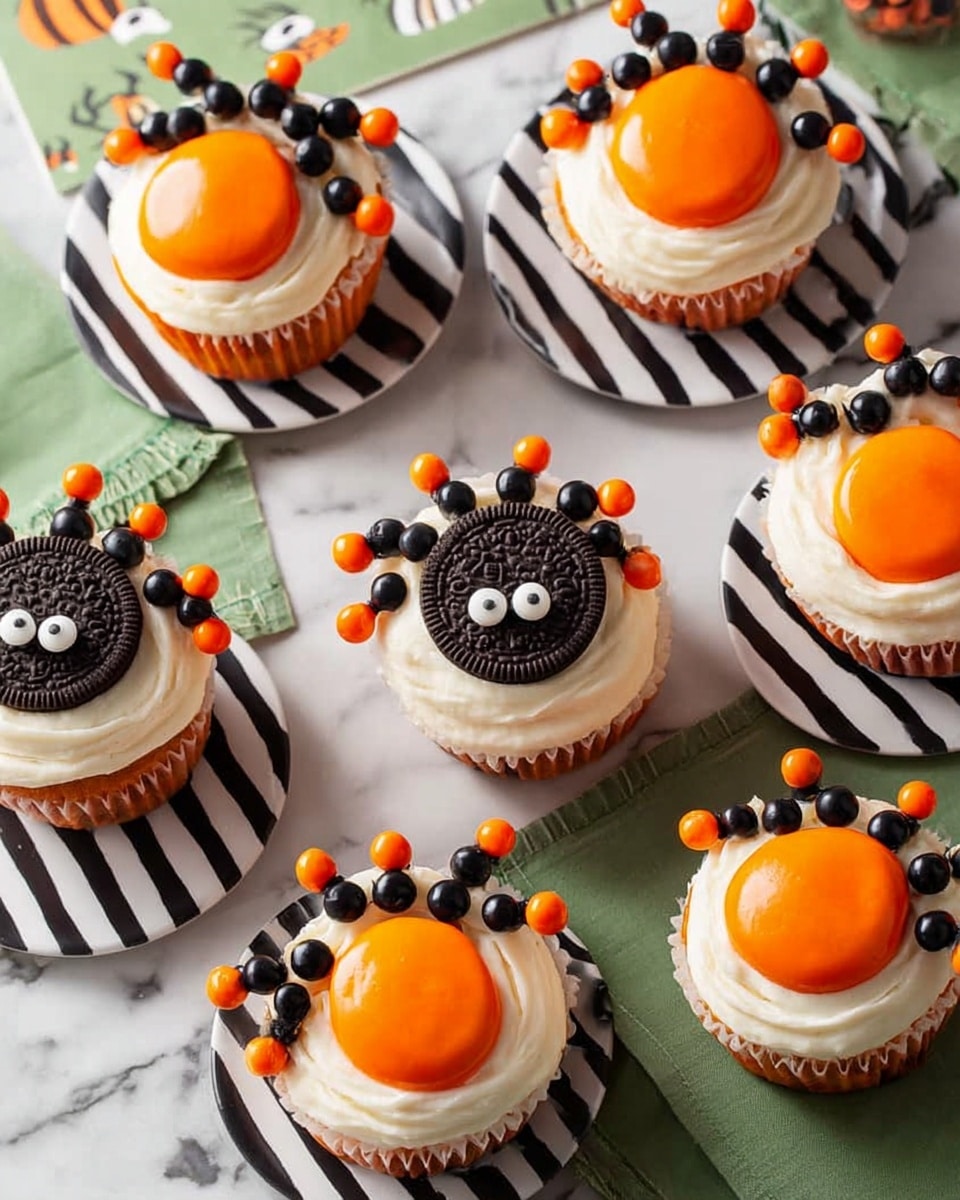
Step 4: Create the Spider’s Head and Attach Candy Eyeballs
This is the fun part! Pipe a small dot of frosting atop each mini chocolate sandwich cookie — this will act like glue. Stick on two candy eyeballs carefully, then lean the cookie next to the orange body on the cupcake. I love how these heads add detail and dimension, making the spiders look like they’re ready to crawl right off the plate.
Step 5: Pipe Spider Legs Using Black and Orange Frosting
Alternate dots of black and orange frosting to create four legs on each side of the spider’s body. This is where the cornstarch trick really shines: dip a small clean brush into cornstarch and gently smooth out each dot to form neat little legs instead of messy globs. This technique is what makes your spider legs look super polished and professional!
Pro Tips for Making Spooky Halloween Spider Cupcakes Recipe
- Cool Completely Before Decorating: I can’t stress this enough—warm cupcakes will make frosting slide and create a mess.
- Use Piping Bags for Control: It makes creating precise spider legs way easier than using a spoon or knife.
- Cornstarch for Smooth Legs: This little secret smooths frost dots beautifully and prevents them from sticking to your fingers.
- Don’t Rush the Eyeballs Placement: Press candy eyes gently and use a little frosting glue so they don’t fall off later.
How to Serve Spooky Halloween Spider Cupcakes Recipe
Garnishes
I like to keep the garnishes simple — the mini sandwich cookie heads with candy eyeballs do all the heavy lifting here. Sometimes I add a few edible glitter sprinkles or some black sugar crystals around the edges of the cupcake for extra sparkle. Trust me, those little details make the whole presentation pop on your Halloween table.
Side Dishes
Pair these cupcakes with spooky punch or hot chocolate with marshmallow ghosts to make a complete Halloween dessert spread. I’ve also served them alongside a simple pumpkin-shaped sugar cookie, which my family totally loves for the combo of chocolate and pumpkin flavors.
Creative Ways to Present
For one Halloween party, I arranged the cupcakes on a black platter lined with fake cobwebs and added plastic spiders crawling around the edges to really ramp up the scary vibe. Another time, I stacked them on a tiered stand wrapped with orange and black ribbon — it made for a centerpiece guests couldn’t stop admiring. Playing with presentation really makes this recipe extra festive and fun.
Make Ahead and Storage
Storing Leftovers
I usually keep leftover cupcakes in an airtight container in the fridge. They stay moist and delicious for up to 3 days. Just be careful to avoid stacking them too high or the decorations might get squished — spacing them out a bit saves you the hassle of redecorating!
Freezing
Yes, these cupcakes freeze beautifully. I wrap each cupcake individually in plastic wrap and then place them in a freezer-safe bag. When you’re ready to enjoy, thaw them overnight in the fridge. This trick has saved me on busy Halloween nights when I needed treats ready in advance without sacrificing freshness.
Reheating
Since they’re cupcakes, reheating isn’t really needed. But if they’ve been in the fridge and you want a fresher feel, you can warm them gently in the microwave for about 10 seconds before serving. Just watch carefully to avoid melting the frosting too much!
FAQs
-
Can I make these spider cupcakes without candy eyeballs?
Absolutely! If you don’t have candy eyeballs, you can draw eyes using white and black frosting with a very small piping tip or even edible markers. Alternatively, small dots of white chocolate chips with a tiny dab of black icing can mimic eyes quite well.
-
Can I use homemade frosting for this recipe?
Definitely! Homemade buttercream or cream cheese frosting works beautifully for the white, orange, and black colors. Just split your batch and tint accordingly with gel food coloring for the best vibrant colors.
-
What if I don’t have mini chocolate sandwich cookies?
No worries! You can use any small, round cookie or even make a small dollop of frosting as the spider’s head. The cookies just add a nice crunch and structure but aren’t mandatory.
-
How long will these cupcakes stay fresh?
Stored airtight in the fridge, they stay fresh for up to 3 days. For longer storage, freezing as described above is your best bet.
Final Thoughts
When I first tried this Spooky Halloween Spider Cupcakes Recipe, I didn’t realize how much joy those little spider details would bring—not just to the kids but to the entire family. It’s simple enough to do as a group activity and impressive enough to show off at any party. I really hope you give it a try this Halloween season because, trust me, you’ll be craving to make these spidery sweets year after year. Happy baking and have a fang-tastic Halloween!
Print
Spooky Halloween Spider Cupcakes Recipe
- Prep Time: 45 minutes
- Cook Time: 25 minutes
- Total Time: 2 hours 40 minutes
- Yield: 12 cupcakes
- Category: Dessert
- Method: Baking
- Cuisine: American
Description
These Spooky Halloween Spider Cupcakes are a fun and festive treat perfect for Halloween parties. Moist chocolate cupcakes are topped with smooth white frosting and decorated with cute spider designs made from orange and black frosting, candy eyeballs, and mini chocolate sandwich cookies for a creepy-crawly effect that’s sure to delight kids and adults alike.
Ingredients
The Best Chocolate Cupcakes
- 12 chocolate cupcakes (homemade or boxed mix)
Frosting and Decorations
- White frosting (approx. 8 oz.)
- Orange frosting (approx. 8 oz.)
- Black frosting (approx. 8 oz.)
- Candy eyeballs (24 pieces)
- Mini chocolate sandwich cookies (12 cookies)
- Cornstarch (for smoothing the frosting dots)
Instructions
- Make chocolate cupcakes: Bake the chocolate cupcakes following your chosen recipe or box instructions. Once baked, transfer them to a cooling rack and let them cool completely to ensure the frosting doesn’t melt.
- Frost cupcakes: Using a piping bag fitted with a round tip, pipe white frosting evenly on top of each cooled cupcake. Use a spatula to gently smooth the frosting, creating a flat surface for decorating.
- Make spider’s body: With orange frosting, pipe a small circle roughly the size of a half dollar coin on the top center of each cupcake to form the spider’s body.
- Create spider’s head: Take a mini chocolate sandwich cookie for each spider. Pipe a dot of orange frosting on one side of the cookie to act as glue, then stick two candy eyeballs onto it. Place the cookie so it leans against the orange spider body on the cupcake, forming the spider’s head.
- Make spider’s legs: Using both black and orange frosting, pipe alternating colored dots extending from the spider body outward to represent 4 legs on each side (8 legs total). Dip a clean brush into cornstarch and gently smooth each dot. This technique refines the look of the legs, giving a polished appearance.
Notes
- Allow cupcakes to cool completely before frosting to prevent melting.
- If you don’t have piping bags, use zip-top bags with a small corner cut off as a substitute.
- Cornstarch on your brush prevents sticking and helps create smooth frosting dots for the legs.
- For a stronger orange and black color, use gel food coloring instead of liquid.
- Store cupcakes in an airtight container at room temperature for up to 2 days or refrigerate for longer freshness.
Nutrition
- Serving Size: 1 cupcake
- Calories: 320
- Sugar: 28g
- Sodium: 180mg
- Fat: 16g
- Saturated Fat: 7g
- Unsaturated Fat: 7g
- Trans Fat: 0g
- Carbohydrates: 40g
- Fiber: 2g
- Protein: 3g
- Cholesterol: 35mg


