
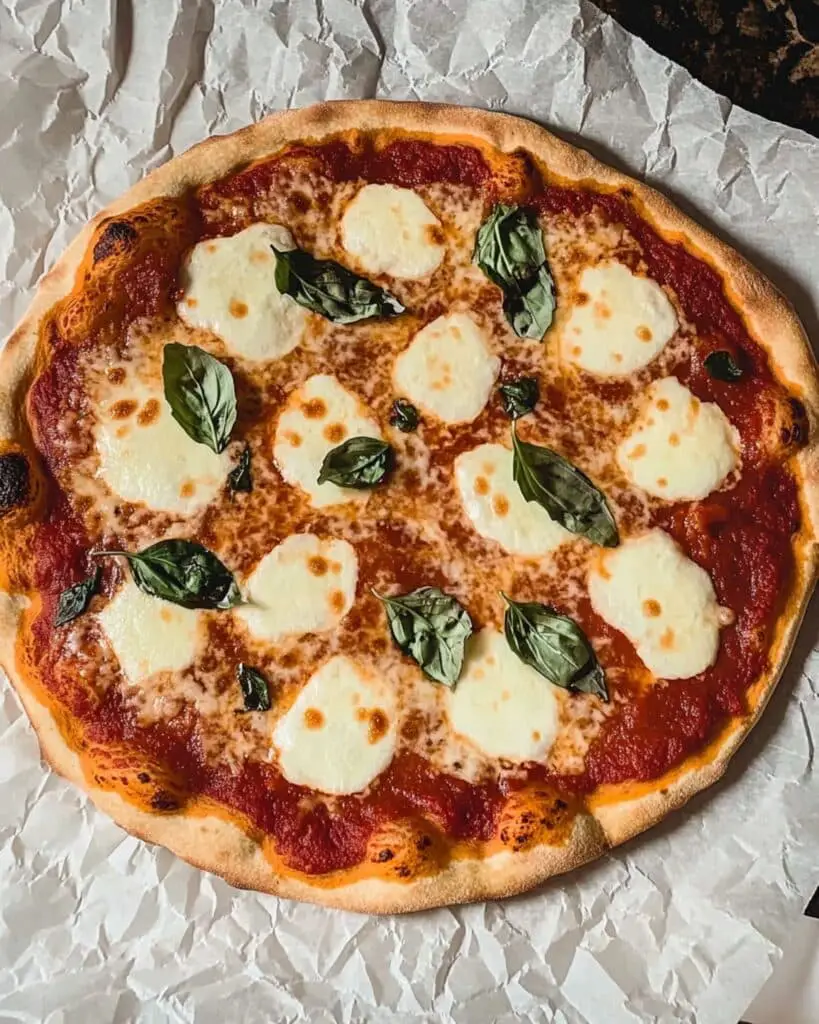
Pizza night is about to get a serious upgrade! This Sourdough Pizza Crust Recipe delivers that irresistible pizzeria quality right from your own kitchen—with minimal effort and maximum flavor. The dough requires just a quick mix and a little hands-off resting, making it perfect for fitting around a busy week. With a golden, bubbly crust kissed by tangy sourdough and a crispy-bottom thanks to a cast iron skillet, this pizza hits all the right notes: chewy, airy, flavorful, and endlessly customizable. Whether you’re using up sourdough discard or a bubbly starter, this recipe gives you beautiful crusts that are ready for anything—from classic margherita to wild, veggie-loaded creations.
Why You’ll Love This Recipe
- Ridiculously Easy: If you’ve got ten minutes to spare, you can have this dough ready in no time. Most of the process is the dough resting, so you can get on with your day.
- Big on Flavor: The sourdough gives the crust incredible depth—slightly tangy, perfectly chewy, and a delightfully crisp bottom that rivals any wood-fired pizzeria.
- Flexible & Forgiving: Forgot to cold ferment? No problem, bake it right away! Want even more flavor? Give it a longer chill in the fridge.
- Ideal for Busy Nights: Prep it in advance or on the fly, and enjoy homemade pizza with minimal mess and effort.
- Customizable: Any toppings, any sauce—just use what you love or have on hand.

Ingredients You’ll Need
Let’s break down what you’ll want in your kitchen and why it matters:
- Sourdough Starter (Discard or Active): Using discard keeps things quick and easy, but an active starter adds more rise. Both give you great, slightly tangy flavor.
- Sea Salt: Brings out all the complex flavors of your dough. Fine sea salt dissolves easily, but kosher or table salt will do—just adjust amounts accordingly.
- Olive Oil: For that subtle richness and a tender, golden crumb. Don’t skip this step!
- Whole Wheat Flour: Adds a nutty background flavor and extra texture. Use more if you like a heartier crust.
- All-Purpose Flour (or Bread/00 Flour): The backbone of your crust. Use bread or 00 flour if you want even more chew and a silkier texture.
- Water: Hydrates the dough for the perfect soft, pliable base. Use cool or lightly warm water, and adjust a spoonful at a time if your dough feels too dry or too sticky.
- Pizza Sauce & Toppings: The sky’s the limit—use tomato, pesto, or even just a drizzle of olive oil. Cheese, vegetables, or meats—all your favorites work here.
Note: You’ll find the complete list of ingredients, along with their exact measurements, in the printable recipe card at the bottom of this post.
Variations
Don’t be afraid to play:
- Gluten-Free? Try a gluten-free all-purpose blend, though the texture may be less chewy.
- Make it Whole Wheat: Swap in more whole wheat flour for extra flavor and fiber, though your crust will be a bit denser.
- Cheesy Crust: Tuck grated mozzarella or parmesan into the dough edges before the final stretch.
- Herbs & Flavor Boosters: Mix in dried oregano, basil, or garlic powder right into your dough for extra depth.
- Pan Pizza: Go thicker for a deep-dish vibe—just press the dough thicker and cook a few minutes longer.
How to Make Sourdough Pizza Crust
Step 1: Mix & Ferment the Dough
In the evening (or the night before pizza night), stir together your sourdough starter/discard, salt, olive oil, whole wheat flour, all-purpose flour, and water in a large bowl. Use your hands and just go for it until you have a shaggy dough—no need for fancy equipment! Cover and let rest at room temperature overnight. This is where the magic starts.
Step 2: Stretch, Fold & Chill (Optional but Awesome)
The next morning, do a simple round of stretch and folds: wet your hand, grab a section of dough, stretch it up, and fold it over. Rotate and repeat all around. This step makes your crust airy and chewy. Cover and pop the bowl into the fridge for anywhere from 8 to 36 hours (totally optional, but your taste buds will thank you).
Step 3: Divide & Rest
When ready to make pizza, let the dough sit on the counter for 30 minutes. Divide into four pieces, shape each into a ball, and let them relax on a floured surface for another 30 minutes under a towel. This makes them super easy to stretch.
Step 4: Shape the Crust
Turn your oven to broil (HIGH). Heat your cast iron skillet over medium to medium-high. While it heats, gently stretch or press a dough ball on a floured surface until it’s about 8 inches wide. If it fights back, let it rest for 15 minutes so the gluten chills out.
Step 5: Cook in the Skillet
Carefully transfer your circle of dough to the hot skillet. Press the edges to fill the bottom, then quickly add your sauce, cheese, and toppings. Cook for 5–6 minutes, or until the bottom is crisp and charring.
Note: If your crust is thicker, let it cook longer at lower heat, or give it a quick broil with no toppings before adding sauce and cheese.
Step 6: Finish Under the Broiler
Once the bottom looks perfectly browned, slide the whole skillet under the broiler for 2–4 minutes until the top bubbles, the cheese is melty, and the crust gets those irresistible leopard spots. Watch it like a hawk!
Step 7: Serve & Savor
Remove carefully, slice, and enjoy immediately while the crust is hot and crisp.
Pro Tips for Making the Recipe
- Hydration Matters: Wetter dough = airier crust. If the dough feels too dry, add a touch more water.
- Cold Ferment = Extra Flavor: A longer chill in the fridge brings out deeper sourdough notes. But if you’re short on time, you’ll still get great pizza.
- No Cast Iron? Use a heavy oven-proof pan or even a baking steel/sheet—just adjust your cooking time as needed.
- Topping Timing: Add toppings as soon as the dough hits the pan for the best melt and melding of flavors.
- Don’t Overload: Less is more. Too many toppings can make your crust soggy.
How to Serve
Pizza like this begs to be the star, but here’s how to elevate the meal:
Classic Style:
Serve hot, straight from the cutting board. Slice into wedges and let everyone help themselves.
With Sides:
Pair with a crisp green salad, marinated olives, or a simple antipasto platter.
Dipping Sauce:
Set out little bowls of pesto, chili oil, or garlicky ranch for dunking those chewy crust edges.
Next-Day Brunch:
Top leftovers with a fried egg and a sprinkle of parmesan—trust me, it’s magic.
Make Ahead and Storage
Storing Leftovers
Any leftover pizza can be cooled, then stored in an airtight container in the fridge for up to 3 days. The crust stays surprisingly tender!
Freezing
Freeze the shaped, par-baked crusts (without toppings) for up to 2 months. Or freeze fully assembled, baked pizza slices for quick lunches.
Reheating
Reheat slices in a hot skillet, toaster oven, or conventional oven until the crust crisps and the cheese melts. Avoid the microwave if possible—it softens the crust.
FAQs
-
Can I use sourdough discard straight from the fridge?
Absolutely! Cold discard works well; you don’t need to feed it first. You’ll still get that tangy flavor and great texture.
-
Do I have to use a cast iron skillet?
While cast iron gives that crispy, pizzeria-style bottom, a heavy oven-proof pan or a baking sheet will work. Just adjust cooking times and keep an eye on the crust.
-
Is the overnight ferment really necessary?
For the best depth of flavor, yes. But if you’re in a hurry, you can let the dough rise for just a couple hours at warm room temperature and still get a delicious crust.
-
How can I tell when the pizza is done?
Look for a deeply browned, slightly charred bottom and bubbling, golden cheese on top. The crust shouldn’t be soggy in the center.
Final Thoughts
Sourdough pizza at home is one of life’s simple (and sensational!) pleasures. With a minimal hands-on approach and so much room for creativity, this recipe is bound to become your go-to for cozy pizza nights, lazy weekends, or feeding a hungry crowd. Try it once, and you’ll never look at take-out quite the same way. Grab your skillet—pizza night just became irresistible!
Print
Sourdough Pizza Crust Recipe
- Prep Time: 10 minutes
- Cook Time: 10 minutes
- Total Time: 2 hours 20 minutes (includes fermenting and resting)
- Yield: 4 crusts
- Category: Main-course
- Method: Stovetop
- Cuisine: Italian
- Diet: Vegetarian
Description
This sourdough pizza crust recipe produces delicious, chewy, and flavorful pizzas with the perfect crisp. Made with sourdough discard or active starter, it uses a simple overnight ferment for depth and is finished with a high-heat broiler for an authentic pizzeria touch. Ideal for weeknight dinners or homemade pizza nights, this method is easy and versatile for your favorite toppings.
Ingredients
Sourdough Pizza Crust
- 1/3 cup (100 g) sourdough starter discard (or 1/4 cup (50 g) active starter)
- 2 teaspoons (10 g) fine sea salt
- 2 tablespoons (30 g) olive oil
- 1/3 cup + 1 tablespoon (50 g) whole wheat flour
- 3 3/4 cups (450 g) all-purpose flour (bread flour or 00 flour can be used)
- 1 1/3 cups + 1 teaspoon (325 g) water
Pizza Toppings
- Pizza sauce
- Homemade pesto
- Your choice of toppings
Instructions
- Prepare the Dough (Night Before) – In a large mixing bowl, combine the sourdough starter discard, sea salt, olive oil, whole wheat flour, all-purpose flour, and water. Mix by hand until everything is fully incorporated. Cover the bowl and allow the dough to ferment overnight at room temperature.
- Strengthen and Cold Ferment (Morning of Baking) – The next morning, perform a set of stretch and folds: wet your hand, gently stretch one side of the dough and fold it over, rotating the bowl until you circle the dough. Cover and refrigerate for 8 to 36 hours. This step develops flavor but is optional if you’re short on time.
- Divide and Shape the Dough – When ready to cook, remove the dough from the fridge and let it rest at room temperature for 30 minutes. Divide it into 4 equal pieces and shape each into a ball on a floured surface. Cover with a tea towel and rest for another 30 minutes.
- Preheat Equipment – Turn your oven’s broiler to HIGH. Preheat a cast iron skillet over medium to medium-high heat on the stovetop. Lightly oil the skillet if needed to prevent sticking.
- Shape Pizza Crust – On a floured work surface, press a dough ball into an 8″ circle with your hands, using extra flour as needed. If the dough resists, rest for an additional 15 minutes to relax the gluten.
- Cook on Stovetop – Place the shaped dough into the hot skillet. Press gently to cover the bottom. Immediately add your sauce and toppings. Cook for 5-6 minutes until the bottom is starting to char. If the crust is thick, cook longer at a lower temperature to ensure it’s cooked through. Optionally, broil the crust (before topping) to avoid an undercooked center if needed.
- Finish Under the Broiler – Once the bottom is nicely browned, transfer the skillet to the broiler for 2-4 minutes to finish cooking the top and melt the toppings. Watch carefully to prevent burning.
- Slice and Serve – Remove the pizza from the oven, slice, and serve hot. Adjust cook times as needed based on your oven and broiler settings for best results.
Notes
- If using a different type of salt (like kosher salt), adjust the amount as it may have different saltiness.
- Bread flour or 00 flour can be used for chewier, crispier crusts rather than all-purpose flour.
- Water amount can be slightly adjusted depending on your flour’s absorbency.
- The cold ferment (refrigeration) is optional but strongly encouraged for better flavor.
- If dough is hard to shape, resting it longer will help gluten relax.
- Watch carefully under the broiler as cooking times can vary widely.
Nutrition
- Serving Size: 1 crust (1/4 of recipe)
- Calories: 350
- Sugar: 0.7g
- Sodium: 585mg
- Fat: 7g
- Saturated Fat: 1g
- Unsaturated Fat: 6g
- Trans Fat: 0g
- Carbohydrates: 63g
- Fiber: 2g
- Protein: 8g
- Cholesterol: 0mg


