
If you’re searching for a charming and festive way to decorate your holiday treats, I can’t recommend the Sneeuwvlokken Kerstboom Cake Decor Recipe enough. This delightful snowflake Christmas tree cake topper is not just stunning, but actually quite approachable once you get the hang of it. I remember the first time I made one, I was amazed at how such delicate-looking decorations can be crafted with some fondant, patience, and a few sweet tricks. Stick with me—I’ll walk you through everything you need to create this fan-freaking-tastic festive centerpiece!
Why You’ll Love This Recipe
- Elegant & Festive Design: The delicate snowflakes and mini golden accents bring a magical holiday vibe to any cake.
- Easy to Customize: You can play with sizes, colors, and sparkles to really make these trees your own.
- Perfect for Parties: These mini Christmas tree toppers wow guests and make dessert tables pop.
- Lasting Texture: Using tylose with fondant means your decorations stay solid and don’t sag, even after hours.

Ingredients You’ll Need
Every ingredient here plays a key role in crafting those delicate snowflakes and tiny decorations that hold up beautifully while looking stunning. I always make sure to have quality fondant and edible decor products on hand because it really makes a difference in the final look and ease of assembling.

- White fondant: Provides a clean, snowy base perfect for the snowflakes; make sure it’s pliable and fresh for easy shaping.
- Red fondant: Used to cover the mini cake base, adding a festive Christmas color contrast.
- Tylose: This is a lifesaver—it strengthens and hardens your fondant so the snowflakes won’t droop or lose form.
- Snowflake plungers (3 sizes): For cutting out perfect, pretty snowflakes in varying sizes.
- Small star cutter: To create tiny stars that top the trees with sparkle.
- Gold mini pearls: These little edible pearls add festive “berries” and glimmer to your decorations.
- Edible glue: Essential for assembling your snowflakes and attaching pearls without a mess.
- Glitters (e.g., Squires Kitchen Sparkledust): Offers that magical shimmer to your snowflakes, making them twinkle like real snow.
- Gold luster dust (e.g., Solar Gold by Edible Art): Gives golden accents a rich tone, especially for the small star topper.
- Mini cakes (or cake rounds to cut): The base to which your decorations will be applied.
- 10 cm wooden skewer: Acts as the tree trunk where all pieces stack and stay put securely.
Variations
I love playing around with this Sneeuwvlokken Kerstboom Cake Decor Recipe depending on the occasion or my mood. You can swap colors or add different edible embellishments to make each tree unique. It’s so fun to get creative and see what works best for you!
- Color Play: I once made these snowflakes in pastel hues for a winter baby shower—a lovely twist on tradition.
- Dietary Tweaks: Use vegan fondant if you want to keep it plant-based, just watch drying times.
- Theme Changes: For a gold and silver holiday party, I dusted everything with silver luster dust instead of gold—stunning and elegant.
- Size Variations: I sometimes scale up to make larger tabletop centerpieces by simply doubling the snowflakes and base size.
How to Make Sneeuwvlokken Kerstboom Cake Decor Recipe
Step 1: Prepare and Strengthen Your Fondant
Start by mixing your white fondant with a tiny pinch of tylose powder—think pea-sized or less. This trick is golden because tylose makes your fondant harden nicely, which keeps the snowflakes from sagging or getting squishy. Knead them well together until smooth. I like to wrap it tightly in plastic wrap and let it rest for at least one hour—sometimes longer if I’m prepping ahead.
Step 2: Cut Out Your Snowflakes and Decorations
Once your fondant is ready, roll it out evenly (about 3-4 mm thick works great) and use your three different sized snowflake plungers to cut two of each size. Don’t forget to cut small round discs in three sizes as well (roughly 6mm, 4mm, 2mm) to create spacing later. Also, use the star cutter to make a tiny topper star. Here’s a little trick: poke holes right through each piece with your skewer or satay stick to prevent cracking when you later stack the layers. Trust me, this step avoids so much frustration!
Step 3: Color and Sparkle Your Pieces
Apply edible glitter dust to your white components for a soft shimmer that mimics fresh snow. I brush on gold luster dust to the star so it really shines atop your mini tree. Let all the pieces air dry for a few hours—this drying time is key for a sturdy final product.
Step 4: Assemble the Christmas Tree
Now for the fun part! Cover your mini cake base with the red fondant. Then, using a bit of edible glue, start layering your round discs and snowflakes onto the skewer, working from the largest snowflake at the bottom to the smallest on top, separated by the round discs to space everything out nicely. Think of stacking shingles on a roof—that “dakpansgewijs” method really brings life to your tiny tree.
Step 5: Add Final Details and Embellishments
Once your tree shape is complete, stick the tiny golden pearls onto the fondant branches using a small dab of edible glue, best done with a satay stick or toothpick rather than a brush to control glue amount. A pair of tweezers is perfect here—I always keep mine nearby. Finish by crafting tiny holly leaves with your cutters and attach golden “berries” to adorn the base cake, giving your Sneeuwvlokken Kerstboom that extra festive pop.
Pro Tips for Making Sneeuwvlokken Kerstboom Cake Decor Recipe
- Tylose Magic: Adding just a pinch to your fondant is a game-changer—it dries hard without making the fondant crumbly.
- Hole Poking Hack: Making holes in your snowflakes before drying prevents them from snapping when assembled.
- Edible Glue Precision: Use a toothpick or satay stick for applying glue to avoid messy or wet spots that warp your fondant.
- Layering Like a Pro: Build from largest to smallest snowflake and use round discs for spacing—this gives a delightful 3D effect and stability.
How to Serve Sneeuwvlokken Kerstboom Cake Decor Recipe

Garnishes
I typically garnish my kerstboom cakes with delicate white holly leaves and sprinkle golden pearly beads to complement the snowflakes. These little touches add charm and detail that guests always notice and compliment. Plus, they tie the whole festive theme together beautifully.
Side Dishes
These decorated mini cakes pair wonderfully with spiced mulled wine or rich hot chocolate for a cozy holiday touch. Also, some buttery shortbread cookies or cinnamon-dusted nuts work great alongside for a variety of textures and flavors.
Creative Ways to Present
One of my favorite presentation ideas is to arrange a handful of these sneeuwvlokken kerstboom mini cakes on a rustic wooden board, surrounded by fresh pine sprigs, fairy lights, and a scattering of edible glitter dust—it turns the whole dessert table into a festive winter wonderland. It’s always a hit at holiday parties and instantly invites everyone to gather around and admire your handiwork.
Make Ahead and Storage
Storing Leftovers
If you have leftovers, store your decorated mini cakes in an airtight container at room temperature if it’s cool, or in the fridge if it’s warmer. I usually add parchment paper between layers to avoid sticking. They hold up nicely for a few days, though I recommend enjoying them sooner rather than later for best freshness.
Freezing
I’ve frozen these snowflake cakes wrapped tightly in plastic wrap and then foil, and honestly, the decorations survive freezing well. Just thaw them slowly in the fridge overnight to prevent moisture damage. It’s a great way to prep holiday treats ahead of time.
Reheating
Since these are cold-set fondant decorations, you don’t need to reheat. Just bring them to room temperature before serving to enjoy the fondant’s best texture. If refrigerated, about 30 minutes on the counter works wonders.
FAQs
-
Can I skip the tylose in the fondant?
You can, but I don’t recommend it for this recipe. Tylose powder strengthens the fondant so the snowflakes harden properly and don’t lose shape or sag, especially because these decorations are delicate and need to hold up standing upright.
-
How long should I let the fondant decorations dry?
I find that leaving the fondant pieces to air dry for at least a few hours, ideally overnight, gives them enough firmness and reduces the risk of breaking during assembly.
-
What if my snowflakes break while assembling?
Usually it’s because the holes poked for the skewer were too small or missing, causing stress points. Next time, make sure to gently enlarge the holes before drying so the layers slide on easily without cracking.
-
Can I use other colors besides red and white?
Absolutely! Feel free to personalize your kerstboom with any fondant colors you like. I’ve seen gorgeous blue-and-silver versions that look wintery and modern. It’s your festive creation to play with!
Final Thoughts
I absolutely love how the Sneeuwvlokken Kerstboom Cake Decor Recipe turns out every single time. It’s such a satisfying project that adds a magical touch to any holiday cake or party setup. When I first tried this recipe, I was amazed at how manageable it was despite the delicate look, and I still get so much joy from assembling each snowy layer. If you’re looking to wow your guests with something unique, impressive, and utterly festive, you’ll enjoy making these charming little Christmas tree cake decorations as much as I do. Give it a try—you’ll be basking in all those oh’s and ah’s in no time!
Print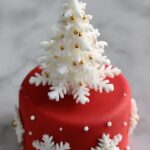
Sneeuwvlokken Kerstboom Cake Decor Recipe
- Prep Time: 45 minutes
- Cook Time: 0 minutes
- Total Time: 4 hours 45 minutes
- Yield: 1 mini kerstboom taartje
- Category: Dessert Decoration
- Method: No-Cook
- Cuisine: Dutch
Description
Maak een feestelijk sneeuwvlokken kerstboom mini taartje met witte en rode fondant, versierd met eetbare gouden parels, glitters en hulstblaadjes. Dit decoratieve dessert is perfect voor de kerstperiode en combineert creatief fondantbewerking met eenvoudige decoratietechnieken voor een indrukwekkend resultaat.
Ingredients
Fondant en Versteviger
- Witte fondant
- Rode fondant
- Tylose (mespuntje per ei-grootte fondant)
Decoratie Benodigdheden
- Sneeuwvlok plungers in 3 maten (2 per maat)
- Uitstekers voor kleine sterretjes
- Gouden mini parels
- Eetbare lijm
- Glitters (bijvoorbeeld Squires Kitchen Sparkledust)
- Gouden kleurpoeder (bijvoorbeeld Solar Gold van Edible Art)
Overige
- Mini taartje bekleed met rode fondant (1 per kerstboom)
- Kleine cirkels in verschillende diktes (2x 6mm, 2x 4mm, 2x 2mm)
- Klein kegeltje van fondant
- Sateprikker van ongeveer 10 centimeter
- Hulstblaadjes uit witte fondant
Instructions
- Fondant verstevigen: Neem een balletje witte fondant ter grootte van een ei en voeg hier een mespuntje tylose aan toe. Kneed het goed door, wikkel het stevig in plastic folie en laat het minimaal een uur rusten zodat het fondant stevig wordt en niet vervormt.
- Voorbereiden ingrediënten: Bekleed een mini taartje met rode fondant. Steek met de sneeuwwvlokplungers 6 sneeuwvlokken uit (2 van elke maat). Maak 6 kleine fondantcirkels in verschillende diktes (2 van 6mm, 2 van 4mm en 2 van 2mm), een klein kegeltje en een klein sterretje. Maak met de sateprikker een gaatje in elk onderdeel groot genoeg voor de sateprikker om straks de kerstboom op te bouwen.
- Decoreren met glitters en poeder: Werk de witte fondant onderdelen af met glitters en kleur het sterretje goud met het gouden kleurpoeder. Laat alle onderdelen enkele uren aan de lucht drogen zodat ze hard en stevig worden voordat je ze in elkaar zet.
- Kerstdboom opbouwen: Begin met het grootste fondantcirkel als basis. Smeer een beetje eetbare lijm op de cirkel en plak de grootste sneeuwvlok erop. Bouw de boom op door laag voor laag af te wisselen tussen rondjes en sneeuwvlokken, van groot naar klein, dakpansgewijs gestapeld op de sateprikker.
- Afwerking van de boom: Plaats het kleine kegeltje bovenop de laatste sneeuwvlok en bevestig het goudkleurige sterretje als toefje bovenaan de boom. Gebruik eetbare lijm en een sateprikker om kleine gouden suikerparels op de takken aan te brengen. Het aanbrengen gaat het beste met een pincet voor precisie.
- Extra decoratie: Werk het uiteindelijke taartje af met witte hulstblaadjes en goudkleurige besjes gemaakt van fondant, bevestig deze eveneens met eetbare lijm. Zo creëer je een schitterend en feestelijk kerstdessert.
Notes
- Tylose verstevigt het fondant zodat het niet inzakt of vervormt tijdens het drogen en de montage.
- Zorg dat de gaatjes voor de sateprikker groot genoeg zijn om breken van delicate sneeuwvlokken te voorkomen.
- Drogen aan de lucht kan enkele uren duren; geduld is belangrijk voor een stevig resultaat.
- Eetbare lijm aanbrengen met een sateprikker geeft meer controle dan een kwastje om overtollige lijm te vermijden.
- Gebruik pincet voor het aanbrengen van mini parels voor nauwkeurigheid en netheid.
- Deze decoraties kunnen ook gebruikt worden op kleine cakejes of cupcakes als variatie.
Nutrition
- Serving Size: 1 mini taartje
- Calories: 150
- Sugar: 20g
- Sodium: 35mg
- Fat: 2g
- Saturated Fat: 1g
- Unsaturated Fat: 1g
- Trans Fat: 0g
- Carbohydrates: 30g
- Fiber: 0g
- Protein: 0.5g
- Cholesterol: 0mg


