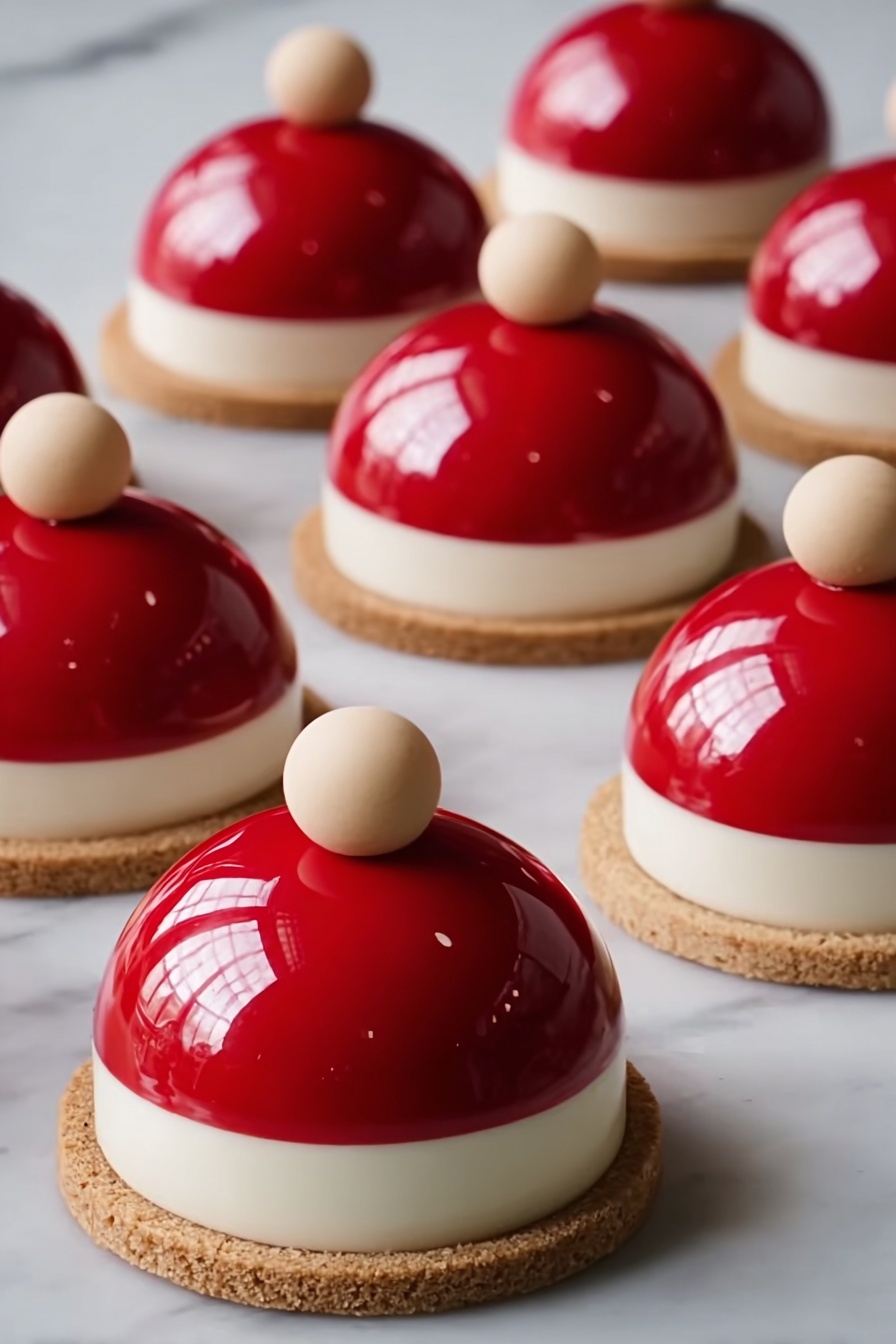
If you’re on the lookout for a festive dessert that’s as delightful to make as it is to eat, you’re going to adore this Santa Claus Dome Cakes Recipe. These charming little dome cakes are the perfect holiday treat – smooth vanilla mousse and juicy strawberries encased in a crunchy sable cookie base, topped with a shiny red mirror glaze that looks just like Santa’s hat! I absolutely love how this recipe blends texture and flavor, plus making them feels like creating tiny edible works of art.
Why You’ll Love This Recipe
- Show-Stopping Presentation: The glossy red mirror glaze and perfect dome shape will wow everyone at your holiday party.
- Balanced Flavors and Textures: Creamy vanilla mousse, fresh strawberries, and a buttery cookie base make every bite a delight.
- Make-Ahead Friendly: These can be prepped in stages and frozen, which is a lifesaver during busy holiday seasons.
- Fun to Make and Customize: I’ve found this recipe perfect for experimenting with flavors or decorations to fit your style.

Ingredients You’ll Need
The ingredients list for this Santa Claus Dome Cakes Recipe includes everything you need for a luscious vanilla mousse, a tender sable cookie base, and a dazzling red mirror glaze. You’ll want to pay attention to sourcing good quality vanilla and fresh strawberries, as they really bring the flavor up a notch.

- Heavy cream: Make sure it’s cold for the perfect whipped texture in your mousse.
- Whole milk: Warmed to infuse the vanilla flavors beautifully.
- Vanilla bean or pure vanilla extract: I love the depth of flavor fresh vanilla bean provides, but high-quality extract works great too.
- Egg yolks: These give richness and body to the mousse custard base.
- Granulated sugar: Sweetens and balances the custard.
- Powdered gelatin: Essential for setting the mousse and the glaze perfectly.
- Fresh strawberries: Small, sweet berries work best placed inside the mousse for that juiciness surprise.
- Unsalted butter: Room temperature for easy creaming in the sable base.
- Powdered sugar: Provides that delicate sweetness in the cookie dough.
- Egg yolk (for cookie dough): Binds the sable dough beautifully.
- All-purpose flour: For the sable cookie’s tender crumb.
- Salt: A pinch to enhance all the flavors.
- Vanilla extract (for cookie dough): Adds a nice aromatic touch.
- Sugar, glucose syrup, and water: These combine into the perfect syrup base for the mirror glaze.
- Sweetened condensed milk: Gives the mirror glaze its luscious, silky texture.
- White chocolate: Finely chopped for melting into the glaze and reserved for decorations.
- Red gel food coloring: For that classic Santa red shine on the glaze.
Variations
One of the things I love about this Santa Claus Dome Cakes Recipe is how easy it is to make your own. Don’t hesitate to swap out flavors or decorations to better suit your taste – this dessert is a blank canvas for your creativity.
- Berry Swaps: I once tried swapping strawberries for raspberries in the center, and the slightly tart pop was delightful.
- Dairy-Free Version: Using coconut cream instead of heavy cream works well, just be sure to adjust whipping times.
- Chocolate Lovers’ Twist: Add a layer of dark chocolate ganache between the cookie base and the mousse for extra indulgence.
- Festive Decorations: Try a sprinkle of edible gold dust or use white chocolate to pipe snowflake designs on the domes.
How to Make Santa Claus Dome Cakes Recipe
Step 1: Bloom the Gelatin and Infuse Your Vanilla
Start by blooming your gelatin for the mousse in cold water—this step is crucial for that perfect set later on. While it’s blooming, gently heat your whole milk with the vanilla (bean or extract). Warm it just until it’s steaming but not boiling to coax out those fragrant vanilla notes.
Step 2: Whisk Egg Yolks and Cook the Custard Base
Whisk the egg yolks and sugar in a bowl until pale and slightly thickened – patience here really pays off. Then slowly add the warm milk to your egg mixture, whisking constantly to avoid scrambled eggs. Pour it back into the saucepan and cook over low heat; keep stirring gently until the mixture thickens slightly around 82°C (180°F). This step takes practice, but watching it thicken is incredibly satisfying.
Step 3: Add Gelatin and Prepare the Mousse
Remove the custard from heat and stir in your bloomed gelatin until fully dissolved—this ensures your mousse sets beautifully without any wobble issues. Let this cool to room temperature while you whip your chilled heavy cream to soft peaks. Then gently fold the cream into the custard base, taking your time for a smooth, airy mousse that holds up well.
Step 4: Assemble the Mousse Domes with Strawberries
Spoon a layer of mousse into your silicone dome molds, place a whole strawberry in the center, then cover with more mousse until filled. Smooth the tops for an even surface. Once done, pop the molds in the freezer overnight – this is key for an easy, clean unmolding later.
Step 5: Make the Sablé Cookie Bases
Cream together your room temperature butter and powdered sugar until fluffy, then mix in the egg yolk and vanilla extract. Add the flour and salt, mixing just until a dough forms. Roll it between parchment sheets to about 4 mm thick, then chill for 30 minutes to make cutting easier.
Use a round cutter slightly larger than your dome molds to cut the cookie bases. Bake at 170°C (340°F) for 12–14 minutes until just golden—don’t overbake or they’ll lose that tender sable texture. Let them cool completely.
Step 6: Prepare the Red Mirror Glaze
Just like with the mousse, bloom your gelatin for the glaze in cold water. In a small saucepan, boil sugar, glucose syrup, and water until it reaches 103°C (217°F). Remove from heat immediately and stir in the sweetened condensed milk and gelatin until everything dissolves nicely.
Pour this hot mixture over chopped white chocolate and let sit for a minute to melt. Then blitz it smooth with an immersion blender and add red gel food coloring until you get that perfect, festive Santa hat red. Let cool to 32–35°C (90–95°F) before glazing the frozen mousse domes.
Step 7: Glaze Your Frozen Domes and Decorate
Remove the mousse domes from their molds and place them on a wire rack over a tray to catch excess glaze. Pour the cooled glaze over each dome, letting it drip down for a perfect glossy finish. Once glazed, transfer to your sable cookie bases and let everything set in the fridge.
For the finishing touch, I melt the remaining white chocolate and pipe tiny rings and little balls that resemble the fluffy trim and pom-pom on Santa’s hat. It’s a simple decoration but adds so much charm!
Pro Tips for Making Santa Claus Dome Cakes Recipe
- Use Silicone Dome Molds: They make unmolding a breeze and help keep that pristine dome shape.
- Temperature Control is Key: Always cool your custard and glaze to the recommended temps before mixing or pouring to avoid ruining texture or appearance.
- Freeze Overnight: Don’t rush this step—fully frozen domes take the glaze beautifully without melting or sliding off.
- Avoid Overmixing Dough: Mix your sable cookie dough just until it comes together to keep it tender, not tough.
How to Serve Santa Claus Dome Cakes Recipe

Garnishes
I like to keep the garnishes simple so the cake shines, but a light dusting of powdered sugar around the plate adds a snowy touch. Sometimes I add a small sprig of mint for color contrast or a few edible silver pearls to bring out the festive sparkle.
Side Dishes
Pair these dome cakes with a warm cup of spiced mulled wine or a rich hot chocolate to make dessert feel extra cozy and festive. A scoop of vanilla bean ice cream on the side also complements the mousse’s vanilla notes beautifully.
Creative Ways to Present
For holiday gatherings, I’ve served these domes atop mini gingerbread “snowy” plates or inside clear glass cloches with a dusting of edible glitter to resemble snow. It’s a simple touch but guests always love the whimsical presentation!
Make Ahead and Storage
Storing Leftovers
I find it best to keep any leftovers covered in the fridge on a flat tray or shallow box to preserve the glaze and mousse texture. They stay fresh for 2-3 days, although they rarely last that long in my house!
Freezing
Because the dome cakes are frozen initially, you can pop any extras back into the freezer wrapped tightly in plastic wrap and stored in an airtight container. They’ll keep well for up to 1 month, making this dessert great for holiday prepping ahead of time.
Reheating
When you’re ready to serve frozen dome cakes, thaw them overnight in the refrigerator. Avoid room temperature thawing to keep the mousse smooth and prevent any glaze condensation. No reheating needed – they’re best enjoyed chilled and glossy!
FAQs
-
Can I make the Santa Claus Dome Cakes Recipe without gelatin?
Gelatin is crucial in this recipe to get that firm yet creamy mousse texture and glossy mirror glaze that holds its shape. Without it, the mousse would be too soft and the glaze wouldn’t set properly. If you need a vegetarian alternative, consider using agar-agar, but note that it behaves differently and might affect texture and flavor.
-
What size silicone molds are best for these dome cakes?
I recommend molds that hold about 80-100 ml per dome. This size is perfect for individual servings and allows room for the strawberry center without being too large. Smaller molds will work but adjust baking and freezing times accordingly.
-
How do I avoid air bubbles in the mousse?
When folding the whipped cream into the custard, do it gently with a spatula in a folding motion. Overmixing or stirring too vigorously incorporates air bubbles that can affect texture and the smooth finish of your domes.
-
Can I make the mirror glaze ahead of time?
Yes! The mirror glaze can be made a day ahead and stored in the refrigerator. Reheat gently in a warm water bath to bring it back to the pouring temperature before using. Just make sure to strain it for a smooth finish.
Final Thoughts
This Santa Claus Dome Cakes Recipe truly holds a special place in my heart as a festive showstopper that’s surprisingly approachable. From my first attempt — which was a little messy but totally worth it — to perfecting each step, it’s become my go-to when I want to impress without stress. I hope you’ll enjoy making and sharing these delicate, joyful cakes as much as I do. Give them a try this season and watch your guests’ faces light up with every glossy, strawberry-filled bite!
Print
Santa Claus Dome Cakes Recipe
- Prep Time: 1 hour 30 minutes
- Cook Time: 15 minutes
- Total Time: 13 hours 45 minutes
- Yield: 6 domes
- Category: Dessert
- Method: Freezing and Baking
- Cuisine: French
Description
Delight in these festive Santa Claus Dome Cakes featuring a light vanilla mousse encasing fresh strawberries atop a buttery sablé cookie base, all glazed with a vibrant red mirror finish and adorned with delicate white chocolate decorations. Perfect for holiday celebrations, these elegant individual desserts combine creamy textures and crisp elements with stunning visual appeal.
Ingredients
Vanilla Mousse
- 300 ml heavy cream (cold)
- 250 ml whole milk
- 1 vanilla bean or 2 tsp pure vanilla extract
- 3 egg yolks
- 80 g granulated sugar
- 6 g powdered gelatin (about 2 tsp) + 30 ml cold water
- 6–8 fresh strawberries (small, stem removed)
Sablé Cookie Base
- 120 g unsalted butter (room temperature)
- 80 g powdered sugar
- 1 egg yolk
- 200 g all-purpose flour
- Pinch of salt
- 1 tsp vanilla extract
Red Mirror Glaze
- 150 g sugar
- 150 g glucose syrup
- 75 ml water
- 100 g sweetened condensed milk
- 150 g white chocolate (finely chopped)
- 10 g powdered gelatin + 60 ml water
- Red gel food coloring
Decorations
- 100 g white chocolate for the ring and ball
Instructions
- Bloom the Gelatin for the Mousse: Combine 6 g powdered gelatin with 30 ml cold water in a small bowl and let it sit for 10 minutes until fully bloomed, ensuring it will dissolve smoothly later in the mousse preparation.
- Heat the Milk and Infuse Vanilla: In a saucepan over medium heat, warm the whole milk with either a split vanilla bean or vanilla extract. Heat until warm but not boiling, then remove from heat to allow the flavors to infuse.
- Prepare the Egg Yolk Mixture: In a separate bowl, whisk together egg yolks and granulated sugar until the mixture becomes pale and thickened, laying the base for the custard.
- Cook the Custard Base: Gradually whisk the warm vanilla milk into the egg yolk mixture, then transfer the blend back to the saucepan. Cook gently over low heat, stirring continuously until the mixture thickens and reaches 82°C (180°F), without curdling.
- Incorporate Gelatin and Cool: Remove the custard from heat, immediately stir in the bloomed gelatin until completely dissolved, then cool the custard to room temperature to prepare for folding in cream.
- Fold in Whipped Cream: Whip the cold heavy cream to soft peaks, then gently fold it into the cooled custard base until smooth and homogeneous, creating the light vanilla mousse.
- Fill Molds with Mousse and Strawberries: Spoon a small layer of mousse into silicone dome molds, press a whole strawberry into each center, then cover with more mousse to fill the mold. Smooth the surface to prepare for freezing.
- Freeze the Mousse Domes: Place the filled molds in the freezer overnight or until the mousse is completely solidified for easier glazing later.
- Make the Sablé Cookie Dough: Cream together the butter and powdered sugar until smooth. Add the egg yolk and vanilla extract, then mix in the flour and salt until a dough forms, combining the sablé cookie components.
- Roll and Chill the Dough: Roll the dough between parchment paper to 4 mm thickness, then chill in the refrigerator for 30 minutes to firm up for baking.
- Bake the Cookie Bases: Cut dough rounds slightly larger than the dome molds, place on parchment-lined baking sheets, and bake at 170°C (340°F) for 12–14 minutes until lightly golden. Let cool completely on a wire rack.
- Bloom the Gelatin for the Glaze: Combine 10 g powdered gelatin with 60 ml water in a small bowl and let it bloom for 10 minutes, prepping it for the mirror glaze.
- Heat Syrup Base for Glaze: In a saucepan, bring sugar, glucose syrup, and water to a boil and cook until the temperature reaches 103°C (217°F), creating the syrup base.
- Finish the Glaze: Remove the syrup from heat, stir in sweetened condensed milk and the bloomed gelatin until fully dissolved. Immediately pour over the chopped white chocolate and let it rest for 1 minute.
- Blend and Color the Glaze: Use an immersion blender to mix the glaze until smooth. Add red gel food coloring gradually until a vibrant Santa hat red is achieved. Allow the glaze to cool to 32–35°C (90–95°F) before application.
- Glaze the Frozen Mousse Domes: Remove the mousse domes from the molds and place on a rack. Pour the cooled red mirror glaze evenly over each dome to coat thoroughly, then set aside to allow the glaze to firm.
- Prepare Decorations: Melt and temper the 100 g of white chocolate; use it to pipe or mold decorative rings and balls resembling Santa’s hat embellishments to adorn the domes once the glaze is set.
- Assemble and Serve: Place each glazed mousse dome onto a sablé cookie base, top with the white chocolate decorations, and serve chilled for a stunning holiday dessert presentation.
Notes
- Ensure the mousse is completely frozen before glazing to avoid melting and achieve a smooth mirror finish.
- Use fresh, firm strawberries to maintain shape inside the mousse domes.
- Tempering the white chocolate decorations will help them hold shape and have a glossy finish.
- The red mirror glaze temperature is crucial; pour too hot and it will melt the mousse, too cold and it won’t coat properly.
- The sablé cookie base can be made ahead and stored in an airtight container for a few days.
- For a more intense vanilla flavor, use a fresh vanilla bean instead of extract.
Nutrition
- Serving Size: 1 dome
- Calories: 450 kcal
- Sugar: 38 g
- Sodium: 80 mg
- Fat: 28 g
- Saturated Fat: 17 g
- Unsaturated Fat: 9 g
- Trans Fat: 0 g
- Carbohydrates: 42 g
- Fiber: 1 g
- Protein: 6 g
- Cholesterol: 140 mg

