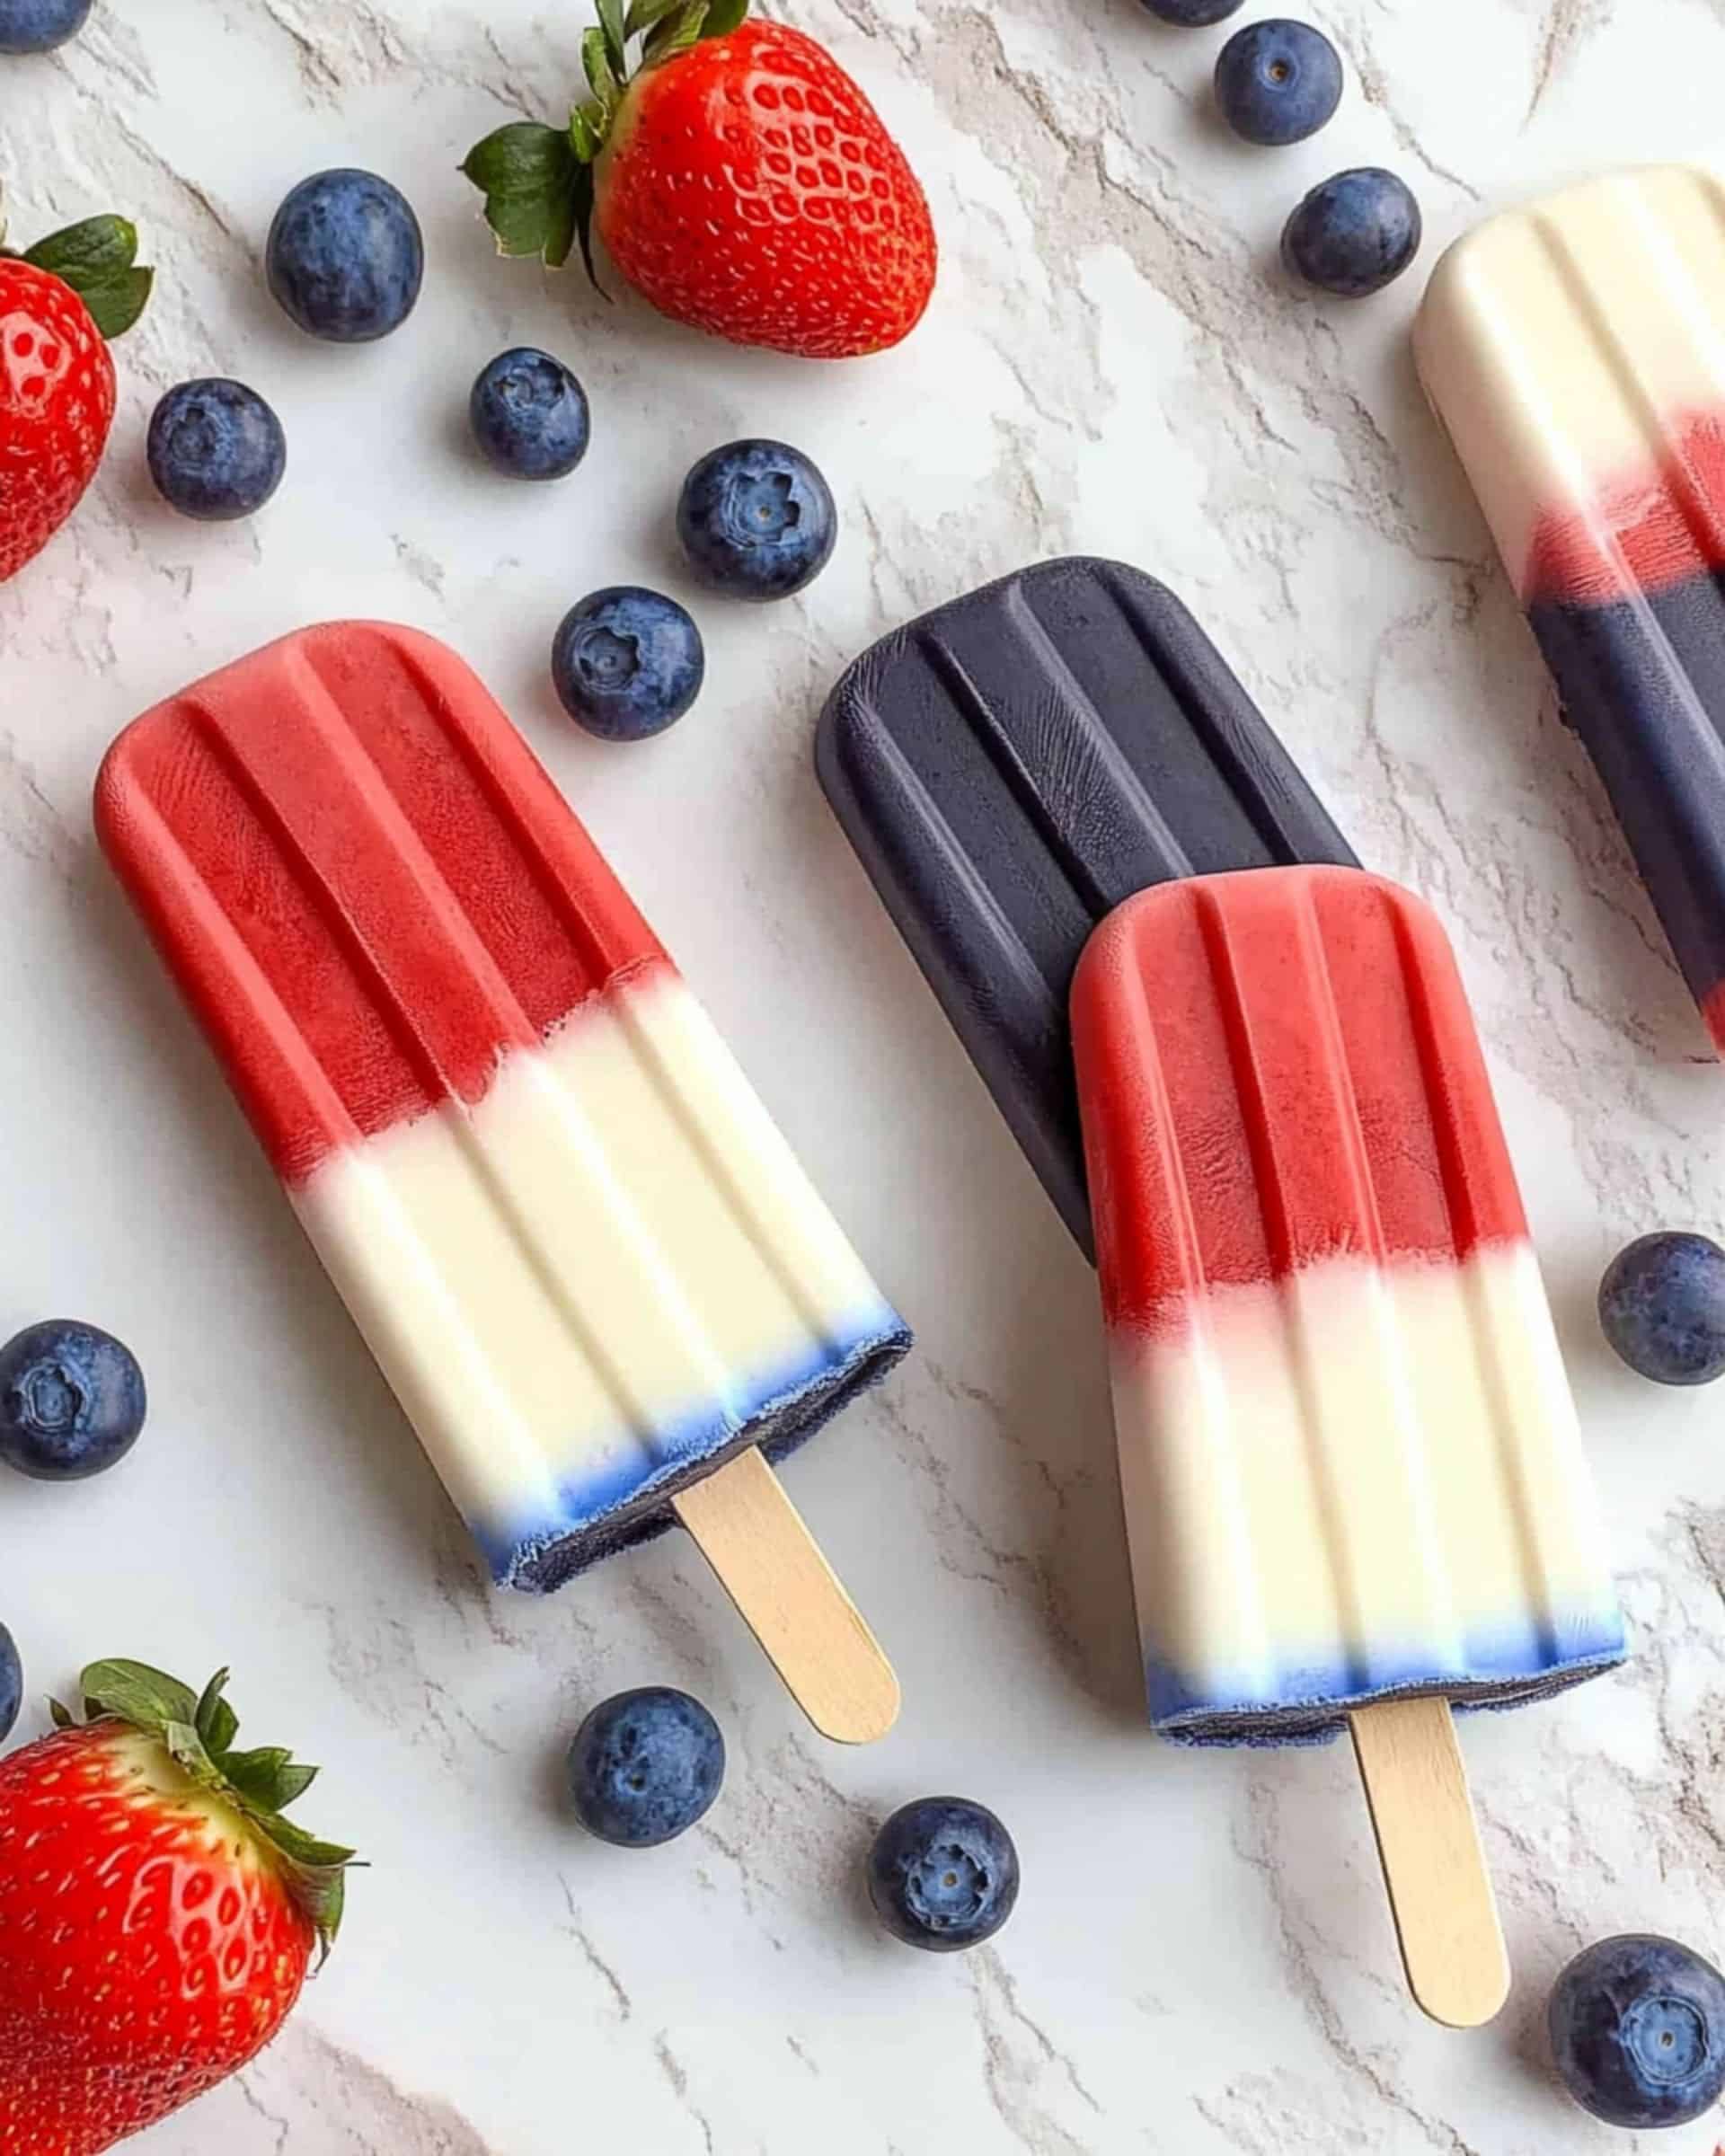
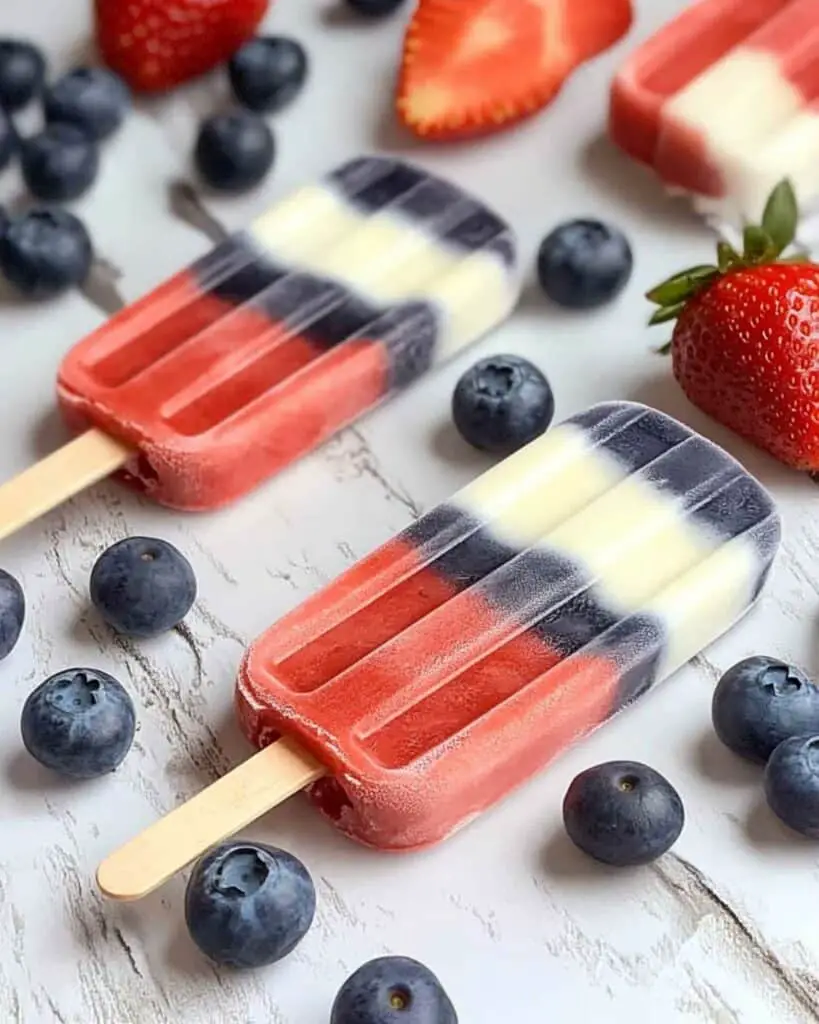
Get ready for a pop of summer magic with these easy and striking Red White And Blue Firecracker Popsicles. Vibrant layers of sweet berries and creamy yogurt come together in these homemade treats that look as exciting as they taste. With just a handful of ingredients and simple steps, these popsicles are the perfect way to celebrate a sunny day, impress a crowd at your next gathering, or simply keep cool after a busy day. They’re kid-approved, naturally delicious, and freezer-friendly—honestly, once you try these, store-bought popsicles just won’t compare.
Why You’ll Love This Recipe
- Effortless to Make: All you need is a food processor and a few bowls—seriously, anyone can pull these off in under 20 minutes of hands-on time.
- Naturally Stunning: Those eye-catching red, white, and blue layers aren’t just for show—they highlight the mouthwatering flavor of real fruit and fresh yogurt.
- Perfectly Refreshing: Juicy strawberries, tangy blueberries, and creamy yogurt meld into a cool, not-too-sweet treat you’ll crave after a long day.
- Kid- and Crowd-Friendly: These popsicles are a hit with kids and adults alike. They’re festive, fun, and just right for celebrations.
- Customizable: Don’t have all the ingredients? No problem—swap in your favorites and make them your own.

Ingredients You’ll Need
Here’s your simple shopping list, plus a few tips for choosing the best ingredients:
-
Strawberries: Fresh and ripe, quartered for easy blending. They bring that irresistible, juicy red layer.
Tip: Frozen strawberries work when fresh aren’t in season—thaw before using. -
Blueberries: Plump blueberries puree into a beautiful, deep blue mixture.
Tip: Both fresh and frozen blueberries are great here! -
Low-Fat Plain Yogurt: The creamy white middle holds everything together and adds a tangy contrast.
Tip: Use Greek yogurt for extra creaminess or non-dairy for a vegan option. -
Sugar: A small amount heightens the natural sweetness of the fruit and yogurt without overpowering.
Tip: Adjust to your taste—these popsicles aren’t overly sugary.
Note: You’ll find the complete list of ingredients, along with their exact measurements, in the printable recipe card at the bottom of this post.
Variations
Craving something a little different? Here’s how you can change things up:
- Swap the Berries: Raspberries or blackberries can easily replace strawberries or blueberries.
- Go Dairy-Free: Use coconut, almond, or soy yogurt for a vegan and lactose-free version.
- Add Citrus: A splash of lime juice in the fruit purées brightens everything up.
- Boost the Flavor: Stir in a pinch of vanilla or a handful of fresh mint.
- Change Up the Swirl: Layer the mixtures for bold stripes or mix gently for that magical marbled effect.
How to Make Red White And Blue Firecracker Popsicles
Step 1: Make the Strawberry Layer
In your food processor, blend the strawberries with a tablespoon of sugar until you have a smooth, bright purée. Transfer to a bowl and set aside.
Step 2: Whip Up the Blueberry Layer
No need to rinse your processor! Toss in the blueberries and another tablespoon of sugar, then blend until smooth. Set it aside in a separate bowl.
Step 3: Sweeten the Yogurt
Whisk the plain yogurt with the remaining two tablespoons of sugar in a third bowl. Stir until the sugar dissolves and the yogurt is lightly sweetened—it should be creamy and scoopable.
Step 4: Layer and Swirl
Now comes the fun part. Grab your popsicle molds and pour in the mixtures, alternating between strawberry, yogurt, and blueberry. You’ll want three to five layers in each mold—no need to be precise. As you go, use a skewer or chopstick to swirl the mixtures together in an up-and-down motion for those signature firecracker streaks.
Step 5: Freeze
Carefully insert the popsicle sticks. Freeze for 2½ to 3 hours, or until solid.
Note: If you don’t have popsicle molds, small paper cups and wooden sticks work perfectly!
Pro Tips for Making the Recipe
- Don’t Over-Swirl: A little swirling creates the “firecracker” look—too much, and you lose the distinct colors.
- Tap the Mold: Gently tap the popsicle mold on the counter after filling to remove air pockets and settle the layers.
- Easy Release: Briefly dip the molds in warm water before unmolding for picture-perfect pops every time.
- Room for Creativity: Let kids help with layering and swirling—it’s virtually foolproof and so much fun to make together.
How to Serve
Serve straight from the freezer on a hot day or as a dazzling dessert after dinner. These popsicles look spectacular on a platter layered with ice for backyard parties, Fourth of July celebrations, or just an ordinary Tuesday. Pair with a chilled lemonade or sparkling water, and watch them disappear in minutes!
Make Ahead and Storage
Storing Leftovers
Stash any uneaten popsicles right in the molds or wrap them in parchment and keep in a freezer-safe container. They’ll stay fresh and vibrant for up to two weeks—if they last that long!
Freezing
These popsicles are made for the freezer. For best results, freeze until completely solid before unmolding, and store at a consistent freezer temperature.
Reheating
There’s no actual reheating needed. If your popsicles are super firm, let them sit at room temperature for one minute before enjoying; they’ll be perfectly creamy and easy to bite into.
FAQs
-
Can I make these popsicles without a food processor?
Absolutely. If you don’t have a food processor, simply mash the berries by hand or use a blender. You’ll get a more rustic texture, but the flavor will still be delicious.
-
What kind of yogurt works best?
Low-fat plain yogurt keeps things light and lets the fruit shine, but Greek yogurt adds extra creaminess. For a dairy-free version, use coconut or almond-based yogurt—you won’t miss the dairy at all.
-
Can I use frozen fruit?
Yes! Frozen berries work wonderfully. Just thaw them first so they blend smoothly and help everything freeze evenly.
-
How do I prevent ice crystals in the popsicles?
Using enough sugar and yogurt helps keep the texture creamy. Also, make sure your mixtures are well blended, and eat the popsicles within two weeks for the best experience.
Final Thoughts
There’s just something special about making your own popsicles from scratch. Each bite of these Red White And Blue Firecracker Popsicles is creamy, fruity, and full of summertime joy. They’re quick, fun, and easily adaptable for every preference and pantry. Give them a try—don’t be surprised if they become your new summer staple!
Print
Red White And Blue Firecracker Popsicles Recipe
- Prep Time: 15 minutes
- Cook Time: 0 minutes
- Total Time: 3 hours 15 minutes
- Yield: 6 popsicles
- Category: Desserts
- Method: No-cook
- Cuisine: American
- Diet: Vegetarian
Description
Red White and Blue Firecracker Popsicles are a festive, healthy, and refreshing frozen treat, perfect for summer or patriotic celebrations. Made with fresh strawberries, blueberries, and creamy low-fat yogurt, these popsicles are visually stunning and bursting with natural fruit flavors. They’re easy to make, requiring just a few wholesome ingredients and no artificial colors.
Ingredients
Fruit Purees
- 1/2 pound strawberries, hulled and quartered (about 1 1/2 cups)
- 1/2 pound blueberries (about 1 1/2 cups)
Sweetener
- 1/4 cup sugar, divided
Yogurt Layer
- 1 1/4 cups low-fat plain yogurt
Instructions
- Puree the Strawberries: In a food processor fitted with the metal blade, puree the hulled and quartered strawberries with 1 tablespoon of sugar until smooth. Transfer the mixture to a small bowl and set aside.
- Puree the Blueberries: In the food processor, puree the blueberries with 1 tablespoon of sugar until well blended. Set this aside in a separate small bowl.
- Prepare the Yogurt Mixture: In another bowl, whisk together the low-fat plain yogurt with the remaining 2 tablespoons of sugar until smooth and creamy.
- Layer the Mixtures: Pour the strawberry puree, yogurt mixture, and blueberry puree alternately into popsicle molds. Aim for 3 to 5 thin layers in each mold to create a striped, firecracker effect.
- Swirl for a Marbled Effect: Use a skewer to gently swirl the mixtures together in an up-and-down motion to achieve a pleasing marbled pattern without fully mixing the colors.
- Freeze: Insert popsicle sticks into the molds and freeze until the popsicles are completely solid, which will take about 2 1/2 to 3 hours.
Notes
- For the best swirl pattern, avoid over-mixing when swirling with the skewer.
- You can substitute vanilla yogurt for plain yogurt if you prefer extra sweetness.
- Fresh or frozen berries can both be used, but thaw frozen berries before pureeing.
- To easily release the popsicles, briefly run the mold under warm water before unmolding.
- Adjust sugar to taste based on the sweetness of your fruit.
Nutrition
- Serving Size: 1 popsicle
- Calories: 60
- Sugar: 11g
- Sodium: 20mg
- Fat: 0.5g
- Saturated Fat: 0g
- Unsaturated Fat: 0.5g
- Trans Fat: 0g
- Carbohydrates: 13g
- Fiber: 1g
- Protein: 2g
- Cholesterol: 2mg
