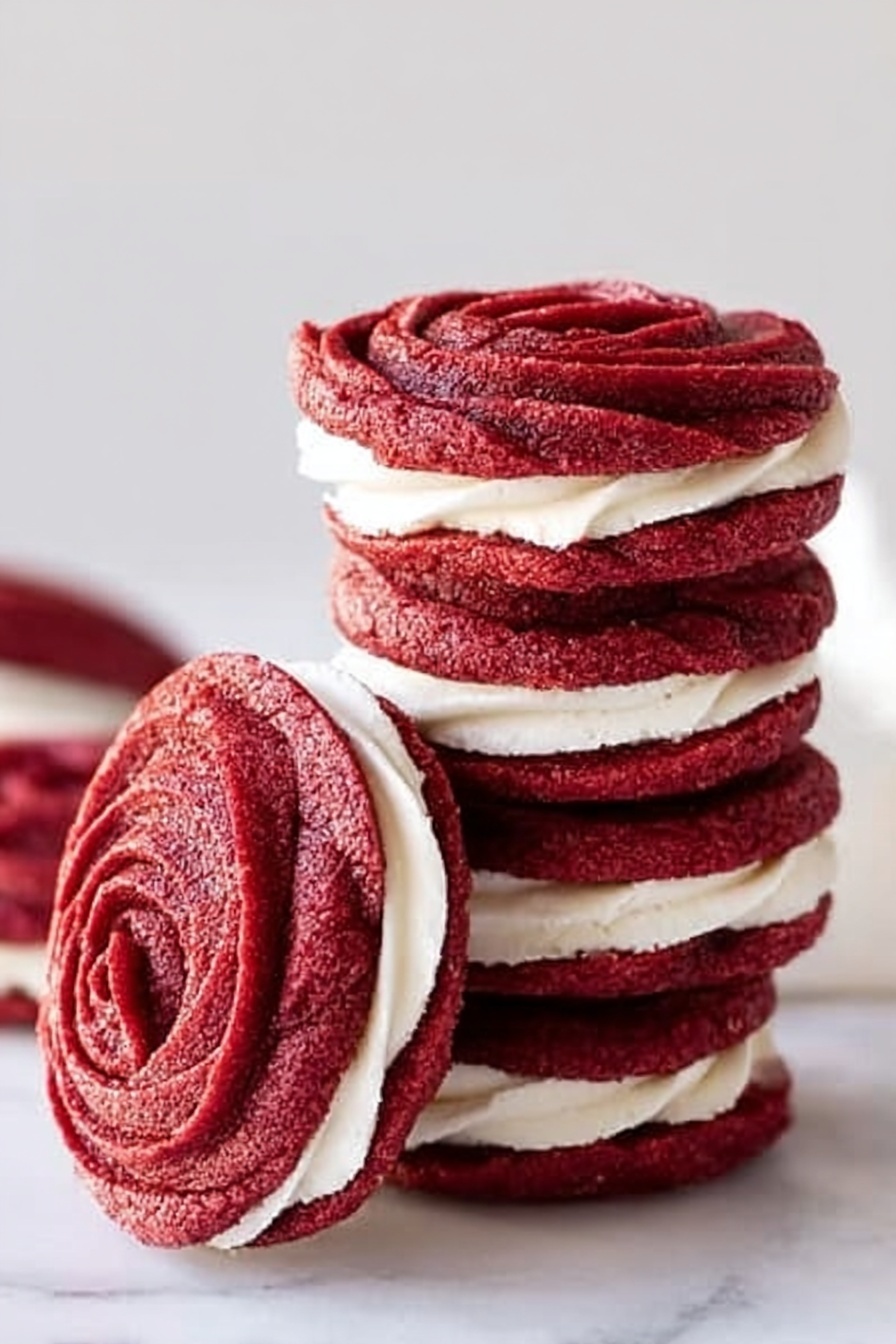
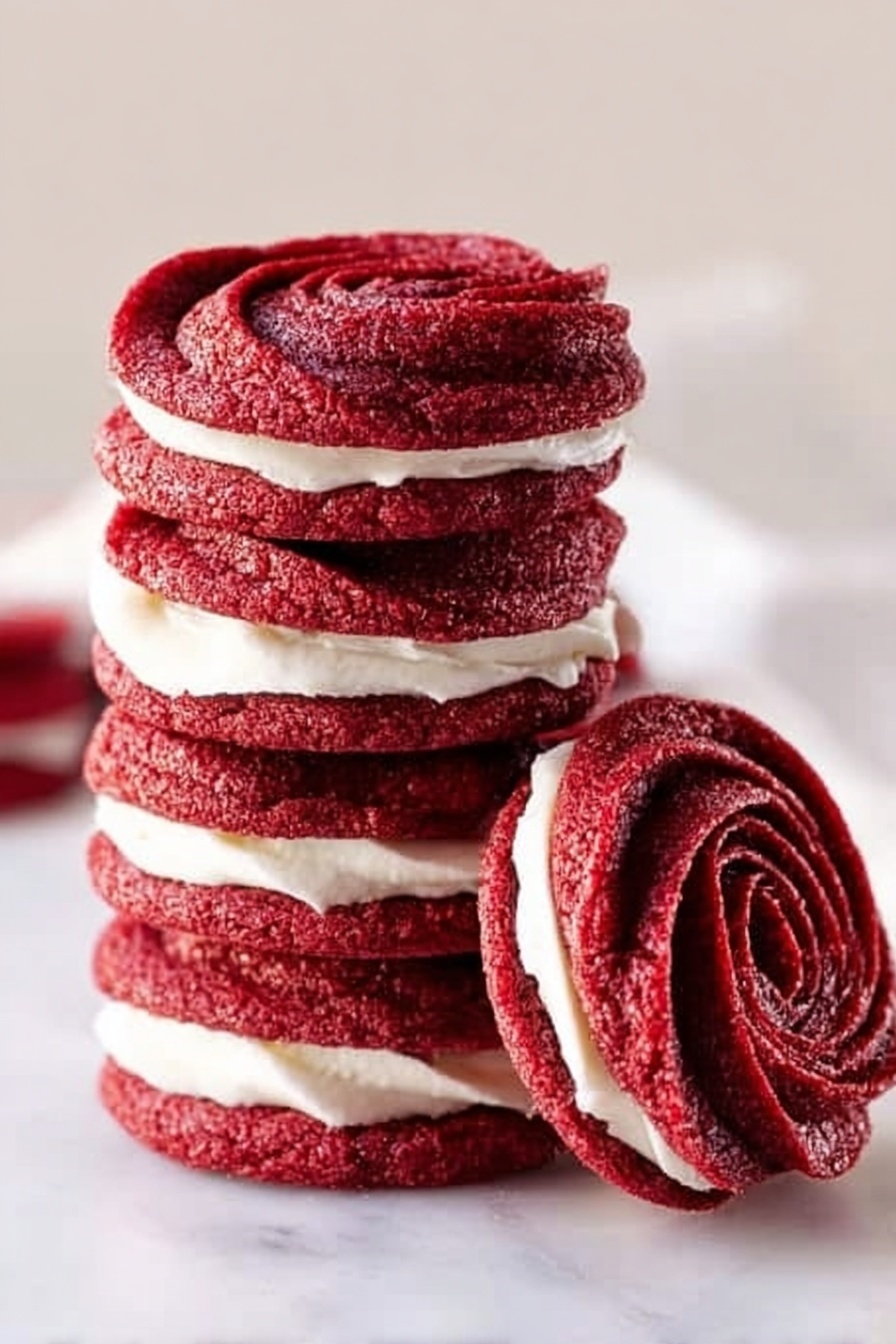
If you’re looking for a stunning, deliciously soft treat that also makes a statement, then this Red Velvet Rose Cookies Recipe is exactly what you need. I absolutely love how these delicate rosette-shaped cookies turn out with their rich red hue and subtle cocoa flavor—plus, they make the perfect little sandwich filled with fluffy marshmallow buttercream. Stick with me, and I’ll walk you through everything to nail this fan-freaking-tastic recipe.
Why You’ll Love This Recipe
- Elegant Presentation: These cookies look like gorgeous red roses—perfect for gifts or special occasions.
- Soft & Tender Texture: Thanks to the buttermilk and shortening, these cookies stay soft, not crunchy.
- Fun to Pipe: Piping the rosettes is surprisingly easy and satisfying once you get the hang of it.
- Delicious Flavor Balance: The cocoa powder adds subtle depth without overpowering, making these truly unique red velvet cookies.

Ingredients You’ll Need
The ingredient list for this Red Velvet Rose Cookies Recipe is straightforward but thoughtfully balanced. Each element plays a key role—from the shortening for moist softness to the vibrant red gel food coloring that helps these rose-shaped beauties stand out.

- Shortening: Use shortening rather than butter for a tender crumb and better pipe holding shape.
- White sugar: Essential for sweetness and structure; I always use granulated.
- Eggs: They bind everything together and add richness.
- Vanilla extract: Adds warmth and depth to the chocolatey flavor.
- Buttermilk: This brings moisture and a slight tang that enhances the cocoa notes.
- Red gel food coloring: Opt for gel instead of liquid for vibrant color without thinning the dough.
- All-purpose flour: The base that gives these cookies their soft structure.
- Unsweetened cocoa powder: Adds that signature red velvet flavor, just enough for depth.
- Salt: Balances sweetness and brings the flavors together.
Variations
I love making this Red Velvet Rose Cookies Recipe my own by experimenting a bit here and there. Don’t hesitate to customize it based on what you enjoy or what you have in the pantry.
- Chocolate lovers: I once added mini chocolate chips into the dough before piping—the cookies got an extra melty surprise my family adored.
- Dairy-free: You can swap buttermilk with coconut milk plus a splash of lemon juice, and use vegan shortening to make these dairy-free.
- Different frostings: Beyond marshmallow buttercream, cream cheese frosting pairs wonderfully for that classic red velvet experience.
- Food coloring-free: If you prefer to skip the red dye, try swirling some beet juice for natural coloring (though results will vary).
How to Make Red Velvet Rose Cookies Recipe
Step 1: Cream Together the Base
Start by preheating your oven to 350°F (175°C). In your stand mixer, beat the shortening and sugar together until the mixture is light and fluffy—this usually takes about 2-3 minutes. This step is so important because it gives your cookies a tender crumb and helps with their texture. When I first tried skipping thorough creaming, the cookies ended up dense, so trust me on this one!
Step 2: Add the Eggs and Flavorings
Mix in the eggs one at a time on medium-low speed to avoid over-beating. Then, lower the mixer speed and add the vanilla, buttermilk, and red gel food coloring. The key here is not to rush; add ingredients gradually so your dough stays stable and perfectly colored.
Step 3: Combine Dry Ingredients and Incorporate
In a separate bowl, whisk together the all-purpose flour, unsweetened cocoa powder, and salt. With the mixer still on low, slowly add these dry ingredients into the wet mixture. If you find the dough is a bit dry or crumbly, feel free to add up to 1/4 cup more of buttermilk—I’ve had to do this on humid days when flour behaves differently.
Step 4: Pipe Your Rose Cookies
This is the fun part! Using a piping bag fitted with a 1M or 2D tip, pipe small rosettes onto parchment-lined baking sheets. I love how the swirls instantly remind me of fresh roses—so pretty even before baking. Keep your rosettes about 1.5 inches in diameter to ensure they bake evenly without spreading too much.
Step 5: Bake and Cool
Bake the cookies for 6-8 minutes. You’ll notice they look a little wet when you pull them out—that’s totally normal! Resist the urge to overbake; soft cookies are the goal. Let them cool completely on the sheet before moving on to assembling sandwiches.
Step 6: Assemble Cookie Sandwiches
Once cookies are cool, spread about 1 tablespoon of marshmallow buttercream on the flat side of one cookie and sandwich together with another. Press gently so the filling peaks out just a bit—so pretty! My family goes crazy for these little treats and I guarantee yours will, too.
Pro Tips for Making Red Velvet Rose Cookies Recipe
- Use Gel Food Coloring: Liquid colors thin the dough, so gel gives you rich color without compromising texture.
- Don’t Overbake: These cookies stay soft when slightly underbaked; they’ll firm up as they cool.
- Consistent Piping Pressure: Keep your piping pressure steady to get even rosettes—practice on parchment before baking!
- Adjust Buttermilk Wisely: If dough feels dry, add buttermilk little by little but never over 1/4 cup or dough gets too loose.
How to Serve Red Velvet Rose Cookies Recipe
Garnishes
I like to give these cookies a light dusting of powdered sugar or a few tiny edible pearl sprinkles on top to add an extra touch of elegance, especially if I’m serving them at parties. It’s subtle but it really elevates the look.
Side Dishes
I often serve these Red Velvet Rose Cookies alongside a simple cup of hot tea or freshly brewed coffee. Their delicate sweetness pairs beautifully with warm, slightly bitter drinks. For brunch, they also go well with fresh fruit plates or creamy spreads.
Creative Ways to Present
For birthdays or bridal showers, I arrange these cookies in a circle on a decorative serving tray, mimicking a blooming rose garden. Tie a few together with ribbon as little take-home gifts, or stack them in clear jars with ribbons—everyone asks for your source!
Make Ahead and Storage
Storing Leftovers
If you have leftovers (and I bet you will!), store your unfilled cookies in an airtight container at room temperature for up to 3 days. Once filled, keep them refrigerated so your marshmallow buttercream stays fresh, but bring them to room temperature before serving for best flavor and softness.
Freezing
I like to freeze the baked, cooled cookies without frosting. Lay them flat on a tray to freeze individually, then transfer to a freezer-safe bag. They freeze beautifully for up to 2 months. When ready to eat, thaw at room temp before piping your filling fresh for a super convenient treat.
Reheating
To warm leftovers, I pop them in the microwave for 10-15 seconds to revive softness—just be careful not to melt the filling! This quick warming makes them taste freshly baked again, which is a nice little trick for reviving stored cookies.
FAQs
-
Can I use butter instead of shortening in this Red Velvet Rose Cookies Recipe?
Butter can be used, but shortening is recommended because it helps maintain the soft texture and the dough’s ability to hold a rosette shape. Butter contains water that can make the dough spread too much, resulting in less defined cookie shapes.
-
Why do my red velvet cookies look flat after baking?
Flat cookies usually happen if the dough is too warm or if the oven temperature is too low. Make sure your dough stays cool when piping and your oven is fully preheated to 350°F. Also, using the right amount of flour and careful piping technique helps keep the shape.
-
How long do Red Velvet Rose Cookies last?
Stored in an airtight container at room temperature, unfilled cookies last about 3 days, while filled sandwich cookies keep best in the fridge for up to 5 days. Always bring to room temp before eating for perfect softness.
-
What if I don’t have a piping bag or tip?
You can use a sturdy plastic sandwich bag and snip a small hole in a bottom corner to pipe, though the rosettes may be less defined. A zipper bag works fine for beginner piping too, and practice makes perfect!
Final Thoughts
This Red Velvet Rose Cookies Recipe is one of those recipes I keep coming back to whenever I want a treat that feels special but is surprisingly easy to make. From their beautiful rose shapes to the soft, flavorful bite, they never fail to impress family and guests alike. I’m confident that once you try piping and savoring these cookies, you’ll love them as much as I do—give it a go, and enjoy every bite of your own little red velvet roses!
Print
Red Velvet Rose Cookies Recipe
- Prep Time: 10 minutes
- Cook Time: 8 minutes
- Total Time: 18 minutes
- Yield: 8 sandwich cookies (makes approximately 16 individual cookies)
- Category: Dessert
- Method: Baking
- Cuisine: American
- Diet: Vegetarian
Description
Delight in these beautifully piped Red Velvet Rose Cookies, featuring a tender red velvet dough with a subtle cocoa flavor, perfectly sandwiched with a luscious marshmallow buttercream. These bite-sized treats are not only visually stunning but also satisfyingly soft and slightly moist, making them a perfect choice for festive occasions or afternoon tea.
Ingredients
Cookie Dough
- 2/3 cup shortening
- 1 3/4 cups white sugar
- 2 eggs
- 1 teaspoon vanilla extract
- 1/4 cup buttermilk (plus up to 1/4 cup more if needed)
- 1 teaspoon red gel food coloring
- 2 cups all-purpose flour
- 1/2 cup unsweetened cocoa powder
- 1/2 teaspoon salt
Filling
- About 1 tablespoon marshmallow buttercream per sandwich (amount varies depending on number of cookies)
Instructions
- Preheat the oven: Set your oven to 350 degrees Fahrenheit (175 degrees Celsius) to prepare for baking the cookies.
- Cream shortening and sugar: In a stand mixer, beat together the shortening and sugar until the mixture is smooth and creamy for a perfect base.
- Add eggs: On medium-low speed, add eggs one at a time until fully incorporated, ensuring a smooth batter.
- Combine wet ingredients: Lower the mixer speed and add vanilla extract, buttermilk, and red gel food coloring, mixing gently to blend all wet components evenly.
- Mix dry ingredients: In a separate bowl, whisk together the all-purpose flour, unsweetened cocoa powder, and salt to ensure even distribution.
- Incorporate dry into wet: Gradually add the dry ingredients into the wet mixture with the mixer on low speed, forming a dough. Add up to an additional 1/4 cup of buttermilk if the dough feels dry, but no more than that.
- Pipe the cookies: Transfer the dough into a piping bag fitted with a 1M or 2D tip. Pipe small rosettes onto a baking sheet lined with parchment paper, ensuring even spacing.
- Bake: Place the baking sheet in the oven and bake for 6 to 8 minutes. The cookies will appear slightly wet when done—this is normal. Remove and let cool completely to room temperature.
- Assemble sandwich cookies: Spread about 1 tablespoon of marshmallow buttercream on the bottom side of one cookie, then gently press another cookie on top to form a sandwich. Repeat for all cookies.
Notes
- Make sure not to overbake the cookies; they should still look a little wet when taken out to ensure softness.
- If the dough is too dry, add buttermilk in small increments, not exceeding 1/4 cup extra.
- Using gel food coloring gives a more vibrant color without affecting dough consistency.
- You can prepare the cookies ahead and store assembled sandwich cookies in an airtight container for up to 3 days.
- To perfectly pipe the rosettes, use consistent pressure and circular motion with the piping bag.
Nutrition
- Serving Size: 1 sandwich cookie
- Calories: 220 kcal
- Sugar: 18 g
- Sodium: 110 mg
- Fat: 12 g
- Saturated Fat: 5 g
- Unsaturated Fat: 6 g
- Trans Fat: 0 g
- Carbohydrates: 27 g
- Fiber: 1 g
- Protein: 2 g
- Cholesterol: 30 mg


