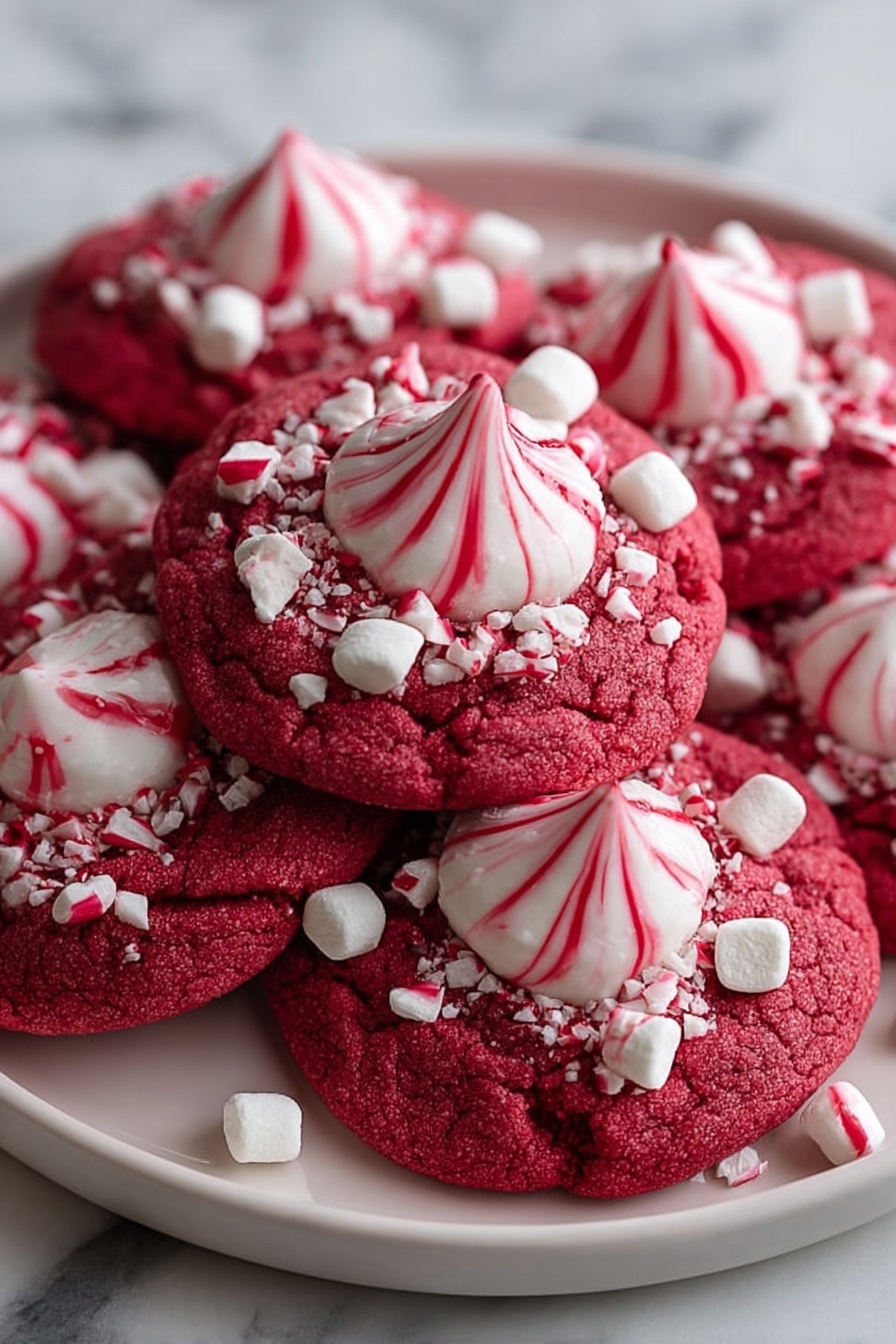
If you’re ready to wow your holiday guests or just want to treat yourself to something special this season, this Red Velvet Peppermint Blossoms Recipe is exactly what you need. These cookies blend the rich, classic red velvet flavor with a refreshing peppermint twist that’s pure magic. Seriously, I absolutely love how festive and fun these cookies turn out, with bright red dough, gooey peppermint kisses, and crushed candy cane crunch. Stick with me, and I’ll share everything you need to know to get these beauties perfect every time!
Why You’ll Love This Recipe
- Festive & Flavorful: The rich red velvet base perfectly complements the cool peppermint flavor for an irresistible holiday treat.
- Fun & Easy to Make: You don’t need to be a pro baker to make these look and taste amazing—perfect for all skill levels.
- Soft & Chewy Texture: These blossoms stay delightfully soft in the center, with just the right amount of chewiness that everyone loves.
- Perfect Holiday Gift: They’re a great homemade gift idea that your family, friends, and coworkers will go crazy for.

Ingredients You’ll Need
Each ingredient in this Red Velvet Peppermint Blossoms Recipe contributes to the overall flavor and texture, creating a cookie that’s soft, rich, and festive. I like to use gel food coloring here because it gives that vibrant red without adding extra liquid to the dough.

- All-purpose flour: The base of the cookies providing structure—make sure it’s fresh for the best results.
- Unsweetened cocoa powder: Adds just a hint of chocolate depth, balancing the sweetness perfectly.
- Baking powder and baking soda: Work together to help the cookies rise and stay soft.
- Salt: Enhances all the other flavors—don’t skip it!
- Unsalted butter: Softened butter gives rich flavor and tender crumb—room temperature for easier creaming.
- Granulated sugar: Sweetens and crunches, helps cookies spread just right.
- Egg: Binds the dough together and adds moisture.
- Vanilla extract: Essential for warmth and depth of flavor.
- Red food coloring (gel): Vital for that iconic red velvet color without watering down the dough.
- Buttermilk: Makes cookies tender and adds a subtle tang that’s so authentic in red velvet.
- Peppermint candy kisses: The star topping—gooey peppermint centers that melt just right.
- Crushed candy canes or peppermint candies: For that festive final crunch and extra peppermint punch.
Variations
I love how versatile this Red Velvet Peppermint Blossoms Recipe is. Over the years, I’ve tried a bunch of tweaks depending on who’s coming over or what ingredients I have on hand. Feel free to make it your own!
- Chocolate Peppermint Twist: Swap the unsweetened cocoa for a chocolate chip cookie base and top with peppermint kisses for a gooey surprise.
- Gluten-Free Version: Use a high-quality gluten-free flour blend; just be mindful that dough texture might be a bit different, so chilling is even more important.
- Nutty Kick: Add finely chopped pecans or walnuts into the dough for some crunch—and my family goes crazy for this version.
- Vegan Adaptation: Replace butter with vegan butter and use flax eggs; while the texture shifts slightly, it’s still delicious and festive.
How to Make Red Velvet Peppermint Blossoms Recipe
Step 1: Mix the Dry Ingredients
Start by whisking together the flour, cocoa powder, baking powder, baking soda, and salt in a medium bowl. This step ensures your leavening agents and cocoa are evenly distributed, which helps your cookies bake evenly and develop that perfect subtle chocolate flavor. I always do this first as a little prep—makes the whole process smoother when you start mixing wet ingredients.
Step 2: Cream the Butter and Sugar
In a large bowl, cream the softened butter and granulated sugar using a hand mixer or stand mixer. I usually do this on medium speed for about 2-3 minutes until it’s light and fluffy. This is the foundation for tender cookies, so don’t rush it. Then, beat in the egg and vanilla extract until everything’s nicely combined. If your butter is too cold, you won’t get that fluffy texture, so take it out early!
Step 3: Add the Red Velvet Magic
With the mixer on low, pour in the red food coloring and buttermilk. This is where the dough starts to come alive with that luscious red color and moisture that gives you the authentic velvet texture. Slowly add in your dry ingredients and mix just until the dough comes together. The dough should be soft and a little sticky—not dry. I discovered this trick when I first tried subbing liquids, and sticking to this helped the cookies stay perfectly soft after baking.
Step 4: Chill the Dough
Cover the dough with plastic wrap and pop it into the fridge for at least 30 minutes. While I often get impatient, this step is crucial! Chilling prevents the cookies from spreading too much during baking, helping them keep their shape and texture. It also firms up the dough, making it easier to handle and roll.
Step 5: Bake and Add Peppermint Kisses
Preheat your oven to 350°F (175°C) and line baking sheets with parchment paper. Roll the dough into roughly 1-inch balls and place them spaced about 2 inches apart. Gently flatten each ball with your palm for an even surface. Bake for 10-12 minutes until the edges look set but the centers still seem soft—that’s perfect! As soon as you pull the trays out, press a peppermint kiss right into the center, then immediately sprinkle crushed peppermint candy around it. The heat melts the kiss slightly so it sticks deliciously while still firming up as it cools.
Step 6: Cool and Enjoy
Let the cookies cool on the baking sheet for about 5 minutes before moving them to a wire rack to cool completely. This resting time lets the peppermint kisses soften and meld with the cookie, rewarding you with that iconic chewy center and peppermint punch. Trust me, these cookies are even better after they’ve fully cooled!
Pro Tips for Making Red Velvet Peppermint Blossoms Recipe
- Use Gel Food Coloring: It packs vibrant color without adding extra liquid, keeping the dough consistency on point.
- Don’t Overmix: Once you add dry ingredients, mix just until combined to avoid dense cookies.
- Chill That Dough: Chilling isn’t optional—this prevents spreading and helps the cookies hold their blossom shape.
- Press Peppermint Kisses Right Out of the Oven: Doing this while cookies are hot helps the kisses melt slightly and stick beautifully.
How to Serve Red Velvet Peppermint Blossoms Recipe

Garnishes
I usually go classic with crushed candy canes sprinkled around the peppermint kiss centerpiece—it gives a delightful crunch and pops in color. Sometimes, I add a light dusting of powdered sugar for a frosted look that feels extra festive without being overwhelming.
Side Dishes
These cookies pair amazingly well with a cup of hot cocoa or peppermint mocha—it really echoes the minty vibe. For holiday parties, I also serve them alongside a small cheese and fruit platter, offering guests a sweet and savory balance.
Creative Ways to Present
One of my favorite things to do is arrange these Red Velvet Peppermint Blossoms Recipe cookies in a wreath shape on a festive platter, scattering fresh holly or rosemary sprigs around for that Christmas charm. If you’re giving them as gifts, stack a few in clear boxes tied with a red ribbon—guaranteed to impress!
Make Ahead and Storage
Storing Leftovers
I keep leftover cookies in an airtight container at room temperature, layered between parchment paper to prevent sticking. They stay soft and flavorful for up to a week, which means a festive treat all season long.
Freezing
If I want to make these in advance, I freeze the unbaked cookie dough balls on a baking sheet, then transfer them to a freezer-safe bag. When ready to bake, just pop them in the oven straight from the freezer, adding a couple of extra minutes to the bake time—easy and no loss in taste!
Reheating
Reheat leftover cookies in a 300°F oven for 3-5 minutes or microwave briefly (about 10 seconds) to bring back some softness and give that peppermint kiss a little warmth again.
FAQs
-
Can I make Red Velvet Peppermint Blossoms Recipe without food coloring?
Technically, yes—but the iconic red color is a big part of what makes these cookies so festive and recognizable. If you prefer to avoid artificial coloring, you could experiment with natural red colorings like beet juice powder, but it may affect the flavor and dough consistency.
-
What if I don’t have buttermilk?
No worries! You can make a quick buttermilk substitute by adding 1 tablespoon of white vinegar or lemon juice to a measuring cup and filling it up with milk to 1 cup total, then letting it sit for 5 minutes before using.
-
Can I use regular peppermint candy instead of peppermint kisses?
While peppermint kisses have that perfect size and melt just right, crushed peppermint candies can also be used on top—just add them after baking for crunch instead of trying to melt them into the cookie center.
-
How do I prevent the kisses from melting too much?
Press the kisses into the cookies immediately after baking, then let everything cool completely on the baking sheet. This short contact with warm cookies softens but doesn’t overly melt the peppermint center, keeping that lovely texture contrast.
Final Thoughts
This Red Velvet Peppermint Blossoms Recipe has become a holiday staple in my kitchen because it’s not only delicious but brings that joyful spirit that makes cookie baking so fun. I always look forward to the moment I pull the warm cookies from the oven and press in those peppermint kisses—the room fills with that soothing peppermint aroma, and I know I’m about to enjoy something truly special. If you give this recipe a try, I promise it will bring a little extra magic to your holidays and leave everyone asking for more. Happy baking, friend!
Print
Red Velvet Peppermint Blossoms Recipe
- Prep Time: 15 minutes
- Cook Time: 10-12 minutes
- Total Time: 40-45 minutes
- Yield: 18-20 cookies
- Category: Dessert
- Method: Baking
- Cuisine: American
Description
These Christmas Peppermint Red Velvet Blossoms are festive, soft, and chewy cookies perfect for holiday celebrations. Infused with rich cocoa and vibrant red food coloring, each cookie is topped with a peppermint candy kiss and sprinkled with crushed candy canes for a delightful minty crunch.
Ingredients
For the cookies:
- 1 ¼ cups all-purpose flour
- ¼ cup unsweetened cocoa powder
- 1 tsp baking powder
- ½ tsp baking soda
- ¼ tsp salt
- ½ cup unsalted butter, softened
- ¾ cup granulated sugar
- 1 large egg
- 1 tsp vanilla extract
- 1 tbsp red food coloring (gel preferred for vibrant color)
- 1 tbsp buttermilk
- 18-20 peppermint candy kisses (unwrapped)
- Crushed candy canes or peppermint candies for garnish
Instructions
- Prepare the dry ingredients: In a medium bowl, whisk together the flour, cocoa powder, baking powder, baking soda, and salt. Set aside.
- Cream the butter and sugar: In a large bowl, using a hand mixer or stand mixer, cream together the softened butter and sugar until light and fluffy, about 2-3 minutes. Beat in the egg and vanilla extract, mixing until combined.
- Add the red velvet magic: With the mixer on low, add the red food coloring and buttermilk to the wet ingredients, and mix until you achieve a vibrant red color. Gradually add the dry ingredients, mixing just until the dough comes together. The dough will be soft but slightly sticky.
- Chill the dough: Cover the dough with plastic wrap and refrigerate for at least 30 minutes. Chilling helps the cookies maintain their shape while baking.
- Preheat and prep: Preheat the oven to 350°F (175°C). Line two baking sheets with parchment paper.
- Shape and bake the cookies: Roll the chilled dough into 1-inch balls and place them 2 inches apart on the prepared baking sheets. Lightly flatten each ball with the palm of your hand. Bake for 10-12 minutes, or until the cookies have set around the edges but are still soft in the center.
- Top with peppermint kisses: As soon as the cookies come out of the oven, gently press a peppermint kiss into the center of each one. Immediately sprinkle crushed peppermint candies around the base of the kiss while the cookies are still warm so that the pieces stick to the surface.
- Cool completely: Allow the cookies to cool on the baking sheet for 5 minutes, then transfer them to a wire rack to cool completely. The peppermint kisses will soften from the heat of the cookies but will firm up as they cool.
Notes
- For vibrant color, use gel-based red food coloring to avoid thinning the dough.
- Chilling the dough is essential to prevent spreading and helps retain the cookie shape.
- Use parchment paper to avoid sticking and facilitate easy removal.
- Press the peppermint kisses gently to avoid breaking the cookies.
- Store in an airtight container to keep cookies fresh and peppermint kisses firm.
Nutrition
- Serving Size: 1 cookie
- Calories: 150
- Sugar: 12g
- Sodium: 110mg
- Fat: 7g
- Saturated Fat: 4g
- Unsaturated Fat: 3g
- Trans Fat: 0g
- Carbohydrates: 20g
- Fiber: 1g
- Protein: 2g
- Cholesterol: 25mg

