If you’re looking to wow your friends at your next gathering with something light, gorgeous, and ridiculously fun to eat, you’ve gotta try this Pull-Apart Pavlova Wreath with Fresh Fruit Recipe. I absolutely love how this dessert turns an ordinary pavlova into a shareable centerpiece — it’s like magic in the kitchen! You’ll find that it’s amazingly simple to make, yet feels special enough for holidays, birthdays, or just a weekend treat with your family.
Why You’ll Love This Recipe
- Fun and Interactive: It’s a dessert you literally pull apart and share, which makes for a lively table experience.
- Simple Ingredients: You probably have most of these in your pantry, making it easy to whip up anytime.
- Customizable Fruit: Fresh berries and mint bring a burst of freshness and vibrant color that you can swap to suit the season.
- Impressive Presentation: It looks stunning, so it’s perfect for impressing guests without stress.

Ingredients You’ll Need
To create your Pull-Apart Pavlova Wreath with Fresh Fruit Recipe, you’ll want high-quality, fresh ingredients that complement each other beautifully. I always recommend using extra-large eggs for the best volume in your meringue and fresh, ripe berries for that perfect sweet-tart contrast.
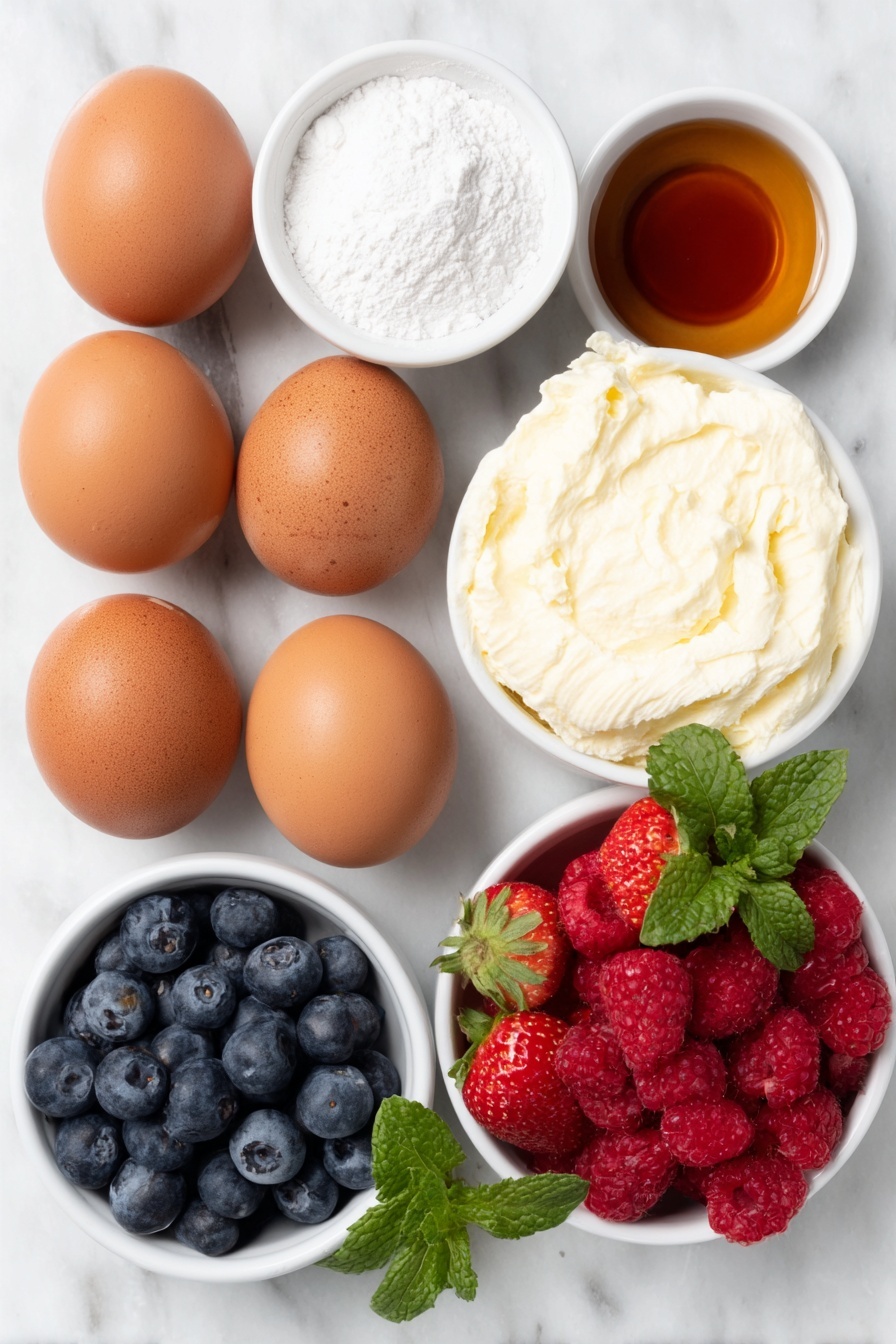
- Extra-large egg whites: Older eggs at room temperature whip up better, giving you higher, airier peaks.
- Icing sugar (powdered sugar): Sifted to avoid lumps and help the meringue stay smooth.
- Cornstarch: This is the secret weapon for that marshmallowy, soft center in your pavlova layers.
- Vanilla extract: Adds beautiful warmth and flavor — don’t skip this!
- Heavy cream (whipping cream): Chill it well for fluffy whipped cream topping.
- Fresh fruit (berries): Strawberries, blueberries, raspberries—you pick your favorites or mix them up for vibrant colors.
- Fresh mint: A little green goes a long way to brighten the wreath visually and add fresh notes.
Variations
I love playing around with this Pull-Apart Pavlova Wreath with Fresh Fruit Recipe depending on what’s in season or who I’m serving it to. It’s so versatile you can really make it your own.
- For a tropical twist: I swap fresh berries for mango chunks, kiwi slices, and passionfruit pulp—my family goes crazy for the refreshing flavors!
- Dietary tweaks: Want to make it dairy-free? Try coconut cream instead of heavy cream for a luscious, dairy-free option.
- Chocolate lovers: Sometimes I sprinkle mini chocolate chips or drizzle melted dark chocolate over the wreath for an indulgent finish.
- Easy smaller portions: Make mini pavlova wreaths if you want a more manageable, personal-sized dessert.
How to Make Pull-Apart Pavlova Wreath with Fresh Fruit Recipe
Step 1: Whip Up Perfect Meringue Bases
First things first—preheat your oven to a low 90°C (195°F) and line two baking sheets with parchment paper to prevent sticking. In your mixer bowl with the whisk attachment, beat the extra-large egg whites until just foamy before gradually adding sifted icing sugar. You’ll want to keep beating until your meringue is bright white, super glossy, and holds stiff peaks—this might take up to eight minutes, so patience is key! Adding the cornstarch and vanilla at the end helps create that glorious crispy outside with a marshmallow-like interior that’s the hallmark of a great pavlova.
Step 2: Shape and Bake Your Pavlova Mounds
Using a piping bag or just a spoon, dollop mounds of meringue roughly 5cm in diameter spaced evenly on your sheets. Then, with the back of a teaspoon, gently press a slight dent in each mound—this will cradle your cream beautifully later. Bake for 60 minutes, then turn off the oven and let the pavlovas cool completely inside—this slow cooling helps keep them crisp and prevents cracks. Trust me, it’s worth the wait (about 2 hours)!
Step 3: Whip Cream and Assemble Your Wreath
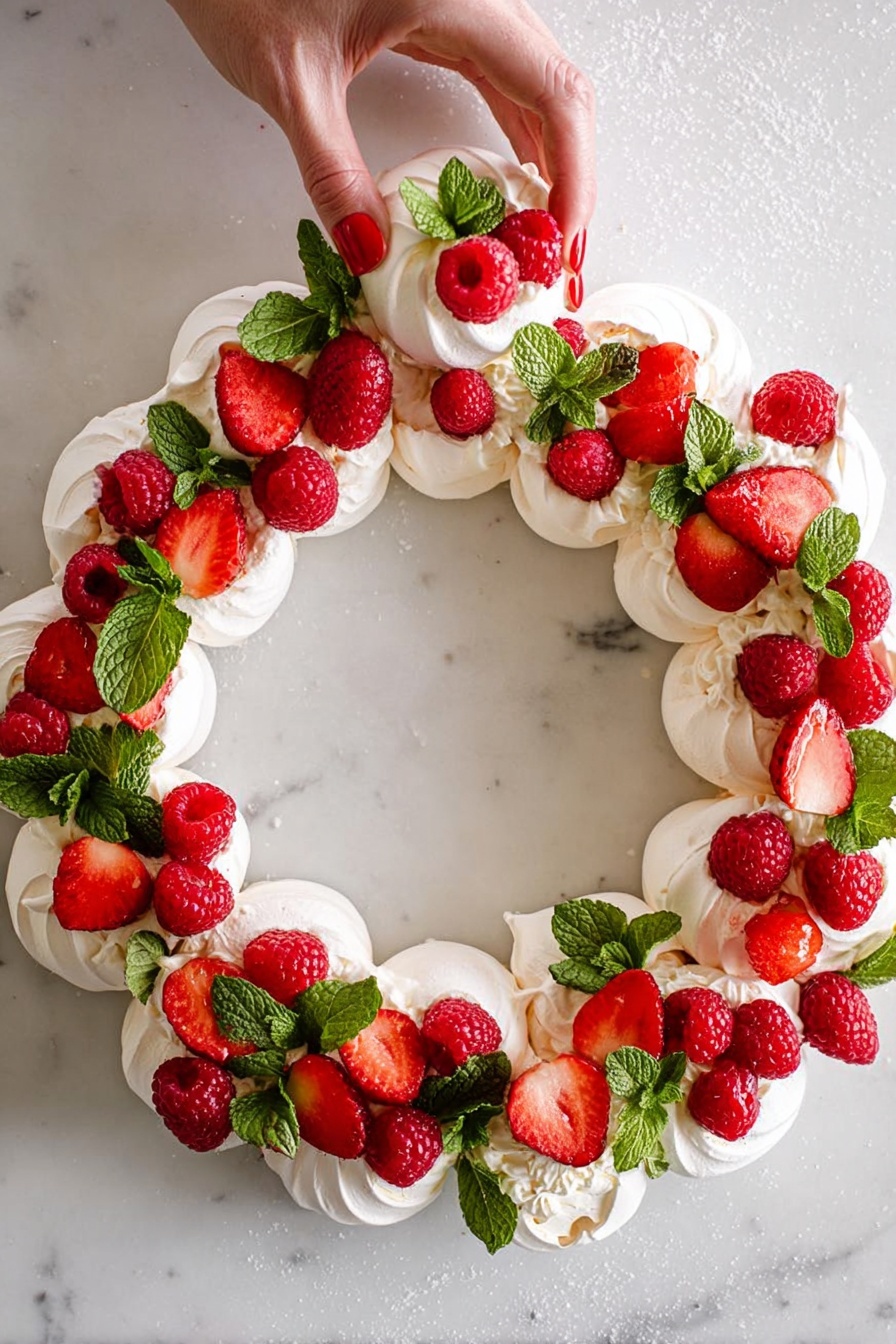
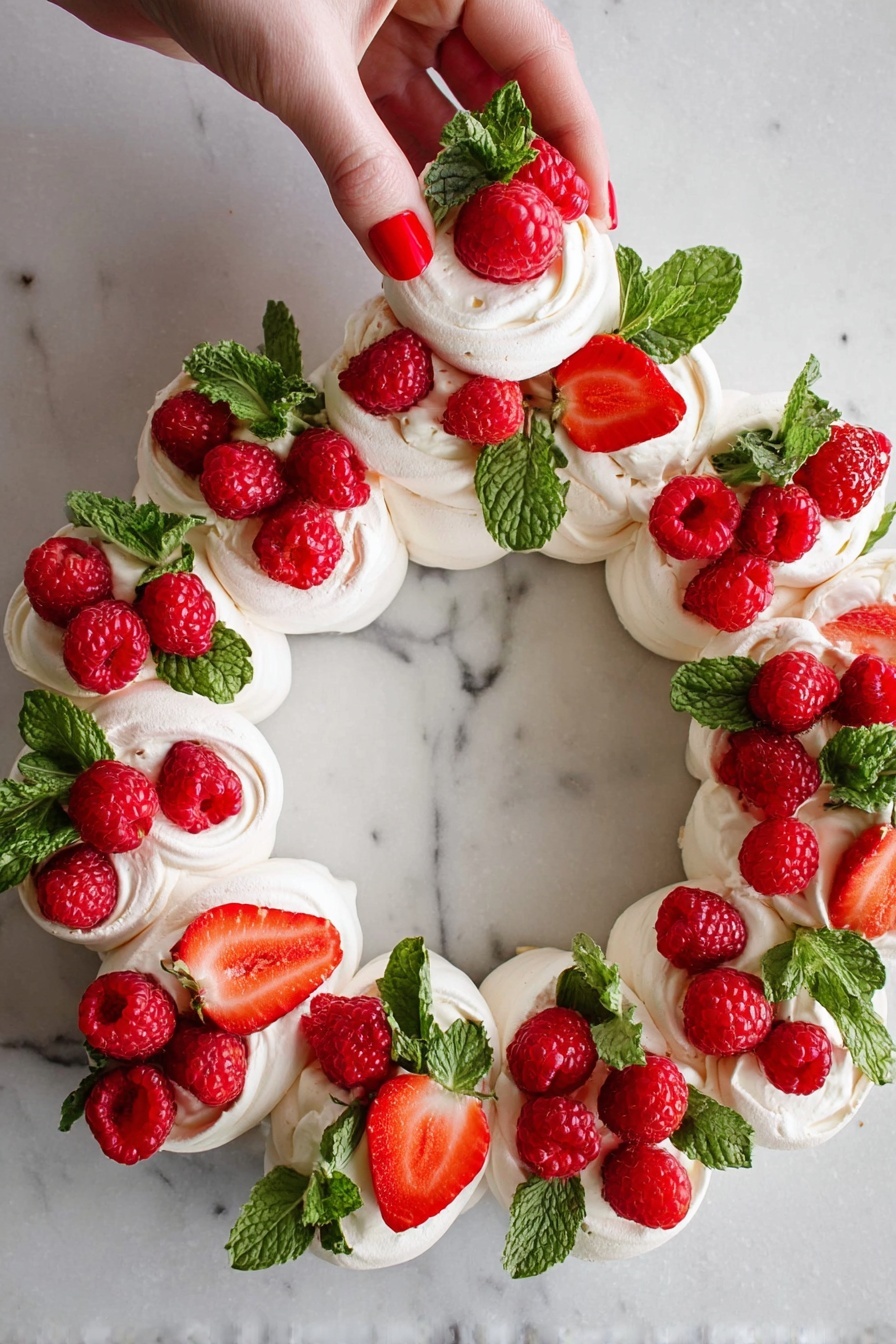
Once your pavlova mounds are cool, arrange them in a festive wreath shape on a large board or platter. Whip your chilled heavy cream with icing sugar and vanilla extract until you get medium-stiff peaks—this is what gives you that luscious, soft cream that holds up without being stiff. Then spoon or pipe dollops of cream onto each pavlova. Now comes the fun part: decorate generously with fresh berries and scatter fresh mint leaves to add brightness both in taste and look!
Step 4: Serve and Enjoy Together!
Encourage everyone to gently pull apart pieces from the wreath—this makes it a sharing masterpiece. It’s a perfect mix of crunchy, creamy, and fruity that keeps every bite exciting. When I first tried this, my family was blown away by how simple but stunning it looked and tasted!
Pro Tips for Making Pull-Apart Pavlova Wreath with Fresh Fruit Recipe
- Use Room Temperature Egg Whites: I discovered this trick early on—eggs whip to higher volume and are less likely to collapse.
- Don’t Skip the Cornstarch: It gives pavlovas that pillowy inside you’ll fall in love with, instead of being super crunchy all the way through.
- Slow Cooling is Key: Keeping meringues in the oven after it’s turned off prevents cracks and ensures crispness outside but chewy softness inside.
- Decorate Just Before Serving: Adding cream and fruit too early can make your pavlovas soggy, so wait until right before your guests arrive.
How to Serve Pull-Apart Pavlova Wreath with Fresh Fruit Recipe
Garnishes
I love topping this wreath with fresh mint leaves because they add a pop of color and a refreshing aroma that makes every bite feel lighter. Sometimes I toss in a few edible flowers to jazz it up for special occasions—it’s an easy touch that looks stunning.
Side Dishes
This dessert pairs beautifully with a light, fruity white wine or sparkling water with a splash of fresh citrus. For brunch, I often serve it alongside fresh squeezed juices or a vibrant fruit salad to echo the flavors in the pavlova wreath.
Creative Ways to Present
For Christmas or festive dinners, I’ve shaped the pavlova wreath with red and green berries and dusted it lightly with edible glitter for a sparkling effect. For summer parties, I’ve used tropical fruits and decorated with small cocktail umbrellas for a playful vibe. Presentation-wise, a rustic wooden board or a white ceramic platter really makes the colors pop.
Make Ahead and Storage
Storing Leftovers
I usually keep any leftover meringue bases stored loosely in an airtight container at room temperature to maintain their crispness. But once the wreath is assembled with cream and fruit, it’s best eaten immediately for ideal texture and flavor—leftovers can become soggy quickly.
Freezing
While I haven’t frozen an assembled wreath (cream and fruit don’t freeze well), I do freeze leftover baked pavlova bases for up to a month. Just thaw at room temperature and add fresh cream and fruit to reassemble when ready to serve.
Reheating
Pavlova isn’t typically reheated once assembled, but if you need to freshen up pre-baked bases from storage, a quick few minutes in a low warm oven can help crisp them back up before adding your toppings.
FAQs
-
Can I make the meringue bases ahead of time for the Pull-Apart Pavlova Wreath with Fresh Fruit Recipe?
Absolutely! You can bake the meringue bases a day or two in advance and store them in an airtight container at room temperature. Just make sure to assemble the wreath with cream and fruit right before serving to keep the texture fresh and crisp.
-
What if I don’t have cornstarch for the pavlova meringue?
Cornstarch is key for creating the classic stomping-ground pavlova texture, but if you don’t have it, you can try arrowroot powder as a substitute. Without it, the meringue may be crunchier and less marshmallowy inside, but still tasty.
-
Can I use frozen fruit for the wreath decoration?
It’s best to use fresh fruit—frozen fruit tends to release extra moisture, which can make the meringue soggy. If you must use frozen, thaw and drain them very well beforehand and add them just before serving.
-
How do I avoid cracking meringues during baking?
Slow baking at a low temperature and then allowing the meringues to cool in the turned-off oven is the best way to prevent cracks. Rapid temperature changes cause cracking, so patience here really pays off.
-
Can I use regular granulated sugar instead of icing sugar?
Icing sugar dissolves more easily in meringue, giving a smooth texture, so it’s recommended. You could try superfine sugar if that’s all you have, but the pavlova’s surface might be less glossy.
Final Thoughts
This Pull-Apart Pavlova Wreath with Fresh Fruit Recipe is one of my absolute favorites because it combines elegance with a carefree, joyful way to serve dessert. I still remember the first time I made it—it was a hit that brought everyone to the table, laughing as they pulled apart their pieces. If you want to impress without the stress, and enjoy a light, fresh, funky dessert that everyone can share, this wreath is your new go-to. Trust me, once you give it a try, it’ll become a beloved tradition in your kitchen too.
Print
Pull-Apart Pavlova Wreath with Fresh Fruit Recipe
- Prep Time: 25 minutes
- Cook Time: 1 hour
- Total Time: 3 hours 25 minutes
- Yield: 15 servings
- Category: Dessert
- Method: Baking
- Cuisine: Australian/New Zealand
- Diet: Vegetarian
Description
This Pull Apart Pavlova Wreath is a delightful dessert featuring crisp meringue nests baked to perfection, layered with whipped cream, and garnished with fresh berries and mint. Perfect for sharing, this elegant and light pavlova wreath offers a beautiful presentation and a refreshing mix of textures and flavors, ideal for any festive occasion or a special treat.
Ingredients
For the Meringue
- 6 extra-large egg whites
- 2 cups icing sugar (powdered sugar), sifted
- 2 tbsp cornstarch
- 1 tsp vanilla extract
For the Pavlova Wreath
- 3 cups heavy cream (whipping cream)
- 1 cup icing sugar (powdered sugar), sifted
- 1 tsp vanilla extract
- Fresh fruit (berries such as strawberries, blueberries, raspberries)
- Fresh mint leaves for garnish
Instructions
- Preheat Oven and Prepare Baking Sheets: Preheat the oven to 90°C (195°F) and line two baking sheets with parchment paper to ensure the meringues do not stick and bake evenly.
- Beat Egg Whites: In the bowl of a stand mixer fitted with the whisk attachment, beat the 6 extra-large egg whites until they are foamy, laying the foundation for a stable meringue structure.
- Add Icing Sugar and Whip to Stiff Peaks: Gradually add the sifted icing sugar while continuing to beat the egg whites until they become bright white, voluminous, and form stiff peaks when the beaters are lifted. This process could take up to 8 minutes and is key to achieving the right texture.
- Incorporate Cornstarch and Vanilla: Add 2 tablespoons of cornstarch and 1 teaspoon of vanilla extract to the meringue mixture and whip until just combined to stabilize the meringue and add flavor.
- Shape the Meringue Mounds: Using a piping bag or spoon, form small mounds of meringue approximately 5cm in diameter on the prepared baking sheets, leaving about 5cm of space between each. Use a teaspoon to create a small dent in the center of each mound, which will hold the whipped cream later.
- Bake the Meringues: Place the baking sheets in the preheated oven and bake the meringues for 60 minutes at low temperature. This slow baking dries out the meringue for crispness without browning.
- Cool the Meringues: After baking, switch off the oven and leave the meringues inside to cool completely for approximately 2 hours. Cooling inside the oven prevents cracks and keeps the meringues crisp.
- Assemble the Pavlova Wreath: Once cooled, remove the meringues from the oven and arrange them in a wreath shape on a large serving platter or board to create a visually impressive presentation.
- Whip the Cream: In a mixing bowl, whip the heavy cream together with the sifted icing sugar and vanilla extract until medium-stiff peaks form. This whipped cream will add a rich and smooth texture to the pavlova.
- Decorate the Meringues: Spoon or pipe some whipped cream onto the center of each pavlova mound. Garnish with fresh berries and mint leaves to add freshness, color, and contrast to the dessert.
- Serve: Serve the pavlova wreath immediately for the best texture and flavor, encouraging guests to pull apart and enjoy individual meringue portions topped with luscious cream and fruit.
Notes
- Ensure egg whites are at room temperature for better volume when whipped.
- Sift the icing sugar and cornstarch to avoid lumps in the meringue.
- Use fresh, firm berries and fresh mint for the best presentation and flavor.
- The meringues can be made a day ahead and stored in an airtight container; assemble just before serving.
- Whip cream just prior to assembling the pavlova wreath to maintain its freshness and structure.
- If your oven runs hot, consider rotating the trays halfway through baking for even drying.
Nutrition
- Serving Size: 1 serving (approx. 1 pavlova mound with toppings)
- Calories: 220 kcal
- Sugar: 20 g
- Sodium: 15 mg
- Fat: 14 g
- Saturated Fat: 8 g
- Unsaturated Fat: 4 g
- Trans Fat: 0 g
- Carbohydrates: 18 g
- Fiber: 1 g
- Protein: 3 g
- Cholesterol: 40 mg

