
If you’re craving a sweet treat that’s as delightful to look at as it is to eat, you’re in for a real treat with this Pink White Chocolate Fudge Recipe. I absolutely love how this creamy, dreamy fudge melts in your mouth with just the right hint of sweetness and a fun pop of pink color. Whether you’re making this for a special occasion or simply to indulge your sweet tooth, you’ll find that it’s surprisingly easy to whip up and totally worth every bite. Stick around, I’ll share some tips and tricks so your fudge turns out just perfect every single time!
Why You’ll Love This Recipe
- Easy and Quick to Make: You won’t believe how fast this fudge comes together with just a few simple steps.
- Visually Stunning: The pretty pink hue adds a festive, fun touch perfect for celebrations or gifts.
- Customizable: You can add cherries, sprinkles, or leave it plain – it’s a great canvas for your creativity.
- Deliciously Smooth Texture: Made with quality white chocolate and condensed milk, it’s irresistibly creamy every time.

Ingredients You’ll Need
The magic here lies in a handful of simple ingredients that work together beautifully. I always make sure to use good quality white chocolate for that rich flavor, and a few drops of gel food coloring make the color pop without affecting the taste.
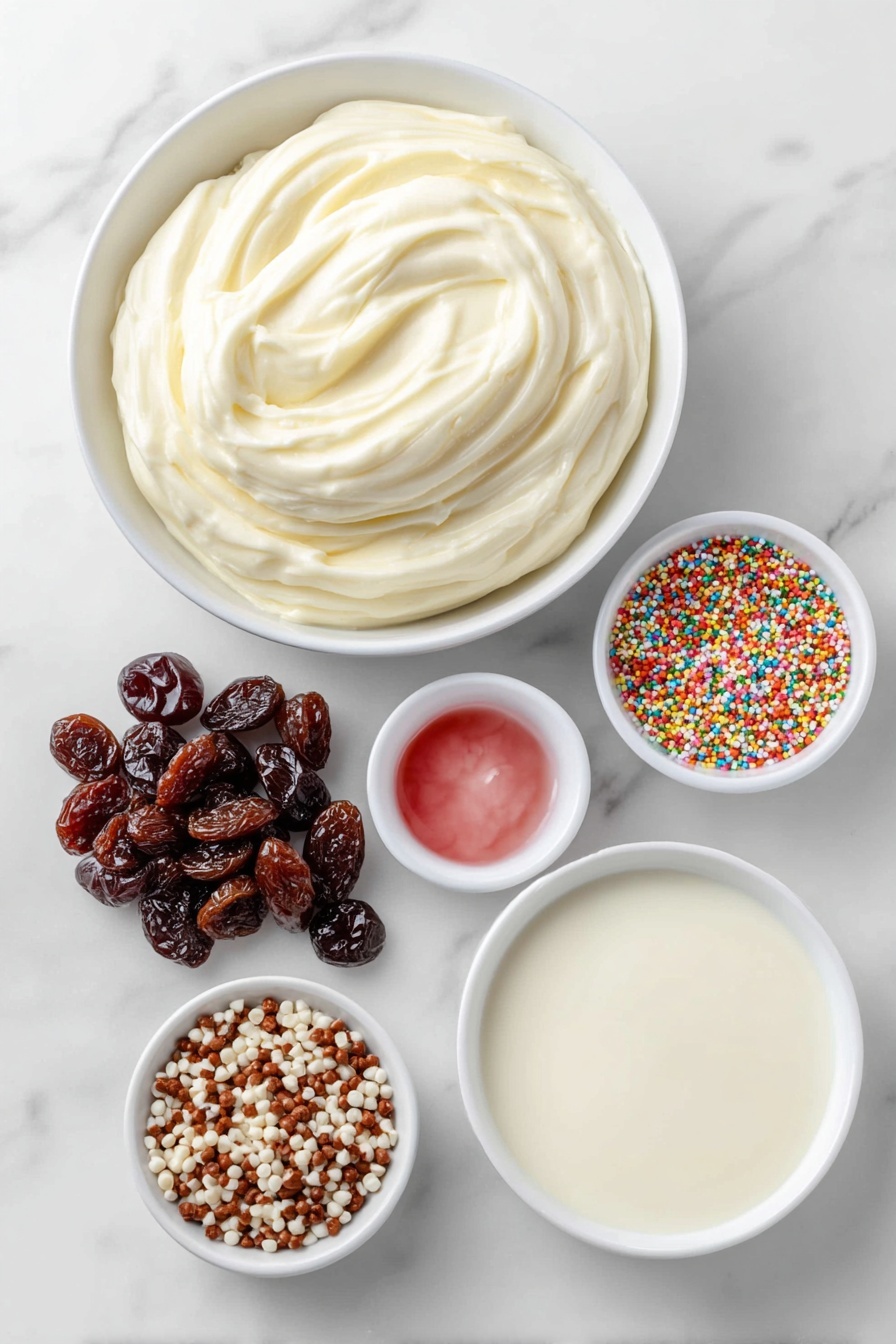
- White chocolate melting wafers or high-quality chopped white chocolate: I like melting wafers because they melt evenly, but if you use regular chocolate just chop it finely to avoid burning.
- Sweetened condensed milk: This is the secret ingredient that gives the fudge a luscious, creamy texture without extra creams or butter.
- Pink gel food coloring: A few drops go a long way for that beautiful pastel pink—gel coloring won’t water down your fudge.
- Optional sprinkles and dried cherries: These add a fun crunch and a burst of tartness that balances out the sweetness perfectly.
Variations
I’ve played around with this Pink White Chocolate Fudge Recipe a bit to suit different moods and occasions. Feel free to make it your own—it’s surprisingly flexible!
- Cherry and Sprinkle Twist: One of my favorite batches included dried cherries and pastel sprinkles, which made it perfect for Valentine’s Day parties.
- Ombre Effect: I like to partially mix the pink coloring so you get a beautiful gradient of pink to white fudge—it’s so pretty and a little fancy.
- Vegan Adaptation: You can swap the condensed milk with a coconut condensed milk alternative and use vegan white chocolate to make it dairy-free.
- Richness Levels: To make it richer, try adding a teaspoon of vanilla extract or a pinch of sea salt for depth of flavor.
How to Make Pink White Chocolate Fudge Recipe
Step 1: Prep Your Pan for Easy Fudge Removal
First things first, line a 9×9 inch pan with parchment paper, making sure the paper overhangs on two edges—this will be your “handle” when it comes time to lift the fudge out. Trust me, this small step makes cutting and serving so much simpler, and you won’t need to scrape the bottom!
Step 2: Melt Your Chocolate and Condensed Milk Together
Combine your white chocolate and the ½ cup plus 1 tablespoon of sweetened condensed milk in a large microwave-safe bowl. If you’re using regular white chocolate bars, chop them into small pieces so they melt evenly. Microwave in 20-30 second intervals, stirring well between each round. In my experience, two rounds of heating is usually enough. Remember, stirring is key here because the residual heat helps melt the chocolate without burning it.
Step 3: Add Your Pink Color and Optional Mix-ins
Once smooth, add just a few drops of pink gel food coloring. I like to leave some of the mixture plain white and gently swirl the pink in for a soft ombre effect—that’s a pretty touch and makes your fudge look extra special. If you’re feeling adventurous, stir in dried cherries or sprinkles here. I’ve found dried cherries add a lovely tart contrast that pairs beautifully with the sweetness.
Step 4: Chill Until Set
Pour your fudge mixture evenly into the lined pan and smooth the top with a spatula. Pop it into the fridge for about an hour so it firms up nicely. Patience pays off here—the fudge should be fully set so it cuts cleanly without crumbling.
Step 5: Cut into Heart Shapes and Serve
When it’s set, lift the fudge out using your parchment paper handles and place it on a cutting board. Use a heart-shaped cookie cutter to cut out charming bite-sized pieces. A little tip I learned: covering the cookie cutter with a kitchen towel helps evenly press through the fudge and spares your fingers from getting sore. If you want, save the scraps to enjoy in chunks or crumble-and-top-your-morning-yogurt style!
Pro Tips for Making Pink White Chocolate Fudge Recipe
- Use High-Quality Chocolate: The taste and texture of your fudge depends greatly on the chocolate, so don’t skimp here. I learned the hard way that low-quality chocolate can lead to grainy fudge.
- Don’t Overheat: Chocolate can seize quickly. Stir frequently and rely on residual heat to melt it fully—this helps keep it silky smooth.
- Parchment Paper Magic: Letting the paper overhang means you don’t have to pry fudge off the pan; this simple trick saved me lots of frustration and keeps pieces intact.
- Cutting Ease: Press the cookie cutter with a cloth or towel on top to protect your hands and get clean, heart-shaped pieces without crumbling or cracking.
How to Serve Pink White Chocolate Fudge Recipe

Garnishes
I enjoy a light dusting of edible glitter on top when serving pink white chocolate fudge for parties; it makes it sparkle without overpowering the flavor. If you want a little texture, tossing on some crushed freeze-dried raspberries looks stunning and adds a tart contrast that’s so refreshing.
Side Dishes
A cup of rich hot tea or coffee pairs beautifully with this fudge. For a brunch or afternoon tea setting, I serve it alongside fresh berries and light scones — the richness of the fudge balances nicely with fresh fruit and flaky pastry.
Creative Ways to Present
I’ve wrapped individual heart-shaped fudge pieces in clear cellophane tied with a bright ribbon for gift-giving—it always wows friends and family! Another way I’ve served it is stacked in a pretty glass jar with layers of sprinkles for a fun, colorful display that doubles as decor and dessert.
Make Ahead and Storage
Storing Leftovers
I store leftover fudge in an airtight container in the refrigerator, layering parchment paper between pieces to prevent sticking. This keeps the fudge fresh and chewy for up to 2 weeks. I always recommend skipping the freezer if possible, as the texture can sometimes change.
Freezing
If you want to freeze pink white chocolate fudge, wrap each piece tightly in plastic wrap then place in a freezer-safe container. I’ve had success keeping fudge frozen for 1-2 months without it losing flavor, but thaw it in the fridge overnight before enjoying.
Reheating
Usually this fudge is best enjoyed cold or at room temperature. If it’s too firm after refrigeration, letting it sit out for 10-15 minutes softens it nicely. I don’t recommend microwaving leftovers as it can get too soft or greasy.
FAQs
-
Can I use regular white chocolate instead of melting wafers for the Pink White Chocolate Fudge Recipe?
Absolutely! Just make sure to chop the regular white chocolate into small, even pieces so it melts smoothly without burning. Microwave in short bursts and stir often to avoid seizing.
-
How do I get the perfect pink color without altering the fudge texture?
Use gel food coloring instead of liquid—it adds vibrant color without thinning your mixture. Start with a few drops and add more if needed; you can’t uncolor once added!
-
Can I skip the dried cherries or sprinkles?
Definitely! The fudge on its own is incredibly tasty and creamy, but these add-ons just bring some fun texture and flavor contrast—totally up to your preference.
-
How long does this fudge keep fresh?
Stored in an airtight container in the fridge, this fudge stays fresh for up to 2 weeks. For longer storage, freezing works well with proper wrapping.
Final Thoughts
Honestly, this Pink White Chocolate Fudge Recipe has become my go-to for gifts and special treat cravings alike. It’s so straightforward to make and consistently turns out creamy and gorgeous. I love sharing it with friends because it feels like a little gesture of joy with every bite. Give this recipe a try—you’ll feel such a sense of satisfaction pulling those perfect pink hearts from your fridge, and I bet your family and friends will go crazy for it, just like mine do.
Print
Pink White Chocolate Fudge Recipe
- Prep Time: 10 minutes
- Cook Time: 10 minutes
- Total Time: 1 hour 20 minutes
- Yield: 12 servings
- Category: Dessert
- Method: No-Cook
- Cuisine: American
- Diet: Vegetarian
Description
This Pink White Chocolate Fudge is a delightful and easy-to-make sweet treat featuring creamy white chocolate mixed with sweetened condensed milk and tinted with pink gel food coloring for a festive touch. Optional additions like dried cherries and sprinkles add texture and color, making this fudge perfect for special occasions or as a charming gift. The fudge is made by melting chocolate and condensed milk together, then setting it in the refrigerator until firm, after which it is cut into heart shapes using a cookie cutter.
Ingredients
Main Ingredients
- 20 ounces white chocolate melting wafers or high-quality chopped white chocolate
- ½ cup + 1 tablespoon sweetened condensed milk
- Pink gel food coloring, a few drops
Optional Add-ins
- Sprinkles
- Dry cherries
Instructions
- Prepare the pan: Line a 9×9 inch pan with parchment paper, allowing the paper to overhang on two sides for easy removal later. Set aside.
- Chop chocolate: If using regular white chocolate bars, chop them into small pieces to ensure even melting in the microwave.
- Combine ingredients: In a large microwave-safe bowl, add the white chocolate pieces or wafers along with the sweetened condensed milk.
- Microwave to melt: Heat the mixture in 20 to 30 second increments, stirring thoroughly after each interval. The residual heat will help melt the chocolate. Continue until the mixture is smooth and fully melted, usually about two intervals.
- Add color: Stir the mixture well to ensure smoothness, then add a few drops of pink gel food coloring. For an ombre effect, leave some of the mixture white by stirring the color in partially.
- Add optional mix-ins: If desired, fold in dried cherries and sprinkles gently to incorporate them evenly.
- Set the fudge: Pour the mixture into the prepared pan, spreading it evenly. Refrigerate for 1 hour or until the fudge is firm and set.
- Cut shapes: Once firm, use a heart-shaped cookie cutter to cut the fudge into heart shapes. To prevent hand strain, place a kitchen towel over the cutter when pressing down.
- Serve and enjoy: Arrange the heart-shaped fudge pieces on a serving platter and enjoy this sweet and creamy treat.
Notes
- Use high-quality white chocolate for the best flavor and smooth texture.
- Microwave in short intervals to avoid burning the chocolate.
- Gel food coloring is preferred as it does not affect the consistency of the fudge.
- The fudge can be stored in an airtight container in the refrigerator for up to one week.
- For easier cutting, very slightly warm the cookie cutter or dip it in hot water before cutting.
- Optional dried cherries add a pleasant tartness that balances the sweetness of the white chocolate.
Nutrition
- Serving Size: 1 piece (approximately 1.5 x 1.5 inch square)
- Calories: 160
- Sugar: 18g
- Sodium: 30mg
- Fat: 9g
- Saturated Fat: 5.5g
- Unsaturated Fat: 3g
- Trans Fat: 0g
- Carbohydrates: 20g
- Fiber: 0.2g
- Protein: 1.5g
- Cholesterol: 10mg

