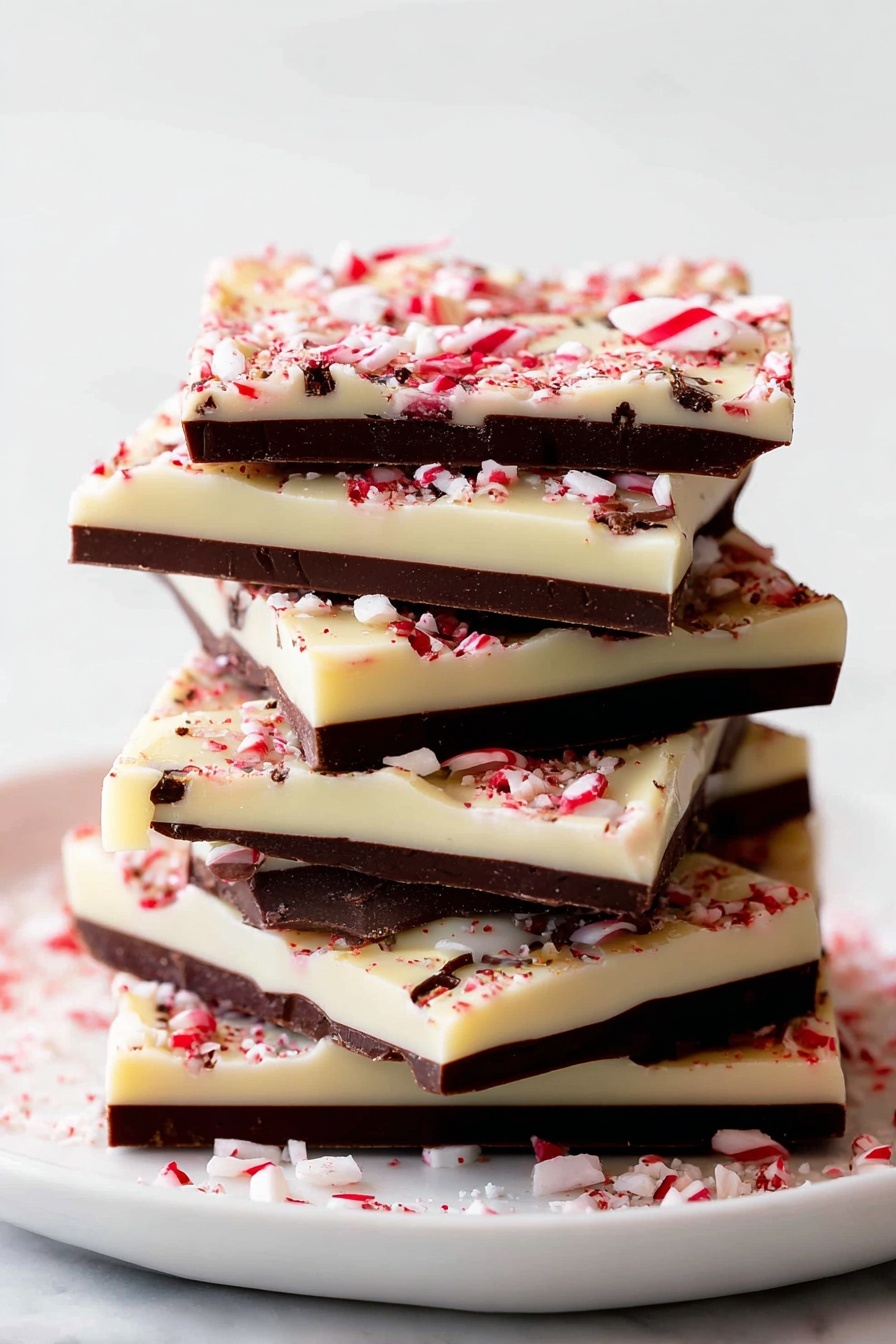
If you want a festive treat that’s quick to make and guaranteed to impress, this Peppermint White Chocolate Bark Recipe is going to be your new favorite. I absolutely love how this bark comes together with layers of creamy white chocolate and rich semi-sweet chocolate, all infused with refreshing peppermint and topped with crunchy candy canes. It’s perfect for gifting, holiday parties, or just satisfying your sweet tooth with something homemade and special.
Why You’ll Love This Recipe
- Simple Ingredients: You only need a handful of pantry staples and a couple candy canes to create something extraordinary.
- No Fancy Equipment: Melting chocolate in the microwave lets you skip the double boiler and still get silky, smooth layers.
- Perfect for Gifting: This bark looks store-bought but tastes way better — your friends and family will be asking for the recipe.
- Festive & Flexible: Peppermint white chocolate bark is easy to customize with different toppings or chocolate types to match your mood.

Ingredients You’ll Need
The magic of this Peppermint White Chocolate Bark Recipe lies in using quality chocolate and fresh peppermint flavor. The contrast between creamy white chocolate and bittersweet layers, balanced with crisp candy cane pieces, is what makes this recipe shine. Keep an eye out for good-quality chocolate bars rather than chips — they melt more smoothly and taste richer.
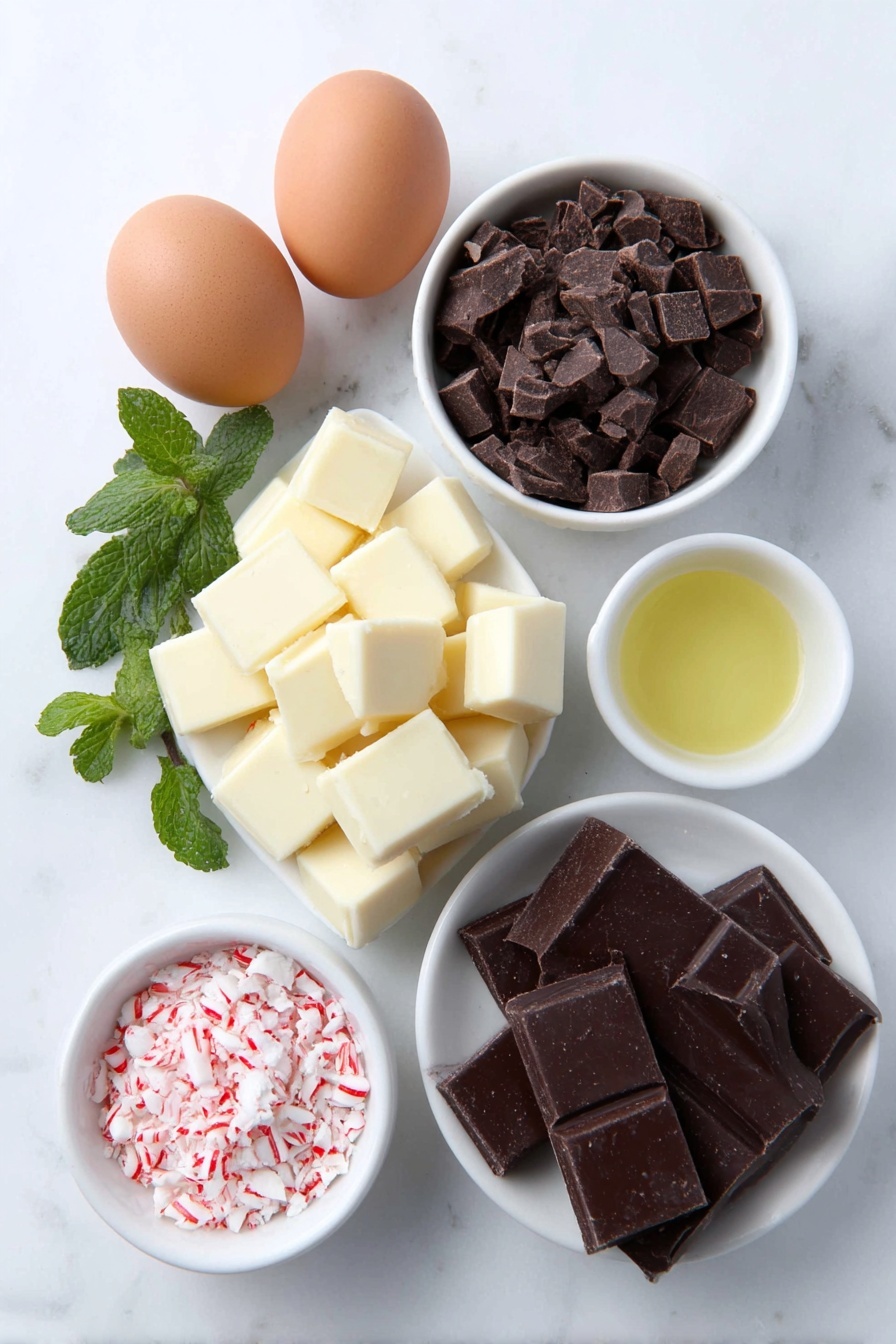
- White Chocolate: Choose a high-quality bar or chunks to get that creamy, melt-in-your-mouth texture.
- Semi-Sweet or Bittersweet Chocolate: This adds depth and a touch of bittersweet flavor that balances the sweetness of the white chocolate.
- Vegetable or Coconut Oil: Helps create a shinier finish and smoother melt without altering the chocolate’s flavor.
- Peppermint Extract: Use pure peppermint extract, not peppermint oil, for the best taste and aroma.
- Candy Canes: Crushing these fresh brings that lovely peppermint crunch and adds visual holiday flair.
Variations
I often like to mix things up with this Peppermint White Chocolate Bark Recipe depending on the occasion or what’s in my pantry. Feel free to get creative — this bark is surprisingly forgiving and a great canvas to personalize.
- Dark Chocolate Swap: For a richer flavor, I’ve swapped out the semi-sweet chocolate for a darker variety, and my family loved the deeper taste.
- Nutty Twist: Adding toasted almonds or pistachios on top adds a lovely crunch and nutty contrast that pairs beautifully.
- Dairy-Free Version: Use dairy-free chocolate and coconut oil to make it suitable for dairy sensitive friends — it still tastes decadent!
- Festive Colors: Mix red or green sprinkles with the candy canes for a more colorful presentation, especially fun with kids.
How to Make Peppermint White Chocolate Bark Recipe
Step 1: Prep Your Pan and Chocolate
Start by lining an 8- or 9-inch square baking pan (or a baking sheet) with parchment or foil to prevent sticking — trust me, this saves so much cleanup. Smooth out wrinkles so your bark comes out with a nice even surface. Chop your chocolates coarsely so they melt evenly without clumping. Having everything ready makes the melting process go smoothly, which is key because white chocolate can be a bit temperamental.
Step 2: Melt the First White Chocolate Layer
Place half of your white chocolate and a bit of oil in a heatproof bowl. I use the microwave, heating in 20-second bursts and stirring thoroughly in between — this is my go-to method for even melting without burning. Stir in a touch of peppermint extract once it’s fully melted, then pour and spread it thinly and evenly into your prepared pan. Pop it in the fridge for about 10-15 minutes until it’s almost set but still slightly tacky — this little trick helps the next layers stick well without separating.
Step 3: Add the Semi-Sweet Chocolate Layer
Next, melt your semi-sweet or bittersweet chocolate the same way with a little oil, then stir in the rest of your peppermint extract. Pour this darker layer over the white chocolate and spread it out smooth to cover the entire surface. Refrigerate again for 10-15 minutes until it’s nearly set. Doing these layers in stages with cooling in between keeps each flavor distinct and that beautiful tiered effect.
Step 4: Finish With the Top White Chocolate Layer and Candy Canes
Finally, melt the remaining white chocolate and oil, then pour it over the chocolate layers without peppermint this time — I found it balances the flavors best. Quickly sprinkle the crushed candy canes on top while the chocolate is still warm so they stick in place. Here’s a tip: crush the candy canes by wrapping them in a zippered bag and giving them a few taps with a rolling pin or meat mallet—super satisfying and less messy than smashing them on the counter!
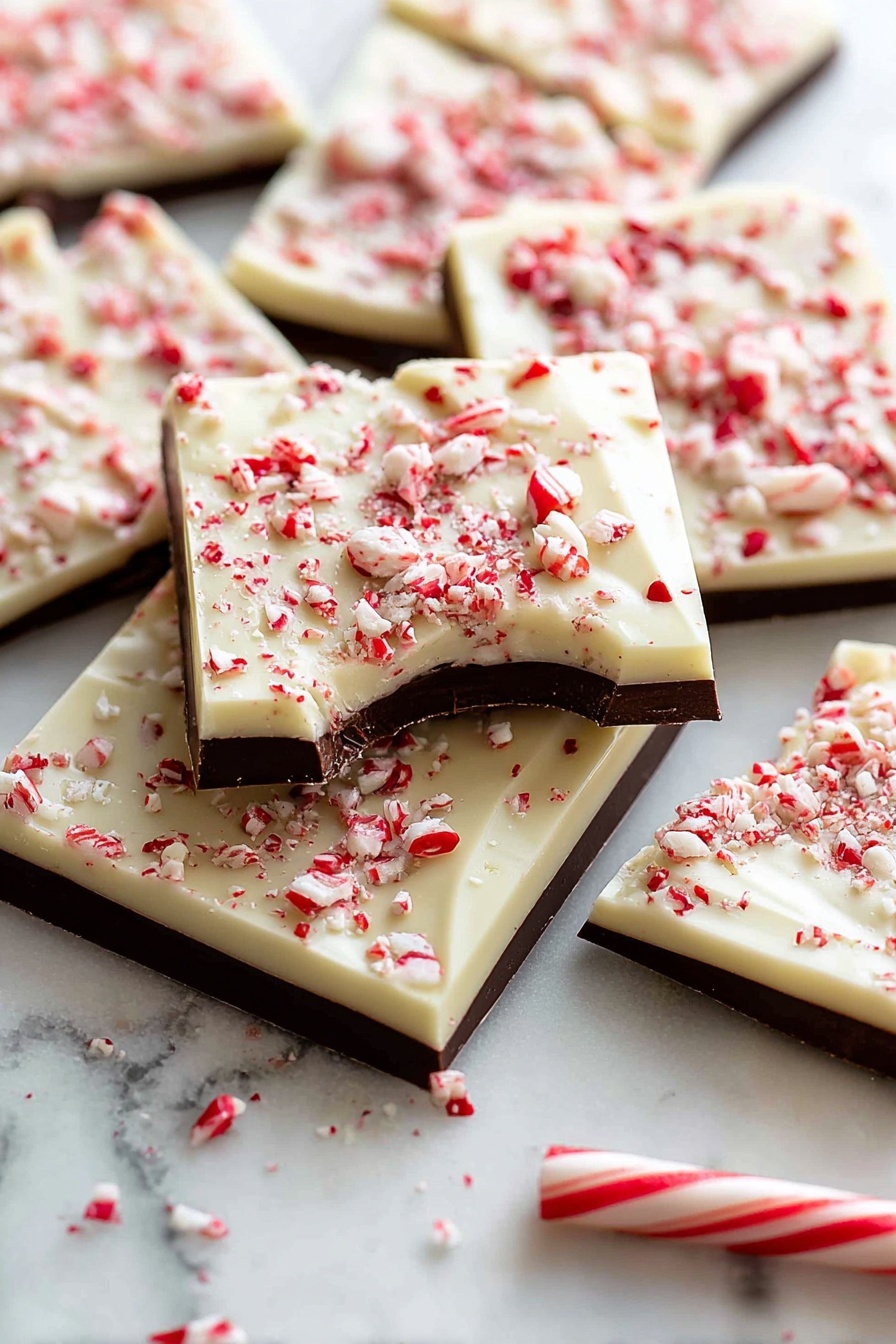
Step 5: Chill and Break Into Pieces
Pop your pan into the fridge for about an hour until the bark is completely firm. When it’s time to break it up, I usually like to let it sit at room temperature for 10-15 minutes if it’s been chilling for several hours — this stops the layers from cracking or separating awkwardly. Break into bite-size pieces or however big you want — it’s just as good either way!
Pro Tips for Making Peppermint White Chocolate Bark Recipe
- Melting in Increments: Always melt white chocolate slowly in short bursts to avoid scorching, stirring each time — this saved me from ruined batches more than once!
- Layer Setting: Chill layers until just almost firm, not rock-hard, so they bind well and don’t separate when you break the bark.
- Use Quality Peppermint Extract: A little goes a long way, and pure extract brings out the best fresh peppermint flavor without bitterness.
- Avoid Moisture: Chocolate seizes if water gets in, so make sure your bowls and utensils are completely dry before melting.
How to Serve Peppermint White Chocolate Bark Recipe
Garnishes
I usually keep it simple with just crushed candy canes sprinkled on top because they add both color and crunch, but sometimes I toss on some shaved white chocolate curls or a light dusting of edible glitter for a party-ready sparkle. You can get playful here — dried cranberries or tiny peppermint candies make cute accents too!
Side Dishes
This peppermint bark stands out on its own as a festive sweet treat, but if I’m serving it after dinner, I like pairing it with a cup of hot cocoa or peppermint mocha. It’s also lovely alongside a cheese board, especially with brie or gouda that plays on the sweet and salty contrast.
Creative Ways to Present
One year, I layered the bark in a clear glass jar tied with a ribbon as a gift, and it was a hit! For parties, break into larger shards and arrange on a wooden board with sprigs of pine or fresh rosemary sprigs for that holiday vibe. Wrapping individual pieces in wax paper and placing them in a festive tin also makes a charming edible gift.
Make Ahead and Storage
Storing Leftovers
I usually store leftover peppermint bark in an airtight container in the fridge. It keeps beautifully for up to three weeks, so feel free to make it ahead of time for holiday preparations. Just bring it back to room temperature for a bit before serving to soften slightly.
Freezing
Freezing is a great option if you want to make a big batch. I wrap pieces well in parchment and foil then place them in a freezer-safe bag. When you want to enjoy, just thaw in the fridge overnight — this helps preserve the texture and flavor without condensation making the bark soggy.
Reheating
I don’t really reheat this bark since it’s best served chilled or at room temp, but if you want to soften it gently, let pieces sit out for 15 minutes. Avoid microwaving, which can melt the texture unevenly and make the chocolate oily or grainy.
FAQs
-
Can I use candy canes from last year for this recipe?
It’s best to use fresh candy canes for the most vibrant peppermint flavor and the right crunch. Old candy canes tend to get sticky or lose their crispness, which can affect the texture of your bark.
-
Why does my white chocolate get grainy when melting?
White chocolate is sensitive to heat and moisture. Melting it too quickly or letting even a drop of water touch it causes it to seize and get grainy. Melting in 20-second microwave increments and stirring thoroughly helps prevent this, plus making sure your utensils are completely dry.
-
Can I make this bark without peppermint extract?
Yes, you can skip the peppermint extract if you prefer another flavor or want a classic white chocolate bark. For a different twist, you could use orange extract or almond extract instead. Just adjust the amount since they vary in strength.
-
How thin or thick should I spread the chocolate layers?
I usually spread each layer to about 1/8 inch thick for a nice balance between chocolate and candy cane crunch. Spreading it thinner makes it crispier but more fragile, while thicker can be rich but harder to break into neat pieces.
Final Thoughts
This Peppermint White Chocolate Bark Recipe has become my secret weapon during the holiday season — quick, beautiful, and loved by everyone who tries it. It’s one of those recipes I’m always happy to share because it feels like a little festive magic you can make in your own kitchen. So go ahead, gather your chocolate and candy canes, and have fun making this classic treat. I promise, you’re going to love every bite!
Print
Peppermint White Chocolate Bark Recipe
- Prep Time: 30 minutes
- Cook Time: 0 minutes
- Total Time: 1 hour 45 minutes
- Yield: Approximately 1 batch (about 24 pieces)
- Category: Dessert
- Method: No-Cook
- Cuisine: American
- Diet: Vegetarian
Description
A festive and delicious peppermint bark made with layers of creamy white chocolate and rich semi-sweet chocolate, infused with peppermint extract, and topped with crushed candy canes for a perfect holiday treat.
Ingredients
White Chocolate Layers
- 12 ounces (339g) white chocolate, coarsely chopped and divided
- 1 and 1/2 teaspoons vegetable oil or coconut oil, divided
- 1/2 teaspoon peppermint extract, divided
Semi-Sweet Chocolate Layer
- 6 ounces (170g) semi-sweet or bittersweet chocolate, coarsely chopped
- 1/2 teaspoon vegetable oil or coconut oil
- 1/4 teaspoon peppermint extract
Topping
- 2–3 regular-size candy canes (24–36g total), crushed
Instructions
- Prepare the baking pan: Line an 8-inch or 9-inch square baking pan with parchment paper or aluminum foil, smoothing out any wrinkles to ensure easy removal of the bark later. Alternatively, you can line a baking sheet if you prefer a thinner bark.
- Melt the first white chocolate layer: Place 6 ounces of white chocolate with 1/2 teaspoon of oil in a small heatproof bowl or liquid measuring cup. Melt the chocolate in the microwave in 20-second increments, stirring vigorously between each session until smooth. Stir in 1/4 teaspoon of peppermint extract. Pour this melted white chocolate into the prepared pan and spread evenly with an offset spatula or spoon. Refrigerate for 10–15 minutes until almost set, but not completely hardened to avoid separation of layers.
- Melt the semi-sweet chocolate layer: In a clean bowl, melt 6 ounces of semi-sweet chocolate with 1/2 teaspoon of oil using the same microwave method. After melting, stir in the remaining 1/4 teaspoon peppermint extract. Pour over the chilled white chocolate layer and spread smoothly. Return the pan to the refrigerator for another 10–15 minutes until the chocolate is nearly set.
- Melt the remaining white chocolate layer: Melt the remaining white chocolate with the last 1/2 teaspoon of oil in the same manner as earlier. Pour this final layer over the semi-sweet chocolate and spread uniformly. This layer does not contain any peppermint extract.
- Add the crushed candy canes topping: Evenly sprinkle the crushed candy canes over the top white chocolate layer while it is still soft. To crush, place unwrapped candy canes in a sealed bag and crush using a rolling pin or meat mallet.
- Set the bark: Refrigerate the entire bark until fully set, about 1 hour. Once hardened, remove from the pan by peeling off the parchment or foil. Break or cut the bark into pieces of your preferred size.
- Serving and storage: If the bark has chilled for more than 3–4 hours, let it come to room temperature for 10–15 minutes before breaking or slicing to prevent layer separation. Store leftovers covered in the refrigerator for up to 3 weeks. The bark can be kept at room temperature for a few days during colder months but may soften slightly.
Notes
- This peppermint bark recipe is simple yet festive, combining smooth white and semi-sweet chocolate layers with refreshing peppermint and crunchy candy canes.
- Be cautious when melting white chocolate as it can overheat easily; melt in short increments and stir well.
- Do not let intermediate layers set completely before adding the next layer to ensure the bark bonds well.
- Use high-quality chocolate for the best flavor and texture.
- If lines separate slightly when breaking, warming the bark slightly before cutting helps maintain layers.
Nutrition
- Serving Size: 1 piece (about 24 pieces per batch)
- Calories: 150
- Sugar: 16g
- Sodium: 10mg
- Fat: 9g
- Saturated Fat: 5g
- Unsaturated Fat: 3g
- Trans Fat: 0g
- Carbohydrates: 18g
- Fiber: 1g
- Protein: 1g
- Cholesterol: 5mg


