If you’re hunting for a Halloween treat that’s equal parts spooky and super easy, you’ve gotta try this Peanut Butter Spider Cookies Recipe. I absolutely love how these little creepy crawlies turn out—cute enough to impress the kids but simple enough that you can whip them up on a whim. Whether you’re throwing a party or just want a fun snack to share, these cookies are a total crowd-pleaser and a blast to make!
Why You’ll Love This Recipe
- Super Simple: You only need a handful of ingredients and minimal prep—perfect for last-minute baking.
- Kid-Friendly Fun: This is such a fun project for little helpers who love to get crafty in the kitchen.
- Crunchy & Chewy Combo: The peanut butter cookies paired with Reese’s cups give you the perfect texture contrast.
- Customizable & Cute: Add candy eyeballs or go without—either way, these spiders are irresistibly festive.

Ingredients You’ll Need
These ingredients work like magic together—there’s no complicated measuring fuss, just fun assembly. I usually grab the mini Reese’s peanut butter cups in bulk because they’re the star of the show, and the melted chocolate binds it all perfectly.
- Peanut butter cookies: You can buy store-bought ones to save time or make your favorite homemade peanut butter cookie recipe.
- Mini Reese’s peanut butter cups: The perfect size to become the spider’s body; make sure they’re wrapped in mini form for cuteness overload.
- Semi-sweet chocolate: Melted to “glue” the pieces together and pipe the spider legs—dark enough to contrast but not too bitter.
- Mini candy eyeballs (optional): These add personality and are so adorable, but you can skip if you don’t have them handy.
Variations
I’ve found that this Peanut Butter Spider Cookies Recipe invites tons of opportunities to personalize it. Feel free to swap candy, experiment with cookie bases, or even mix in some festive sprinkles to crank up the Halloween vibe.
- Addictive Chocolate Drizzle: I once drizzled white chocolate over the spiders for a spooky web effect—it was a hit with the adults!
- Gluten-Free Cookies: Use your favorite gluten-free peanut butter cookies for a fun twist that everyone can enjoy.
- Nut-Free Version: Swap peanut butter cookies for sugar cookies and use chocolate chips instead of Reese’s cups if allergies are a concern.
- Mini Marshmallow Eyes: If you don’t have candy eyeballs, tiny marshmallows and a dot of chocolate make cute improvised eyes.
How to Make Peanut Butter Spider Cookies Recipe
Step 1: Melt Your Chocolate Like a Pro
Start by melting the semi-sweet chocolate either over a double boiler or in the microwave. I like microwaving in 30-second bursts, stirring each time—this helps keep your chocolate silky smooth without burning it. Once melted, spoon the chocolate into a piping bag or a Ziploc with just a teensy snip of the corner. This will make your jungle of spider legs look neat and realistic.
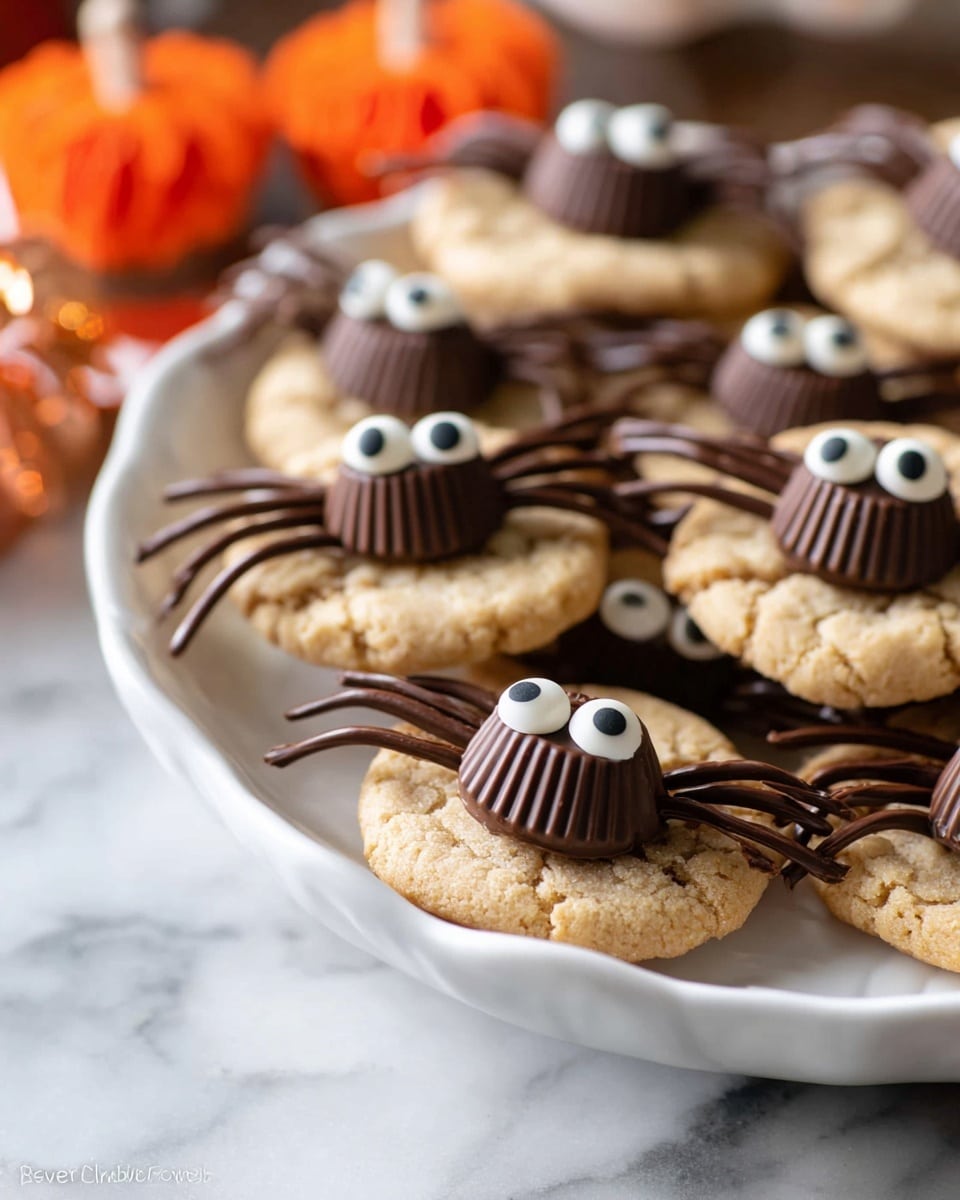
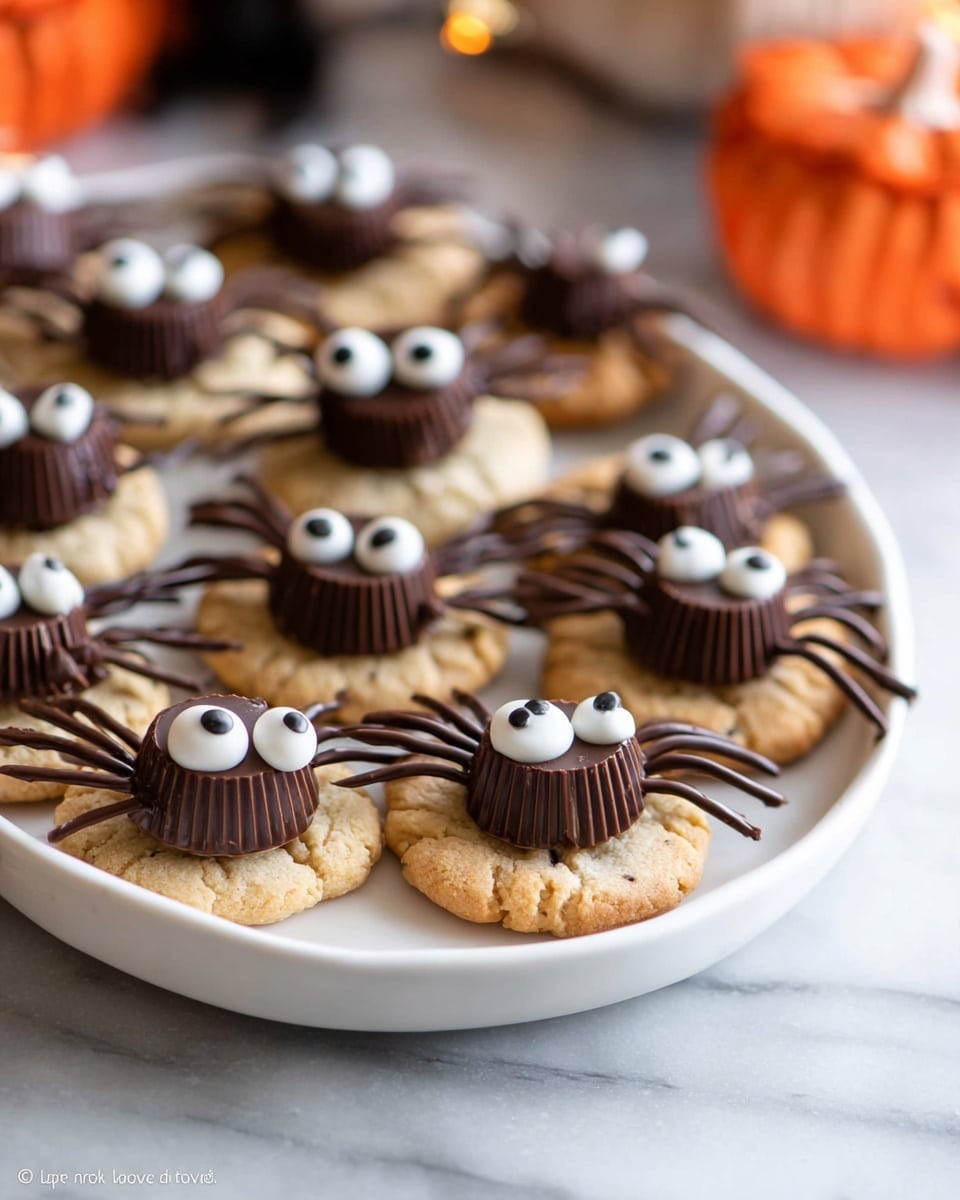
Step 2: Build Your Peanut Butter Spider Body
Place a small dollop of melted chocolate in the center of one peanut butter cookie. Quickly press a mini Reese’s peanut butter cup on top—the chocolate acts like glue here, keeping the cup in place. This is such a fun step because you realize how simple it is to turn these classic candies into spiders!
Step 3: Create Those Creepy Crawly Legs
Using the piping bag, draw eight thin “legs”—four on each side of the Reese’s cup. It helps to work on a piece of parchment paper first if you want to practice your spider legs before going straight onto the cookies. Just take your time and don’t rush; the chocolate dries pretty quickly so you want clean, even lines.
Step 4: Attach the Eyes for Extra Spooky Personality
Dip a tiny bit of melted chocolate onto the front of the Reese’s peanut butter cup and carefully press two mini candy eyeballs on top. This step turns a regular cookie into a spidery critter with character. If you skip the eyes, the cookies are still fabulous, but trust me—the googly eyes are what make people go “aww” and “yikes!” simultaneously.
Pro Tips for Making Peanut Butter Spider Cookies Recipe
- Use Room Temperature Chocolate: If your melted chocolate gets too thick, gently reheat it—stiff chocolate makes leg piping tricky.
- Chill Before Serving: I like to refrigerate the cookies for about 10-15 minutes so the chocolate sets nicely and legs don’t break when you pick them up.
- Work Quickly: Melted chocolate hardens fast; have all your cookies ready to assemble before you start piping legs or attaching eyes.
- Prevent Sticky Cookies: Use a clean, dry cookie surface—any oil or moisture can prevent the chocolate from sticking properly.
How to Serve Peanut Butter Spider Cookies Recipe
Garnishes
I usually keep it simple with the mini candy eyeballs because that’s enough to bring the spiders to life. For extra flair, you could dust them lightly with edible glitter or add a tiny dab of colored frosting to give the eyes a little sparkle. I once sprinkled crushed pretzels around the plate to create a creepy spider web effect—seriously elevated the display!
Side Dishes
Since these are sweet and rich, I like pairing them with something refreshing like apple slices or a glass of cold milk to balance the peanut buttery goodness. They’re also great alongside a pumpkin spice latte or hot cocoa for an indulgent treat on a chilly fall evening.
Creative Ways to Present
I’ve served these on dark-colored platters to make those chocolatey legs pop visually—adds a fun contrast. For kids’ parties, setting them on a big spider web made from string or icing on a tray makes it interactive and Instagram-worthy. Plus, you could let kids decorate their own spiders with different candies for a festive cookie-decorating activity.
Make Ahead and Storage
Storing Leftovers
Leftover Peanut Butter Spider Cookies hold up really well stored at room temperature in an airtight container for 5-6 days. I keep mine in a single layer to protect those delicate chocolate legs from breaking. You’ll notice they stay flavorful and perfectly textured without getting too soft or dry.
Freezing
If you want to make these ahead of time for a party, freezing is your friend. I freeze assembled spiders in a single layer on a baking sheet, then transfer them to a freezer-safe bag or container. They keep great for up to 2 months. Just thaw at room temperature before serving—the legs might be a tiny more fragile after thawing, so handle gently.
Reheating
Since these are cookies with chocolate decorations, I recommend skipping the microwave to warm them up—it can melt the chocolate legs. Instead, let them sit at room temp or pop them in a low-temp oven (like 250°F) for a few minutes if you want them slightly warm. This keeps their shape intact and makes them extra comforting.
FAQs
-
Can I use any type of peanut butter cookie for this recipe?
Absolutely! Whether you go homemade or store-bought, as long as the cookies are sturdy enough to hold the Reese’s cup and the melted chocolate, your peanut butter spiders will turn out great. Chewier cookies work best to support the chocolate legs without crumbling.
-
What if I don’t have candy eyeballs?
No worries at all! You can use mini marshmallows with small dots of melted chocolate for eyes or even small chocolate chips. The cookies still look awesome without eyes too, just a little less creepy-cute.
-
How do I prevent the chocolate from hardening too fast when piping the legs?
Working in a slightly warm kitchen helps, and reheating the chocolate gently if it starts to stiffen is key. Make sure your chocolate is smooth and fluid before you start piping, and do small batches of legs at a time.
-
Can I prepare these cookies a day ahead?
Yes! You can assemble them a day in advance and store them in an airtight container at room temperature. Just be gentle when handling to avoid breaking the chocolate legs.
Final Thoughts
This Peanut Butter Spider Cookies Recipe is one of those feel-good treats that brings smiles and just a little bit of silly spookiness to your snack time. I still remember the first time I made these for my niece’s Halloween party—she was so proud showing off “her” spiders, and honestly, I was proud of how easy and delicious they turned out. I can’t recommend giving this recipe a try enough; it’s a simple way to delight both kids and adults without fuss or stress. So grab some peanut butter cookies and mini Reese’s cups, and let’s make some adorable spider magic!
Print
Peanut Butter Spider Cookies Recipe
- Prep Time: 10 minutes
- Cook Time: 0 minutes
- Total Time: 10 minutes
- Yield: 12 cookies
- Category: Dessert
- Method: No-Cook
- Cuisine: American
Description
These Peanut Butter Spider Cookies are a fun and spooky treat perfect for Halloween or any festive occasion. Made with peanut butter cookies topped with mini Reese’s peanut butter cups and decorated with melted chocolate to create spider legs, they are both delicious and adorable. Optional mini candy eyeballs add an extra creepy-cute touch. Quick to assemble and no baking required if using store-bought cookies, these cookies are sure to delight kids and adults alike.
Ingredients
Base Cookies
- 12 peanut butter cookies (store-bought or homemade)
Toppings
- 12 mini Reese’s peanut butter cups
- 1/4 cup semi-sweet chocolate, melted
- Optional: 24 mini candy eyeballs
Instructions
- Melt Chocolate: Gently melt the semi-sweet chocolate in a double boiler or microwave, stirring every 30 seconds until smooth and fully melted. Transfer the melted chocolate into a piping bag or a Ziploc bag and snip a tiny hole at the end for precise piping.
- Assemble Spiders: Place a small dollop of melted chocolate in the center of each peanut butter cookie as glue. Press a mini Reese’s peanut butter cup firmly on top of each chocolate spot to create the spider’s body.
- Pipe Legs: Using the piping bag filled with melted chocolate, pipe eight spider legs per cookie—four on each side—extending outwards from the peanut butter cup to resemble spider legs.
- Add Eyes (Optional): Dab a small amount of melted chocolate on the front of each mini peanut butter cup and affix two mini candy eyeballs on top to give your spiders creepy eyes.
- Storage: Allow the chocolate to set completely at room temperature. Store the finished peanut butter spider cookies at room temperature for 5-6 days or freeze them for up to 2 months.
Notes
- For best results, use fresh peanut butter cookies that are firm enough to support the Reese’s peanut butter cups.
- If you don’t have a piping bag, a Ziploc bag with a small corner snipped off works perfectly for piping the legs.
- To speed up chocolate setting, you can refrigerate the cookies briefly after assembling.
- If you prefer less sweetness, use dark chocolate instead of semi-sweet.
- These cookies are great for Halloween parties, school events, or as a fun family baking project.
Nutrition
- Serving Size: 1 cookie
- Calories: 180
- Sugar: 14g
- Sodium: 150mg
- Fat: 10g
- Saturated Fat: 4g
- Unsaturated Fat: 5g
- Trans Fat: 0g
- Carbohydrates: 19g
- Fiber: 1g
- Protein: 4g
- Cholesterol: 10mg


