
If you’re craving a fun, colorful twist on the classic cookie, I’ve got something special for you. These Pastel Sugar Cookie Sandwiches Recipe are absolutely delightful—vibrant pastel colors, soft but sturdy sugar cookies, and a creamy vanilla filling that makes every bite a party in your mouth. I promise you, once you try this recipe, you’ll find it hard to stop at just one sandwich!
Why You’ll Love This Recipe
- Vibrant pastel colors: Using gel food coloring, the cookies get beautiful soft hues without changing their texture.
- Perfectly soft cookies: Not too crunchy, not too soft—just the right balance to hold the filling without falling apart.
- Creamy vanilla filling: It’s fluffy, smooth, and adds a luscious touch that complements the cookies flawlessly.
- Great for any occasion: These pastel sandwich cookies brighten up celebrations or just make everyday moments extra fun.

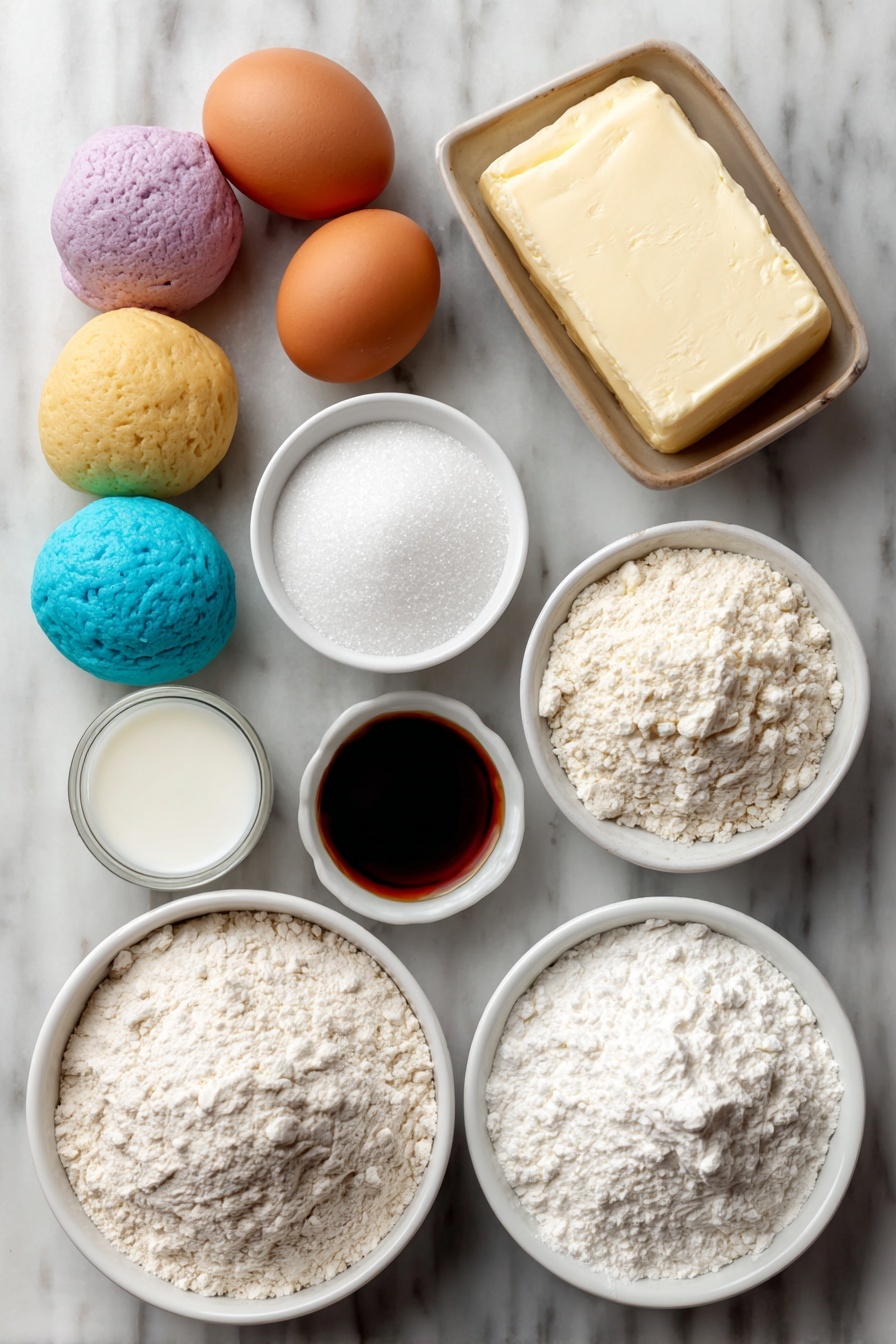
Ingredients You’ll Need
This recipe relies on simple, pantry-friendly ingredients that come together beautifully. Freshness is key here, especially for the butter and vanilla, which add richness and flavor depth.
- Unsalted butter: Softened to room temperature for easy creaming and fluffy texture in both cookies and filling.
- Granulated sugar: Adds sweetness and helps create that classic sugar cookie crumb.
- Egg: Binds ingredients together and gives the cookies structure.
- Vanilla extract: Brings warmth and richness—don’t skimp on this!
- All-purpose flour: The base that creates the cookie’s tender yet sturdy crumb.
- Baking soda and baking powder: Work together to give a slight lift without puffiness.
- Salt: Balances sweetness and enhances overall flavor.
- Milk: Adds moisture to create soft dough that’s easy to shape.
- Gel food coloring (pink, yellow, green, blue, purple): Use gel varieties for vibrant pastel shades without watering down the dough.
- Powdered sugar: Essential for the silky vanilla filling – sweet and smooth!
- Heavy cream or milk: Adds creaminess and helps get the filling to the perfect spreadable consistency.
- Pinch of salt (for filling): Enhances the vanilla filling’s flavor, cutting through the sweetness just right.
Variations
I love that this pastel sugar cookie sandwich template gives you so much room to play around. You can tweak colors, fillings, and even add flavor twists to make these your own. Don’t hesitate to experiment—you might discover your new favorite!
- Different Fillings: I sometimes swap the vanilla filling for chocolate ganache or cream cheese frosting—it changes the game entirely!
- Flavor Boosts: Adding lemon zest or almond extract to the dough gives a subtle but amazing twist I’ve tried with great results.
- Dietary Mods: You can make these gluten-free by swapping in your favorite gluten-free flour blend and adjusting liquids accordingly.
- Seasonal Colors: Change the pastel palette to bolder hues for holidays or celebrations, like red and green for Christmas or orange and black for Halloween.
How to Make Pastel Sugar Cookie Sandwiches Recipe
Step 1: Preheat and Prepare Your Space
I always start by preheating the oven to 350°F (175°C) and lining my baking sheets with parchment paper. It’s such a simple step but saves you from sticky cookies or uneven browning later. Plus, having everything prepped lets you focus when the dough’s ready.
Step 2: Cream Butter and Sugar Until Fluffy
This is where the magic begins. Beat your softened butter and granulated sugar together for about 2 minutes until you see a pale, fluffy mixture. I discovered this trick early on—if you don’t cream enough, the cookies can turn out dense instead of tender.
Step 3: Add Egg and Vanilla, Then Combine Dry Ingredients
Mix the egg and vanilla into the butter mixture until everything’s smoothly incorporated. In a separate bowl, whisk together flour, baking soda, baking powder, and salt to evenly disperse the leavening agents. Slowly add these dry ingredients to your wet mix on low speed—if you go too fast, you’ll end up with a flour cloud everywhere.
Step 4: Add Milk for Texture
Add the milk in last to soften the dough. You’ll find that it makes the dough pleasantly pliable without being sticky. If yours feels too sticky to handle, just pop it in the fridge for about 15 minutes before moving on.
Step 5: Divide and Color the Dough
I like to split the dough into five equal parts, then knead in a different gel food color into each. This step is so fun! I usually wear gloves to avoid stained fingers. Be patient kneading the color evenly—you want those pretty pastel shades to shine through with no streaks.
Step 6: Shape, Bake, and Cool
Roll each portion into smooth balls about 1 tablespoon each and place them on your parchment-lined sheets about 2 inches apart. Bake for 8-10 minutes just until the edges set and the tops show those delicate cracks—not browned. You want them just done so the cookies stay tender yet firm enough to sandwich. Let them rest 5 minutes on the sheet, then cool fully on a wire rack.
Step 7: Whip Up the Vanilla Filling
In a mixing bowl, beat softened butter until smooth. Gradually add powdered sugar, then mix in heavy cream (or milk), vanilla extract, and a pinch of salt. Keep beating until the filling is light, fluffy, and spreadable. If it’s too stiff, add a bit more cream; too runny, toss in extra powdered sugar. Finding this balance makes assembly easier and the filling perfect.
Step 8: Assemble Your Cookie Sandwiches
Once cookies are completely cool, pair them by size to keep sandwiches uniform. On the flat side of one cookie, spread or pipe a generous amount of the vanilla filling, then gently press the second cookie on top. The filling should peek out just a bit—that’s the sweet spot!
Step 9: Let Them Set Before Serving
Letting the sandwiches rest for about 10 minutes helps the filling firm up slightly, which keeps everything neat and makes them easier to handle—especially if you’re packing them for a party or gift.
Pro Tips for Making Pastel Sugar Cookie Sandwiches Recipe
- Use Gel Food Coloring: It gives vibrant pastels without thinning your dough, which I learned saves a lot of frustration.
- Don’t Overbake Cookies: They should be just set with cracked tops, not browned—this keeps them tender and perfect for sandwiches.
- Match Cookie Sizes: Pairing similar-sized cookies makes your sandwiches look professional and ensures even filling layers.
- Chill If Dough Feels Sticky: Don’t skip this step if needed—handling cool dough prevents overly soft or crumbly cookies.
How to Serve Pastel Sugar Cookie Sandwiches Recipe

Garnishes
I like adding a light dusting of powdered sugar on top right before serving—it adds a pretty, snowy effect without overpowering the colors. Sometimes, I also sprinkle a few tiny edible glitter specks or pastel nonpareils for extra festivity, especially when serving to kids.
Side Dishes
These cookie sandwiches are sweet and substantial on their own. But when I serve them at brunch or parties, I love pairing them with a fresh fruit platter, herbal tea, or a light citrus punch to balance the sweetness.
Creative Ways to Present
I’ve found that arranging pastel cookie sandwiches in a tiered dessert stand instantly makes any celebration feel special. For Easter or baby showers, lining them up in a pretty box with shredded pastel tissue paper also makes a wonderful edible gift that always gets compliments!
Make Ahead and Storage
Storing Leftovers
Store your assembled cookie sandwiches in an airtight container at room temperature for up to 3 days—if you want them softer, that’s perfect. Refrigeration extends freshness up to a week, just bring them to room temp before enjoying so the filling softens up beautifully again.
Freezing
You can freeze both unfilled cookies and assembled sandwiches! For sandwiches, wrap each one in plastic wrap and place all in a freezer bag. I’ve had success freezing up to a month. Just thaw overnight in the fridge and then bring to room temperature before serving.
Reheating
I don’t usually reheat these since they’re best enjoyed cool. But if you prefer a slightly warm cookie, pop one in the microwave for about 5-7 seconds—just enough to soften without melting the filling completely.
FAQs
-
Can I make these cookie sandwiches without food coloring?
Absolutely! If you prefer, you can leave the dough its natural creamy color for a classic sugar cookie look. The filling still shines on its own, and you’ll get delicious results without the colors.
-
Why use both baking soda and baking powder?
Using both gives the cookies a delicate lift and tender crumb without making them too cakey or fluffy, which is perfect for sturdy sandwich cookies that hold filling well.
-
Can I use butter substitutes?
You can use margarine or vegan butter alternatives, but note the taste and texture might differ slightly. Real unsalted butter gives the best flavor and texture for this recipe.
-
How long do these cookies stay fresh?
Stored properly in an airtight container, they’re best eaten within 3 days at room temperature. Refrigeration extends shelf life up to a week.
Final Thoughts
I absolutely love how these pastel sugar cookie sandwiches brighten up any afternoon snack or celebration. When I first tried this recipe, I was amazed at how easy it was to create bakery-worthy treats right at home, and my family goes crazy for them every time. If you’re looking for a fun project that delivers both eye-catching color and irresistible flavor, I encourage you to give this Pastel Sugar Cookie Sandwiches Recipe a try—you won’t regret it, and I bet it’ll become a beloved favorite for your kitchen too!
Print
Pastel Sugar Cookie Sandwiches Recipe
- Prep Time: 30 minutes
- Cook Time: 10 minutes
- Total Time: 40 minutes
- Yield: 24 cookie sandwiches
- Category: Dessert
- Method: Baking
- Cuisine: American
Description
Delight in these charming Pastel Sugar Cookie Sandwiches, featuring soft, colorful sugar cookies paired with a creamy vanilla filling. Perfect as a sweet treat for parties or everyday indulgence, these cookies have a tender crumb with vibrant pastel hues and a luscious, fluffy filling that melts in your mouth.
Ingredients
For the Sugar Cookies:
- 1 cup unsalted butter, softened
- 1 ½ cups granulated sugar
- 1 large egg
- 2 teaspoons vanilla extract
- 2 ¾ cups all-purpose flour
- 1 teaspoon baking soda
- ½ teaspoon baking powder
- ½ teaspoon salt
- 2 tablespoons milk
- Gel food coloring (pink, yellow, green, blue, and purple)
For the Vanilla Filling:
- ½ cup unsalted butter, softened
- 2 cups powdered sugar
- 2 tablespoons heavy cream or milk
- 1 teaspoon vanilla extract
- Pinch of salt
Instructions
- Preheat the Oven: Set your oven to 350°F (175°C). Line a baking sheet with parchment paper and set aside for baking the cookies.
- Make the Cookie Dough: In a large mixing bowl, beat softened butter and granulated sugar until the mixture is light and fluffy, approximately 2 minutes. Then add the egg and vanilla extract, mixing thoroughly until combined.
- Combine the Dry Ingredients: In another bowl, whisk together all-purpose flour, baking soda, baking powder, and salt. Gradually incorporate this dry mix into the wet ingredients on low speed, forming a thick but soft dough. Add the milk and mix just until combined.
- Color the Dough: Divide the dough evenly into five portions. Tint each portion with a different gel food coloring (pink, yellow, green, blue, and purple), kneading each until the color is evenly distributed.
- Shape and Bake: Roll tablespoon-sized dough portions into smooth balls and place them 2 inches apart on the prepared baking sheet. Bake for 8-10 minutes until the edges are set and the tops show slight cracks but no browning. Let cookies cool on the baking sheet for 5 minutes, then transfer to wire racks to cool completely.
- Make the Vanilla Filling: Beat softened butter in a bowl until smooth. Gradually add powdered sugar, then mix in heavy cream (or milk), vanilla extract, and a pinch of salt. Continue beating until the filling is fluffy and spreadable. Adjust thickness by adding more cream or powdered sugar as needed.
- Assemble the Cookie Sandwiches: Pair cooled cookies of similar size. Spread a generous amount of filling on the flat side of one cookie using a piping bag or spoon, then top with the matching cookie. Press gently to evenly spread the filling.
- Set Before Serving: Allow the assembled cookie sandwiches to rest for about 10 minutes so the filling firms slightly and melds the cookies together for the perfect texture.
Notes
- Use gel food coloring for vibrant pastel shades without affecting dough texture.
- If dough gets too soft while handling, refrigerate for 15-20 minutes before rolling.
- Store cookie sandwiches in an airtight container at room temperature for up to 3 days or refrigerated for up to one week.
- Let chilled cookies come to room temperature before serving for optimal texture.
Nutrition
- Serving Size: 1 cookie sandwich
- Calories: 180 kcal
- Sugar: 15 g
- Sodium: 80 mg
- Fat: 9 g
- Saturated Fat: 5 g
- Unsaturated Fat: 3 g
- Trans Fat: 0 g
- Carbohydrates: 22 g
- Fiber: 0.5 g
- Protein: 2 g
- Cholesterol: 20 mg


