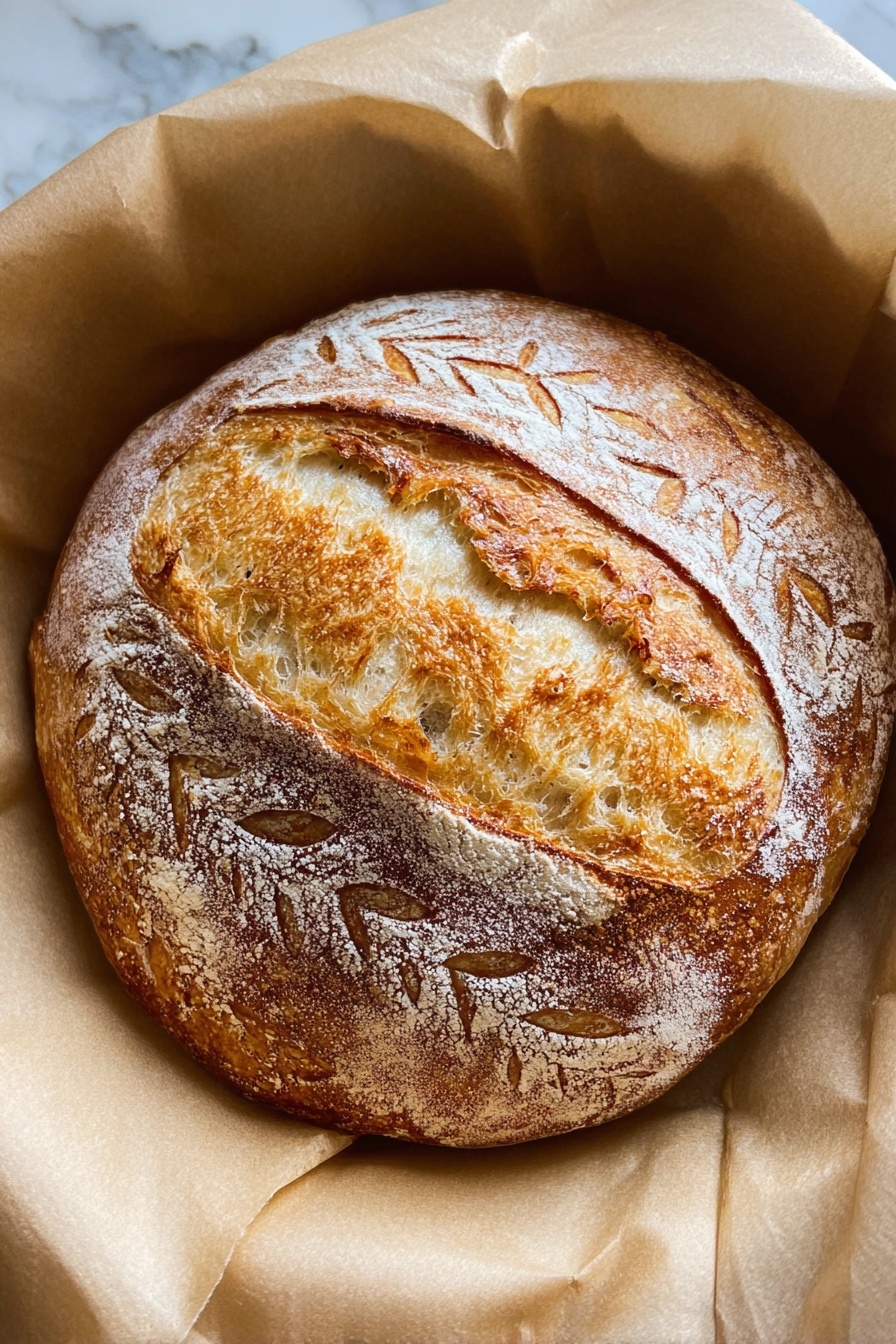
If you’ve ever been curious about baking your own bread but felt intimidated by sourdough, this Overnight Sourdough Bread Recipe is about to become your new best friend. I love this recipe because it’s forgiving, hands-off overnight, and yields a crusty, tangy loaf that makes your kitchen smell like a cozy bakery. Whether you’re a beginner or just looking for a simple way to get that homemade sourdough fix, you’ll find that this recipe fits perfectly into any schedule.
Why You’ll Love This Recipe
- Effortless Overnight Rise: Mix it up at night and let the magic happen while you sleep.
- Beautiful Crust and Open Crumb: You’ll get those perfect bubbles and a golden crust every time.
- Flexible Ingredients: Only a handful of pantry staples required, great for beginners.
- Sourdough Flavor That Pops: Using an unfed starter gives your bread a tangy, bold character.

Ingredients You’ll Need
Here’s where simplicity shines—the ingredients are straightforward, yet they come together wonderfully to create a bread that’s more than the sum of its parts. Buying high-quality all-purpose flour and a lively sourdough starter will make your life much easier.
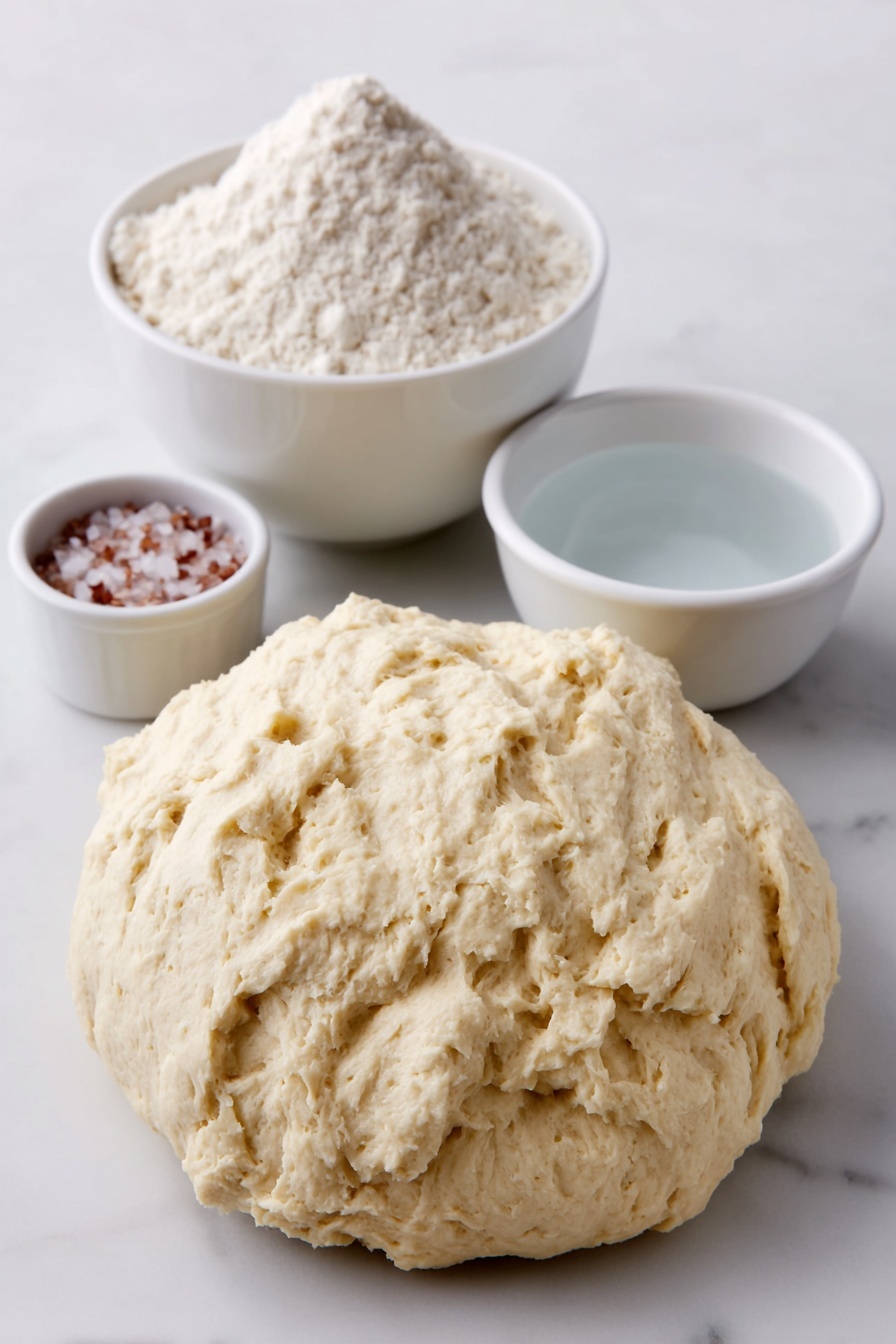
- Sourdough starter: This is your natural leavening agent; make sure it’s active and bubbly for the best rise.
- All-purpose flour: I love this flour because it strikes the perfect balance between protein and softness, giving a great crumb texture.
- Salt: Essential for flavor—don’t skip it, or your bread will taste flat.
- Water: Using lukewarm water helps your starter wake up and mix into the dough easily.
Variations
While this Overnight Sourdough Bread Recipe is fantastic as is, I love tinkering with it depending on my mood or what’s in my pantry. Feel free to play around and make it your own—bread baking should be fun, not stressful!
- Whole Wheat Addition: I sometimes swap out 20–30% of the flour for whole wheat to add depth and earthiness.
- Seed Mix Ins: Toasted sesame, sunflower, or flax seeds give a lovely crunch and nuttiness that my family can’t get enough of.
- Gluten-Free Twist: While this recipe is designed for all-purpose flour, you can blend gluten-free flours; just expect a different crumb and more hydration.
- Flavor Enhancers: Adding fresh herbs like rosemary or a touch of garlic powder can make your loaf extra special.
How to Make Overnight Sourdough Bread Recipe
Step 1: Mix It Up Before Bed
The night before you want to bake, measure out your flour, salt, and sourdough starter in a large bowl. I like to pour in the water gradually to help bring everything together with my hands. Don’t worry if the dough looks wet and sticky—that’s totally normal for this style. Cover your bowl with a towel and let it rest for 15 minutes; this little break lets the flour hydrate nicely.
Step 2: Fold, Don’t Knead
After the initial rest, it’s folding time. This technique is what gives your bread its structure without the work of traditional kneading. Wet your hands lightly so the dough won’t stick, then pick up one corner and fold it over the rest of the dough. Rotate and repeat about 15 times until it feels more elastic and less sticky. Let it rest another 15 minutes, then fold again and cover overnight. You’ll wake up to a bubbly, risen dough that smells amazing.
Step 3: Shape and Chill
In the morning, your dough will have risen beautifully with air bubbles on top—that’s the sourdough spirit showing! Prepare a bowl lined with parchment paper and dusted with flour. Wet your hands and gently loosen the dough from the bowl edges. Fold the dough by gently lifting the middle and tucking the ends underneath, giving the bowl a quarter turn and repeating a couple more times. Transfer your shaped dough to the lined bowl, sprinkle flour on top, and pop it into the fridge for about 5 hours. This chilling step helps develop flavor and makes handling the dough easier for baking.
Step 4: Bake Like a Pro
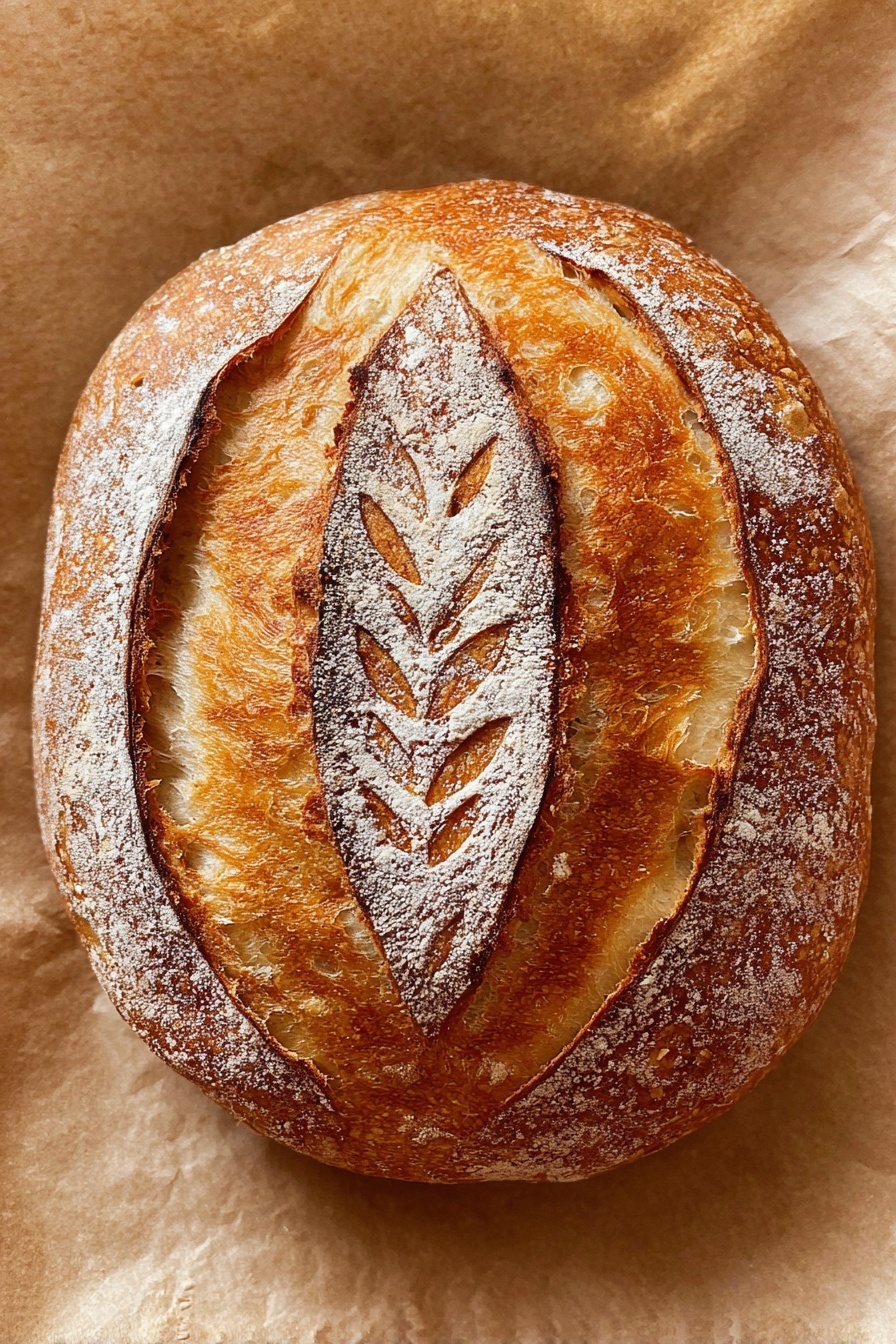
Preheat your oven to 500°F (I love using convection if you have it) and place a Dutch Oven inside to get it blazing hot—this mimics a professional bread oven with steam. Take your dough out of the fridge, score it with a sharp knife to let it expand in the oven (I do a long slash down the middle with a few little cuts on the sides), then carefully transfer it to the Dutch Oven using the parchment paper. Cover and bake for 25 minutes, then remove the lid, lower the temperature to 450°F, and bake for another 12–14 minutes until it’s a gorgeous golden brown crust. Ah, that aroma—you’re moments from bread bliss!
Once out of the oven, let it cool on a wire rack (this part is hard to wait for, but trust me on this!)—about an hour is best. This resting time lets the crumb set perfectly, so you get that chewy, open texture we all crave.
Pro Tips for Making Overnight Sourdough Bread Recipe
- Use Unfed Starter for More Tang: I learned that using unfed starter results in that classic sourdough tang that I adore—feel free to experiment!
- Wet Your Hands Before Folding: It prevents the dough from sticking and keeps the folds smooth and gentle, making shaping far less frustrating.
- Preheat Dutch Oven Thoroughly: Putting your bread into a fully heated Dutch Oven creates steam that’s key for that crispy crust.
- Don’t Rush Cooling: Waiting at least one hour before slicing keeps the crumb from becoming gummy—it’s tough, but worth it!
How to Serve Overnight Sourdough Bread Recipe
Garnishes
I love sprinkling just a little extra flour on top before baking—it gives that artisan look everyone admires. When serving, a swipe of good salted butter or a drizzle of olive oil with fresh herbs makes the bread sing. Some days, I’ll toast a slice and add smashed avocado with a pinch of chili flakes for a simple, delicious treat.
Side Dishes
This bread is fantastic alongside soups, especially creamy tomato or a hearty lentil stew. My family goes crazy for it dipped in warm olive oil and balsamic vinegar, paired with a fresh salad or roasted veggies for a lighter meal. It’s also perfect for sandwiches — truly a kitchen all-rounder.
Creative Ways to Present
Hosting a brunch? I like slicing the loaf and arranging it on a wooden board with bowls of flavored butter, olives, and cheeses—it turns a simple loaf into a centerpiece. For special occasions, scoring the dough with decorative patterns (like leaves or waves) adds a personalized touch that always impresses guests.
Make Ahead and Storage
Storing Leftovers
I store leftover bread in a paper bag or a clean kitchen towel at room temperature to keep the crust crisp longer. Plastic bags tend to soften the crust too quickly. Usually, it lasts a good 2-3 days before I need to think about reviving it or freezing.
Freezing
If you want to save some for later, slice the loaf and freeze the slices individually wrapped or in a freezer-safe container. This way, you can pull out just a slice or two without thawing the whole loaf. I’ve found that frozen sourdough keeps great flavor and texture if well wrapped.
Reheating
To bring frozen or leftover bread back to life, I like to toast slices directly or wrap the whole loaf in foil and warm it in a 350°F oven for 10-15 minutes. This refreshes the crust and softens the crumb beautifully—like it was just baked!
FAQs
-
Can I use whole wheat flour for this Overnight Sourdough Bread Recipe?
Absolutely! You can swap out a portion of the all-purpose flour for whole wheat, but keep in mind that whole wheat absorbs more water and can make the dough denser. I recommend starting with 20-30% whole wheat and increasing hydration slightly to maintain that lovely open crumb.
-
Do I need to feed my sourdough starter before making this bread?
This recipe actually works great with unfed starter, which I find gives a more tangy flavor profile. However, if your starter hasn’t been active for a while, feeding it a few hours before baking can help boost its leavening power.
-
What if I don’t have a Dutch Oven — can I bake this bread another way?
You can definitely bake the bread on a preheated baking stone or heavy baking sheet. Adding steam during the first 20-25 minutes helps develop a crisp crust—try placing a pan of hot water in the oven or spritzing the dough with water before baking.
-
How can I tell when the bread is done baking?
Good question! The crust should be deep golden brown and feel firm to the touch. You can also tap the bottom of the loaf—it should sound hollow. If you have a thermometer, an internal temperature of around 200–210°F means it’s perfectly baked.
Final Thoughts
I absolutely love how this Overnight Sourdough Bread Recipe fits into my busy life without sacrificing flavor or that wonderful homemade quality. It’s like having a patient baking buddy who works quietly overnight and delivers fresh bread ready to impress each morning. I can’t wait for you to try it—you’ll soon find yourself hooked on baking bread at home just as much as I am. Remember, every loaf you make teaches you something new, so don’t be afraid to experiment and enjoy the process!
Print
Overnight Sourdough Bread Recipe
- Prep Time: 40 minutes
- Cook Time: 40 minutes
- Total Time: 18 hours 20 minutes
- Yield: 12 slices
- Category: Bread
- Method: Baking
- Cuisine: Artisan
Description
This Easy Overnight Sourdough Bread recipe produces a wonderfully tangy and airy loaf with a crisp crust using a minimal hands-on approach. Utilizing an overnight fermentation process, it requires only basic ingredients like sourdough starter, all-purpose flour, salt, and water. The dough is mixed, folded twice before an overnight rise, then shaped and retarded in the fridge before baking in a Dutch oven for a perfectly crusty, artisan-style bread at home.
Ingredients
Ingredients
- 90 grams sourdough starter
- 520 grams all-purpose flour
- 12 grams salt
- 1 7/8 cups water
Instructions
- Mix the Dough: The night before baking, combine 520 grams of all-purpose flour, 12 grams of salt, and 90 grams of sourdough starter in a bowl. Pour in 1 7/8 cups of water and mix with your hands until the dough is wet and sticky. It’s normal for the dough to not be smooth at this stage.
- First Rest and Fold Series: Cover the bowl with a towel. Let the dough rest for 15 minutes to hydrate the flour. Then perform a series of about 15 folds by grabbing a corner of the dough and folding it over itself, rotating the bowl with each fold. Wet your hands slightly to prevent sticking.
- Second Rest and Fold Series: Cover again and rest for another 15 minutes. Repeat the folding procedure to further develop gluten strength and dough structure.
- Overnight Rise: Cover the dough and leave it out at room temperature overnight to ferment and rise slowly, developing flavor and texture.
- Morning Fold and Shape: The next morning, the dough will be risen with visible air bubbles. Prepare a second bowl lined with parchment paper and floured base. Wet your hands, gently loosen the dough from its initial bowl, and fold it by lifting the center and tucking the ends underneath, rotating a quarter turn each time, repeating three times. Transfer the shaped dough to the prepared bowl, sprinkle flour on top, and place it in the fridge for a 5-hour cold retardation.
- Preheat Oven and Dutch Oven: Preheat your oven to 500°F (260°C), preferably using the convection setting. Place your Dutch oven inside to heat up while the oven comes to temperature.
- Score and Bake: Remove the dough from the fridge. Score the top with a sharp knife or blade, typically a long central slash with smaller side slashes. Using the parchment paper as a sling, transfer the dough into the hot Dutch oven.
- Bake Covered: Bake the bread covered with the Dutch oven lid on for 25 minutes. This traps steam allowing the crust to expand and develop.
- Bake Uncovered: Remove the lid and reduce the oven temperature to 450°F (230°C). Continue baking for another 12 to 14 minutes until the crust turns a deep golden brown and crisp.
- Cool: Remove the bread from the oven and let it cool on a wire rack. Wait at least 1 hour before slicing to allow the crumb structure to set.
Notes
- You may substitute other flours, but it’s recommended to keep a large portion as all-purpose flour to maintain the ideal texture and crumb.
- Baking times can be adjusted: for a lighter crust, bake longer with the lid on and shorter without it.
- Feeding your sourdough starter 8-12 hours before using it is common, but using unfed starter as in this recipe results in a tangier flavor.
Nutrition
- Serving Size: 1 slice (1/12th of loaf)
- Calories: 180
- Sugar: 0.3 g
- Sodium: 220 mg
- Fat: 1.1 g
- Saturated Fat: 0.2 g
- Unsaturated Fat: 0.7 g
- Trans Fat: 0 g
- Carbohydrates: 37 g
- Fiber: 2 g
- Protein: 6 g
- Cholesterol: 0 mg
![The Best Chicken Ramen Noodles [Of All Time] Recipe](https://evelynseats.com/wp-content/uploads/2025/06/0_0-1749385410884-768x960.webp)


