
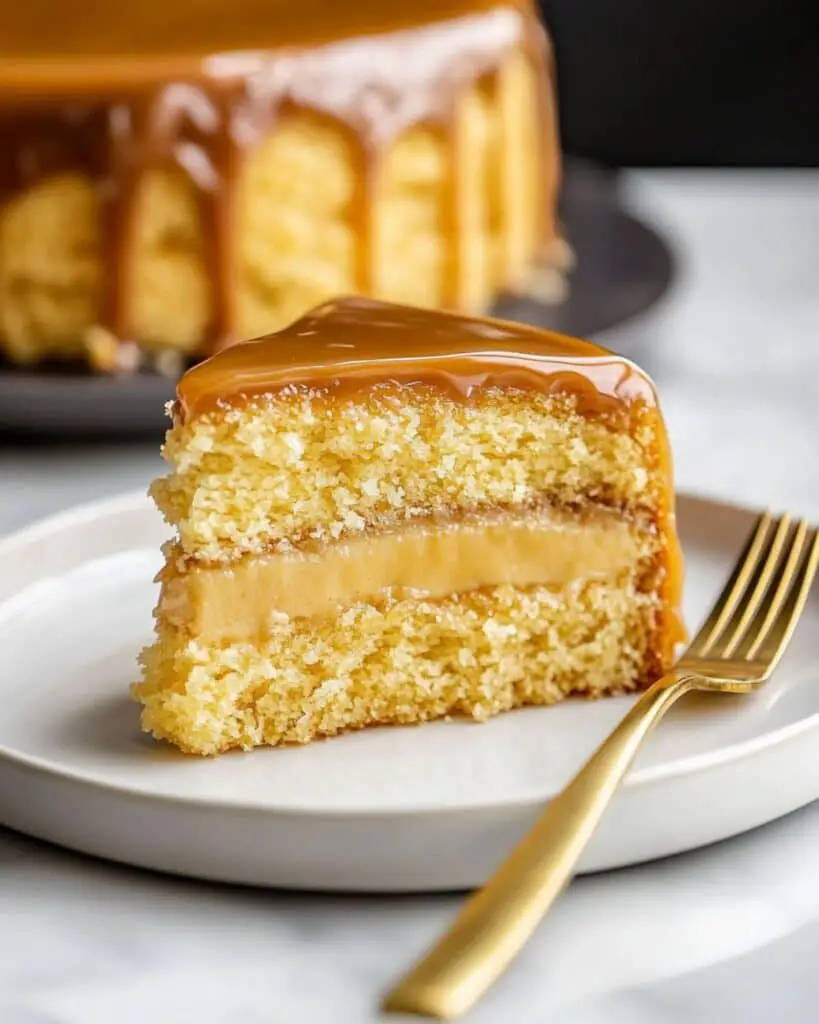
This Old Fashioned Caramel Cake is a true Southern treasure that brings together the perfect balance of moist, tender cake layers and rich, homemade caramel icing. The kind of dessert that makes time stand still at family gatherings, this recipe delivers a comforting sweetness that’s complex yet familiar. Made with everyday ingredients but resulting in extraordinary flavor, this cake is perfect for special occasions or whenever you need to satisfy that caramel craving.
Why You’ll Love This Recipe
- Classic Comfort: There’s something about this cake that feels like a warm hug. The homemade caramel icing creates a nostalgic flavor that reminds you of grandma’s kitchen.
- Impressive Results: Despite being a straightforward recipe, the finished cake looks and tastes like it came from a high-end bakery. Your friends will be begging for the recipe!
- Versatile Showstopper: Perfect for birthdays, holidays, or Sunday dinners. This cake doesn’t need a special occasion, but it certainly creates one!
- Balance of Flavors: The delicate vanilla cake provides the perfect canvas for the star of the show – that rich, deeply flavored caramel icing that’s worth every minute it takes to make.

Ingredients You’ll Need
- Cake flour: Creates a more tender, delicate crumb than all-purpose flour. The lower protein content means your cake will be light rather than dense.
- Baking powder and baking soda: The dynamic duo that gives your cake the perfect rise. They work differently but together create the ideal texture.
- Salt: A flavor enhancer that balances the sweetness and brings out the vanilla notes.
- Butter: Provides richness and helps create that velvety texture. The fat also carries flavor throughout the cake.
- Sugar: Beyond sweetness, sugar adds moisture and helps create a tender crumb structure.
- Egg yolks: Add richness and help emulsify the batter, creating a smooth, cohesive mixture.
- Vanilla extract: Adds that warm, aromatic flavor that pairs perfectly with caramel.
- Buttermilk: The slight tang cuts through the sweetness and reacts with the leavening agents for a better rise.
- Egg whites: When beaten separately and folded in, they add lightness and airiness to the cake structure.
For the Caramel Icing:
- Butter: Creates the base for your caramel and adds richness.
- Evaporated milk: More concentrated than regular milk, it gives the caramel a creamy consistency and depth of flavor.
- Sugar: Transforms through slow cooking into that magical caramel flavor we’re after.
- Salt: Enhances the caramel flavor and creates that irresistible sweet-salty balance.
- Vanilla extract: Rounds out the flavor profile of the caramel with its aromatic warmth.
Note: You’ll find the complete list of ingredients, along with their exact measurements, in the printable recipe card at the bottom of this post.
Variations
Salted Caramel Version
Add an extra 1/2 teaspoon of salt to the caramel icing for a trendy salted caramel twist that balances sweetness beautifully.
Nutty Upgrade
Sprinkle toasted pecans or walnuts between the layers or press them into the sides of the frosted cake for a delightful textural contrast.
Caramel Apple Cake
Add 1 cup of finely diced apples to the cake batter and a teaspoon of cinnamon to create a fall-inspired version that’s absolutely divine.
Caramel Mocha Fusion
Add 2 tablespoons of espresso powder to the cake batter and 1 tablespoon to the caramel for a sophisticated coffee-infused variation.
How to Make Old Fashioned Caramel Cake
Step 1: Prepare Your Baking Pans
Start by preheating your oven to 350°F. Properly prepare your cake pans with a thorough greasing and light flour coating. This crucial step ensures your cakes will release perfectly after baking.
Step 2: Mix the Dry Ingredients
Whisk together your cake flour, baking powder, salt, and baking soda in a bowl until well combined. This even distribution ensures consistent leavening and flavor throughout your cake.
Step 3: Create the Butter Base
Beat the butter and sugar together until they transform into a light, fluffy mixture. This process, which takes about 3 minutes, incorporates air that’s vital for a tender cake texture.
Step 4: Build Your Batter
Add egg yolks one at a time, allowing each to fully incorporate before adding the next. Mix in vanilla, then alternately add your dry ingredients and buttermilk, starting and ending with dry ingredients. This method prevents overmixing while ensuring everything blends properly.
Step 5: Add the Secret to Lightness
Beat those egg whites separately until they form soft, fluffy peaks. Gently fold them into your batter, preserving as much air as possible for that perfect cake texture.
Step 6: Bake to Perfection
Divide your batter evenly between pans and bake for 22-25 minutes. Your cake is done when a toothpick comes out clean and the edges just begin to pull away from the pan.
Step 7: Craft the Caramel Icing
While your cakes cool, make the caramel icing by melting butter in a large saucepan, then adding evaporated milk, sugar, and salt. Cook over low heat, whisking frequently, until it transforms into a thick, golden-brown caramel that coats the back of a spoon.
Step 8: Finish and Assemble
Allow the caramel to cool slightly before icing your completely cooled cake. Pour some caramel between layers, then cover the top and sides with the remaining icing, working quickly as it will begin to set.
Pro Tips for Making the Recipe
- Take Your Time: The caramel icing requires patience. Rushing with higher heat will result in burned caramel that can’t be saved.
- Room Temperature Matters: Using room temperature ingredients for the cake batter creates a smoother, more even texture and better rise.
- The Whisk Test: Your caramel is ready when it coats the back of a spoon and you can draw a line through it with your finger that holds its shape.
- Work Quickly with Caramel: Have your cake layers ready before the caramel is done. Once the caramel reaches the right consistency, you’ll need to ice the cake while it’s still pourable.
- Level Your Cakes: For a professional-looking finish, trim the domed tops of your cakes with a serrated knife before assembling.
How to Serve
This cake shines as the centerpiece of any dessert table! Here are my favorite ways to serve it:
Perfect Pairings
Serve slices with a scoop of vanilla ice cream or a dollop of lightly sweetened whipped cream to complement the rich caramel flavors.
Beverage Companions
A cup of strong coffee balances the sweetness beautifully, while a glass of cold milk is the classic choice that never disappoints.
Presentation
For special occasions, dress up individual slices with a light dusting of powdered sugar, a drizzle of extra caramel sauce, or even a few edible gold flakes for a truly spectacular presentation.
Make Ahead and Storage
Storing Leftovers
Store this cake covered at room temperature for up to 3 days. The caramel icing actually creates a protective seal that helps keep the cake moist and fresh.
Freezing
You can freeze unfrosted cake layers, tightly wrapped in plastic wrap and aluminum foil, for up to 3 months. Thaw at room temperature before icing. The completed caramel cake doesn’t freeze well as the texture of the icing changes upon thawing.
Reheating
Individual slices can be warmed for 10-15 seconds in the microwave for that fresh-baked taste and to slightly soften the caramel icing.
FAQs
-
Why did my caramel icing turn grainy?
Graininess usually occurs when sugar crystals form during cooking. Make sure you’re whisking regularly and cooking over low heat. Also, avoid scraping down the sides of the pan where sugar crystals can form – instead, gently wash down the sides with a wet pastry brush if needed.
-
Can I make this cake with all-purpose flour instead of cake flour?
Yes, you can substitute all-purpose flour, but your cake will have a slightly denser texture. For each cup of cake flour, use 1 cup minus 2 tablespoons of all-purpose flour plus 2 tablespoons of cornstarch to more closely mimic cake flour’s properties.
-
My caramel icing hardened before I could finish frosting the cake. What went wrong?
Caramel continues to thicken as it cools. If it hardens too quickly, gently warm it over very low heat while whisking until it reaches a pourable consistency again. Work as quickly as possible when frosting the cake.
-
How do I know when the caramel is the right consistency?
The perfect caramel should be thick enough to coat the back of a spoon but still pourable. It should be a rich golden-brown color, similar to a copper penny. If you drop a small amount into cold water, it should form a soft ball that flattens when removed from the water.
Final Thoughts
This Old Fashioned Caramel Cake is more than just a dessert—it’s a legacy on a plate. The first time I made it, I was intimidated by the caramel process, but that first perfect bite made every minute of stirring worthwhile. Don’t be discouraged if your first attempt isn’t perfect; caramel-making is an art that gets better with practice. The beauty of this recipe lies in its timeless appeal and the way it brings people together around the table. Go ahead and treat yourself and your loved ones to this southern classic—I promise the memories you’ll create will be as sweet as the cake itself!
Print
Old Fashioned Caramel Cake Recipe
- Prep Time: 25 minutes
- Cook Time: 25 minutes
- Total Time: 50 minutes
- Yield: 12 servings
- Category: Desserts
- Method: Stovetop
- Cuisine: American
Description
This classic Old Fashioned Caramel Cake is a showstopper that combines soft, buttery cake layers with a rich and luscious homemade caramel icing. It’s the perfect indulgent dessert for special occasions, family gatherings, or whenever you’re craving something truly divine. The icing, slow-cooked to perfection, creates a deep caramel flavor that melts in your mouth.
Ingredients
For the Cake
- 2 1/2 cups cake flour
- 2 1/2 teaspoons baking powder
- 1/2 teaspoon Diamond Crystal kosher salt (or 1/4 teaspoon if using another type of salt)
- 1/4 teaspoon baking soda
- 2 cups granulated white sugar
- 1 cup unsalted butter (room temperature)
- 4 large egg yolks (room temperature)
- 1 tablespoon vanilla extract
- 1 cup buttermilk (room temperature)
- 2 large egg whites
For the Caramel Icing
- 3/4 cup unsalted butter
- 1/2 teaspoon Diamond Crystal kosher salt (or 1/4 teaspoon if using another type of salt)
- 2 (12-ounce) cans evaporated milk
- 2 cups granulated white sugar
- 1 tablespoon vanilla extract (optional)
Instructions
-
Preheat Oven:
Preheat your oven to 350°F (177°C). -
Prepare Cake Pans:
Grease two 8- or 9-inch round cake pans with oil, butter, or cooking spray. Add a small amount of flour, tilt, and tap the pan to coat all surfaces evenly. Tap out any excess flour. -
Mix Dry Ingredients:
In a medium-sized bowl, whisk together the cake flour, baking powder, baking soda, and salt. Set this mixture aside. -
Cream Butter and Sugar:
In a large bowl or stand mixer, beat the softened butter and sugar on high speed for about 3 minutes until creamy. Scrape down the sides of the bowl as needed. -
Add Egg Yolks and Vanilla:
Lower the mixer speed to medium-high and add the egg yolks one at a time, followed by the vanilla extract. Beat until fully combined. -
Combine Dry Ingredients and Buttermilk:
Gradually add the dry ingredient mixture and buttermilk to the creamed butter mixture in alternating portions. Mix on low speed until fully incorporated. Stir gently by hand to ensure there are no lumps. -
Beat Egg Whites:
In a separate clean bowl, beat the egg whites on high speed until fluffy peaks form (about 3 minutes). Gently fold the beaten egg whites into the cake batter to maintain a light and airy texture. -
Bake:
Divide the batter evenly between the prepared cake pans. Bake for 22-25 minutes or until a toothpick inserted into the center comes out clean. Remove the cakes from the oven and allow them to cool completely. -
Prepare the Caramel Icing:
While the cakes are cooling, make the caramel icing: - Melt Butter: In a large saucepan set over low heat, melt the butter.
- Add Ingredients: Add the evaporated milk, sugar, and salt. Stir to combine.
- Cook and Whisk: Cook over low to low-medium heat, whisking frequently, for about 1 to 1 1/2 hours. The caramel should gradually thicken and develop a rich golden brown color. Keep an eye on it to avoid burning.
- Add Vanilla: Once the caramel has thickened enough to coat the back of a spoon, remove it from the heat and stir in the vanilla extract (if using).
- Cool: Let the caramel cool for 15-20 minutes before pouring it over the cake.
-
Assemble the Cake:
Once the cakes have cooled completely, pour the caramel icing over each layer and assemble the cake. Allow the icing to set slightly before serving.
Notes
- Room Temperature Ingredients: Ensure all cake ingredients are at room temperature to achieve the best texture.
- Don’t Overmix: Overmixing the batter can result in a dense cake; mix until just combined.
- Cooling is Crucial: Let the cakes cool fully before applying the caramel icing to prevent it from sliding off.
Caramel Tips
- Be patient and cook the caramel on low heat to avoid burning.
- Stir frequently with a whisk to ensure even consistency.
- Monitor the caramel color closely, aiming for a deep golden brown.
- Never leave the caramel unattended once it starts browning—it can burn quickly.
Nutrition
- Serving Size: 1 slice
- Calories: 530
- Sugar: 48
- Sodium: 270 mg
- Fat: 27g
- Saturated Fat: 16g
- Unsaturated Fat: 9g
- Trans Fat: 0g
- Carbohydrates: 65
- Fiber: 0g
- Protein: 6g
- Cholesterol: 113