If you’re craving a festive, melt-in-your-mouth treat that’s easy to whip up without baking, you’re in for a treat. I’m so excited to share my No-Bake Christmas Peppermint Mints Recipe with you — these little delights are refreshingly minty, sweet, and just so fun to make! Whether you’re prepping for a holiday party or looking for a gift idea that’s homemade and heartfelt, this recipe will quickly become your go-to. Trust me, once you try these, your family and friends will be begging you to make them every year.
Why You’ll Love This Recipe
- No Oven Needed: It’s perfect during busy holiday seasons when you want sweet treats without turning on the oven.
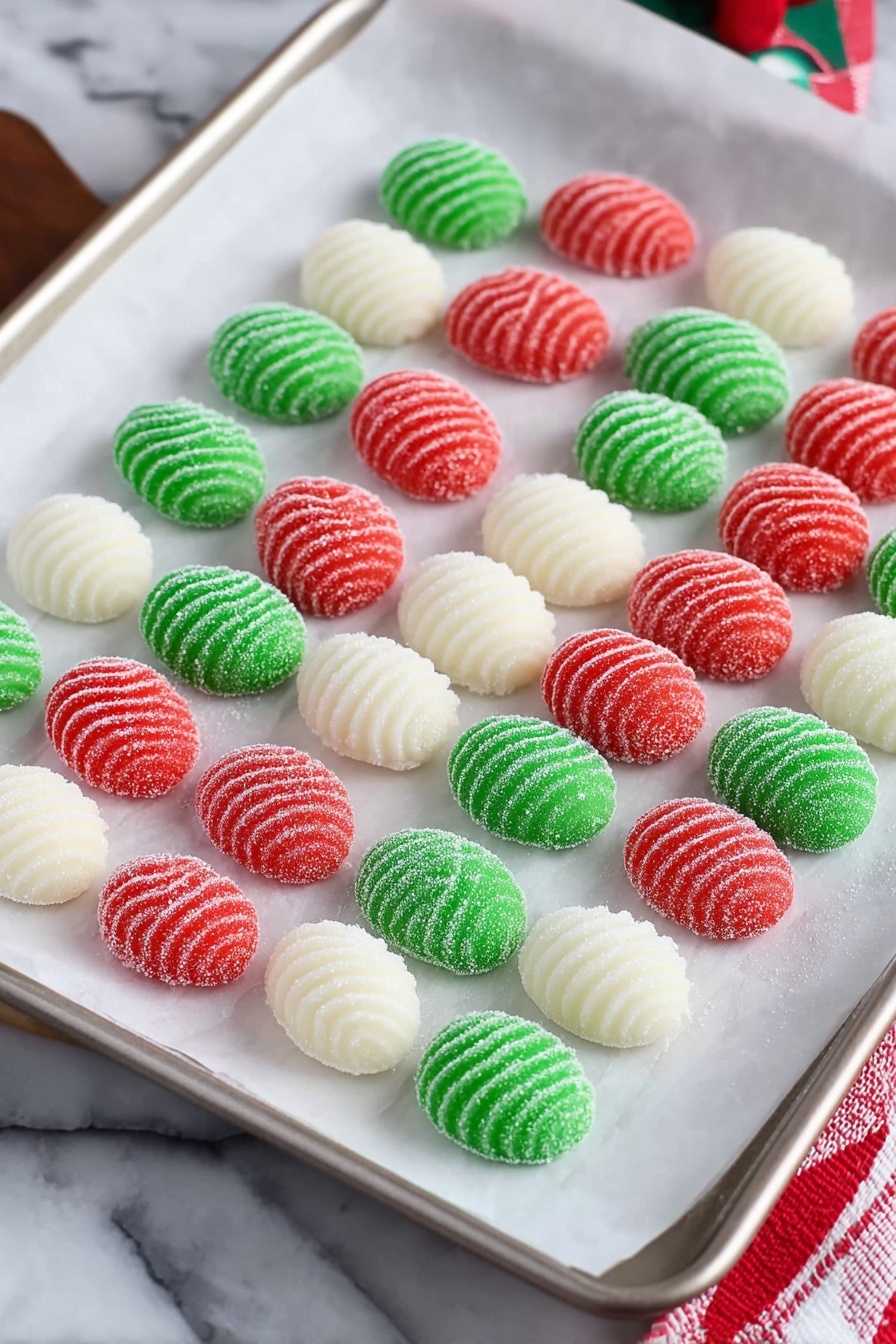
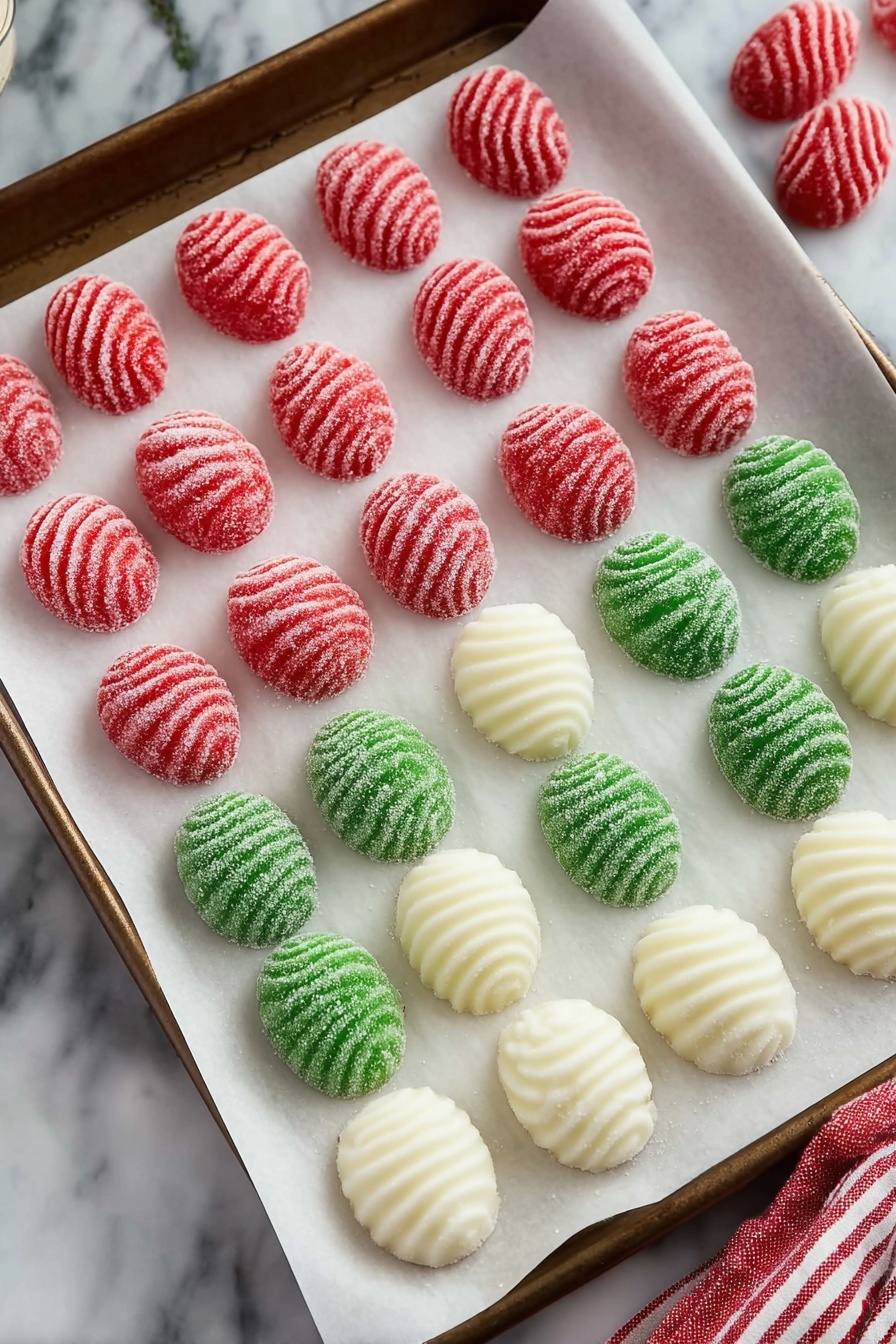
- Customizable Colors: The red, green, and white peppermint colors add that perfect Christmas vibe and make them look like mini gifts.
- Simple Ingredients: You probably have everything in your pantry already, which means no last-minute store runs.
- Taste & Texture: They have that classic cool peppermint flavor with a slightly creamy, melt-in-your-mouth texture that’s just irresistible.

Ingredients You’ll Need
All the ingredients in this No-Bake Christmas Peppermint Mints Recipe work harmoniously to create candy that’s smooth, sweet, and refreshingly minty. Don’t skip the powdered sugar—it really helps get that perfect dough texture that isn’t too sticky. Also, you’ll want to pick clear corn syrup for the best results since it blends seamlessly without affecting color.

- Granulated sugar: Used for coating the mints at the end, giving a delicate crunch and festive sparkle.
- Cream cheese: Softened to room temperature for easy mixing; it adds a creamy richness that sets these mints apart.
- Unsalted butter: Also softened; balances the creaminess and helps bind the dough together.
- Clear corn syrup: Keeps the mixture smooth and chewy without adding extra color.
- Peppermint extract: The star flavor! Make sure it’s pure and strong for that classic peppermint zing.
- Powdered sugar: Divided into portions, it turns the wet ingredients into manageable dough and adds sweetness.
- Red and green liquid food coloring: To get those beautiful festive colors, use liquid coloring so it blends well with the dough.
Variations
I love mixing things up with this No-Bake Christmas Peppermint Mints Recipe—it makes each holiday season feel a bit different. You can easily tailor the colors or even the flavors to suit your mood or dietary needs. Don’t hesitate to make it your own!
- Mint & chocolate combo: I once rolled mini chocolate chips into the dough for a chocolate-mint twist that my family couldn’t get enough of.
- Natural food coloring: If you prefer, beet juice or spirulina powder can provide festive color without artificial dyes.
- Vegan version: Swap cream cheese and butter for vegan alternatives—just make sure they’re softened for easy mixing.
- Flavored twists: Try adding orange or almond extract instead of peppermint for a different seasonal vibe.
How to Make No-Bake Christmas Peppermint Mints Recipe
Step 1: Prep Your Workspace and Sugar Coating
Start by lining a large rimmed baking sheet with parchment paper—this is where your finished mints will rest. Next, pour the granulated sugar into a small bowl nearby; you’ll use this to coat the candies later. Having everything prepped upfront makes the process smooth and fun.
Step 2: Mix the Creamy Base
In a large bowl, blend the softened cream cheese, butter, corn syrup, and peppermint extract using a handheld mixer on low speed. This usually takes about a minute until you get a smooth, creamy mixture. I love doing this by hand but the mixer saves time and gives such a velvety texture—it’s worth it.
Step 3: Add the Powdered Sugar
Keep your mixer on low and add powdered sugar gradually—about a half cup at a time. The mixture will thicken as you go; your mixer might struggle, which is totally normal. When it gets too stiff, switch to a spatula or wooden spoon to knead the rest in by hand. You’re aiming for a firm dough that’s just tacky enough to hold together.
Step 4: Color and Knead the Dough
Turn your dough out onto a fresh parchment paper dusted with powdered sugar. Divide it into three equal parts. Make a small indentation in two portions and add red food coloring to one and green to the other; leave the third plain white. Knead each colored portion gently, adding powdered sugar as needed to keep things from getting sticky. This step is where you really get to feel the dough and play with your hands—it’s oddly satisfying!
Step 5: Roll and Cut Into Pieces
Roll each dough portion into long ropes about 18 inches in length and 1 inch thick. Then slice them into half-inch segments. This part goes fast once you get rolling, literally! I find that sharper knives make cleaner cuts so the mints look more polished.
Step 6: Shape and Coat Your Mints
Roll each small piece between your palms to form smooth little balls. Drop a few at a time into the granulated sugar bowl and toss gently to coat. Transfer them evenly to the prepared baking sheet, arranging spaced out so they don’t stick together.
Step 7: Flatten and Decorate
Using a fork, press gently down on each sugar-coated ball to flatten it into a small disc. The fork tines leave those charming striped patterns, giving the mints that homemade, festive look I adore so much.
Step 8: Let Them Set
Allow your mints to sit at room temperature on the tray for up to 24 hours. This resting period is crucial because it lets the candies firm up and develop that signature tender texture that melts in your mouth.
Pro Tips for Making No-Bake Christmas Peppermint Mints Recipe
- Room Temperature Is Key: Make sure your cream cheese and butter are fully softened to avoid lumps and ensure smooth mixing.
- Gradual Sugar Addition: Slowly adding powdered sugar prevents your dough from getting too dry or too sticky—patience here pays off.
- Sticky Dough Fix: If dough feels overly sticky when kneading with colors, add powdered sugar little by little—trust your hands to feel the right texture.
- Resting Time Matters: Don’t skip the 24-hour room temp rest; it’s what gives these mints their perfect tenderness and melt-in-your-mouth feel.
How to Serve No-Bake Christmas Peppermint Mints Recipe
Garnishes
I love to sprinkle a tiny pinch of finely crushed candy canes or silver edible glitter on top of the mints right after flattening them with the fork. It adds a little extra sparkle and crunch without overpowering the classic peppermint flavor. Sometimes, edible gold dust makes them look extra special when gifting.
Side Dishes
These peppermint mints pair beautifully with a hot cup of cocoa, peppermint tea, or even a Christmas punch. For holiday gatherings, I like setting them alongside rich chocolate truffles or buttery shortbread cookies for a delightful sweet platter.
Creative Ways to Present
For gifting, I’ve wrapped these mints in festive cellophane bags tied with red and green ribbons, or placed them in decorative tins with holiday-themed labels. Rolling them in different colored sugars for a sparkling effect is another fun way to customize presentation and impress guests.
Make Ahead and Storage
Storing Leftovers
I store leftover peppermint mints in an airtight container at room temperature. They stay fresh and retain their texture for up to two weeks—perfect if you want to make a batch well ahead of time and enjoy them throughout the holiday season.
Freezing
Freezing is an option if you want to keep these mints longer. I place mine in a freezer-safe container with parchment between layers to avoid sticking. When ready to eat, I let them thaw in the fridge overnight to keep their firmness and texture.
Reheating
Since these are no-bake mints, reheating isn’t necessary. Just bring them back to room temperature if they were chilled or frozen—this brings back their soft, creamy texture perfectly. Avoid warming them too much or they might get too soft or lose shape.
FAQs
-
Can I make these No-Bake Christmas Peppermint Mints Recipe without cream cheese?
You can try substituting cream cheese with mascarpone or a vegan cream cheese alternative, but keep in mind the texture and flavor might shift slightly. Cream cheese gives the mints their creamy richness and helps bind the ingredients, so a substitute should be soft and spreadable.
-
How long do these peppermint mints last?
Stored in an airtight container at room temperature, these mints keep well for about two weeks. They may dry out if left longer, but freezing can extend their life, as I mentioned.
-
Why is my peppermint mint dough too sticky?
Humidity and warmth in your kitchen can affect stickiness. If your dough feels sticky while kneading with colors, add powdered sugar little by little until the dough feels smooth but not overly dry. This step is very much about feel more than exact measurements.
-
Can I use gel food coloring instead of liquid?
Gel coloring is more concentrated and thicker, so it can be used, but you’ll want to add it sparingly and possibly adjust powdered sugar amounts to counteract extra moisture. Liquid coloring is easier to blend evenly into the dough for this recipe.
-
Do these mints need refrigeration?
Nope! I usually keep them at room temperature just fine. Refrigerating can sometimes make them a bit firm or dry. Just keep them in an airtight container away from heat or direct sunlight.
Final Thoughts
I absolutely love how this No-Bake Christmas Peppermint Mints Recipe brings a little magic to my holiday baking routine. It’s quick, easy, and the color coordination is so festive it gets everyone in the Christmas spirit. Plus, knowing these are homemade makes handing them out as gifts or sharing at a party feel extra special. I hope you find as much joy in making and munching on these as I do—give it a try, and you might just start a new holiday tradition!
Print
No-Bake Christmas Peppermint Mints Recipe
- Prep Time: 15 Minutes
- Cook Time: 0 Minutes
- Total Time: 15 Minutes plus 24 hours resting
- Yield: About 100 peppermint candies
- Category: Candy
- Method: No-Cook
- Cuisine: American
Description
These no-bake Christmas mints are a delightful holiday treat made with a creamy mixture of cream cheese, butter, and peppermint extract, combined with powdered sugar and colored with festive red and green food coloring. Effortlessly prepared without baking, these smooth, minty candies are perfect for gifting or enjoying throughout the season.
Ingredients
Main Ingredients
- ⅓ cup granulated sugar, plus extra for coating
- 4 ounces cream cheese, softened to room temperature
- 2 tablespoons unsalted butter, softened to room temperature
- 2 tablespoons clear corn syrup
- 1 teaspoon peppermint extract
- 4¼ to 5 cups powdered sugar, separated
Food Coloring
- 6 drops green liquid food coloring
- 6 drops red liquid food coloring
Instructions
- Prepare Baking Sheet and Sugar: Line a large rimmed baking sheet with parchment paper. Pour the granulated sugar into a small bowl and set aside for coating the candies later.
- Mix Cream Cheese Mixture: In a large bowl, combine softened cream cheese, unsalted butter, clear corn syrup, and peppermint extract. Using a handheld mixer on low speed, blend for about one minute until smooth and creamy.
- Add Powdered Sugar: Gradually add 4¼ cups of powdered sugar to the mixture about ½ cup at a time while mixing on low speed. As the mixture thickens and the mixer struggles, switch to a spatula or wooden spoon to incorporate the remaining sugar by hand until a thick dough forms.
- Dust Surface and Divide Dough: Spread parchment paper on the counter and dust with ¼ cup of the remaining powdered sugar. Turn the dough onto this surface and divide it into three equal portions.
- Add Food Coloring: Make a small indentation in two dough portions. Add red food coloring to one and green food coloring to the other, leaving the third piece white. Knead each colored dough gently, adding up to ¼ cup more powdered sugar as needed to prevent stickiness. Use 1-2 tablespoons extra sugar for the plain white dough to achieve a non-sticky consistency.
- Roll Into Ropes: Roll each dough portion into long ropes about 18 inches long and 1 inch thick on the sugared surface.
- Slice and Shape: Using a knife, slice each rope into ½-inch thick segments from end to end. Roll each segment between your palms to form smooth, round balls and set aside.
- Coat with Granulated Sugar: Drop a few candy balls at a time into the granulated sugar bowl and gently toss until fully coated. Transfer the coated balls onto the prepared baking sheet.
- Flatten and Add Texture: Use a fork to gently press each sugar-coated candy ball into a small disc, creating striped fork marks on top.
- Rest to Set: Leave the mints at room temperature on the tray for up to 24 hours to firm up and develop the perfect texture before serving or gifting.
Notes
- These no-bake mints are perfect for making ahead during the busy holiday season.
- The amount of extra powdered sugar needed during kneading varies with temperature—warmer kitchens require more, cooler kitchens less.
- The 24-hour resting period helps the candies firm up and develop their signature texture.
Nutrition
- Serving Size: 3 pieces (approximately 15g)
- Calories: 70
- Sugar: 10g
- Sodium: 30mg
- Fat: 2.5g
- Saturated Fat: 1.5g
- Unsaturated Fat: 1g
- Trans Fat: 0g
- Carbohydrates: 11g
- Fiber: 0g
- Protein: 0.5g
- Cholesterol: 8mg


