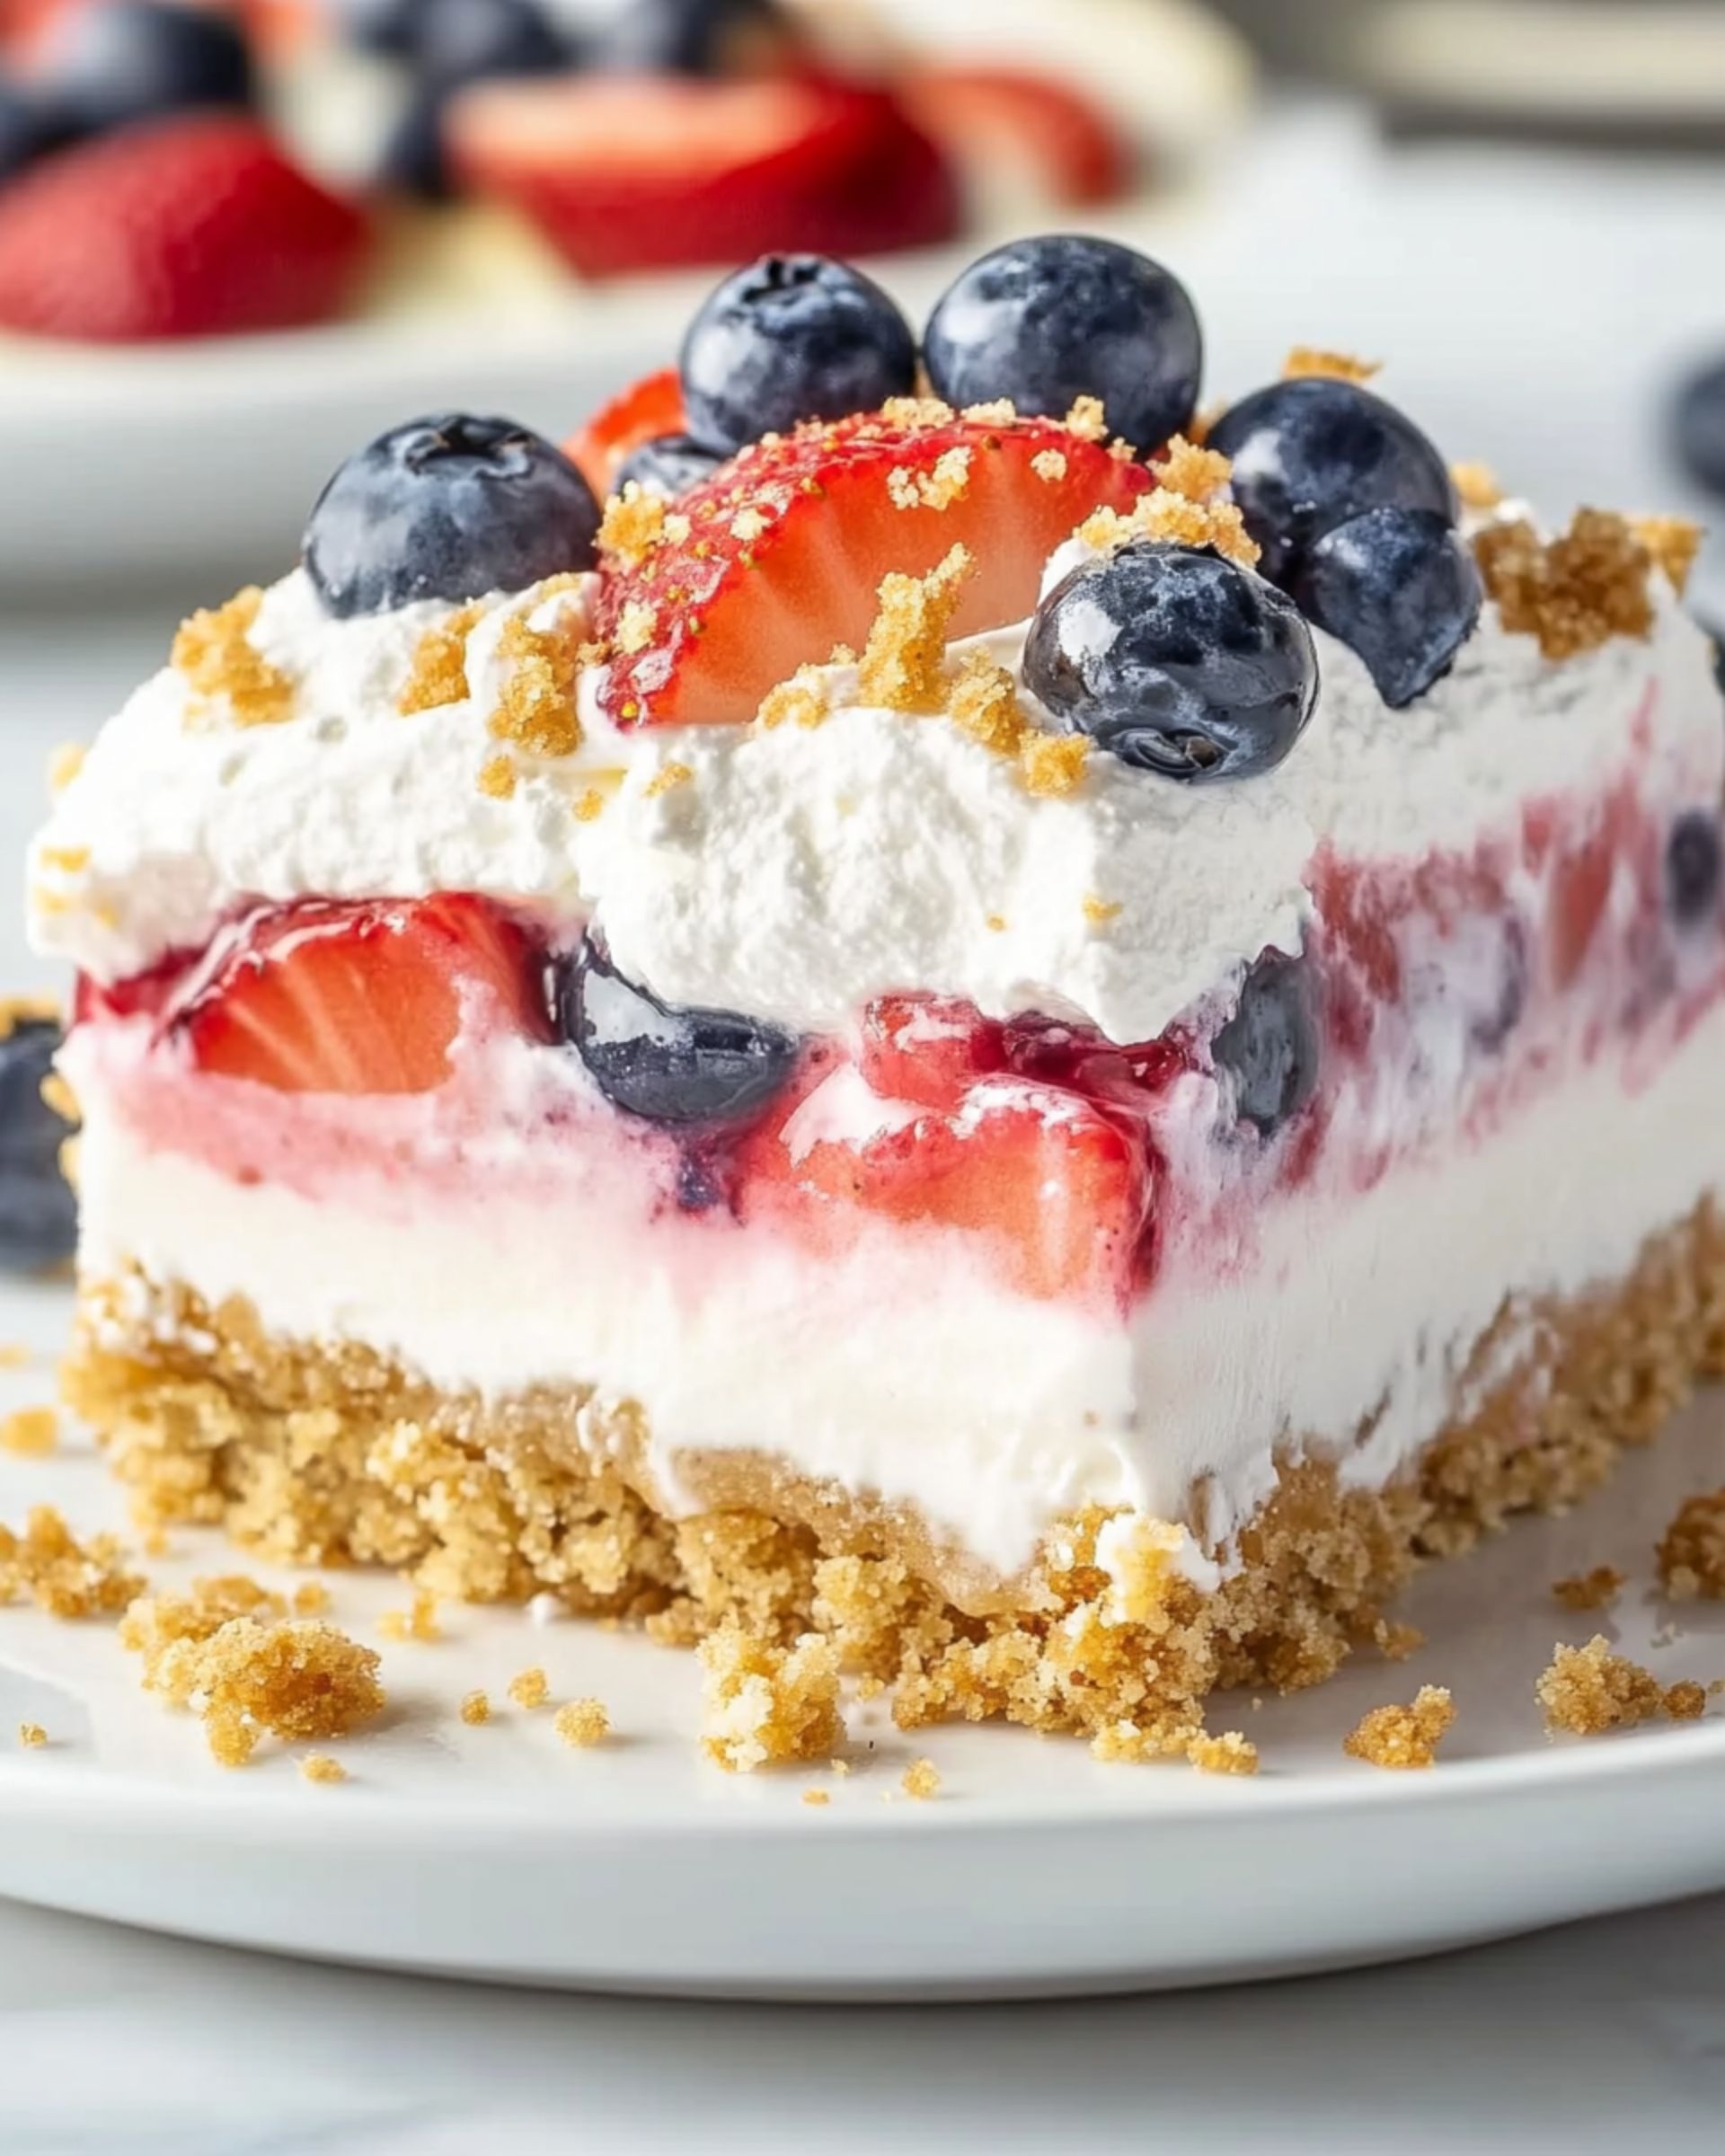
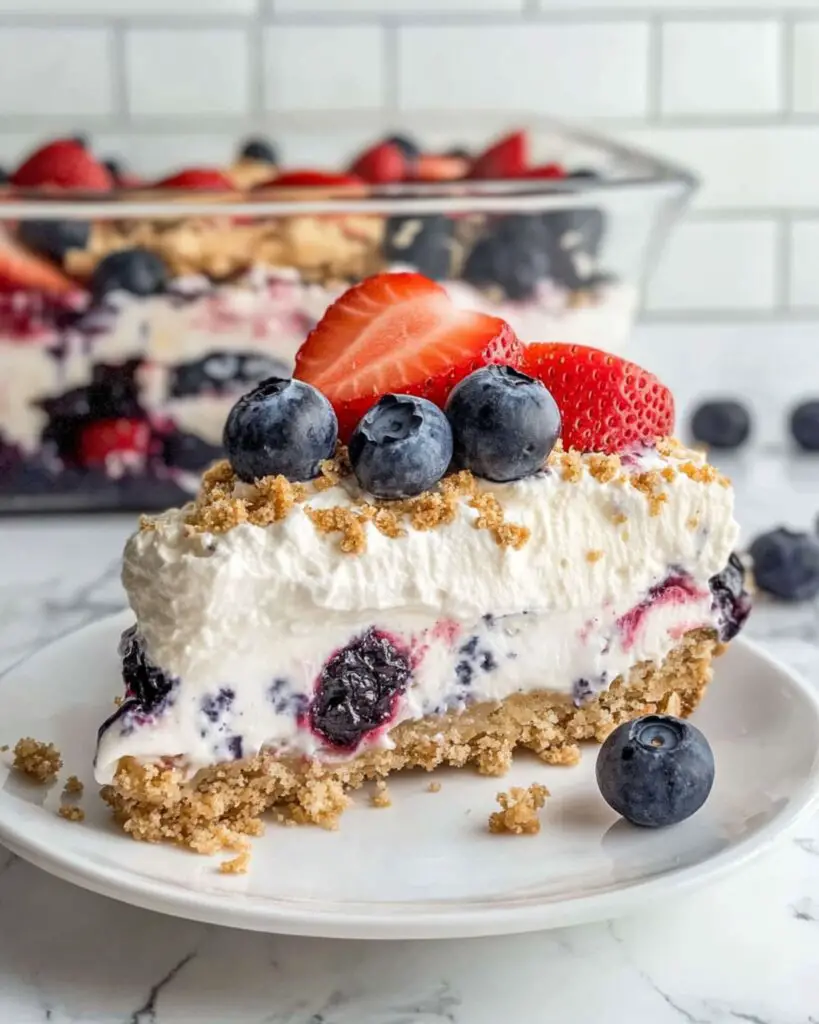
Looking for a show-stopping dessert that comes together in just minutes, without ever turning on the oven? This No-Bake Berry Lush might just become your new secret weapon. Creamy, fruity, and layered with that perfect buttery crunch, it’s a dessert that looks fancy but couldn’t be easier to put together. Fresh berries keep it bright and light, while luscious layers of cream cheese and whipped topping make every bite a dreamy treat. Whether you’re hosting friends or simply want a sweet reward after a busy day, this dessert proves that effortless and irresistible absolutely belong in the same sentence.
Why You’ll Love This Recipe
- Ridiculously Easy: No oven, no stress, and just a handful of basic ingredients. If you can stir and layer, you can make this!
- Quick Preparation: In less than 20 minutes of active prep, dessert is chilling in the fridge—perfect for shocking those last-minute guests or satisfying a sudden sweet craving.
- Fresh and Creamy Delight: Each layer bursts with juicy berries and silky-smooth cream, balanced by a buttery cookie foundation.
- Versatile and Customizable: Swap in your favorite berries, go nuts with extra toppings, or get creative with the cookie base—this recipe loves a personal touch.

Ingredients You’ll Need
- Vanilla Wafer Cookies: Create a sweet, crunchy crust that holds everything together. Graham crackers or shortbread work great, too.
- Butter (melted): Binds the cookie crumbs for that classic no-bake base with rich flavor.
- Cream Cheese (softened): Brings dreamy tang and creaminess to the dessert. Let it soften for easy blending.
- Powdered Sugar: Sweetens the cream cheese while keeping the texture velvety-smooth—no gritty sugar here!
- Vanilla Extract: Adds warmth and rounds out the sweetness with a lovely aroma.
- Whipped Topping (thawed): Gives lift and lightness to the creamy layers. For extra decadence, use homemade whipped cream.
- Fresh Berries: Strawberries, blueberries, raspberries, blackberries—mix and match for color, flavor, and gorgeous presentation. Slice larger berries for the best texture.
- Extra Cookies (optional): Crumble more cookies over the top for extra crunch and an inviting finish.
Note: You’ll find the complete list of ingredients, along with their exact measurements, in the printable recipe card at the bottom of this post.
Variations
Feel like switching things up? This recipe thrives on personalization!
- Different Fruit: Try sliced peaches, kiwi, or mango for a tropical spin, or swap in cherries for something extra luscious.
- Switch the Crust: Use graham crackers, chocolate wafers, or even gingersnaps for a twist on the base flavor.
- Dairy-Free: Opt for vegan cream cheese and coconut-based whipped topping for a plant-based treat.
- Add Zest: A sprinkle of lemon or orange zest in the cream cheese mixture adds brightness.
- Go Nutty: Fold in chopped toasted almonds or pecans between the layers for a little crunch.
How to Make No-Bake Berry Lush
Step 1: Make the Cookie Crust
Add your vanilla wafers to a large zip-top bag and crush them into fine crumbs—this is seriously satisfying! Pour the crumbs into your 8-inch square baking pan and combine them with the melted butter. Press them down firmly with your hands or the back of a spoon to form a solid, buttery crust.
Step 2: Mix the Creamy Filling
In a big mixing bowl, blend the softened cream cheese, powdered sugar, and vanilla extract with an electric mixer until completely smooth. Trust me, the silkier, the better—it’s worth the extra minute! Gently fold in one container of whipped topping until the mixture is fluffy and evenly combined.
Step 3: Prepare the Berries
Wash your berries and slice any larger ones—halved strawberries work best for even layering. This step not only makes for great texture but ensures you get a bit of berry in each bite.
Step 4: Layer It Up
Spread half of the cream cheese mixture evenly over your cookie crust. Scatter half of your beautiful berries across the surface. Repeat with the remaining cream cheese mixture and berries for two gorgeous layers.
Step 5: Final Flourish
Smooth a generous layer of whipped topping over the top, saving a little drama for the final reveal. If you’re feeling fancy, crumble up a few extra vanilla wafers and sprinkle over the top for added crunch and a homey finish.
Step 6: Chill and Serve
Pop the pan in the fridge and chill for at least an hour—this helps everything set perfectly and allows the flavors to mingle. Slice, serve, and bask in the endless compliments!
Pro Tips for Making the Recipe
- Soften the Cream Cheese Fully: This gives you that ultra-smooth mixture and prevents lumps.
- Press the Crust Firmly: For easy cutting, take a moment to really pack down that cookie layer—use the bottom of a measuring cup for super-sturdy results.
- Don’t Rush the Chill: Even if you’re impatient, chilling is key for the layers to set. Overnight is even better!
- Dry the Berries: After washing, pat berries dry with a towel—too much moisture can make your dessert soggy.
How to Serve
Serve this No-Bake Berry Lush chilled straight from the fridge, ideally garnished with a few extra fresh berries and a sprinkle of cookie crumbs for a picture-perfect touch. It’s dreamy on its own, but for a special twist, pair it with a dollop of lemon curd or a drizzle of berry coulis. If serving at a gathering, spoon portions into individual cups for a fuss-free, elegant finish.
Make Ahead and Storage
Storing Leftovers
If you have the willpower to save some, simply cover the pan tightly with plastic wrap and refrigerate for up to 3 days. The crust may soften a bit, but the flavors just meld and become even more delicious.
Freezing
You can freeze this dessert (without the fresh berries on top) for up to one month. Build up to the cream cheese and cookie layers, then wrap securely. Add fresh berries after thawing for the best texture and appearance.
Reheating
No reheating needed—this is a dessert best enjoyed cold, straight from the fridge!
FAQs
-
Can I use frozen berries instead of fresh?
Yes, but be sure to thaw and drain them thoroughly and pat dry. Frozen berries can be juicier, so excess moisture can make the dessert a bit soggy if not drained well.
-
Can I make this dessert the night before?
Absolutely! In fact, making it ahead gives the layers time to meld and enhances the flavor. Just keep it tightly covered in the fridge until ready to serve.
-
What can I use if I don’t have vanilla wafer cookies?
Graham crackers, shortbread, or even speculoos cookies are all fantastic alternatives and each adds its own signature taste.
-
Is it possible to make this recipe gluten-free or dairy-free?
Definitely! Swap in your favorite gluten-free cookies and dairy-free alternatives for the cream cheese and whipped topping. It’s easy to customize for dietary needs without sacrificing flavor.
Final Thoughts
If easy, crowd-pleasing, and utterly scrumptious is what you’re after, this No-Bake Berry Lush delivers every time. Don’t let its simplicity fool you—every bite is a celebration of creamy, fruity, crunchy joy. So go ahead, gather those berries and whip up a pan. The hardest part will be waiting to dig in!
Print
No-Bake Berry Lush Recipe
- Prep Time: 20 minutes
- Cook Time: 0 minutes
- Total Time: 1 hour 20 minutes (includes chilling)
- Yield: Serves 6
- Category: Desserts
- Method: No-cook
- Cuisine: American
- Diet: Vegetarian
Description
This easy No-Bake Berry Lush dessert features layers of vanilla wafer cookie crust, luscious cream cheese filling, and an abundance of fresh berries, all topped with fluffy whipped topping. Ready in just a few steps with no oven required, it’s the perfect chilled treat for summer gatherings or weeknight indulgence.
Ingredients
Crust
- 35 vanilla wafer cookies
- 5 tablespoons butter, melted
Cream Cheese Layer
- 8 oz cream cheese, softened
- 1 cup powdered sugar
- 1 1/2 teaspoons vanilla extract
- 1 (8 oz) container whipped topping, thawed
Berries
- 2 lbs fresh berries (such as strawberries, blueberries, raspberries, or blackberries; slice larger berries if desired)
Topping
- 1 (8 oz) container whipped topping, thawed (for topping)
- Additional vanilla wafer cookies, crumbled (optional, for garnish)
Instructions
- Prepare the Cookie Crust: Place the vanilla wafer cookies in a large ziptop bag and crush them into fine crumbs using a rolling pin. Transfer the crumbs into an 8-inch square baking pan. Add the melted butter and mix until the crumbs are evenly coated, then firmly press the mixture into the bottom of the pan to form the crust layer.
- Make the Cream Cheese Filling: In a large mixing bowl, combine the softened cream cheese, powdered sugar, and vanilla extract. Beat with an electric mixer until the mixture is smooth and creamy. Gently fold in one container (8 oz) of whipped topping until fully incorporated, creating a fluffy filling.
- Prepare the Berries: Wash the fresh berries thoroughly. If using larger berries like strawberries, slice them into bite-sized pieces. Set aside.
- Layer the Dessert: Spread half of the cream cheese mixture evenly over the prepared cookie crust. Top with half of the berries, spreading them out for even distribution. Repeat with a second layer: spread the remaining cream cheese mixture, followed by the remaining berries.
- Add the Topping: Spread half of the remaining tub of whipped topping on top of the berry layer. Optionally, crumble more vanilla wafer cookies and sprinkle over the top as a garnish.
- Chill and Serve: Cover and refrigerate the dessert for at least 1 hour to allow it to set. Slice into pieces and enjoy chilled.
Notes
- Use a mix of your favorite berries or whatever is in season.
- For a firmer crust, briefly freeze the crust layer before adding the filling.
- Dessert can be made up to a day ahead for convenience.
- Store leftovers covered in the refrigerator for up to 2 days.
Nutrition
- Serving Size: 1/6 of pan
- Calories: 420
- Sugar: 33g
- Sodium: 290mg
- Fat: 24g
- Saturated Fat: 13g
- Unsaturated Fat: 9g
- Trans Fat: 0g
- Carbohydrates: 49g
- Fiber: 4g
- Protein: 4g
- Cholesterol: 44mg


