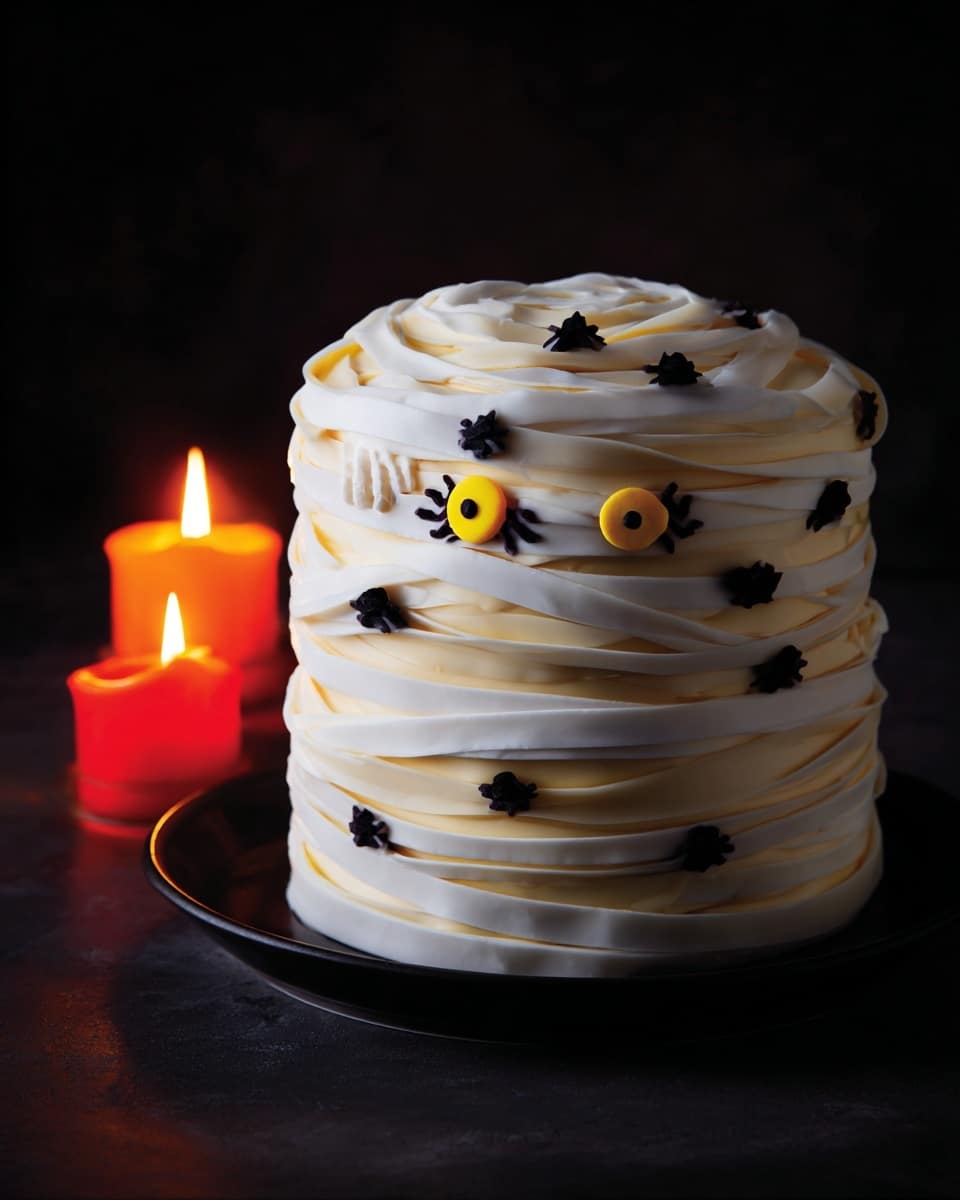
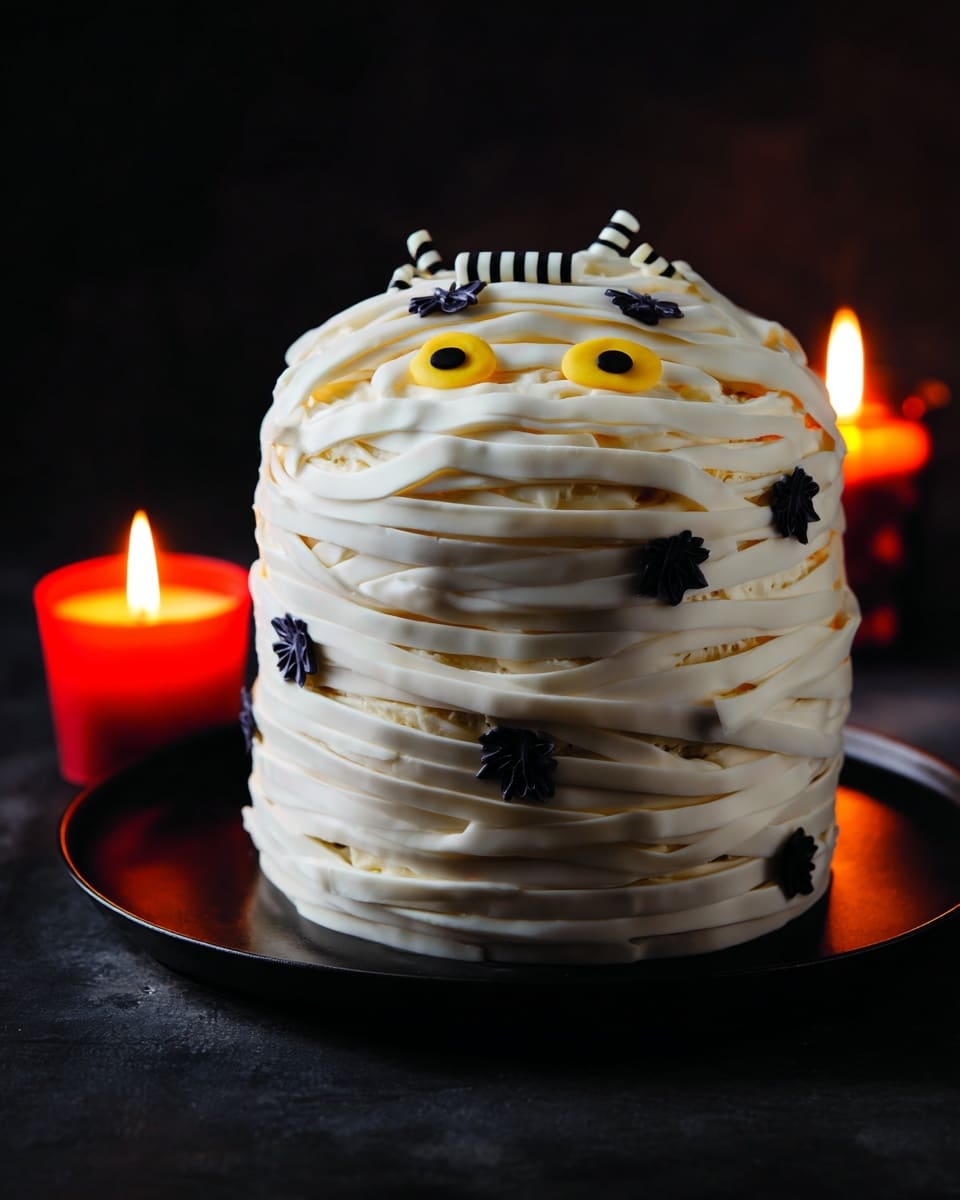
If you’re looking for a show-stopping Halloween treat that’s as fun to make as it is to eat, let me introduce you to the Mummy Mallow Cake Recipe. It’s joy wrapped up in layers of fluffy sponge, indulgent coconut and cherry jam filling, topped off with spooky marshmallow “mummy” decorations. Trust me, once you try this, you’ll be hooked—and your family and guests will be asking for it year after year!
Why You’ll Love This Recipe
- Fun Halloween Design: The quirky marshmallow mummy face makes it a memorable centerpiece for any spooky celebration.
- Moist, Fluffy Layers: The sponge is perfectly light and airy, thanks to a simple yet effective mix of ingredients and technique.
- Tantalizing Flavors: The blend of morello cherry jam and desiccated coconut adds a delightful contrast of sweet and slightly tart textures.
- Customizable Decorations: The liquorice allsorts and sprinkles let you get creative while keeping it easy and approachable.

Ingredients You’ll Need
The beauty of the Mummy Mallow Cake Recipe is in its balanced blend of basic baking pantry staples with a few special touches. Each ingredient works beautifully to build the perfect texture, flavor, and look, whether you’re a baking pro or just having fun in the kitchen.
- Unsalted butter: Softened butter helps create that dreamy, fluffy texture for the sponge and a smooth, creamy icing.
- Caster sugar: Fine sugar dissolves quickly for even sweetness and a delicate crumb.
- Vanilla bean paste: I love this over vanilla extract because it adds a richer, more aromatic vanilla flavor.
- Eggs: They provide structure and richness—be sure they’re at room temperature for best results!
- Plain flour: Sifting it is key to prevent lumps and gives a lighter sponge.
- Baking powder: This little leavening agent makes the cake rise beautifully.
- Hot water: Added last, it helps keep the sponge moist and tender.
- Morello cherry jam: The tartness is perfect inside this sweet cake—it’s one of my favorite flavor combos.
- Desiccated coconut: Adds texture and a hint of tropical flavor that pairs surprisingly well with cherry.
- Icing sugar: For that smooth, sweet frosting that melts in your mouth.
- Soft cheese: It gives the icing a slight tang and creaminess, making it way better than plain buttercream.
- Ready rolled royal icing: For the “mummy” strips on top, super easy to handle and cuts beautifully.
- Marshmallows: These create the fluffy mummy face—such a fun texture and look!
- Liquorice allsorts: Use these candies here and there for eyes, eyebrows, and other decorations—they’re playful and cute.
- Pirate sprinkles: Adds that spooky finishing touch all around the sides.
Variations
I love how versatile the Mummy Mallow Cake Recipe is! While I stick to the original most years because it’s such a hit, you can switch things up depending on your mood or dietary needs—go wild, the mummy won’t mind.
- Gluten-Free Variation: I swapped plain flour for a gluten-free blend once and honestly, it worked like a charm—just make sure your baking powder is gluten-free too.
- Dairy-Free Option: I’ve used vegan butter and a vegan cream cheese alternative with great results—texture was slightly different but still delicious.
- Fruit Jam Switch-Up: Try raspberry or blackcurrant jam instead of morello cherry for a unique twist.
- Decoration Fun: Use candy eyes or chocolate chips instead of liquorice for a less intense flavor but same fun look.
How to Make Mummy Mallow Cake Recipe
Step 1: Prep Your Pans and Ingredients
Before you dive in, preheat your oven to 180°C (160°C fan)/Gas Mark 4. Lightly grease and line three 18cm (7-inch) round tins with nonstick baking paper. I find that lining the tins carefully prevents sticking and helps the layers come out perfectly flat, which is key to a neat final look.
Step 2: Cream Butter, Sugar, and Vanilla
Using an electric mixer, beat the softened butter, caster sugar, and vanilla bean paste until the mixture is really light and fluffy. This usually takes about 2 to 3 minutes. I learned early on that crisp creaming here makes the sponge lighter and gives the cake such a wonderful texture.
Step 3: Add Eggs Slowly and Flour Gradually
Next, add the beaten eggs a bit at a time, beating after each addition to keep the mix smooth. If it starts to look like it might split or curdle, stir in a tablespoon of the flour—that trick saved me more than once. Then fold in the rest of the flour, baking powder, and hot water carefully to keep the batter airy and smooth.
Step 4: Bake and Cool the Sponge Layers
Divide the batter evenly between your tins (about 495g per tin if you want to be precise) and smooth the tops. Bake for 30 to 40 minutes until golden and springy to the touch. The skewer test is your best friend here—if it comes out clean, the cakes are ready. Cool them in the tins for 5 minutes, then transfer to a wire rack. Once fully cool, trim the tops flat for stacking. I can’t emphasize enough how much trimming helps your finished cake look neat and balanced.
Step 5: Whip Up the Icing
Mix soft cheese, soft butter, and icing sugar on medium-high speed for 5 to 7 minutes until pale and fluffy. I use the paddle attachment on my stand mixer, but hand mixers do the job too—with a little more arm power! This icing is luscious but light, a refreshing change from heavy buttercreams.
Step 6: Build Your Cake Layers
Stick the first sponge layer down on a cake board with a dab of icing, then spread half the morello cherry jam evenly on top, leaving a bit of a border. Sprinkle some desiccated coconut over the jam—it adds a lovely texture surprise. Repeat with the second layer, then top with the third cake layer.
Step 7: Roughly Ice and Create the Mummy Face
Slap on a thick, rough layer of the cream cheese icing with a pallet knife. Don’t strive for perfection here—the rough texture gives your mummy cake that cool, homemade charm. For the face, pile a big marshmallow round in the center and attach the liquorice allsorts for eyes and eyebrows using cocktail sticks. Use striped liquorice for the mouth, then unroll your royal icing and cut it into thin strips to drape over like mummy bandages.
Step 8: Decorate the Sides
Finish by sticking black skull liquorice allsorts around the sides of the cake and scatter pirate sprinkles for that extra spooky vibe. Not only does this look fantastic, but it’s a fun way to get the family involved with decorating, especially for the little ones.
Pro Tips for Making Mummy Mallow Cake Recipe
- Room Temperature Ingredients: Always bring eggs and butter to room temperature for smoother batter and better rise.
- Don’t Overmix After Adding Flour: Fold gently to keep your cake fluffy and tender, avoiding a dense texture.
- Even Layer Weighing: I use a kitchen scale to portion batter equally—it makes a huge difference when stacking and decorating.
- Decorate After Defrosting if Frozen: This prevents icing from melting and keeps decorations neat and intact.
How to Serve Mummy Mallow Cake Recipe
Garnishes
I love adding extra pirate sprinkles when serving—it boosts the spooky vibe and adds a little crunchy texture. Sometimes, I drizzle a bit of melted chocolate around the base for a dramatic flair. If you’re feeling extra creative, edible glitter on the marshmallow mummy eyes really pops under party lights.
Side Dishes
The Mummy Mallow Cake Recipe is pretty sweet and rich, so I keep sides light and simple. A cup of spiced chai or hot chocolate complements it perfectly. For daytime parties, fresh berries or a tangy fruit salad balance the sweetness beautifully.
Creative Ways to Present
One year, I placed the mummy cake on a rustic wooden board with fake cobwebs and plastic spiders for a Halloween party table centerpiece—it was a huge hit! Wrapping the cake board with orange or black ribbon adds a festive touch, plus you can serve the cake in individual “mummy slices” for easy self-serving at kids’ parties.
Make Ahead and Storage
Storing Leftovers
I usually keep any uneaten Mummy Mallow Cake wrapped tightly in clingfilm in the fridge. This helps keep the sponge moist and the icing fresh for up to 3 days. The flavors meld beautifully overnight, so sometimes I find it’s actually better the next day!
Freezing
If you want to make this in advance (which I definitely recommend for busy Halloween schedules), bake all the layers and cool them fully, then freeze—no icing or decorations yet. Wrap each cake tightly in clingfilm and foil to avoid freezer burn. It freezes wonderfully for up to 3 months.
Reheating
When you’re ready to serve, defrost the cake layers wrapped at room temperature for several hours. Once thawed, add icing and decorate fresh. If you have leftover slices, I find warming them gently in the microwave for 10 seconds revives the softness beautifully without melting the icing.
FAQs
-
Can I make the Mummy Mallow Cake Recipe dairy-free?
Absolutely! Swap the unsalted butter for a plant-based vegan butter and use a dairy-free cream cheese alternative for the icing. The texture might vary slightly, but the cake will still be delicious and moist. Just make sure your vanilla paste and other ingredients are dairy-free.
-
How do I prevent the cake from sinking in the middle?
Make sure not to open the oven door during the first 25 minutes of baking as sudden temperature changes can make it collapse. Also, don’t overmix the batter once the flour is added—fold gently to keep in the airiness. Using fresh baking powder is another key factor.
-
Can I use this recipe for cupcakes?
Definitely! This sponge adapts well to cupcakes—just fill your liners about two-thirds full and bake for around 18-22 minutes. Decorating cupcakes with mini marshmallow mummies would be a super cute alternative to the full cake!
-
Is it okay to use other jam flavors?
Yes! While morello cherry jam gives a perfect tart contrast, raspberry, blackberry, or blackcurrant jams work beautifully too. Just choose a flavor you love and that pairs well with coconut and cream cheese icing.
Final Thoughts
This Mummy Mallow Cake Recipe is one of those rare finds that’s equal parts easy, festive, and downright delicious. I love how it brings my family together to bake, decorate, and then—most importantly—devour! If you’re after a Halloween cake that’s all about fun and flavor with a touch of whimsy, I wholeheartedly recommend giving this recipe a try. You’ll see your cake disappear slice by slice, and maybe even catch some “oohs” and “ahhs” along the way. Happy baking!
Print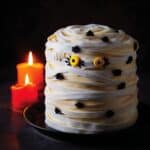
Mummy Mallow Cake Recipe
- Prep Time: 1 hr
- Cook Time: 40 mins
- Total Time: 1 hr 40 mins
- Yield: 16 servings
- Category: Dessert
- Method: Baking
- Cuisine: British
Description
A festive and fun Mummy Mallow Cake perfect for Halloween celebrations. This layered sponge cake is filled with morello cherry jam and desiccated coconut, frosted with a creamy cheese icing, and decorated with marshmallows, liquorice allsorts, and pirate sprinkles to create a mummy-themed design. Moist, flavorful, and visually delightful, this cake serves 16 and is ideal for parties and special occasions.
Ingredients
For the filling
- 6 tbsp Tesco Finest morello cherry jam
- 2 heaped tbsp desiccated coconut
For the sponge
- 275g unsalted butter, softened
- 375g caster sugar
- 2 tsp vanilla bean paste
- 6 medium eggs, beaten
- 425g plain flour, sifted
- 3 tsp baking powder
- 5 tbsp hot water
For the icing
- 200g icing sugar
- 125g soft unsalted butter
- 125g soft cheese
To decorate
- 200g ready rolled royal icing
- 200g marshmallows
- 2 x 190g bags liquorice allsorts
- 1 x tub pirate sprinkles
Instructions
- Prepare the oven and tins: Preheat your oven to gas mark 4 (180°C, fan 160°C). Lightly grease and line three 18cm (7 inch) cake tins with nonstick baking paper to prevent sticking.
- Make the sponge batter: In a large bowl, cream together the softened butter, caster sugar, and vanilla bean paste using an electric mixer until very light and fluffy, about 2-3 minutes. Gradually add the beaten eggs a little at a time, beating well between each addition; stir in 1 tbsp of flour if the mixture starts to curdle. Fold in the remaining flour, baking powder, and hot water in stages, mixing until the batter is smooth and lump-free.
- Divide and bake the sponges: Pour the batter evenly into the prepared tins, approximately 495g (15 1/2 oz) of mixture per tin. Smooth the tops and bake for 30-40 minutes until the cakes have risen, turned golden, and are springy to the touch. Test doneness with a skewer; it should come out clean.
- Cool and trim: Remove the cakes from the oven and let them cool in their tins for 5 minutes before transferring to a wire rack to cool completely. Once cooled, trim the tops and edges so all layers are even and flat, ensuring a balanced cake when stacked.
- Prepare the icing: In a mixing bowl fitted with a paddle attachment, combine the soft cheese, soft unsalted butter, and icing sugar. Beat on medium-high speed for 5 to 7 minutes until the icing is pale, fluffy, and smooth. Electric beaters can be used as an alternative.
- Assemble the cake layers: Place a small dab of icing on a 30cm (12in) round cake board to secure the first cake layer. Spread half the morello cherry jam evenly over this layer, leaving a border around the edges, then sprinkle with desiccated coconut. Add the second cake layer and repeat the jam and coconut layer before topping with the final cake layer.
- Ice the cake: Apply a thick, roughly spread layer of icing all over the cake using a palette knife to create a lightly padded texture effect. This rustic icing finish complements the Halloween theme.
- Create the mummy face decoration: Build a white marshmallow mound in the center of the cake top. Use yellow and black liquorice allsorts for the eyes, securing them with cocktail sticks pushed through the marshmallows into the cake. Form eyebrows with black allsorts and fashion a mouth from striped black and white sweets.
- Apply royal icing strips: Unroll the ready rolled royal icing and cut it into thin strips. Layer these strips over the mummy face to simulate bandages, leaving the sides of the cake undecorated.
- Add final decorations: Decorate the cake sides with black skulls from the liquorice allsorts and scatter pirate sprinkles around for an extra spooky touch.
- Freezing and defrosting: Bake and cool the cake layers but hold off on decorating or icing if freezing. Wrap well in clingfilm and foil, freeze for up to 3 months, and defrost wrapped at room temperature. Add icing and decorations after full defrosting.
Notes
- Ensure all cake layers are trimmed evenly for a balanced finish and stable stacking.
- Use cocktail sticks carefully to safely secure decorations without piercing too deeply.
- The icing should be applied thickly but with a rustic, rough finish suitable for a Halloween mummy look.
- For best results, allow cakes to cool completely before assembling and decorating.
- This cake is best enjoyed fresh but can be frozen before decoration for later use.
- Consider chilling the completed cake slightly before slicing to maintain shape.
Nutrition
- Serving Size: 1 slice (1/16 of cake)
- Calories: 682 kcal
- Sugar: 81 g
- Sodium: 0.4 g
- Fat: 28 g
- Saturated Fat: 16 g
- Unsaturated Fat: 12 g
- Trans Fat: 0 g
- Carbohydrates: 105.6 g
- Fiber: 1.2 g
- Protein: 6.8 g
- Cholesterol: 105 mg


