
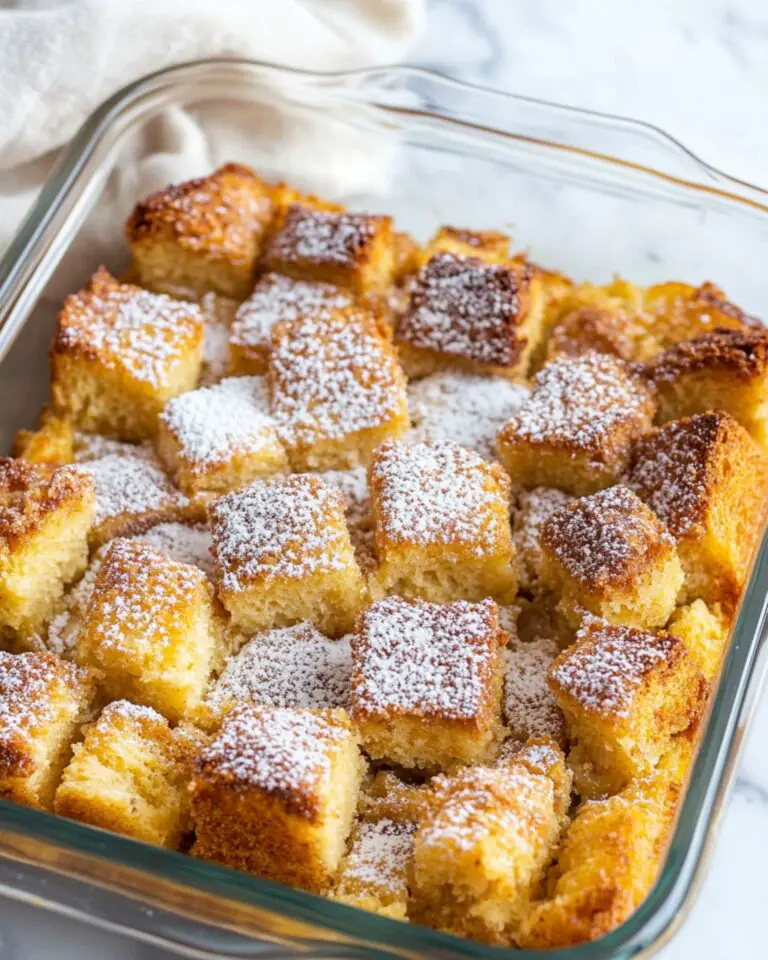
I absolutely love this Monte Cristo Roll-Ups Recipe because it takes all the flavors of a classic Monte Cristo sandwich and wraps them up into easy-to-eat, bite-sized roll-ups. Whether you’re serving them for a fun family dinner or impressing friends at a casual get-together, these roll-ups are a total crowd-pleaser that never fail to wow.
When I first tried making Monte Cristo Roll-Ups, I was amazed at how simple the process was—it’s basically a shortcut to all the amazing, melty goodness in less time and with less mess. You’ll find that these roll-ups are perfect for busy weeknights, snack time, or even appetizers at your next party!
Why You’ll Love This Recipe
- All-in-One Flavor: Combines ham, cheese, and a hint of sweetness in a portable roll-up.
- Quick and Easy: Ready in under 30 minutes, perfect for busy days or last-minute guests.
- Kid-Friendly & Crowd-Pleasing: Kids and adults alike can’t get enough of the crispy, melty bites.
- Versatile: Great as a snack, appetizer, or even a fun lunch option.

Ingredients You’ll Need
For this Monte Cristo Roll-Ups Recipe, you’ll want a mix of savory ham, melty cheese, and a touch of sweetness from jelly or preserves. The simple ingredients come together beautifully to create a nostalgic yet fresh flavor combo.
- White sandwich bread: Use soft, fresh bread for easy rolling without tearing.
- Thinly sliced deli ham: The classic ham brings saltiness and pairs perfectly with cheese.
- Swiss cheese: This cheese melts wonderfully and adds that signature nutty flavor.
- Strawberry or raspberry jelly: Adds a sweet contrast to the salty ham and cheese.
- Eggs: For the egg wash that gives a golden, crispy exterior when cooking.
- Milk: Mixed with eggs to make a smooth wash.
- Butter: Essential for pan-frying the roll-ups to golden perfection.
- Powdered sugar (optional): For sprinkling on top, giving that sweet finish.
Variations
I love mixing things up with this Monte Cristo Roll-Ups Recipe — it’s a great base for all kinds of delicious tweaks, so you really can make it your own. You might want to swap out the ham for turkey or try a different jam flavor to keep things interesting!
- Use Turkey or Chicken: For a lighter alternative, I swapped ham for deli turkey once and it was just as tasty!
- Different Cheeses: Try cheddar or provolone if Swiss isn’t your fave—these cheeses melt beautifully too.
- Jam Swaps: Apricot or blackberry jam give a unique twist that’s just as delicious.
- Gluten-Free Bread: This recipe works with your favorite gluten-free sandwich bread for special diets.
How to Make Monte Cristo Roll-Ups Recipe
Step 1: Prepare Your Bread
The first thing you want to do is remove the crusts from each slice of white sandwich bread to make rolling easier. Then, use a rolling pin or your hands to gently flatten each slice until it’s about 1/8 inch thick. This gives you that flexible base you need to roll everything up neatly without tearing. I discovered this tip after one too many ripped sandwiches!
Step 2: Layer and Roll
Place a slice of ham on the flattened bread, then add a slice of Swiss cheese on top. Spread about a teaspoon of your favorite jelly over the cheese — it’s that sweet surprise that makes this Monte Cristo Roll-Ups Recipe so special. Roll up the bread tightly, tucking in the edges as you go, so everything stays inside when cooking. If you want, secure the roll-ups with a toothpick for extra hold.
Step 3: Egg Wash Magic
In a shallow bowl, whisk together eggs and a splash of milk to make the egg wash. Dip each roll-up into the mixture, making sure all sides get coated. This is the secret to that beautiful golden-brown, crispy finish you’ll love.
Step 4: Cook Until Golden
Heat a skillet over medium heat and melt some butter. Place the roll-ups seam side down first to seal them well, then cook, turning occasionally, until all sides are golden brown and the cheese inside is melty—usually about 3 to 4 minutes per side. You’ll want to keep an eye on them so they don’t burn but still get that perfect crust.
Step 5: Serve with a Sweet and Savory Touch
Once cooked, sprinkle a little powdered sugar over the roll-ups to add that classic Monte Cristo sweetness. Serve warm, maybe with a side of mustard or extra jelly for dipping. My family goes crazy for this sweet and savory combo every time!
Pro Tips for Making Monte Cristo Roll-Ups Recipe
- Flatten the Bread Gently: Avoid tearing by rolling slowly and evenly—you want it flexible, not crunchy.
- Seal the Edges Well: Pinch the bread edges tight or secure with a toothpick to keep the filling inside when cooking.
- Cook on Medium Heat: High heat might burn the bread before the cheese melts inside; moderate heat ensures even cooking.
- Add Powdered Sugar Last: Sprinkle it right before serving to keep it pretty and not melt away.
How to Serve Monte Cristo Roll-Ups Recipe

Garnishes
I usually sprinkle these roll-ups with powdered sugar, which adds just the right hint of sweetness and looks so pretty on the golden crust. Sometimes I also serve them with a small bowl of mustard or cranberry sauce for dipping—it amps up the flavor perfectly.
Side Dishes
For sides, my go-to is a fresh green salad or some crispy sweet potato fries. The crisp veggies help balance the richness of the roll-ups, making the whole meal feel lively and satisfying.
Creative Ways to Present
When I’ve made these for parties, I like to slice the roll-ups into bite-sized pinwheels and arrange them on a platter with colorful dipping sauces in little bowls. It looks festive and makes it easy for guests to grab and enjoy.
Make Ahead and Storage
Storing Leftovers
I store leftover Monte Cristo Roll-Ups in an airtight container in the fridge for up to 2 days. Reheating in a skillet or oven helps bring back the crispy exterior far better than the microwave.
Freezing
If I want to prep ahead, I freeze unbaked roll-ups on a tray first, then transfer them to a freezer bag. When ready, I bake them straight from frozen, adding a few extra minutes to the baking time—super convenient!
Reheating
To reheat, I pop the cooked roll-ups into a toaster oven or regular oven at 350°F for about 10 minutes to refresh the crunch without drying out the filling. It’s much better than soggy microwave results.
FAQs
-
Can I make Monte Cristo Roll-Ups ahead of time?
Absolutely! You can assemble the roll-ups, keep them covered in the fridge for a few hours, or freeze them for longer storage. Just be sure to cook them fresh or reheat gently for the best texture.
-
What bread works best for this recipe?
Soft white sandwich bread is ideal because it’s easy to flatten and roll without cracking. You can also try brioche for a richer flavor, but avoid very crusty breads that might not roll well.
-
Can I use gluten-free bread?
Yes! Just make sure your gluten-free bread is sturdy enough to roll and won’t fall apart. Flatten it gently to avoid breaking the slices.
-
What’s the best way to melt the cheese inside?
Cooking the roll-ups over medium heat slowly browns the outside while gently melting the cheese inside. Don’t rush with high heat or the exterior will burn before the cheese melts.
-
Is it necessary to add powdered sugar?
It’s traditional and strongly recommended because the slight sweetness balances the savory flavors beautifully, but if you prefer, you can leave it off without losing the essence of the recipe.
Final Thoughts
This Monte Cristo Roll-Ups Recipe holds a special place in my heart because it takes a classic comfort food and makes it so approachable and fun to eat. If you’re looking for an easy recipe that delivers impressive flavor with minimal fuss, trust me—you’ll want to keep this one in your rotation. Give it a try, and I’m sure you’ll love how perfectly crispy, cheesy, and just the right amount of sweet these roll-ups turn out!
Print
Monte Cristo Roll-Ups Recipe
- Prep Time: 10 mins
- Cook Time: 15 mins
- Total Time: 25 mins
- Yield: 8 servings
- Category: Appetizer
- Method: Baking
- Cuisine: American
- Diet: Halal
Description
These Buffalo Chicken Biscuit Bombs are a deliciously savory snack featuring tender shredded chicken tossed in spicy buffalo sauce, wrapped in flaky Pillsbury biscuit dough, and baked to golden perfection. Enhanced with Monterey Jack and blue cheese, and brushed with a buttery ranch seasoning glaze, they are perfect for game day, parties, or a flavorful appetizer.
Ingredients
Filling
- 3/4 cup shredded cooked chicken
- 1/4 cup Frank’s RedHot buffalo wing sauce
- 2 Tbsp. mayonnaise
- 1/4 tsp. kosher salt
Dough
- 1 (12-oz.) can Pillsbury biscuit dough
- 1/2 cup shredded Monterey Jack cheese
- 1/4 cup crumbled blue cheese (optional)
Finishing & Serving
- 2 Tbsp. unsalted butter, melted
- 2 tsp. ranch seasoning
- Cooking spray
- Ranch dressing and blue cheese dressing, for serving (optional)
Instructions
- Preheat and prepare pan: Arrange a rack in the center of the oven and preheat to 350°F (175°C). Grease an 8-inch round pan thoroughly with cooking spray to prevent sticking.
- Mix filling: In a medium bowl, combine shredded cooked chicken, Frank’s RedHot buffalo wing sauce, mayonnaise, and kosher salt. Stir well so all ingredients are evenly incorporated.
- Form biscuit bombs: Flatten each biscuit dough round with your fingers to about 1/4 inch thickness. Place approximately 1 tablespoon of the chicken mixture into the center of each flattened biscuit. Sprinkle Monterey Jack cheese and crumbled blue cheese (if using) over the chicken mixture. Carefully gather the edges of the biscuit dough together, pinching the seams tightly to completely seal and form a ball. Place each biscuit bomb seam side down in the prepared pan.
- Prepare ranch butter glaze: In a small bowl, combine melted unsalted butter with ranch seasoning. Use a brush to evenly coat the top of each biscuit bomb with the ranch butter mixture.
- Bake first stage: Bake the biscuit bombs in the preheated oven for 10 to 12 minutes, or until they start to turn golden brown at the edges.
- Apply second ranch butter coat: Remove the pan and brush the biscuit bombs again with the ranch butter mixture to enhance flavor and browning.
- Bake second stage: Return the pan to the oven and bake for about 5 more minutes, or until the biscuits are fully toasted and golden brown on top.
- Serve: Transfer the biscuit bombs to a serving platter. Serve warm with ranch dressing and blue cheese dressing on the side, if desired, for dipping.
Notes
- You can substitute the chicken with rotisserie chicken for convenience.
- Adjust the amount of buffalo wing sauce to control the spice level.
- Blue cheese is optional; omit if preferred or use extra Monterey Jack cheese instead.
- Make sure to seal the seams tightly to prevent filling from leaking during baking.
- These biscuit bombs are best served fresh and warm for optimum flavor.
- For a crispier texture, bake on a wire rack set inside the pan.
Nutrition
- Serving Size: 1 biscuit bomb (approx. 1/8 of recipe)
- Calories: 210
- Sugar: 1 g
- Sodium: 470 mg
- Fat: 13 g
- Saturated Fat: 6 g
- Unsaturated Fat: 5 g
- Trans Fat: 0.2 g
- Carbohydrates: 15 g
- Fiber: 1 g
- Protein: 9 g
- Cholesterol: 30 mg


