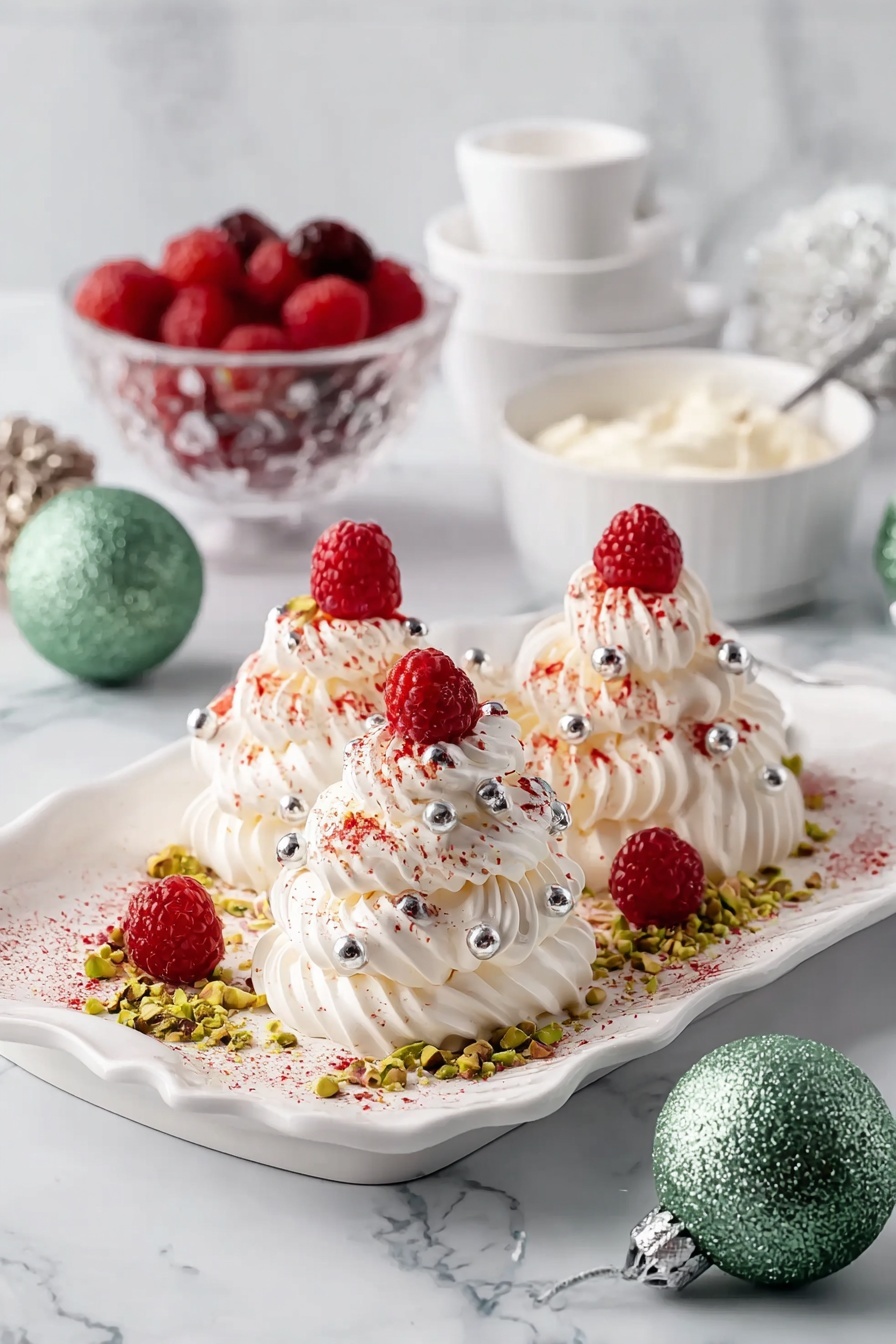
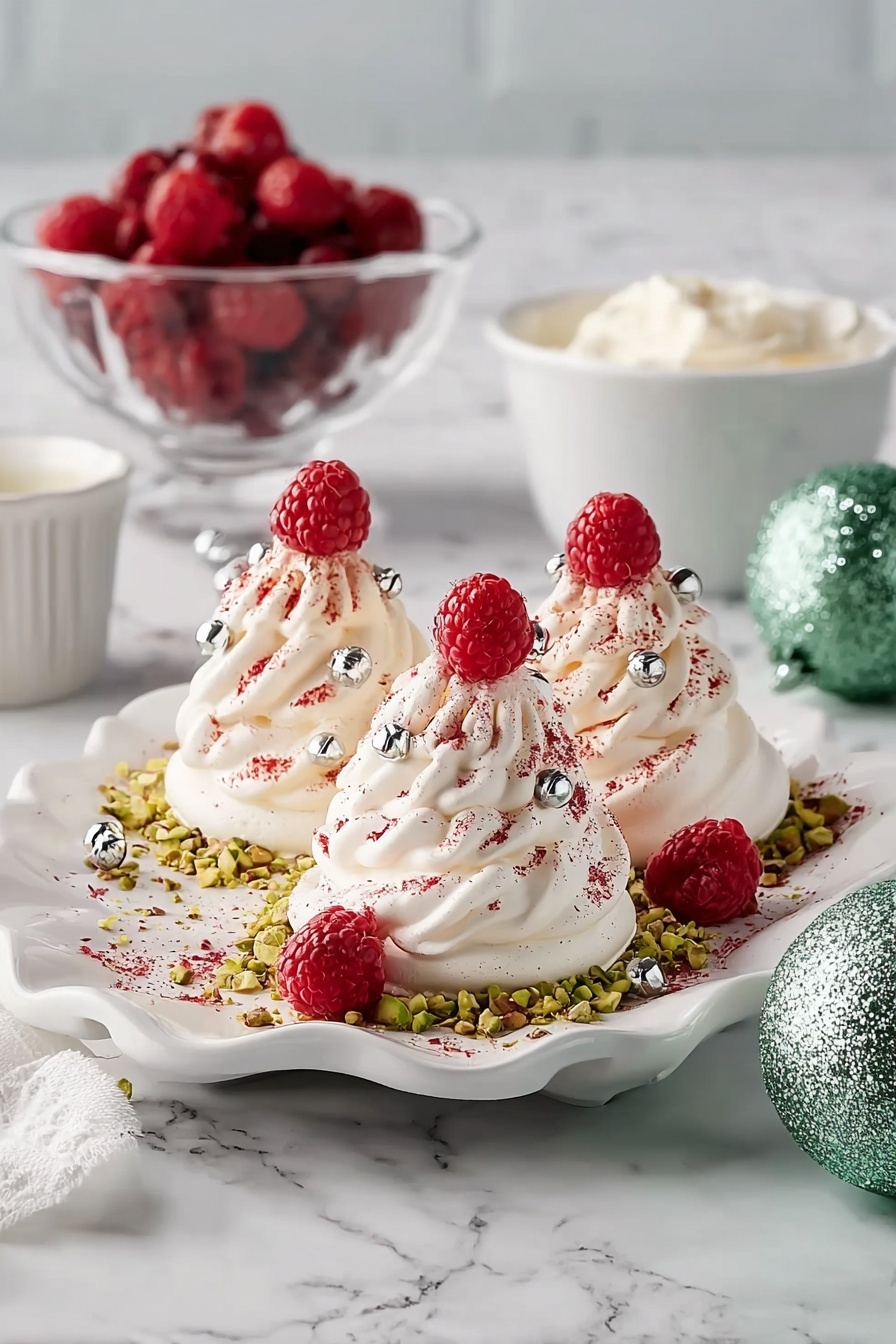
Get ready to wow your holiday guests with this festive and absolutely adorable Mini Pavlova Christmas Trees Recipe. These tiny, delicate meringue trees look like they came straight out of a winter wonderland and taste like pure, heavenly clouds topped with fresh cream and vibrant berries. I absolutely love how this turns out every year—it’s a total crowd-pleaser and surprisingly simple to make once you get the hang of it. Stick with me here, and I’ll walk you through the whole process so you can impress without stress!
Why You’ll Love This Recipe
- Festive Presentation: These mini pavlova trees are stunning on any Christmas table and make for a memorable dessert.
- Light and Airy Texture: You get that perfect crisp outside with a soft, marshmallow-like center that melts in your mouth.
- Easy to Customize: You can swap out berries or nuts to suit your preferences or what’s in season.
- Make-Ahead Friendly: These hold up well when baked ahead and assembled just before serving.

Ingredients You’ll Need
For this Mini Pavlova Christmas Trees Recipe, you’ll want to use fresh, free-range egg whites for the best meringue rise, and quality caster sugar to get that perfect glossy finish. Thickened cream becomes the heavenly icing that brings the whole thing together alongside the pistachios and berries for flavor and festive color.
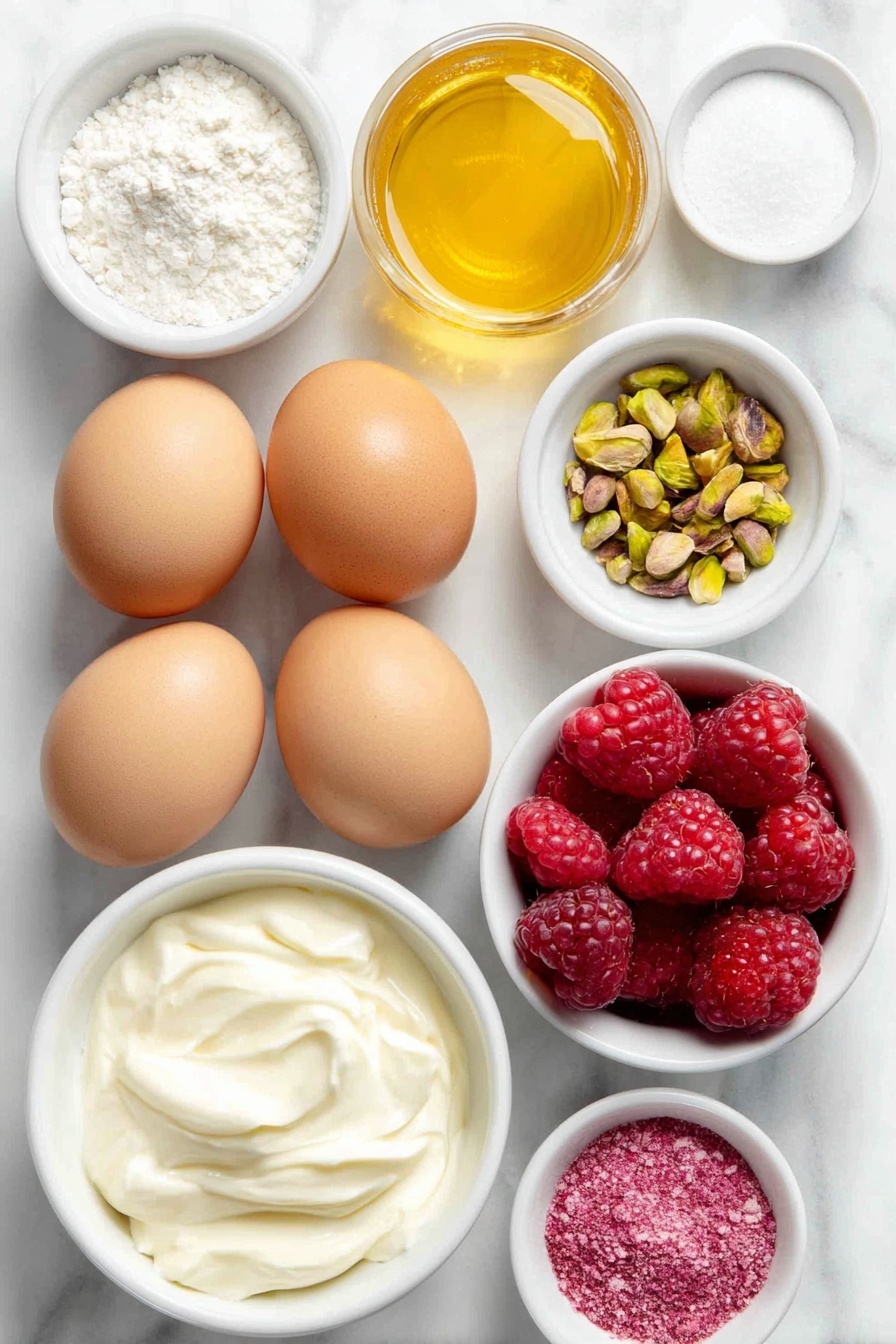
- Free-range egg whites: Room temperature whites whip better and create more volume for your pavlova base.
- Caster sugar: Fine sugar dissolves easily, yielding that smooth, glossy meringue we all adore.
- White vinegar: A little acidity stabilizes the egg whites and helps the pavlova keep its shape.
- Cornflour: This keeps the pavlova center soft and marshmallowy while the exterior crisps up.
- Sunbeam Australian Pistachios: Finely processed, these add a gorgeous green sprinkle and a nutty crunch.
- Thickened cream: Whipping this with just a touch of icing sugar and rosewater lifts the dessert to elegant heights.
- Silver cachous: Tiny silver balls that look like little ornaments on your mini trees.
- Raspberries, freeze-dried raspberry powder, strawberries: Fresh and freeze-dried berries add festive reds and bursts of tartness.
Variations
I love that this Mini Pavlova Christmas Trees Recipe is super versatile—you can easily tweak it to match your holiday style or dietary needs. I’ve tried swapping pistachios for toasted almonds or walnuts when I ran out, and it still worked beautifully. Feel free to get creative with your toppings or even whip up a chocolate cream filling for a twist!
- Nut-Free Version: Omit nuts and sprinkle crushed freeze-dried berries or colorful sprinkles for a similar festive effect—my niece is allergic, and she still loved them!
- Vegan Adaptation: While traditional pavlova uses egg whites, you can experiment with aquafaba (chickpea water) as a substitute—but be sure to research to nail those peaks.
- Flavored Cream: Add a splash of vanilla or almond extract to the whipped cream for an extra layer of flavor that felt super special in my last batch.
- Mini Pavlova Sizes: Play with the size of your piped meringues—smaller ones work great for individual bites at parties.
How to Make Mini Pavlova Christmas Trees Recipe
Step 1: Prep Your Oven and Piping Sheets
First things first, preheat your oven to 100°C fan-forced (or 120°C conventional). Grease two large oven trays lightly, then lay down two sheets of baking paper. Mark four 4.5cm circles on each sheet, spacing them apart—it’ll be your piping guide to keep all mini pavlovas uniformly shaped. I’ve found marking the paper saves so much time and ensures consistent “trees.” Flip the sheets over so the pencil marks are underneath to avoid any charcoal taste.
Step 2: Beat Your Meringue to Soft Peaks
Using an electric mixer, start beating your room temperature egg whites until soft peaks form—you’ll see the mixture hold a shape but still softly curl when you lift the beaters. Then, gradually add caster sugar one tablespoon at a time, beating well after each addition. This slows adds sweetness and builds that classic pavlova gloss you’re aiming for. Finally, mix in the white vinegar and cornflour. Keep beating until everything is combined and your meringue shines like a pearl.
Step 3: Pipe the Bases and Create Your Trees
I love the magic of this step! Scoop about one-quarter of your meringue into a large piping bag fitted with a 1cm plain nozzle. Pipe small mounds directly onto the baking paper inside your marked circles—these are the bases of your Christmas trees. Use another piping bag with a 0.5cm fluted nozzle to pipe three rows of vertical ‘branches’ around each mound, building that iconic tree shape. Don’t worry if your first try isn’t perfect; you quickly get the rhythm, and the layering adds such charm.
Step 4: Bake Slow and Low
Bake the meringues for 50 minutes to 1 hour until the edges are crisp but not browned. The low and slow method is key here to keep that chalky white color—brown edges just don’t scream Christmas tree! When done, turn off the oven and leave the meringues to cool inside with the door ajar; this prevents cracking from sudden temperature changes.
Step 5: Prep Your Pistachios and Whip the Cream
While the meringues are baking or cooling, pop your pistachios into a small food processor and pulse until you get fine crumbs—this adds that nutty topping that feels fancy without fuss. Next, whip the thickened cream with icing sugar and rosewater until just firm peaks form. The rosewater gives the cream a subtle, fragrant holiday twist I actually stumbled on one year, and we’ve never gone back.
Step 6: Decorate and Serve Your Mini Pavlova Christmas Trees
Spoon a quarter of your whipped cream into a small piping bag fitted with a tiny plain nozzle. Pipe small dots of cream onto each mini tree—this helps the silver cachous stick like little Christmas baubles. Go ahead and decorate with silver cachous, fresh raspberries, and a dusting of freeze-dried raspberry powder for color and tartness. Sprinkle on your pistachio crumbs and serve alongside strawberries and remaining cream. Trust me, these look like they belong front and center at your Christmas feast!
Pro Tips for Making Mini Pavlova Christmas Trees Recipe
- Room Temperature Eggs: I always separate eggs the night before and leave the whites out to reach room temp—this triples your meringue’s volume!
- Slow Sugar Addition: Adding sugar slowly while beating helps avoid gritty meringue texture and ensures a glossy finish every time.
- Piping Practice: Practice piping on spare paper first to get comfortable shaping your little trees; it makes the actual ones look polished.
- Cooling in Oven: Cooling with the door ajar avoids cracks and collapsing by letting air circulate gently around your pavlovas.
How to Serve Mini Pavlova Christmas Trees Recipe
Garnishes
I’m all about the silver cachous for that magical sparkle, but I also love scattering fresh raspberries and a pinch of freeze-dried raspberry powder to add a festive pop of red and a subtle tang. Pistachio crumbs add the perfect nutty crunch and vibrant green hue to bring these tiny trees to life. Strawberries on the side are my go-to because they complement the cream so well and make the plate extra colorful.
Side Dishes
These Mini Pavlova Christmas Trees make an excellent dessert, but if you’re wanting to round out your festive meal, I like to serve them alongside a batch of homemade mulled wine or hot chocolate. A simple fruit salad or citrus sorbet also pairs beautifully if you want something light and refreshing right after a big holiday feast.
Creative Ways to Present
One year, I arranged these mini trees in a circular pattern on a large white platter, sprinkled with edible gold dust around the edges. For a more rustic vibe, try nesting them on a bed of fresh pine needles or holly sprigs (just be sure no one eats the greenery!). Another fun way? Stack a few on mini cake stands at different heights for a dynamic dessert table display that immediately draws the eye.
Make Ahead and Storage
Storing Leftovers
If you end up with leftovers (though good luck with that!), store the naked pavlova trees in an airtight container at room temperature to keep them crisp. Once decorated, they’re best served immediately because the cream and toppings can soften the meringue quickly.
Freezing
I don’t recommend freezing the finished decorated pavlovas because the cream and berries won’t freeze well. However, you can freeze the baked meringue shells in an airtight container for up to a month. Thaw at room temperature before decorating, which is a lifesaver for busy holiday prepping.
Reheating
Since these pavlovas are best served cool and crisp, I avoid reheating. If you want to refresh meringue shells that absorbed humidity, a quick 5-10 minute bake in a low oven at 90°C can help crisp them back up before assembling your Christmas trees.
FAQs
-
Can I make the Mini Pavlova Christmas Trees Recipe dairy-free?
Absolutely! Swap the thickened cream for a plant-based whipped cream alternative, like coconut cream whipped with a bit of powdered sugar and vanilla. The meringue stays the same, so the texture and look remain just as gorgeous.
-
How do I store leftover meringues without them going soft?
Store them in an airtight container at room temperature, away from moisture and humidity. Avoid refrigerating as this can cause the meringues to absorb moisture and turn chewy.
-
Why does my pavlova crack when cooling?
Rapid cooling causes cracks due to temperature shock. Leaving the pavlovas to cool slowly in the oven with the door cracked open helps maintain their delicate shape and prevents cracking—trust me, it works wonders!
-
Can I make these Mini Pavlova Christmas Trees Recipe in advance?
You can bake and cool the meringue trees a couple of days ahead, then store them in an airtight container. Assemble and decorate right before serving to keep everything looking fresh and crisp.
Final Thoughts
This Mini Pavlova Christmas Trees Recipe has become a staple in my holiday baking—and I genuinely think it’ll become one for you, too. It’s a fun twist on a classic pavlova, with that delicate appearance making it feel special for the season. Plus, it’s not only beautiful but also delivers that melt-in-your-mouth joy we all crave in Christmas desserts. So grab your piping bags and some festive spirit, and let’s get these little trees on your table—I just know your family and friends will go crazy for them!
Print
Mini Pavlova Christmas Trees Recipe
- Prep Time: 20 minutes
- Cook Time: 1 hour
- Total Time: 1 hour 20 minutes
- Yield: 8 servings
- Category: Dessert
- Method: Baking
- Cuisine: Australian
- Diet: Vegetarian
Description
These Mini Pavlova Christmas Trees are a festive twist on the classic pavlova dessert. Crisp on the outside and soft inside, these meringue-based treats are shaped like Christmas trees, decorated with whipped cream, pistachio crumbs, silver cachous, and fresh berries. Perfect for holiday celebrations, they combine crunchy textures and creamy richness with a delicate hint of rosewater.
Ingredients
Meringue
- 6 free-range egg whites, at room temperature
- 1 1/2 cups caster sugar
- 1 tsp white vinegar
- 3 tsp cornflour
Decoration
- 1/4 cup Sunbeam Australian pistachios
- 300ml thickened cream
- 1 tsp pure icing sugar
- 1 tsp rosewater
- Silver cachous, to garnish
- Raspberries, to serve
- Freeze-dried raspberry powder, to garnish
- Strawberries, to serve
Instructions
- Preheat and prepare: Preheat the oven to 100°C fan-forced (120°C conventional). Grease two large oven trays. On two baking paper sheets, mark four 4.5cm circles spaced apart to guide your meringue shapes. Place the sheets marked side down on the trays.
- Make meringue base: Using an electric mixer, beat the egg whites until soft peaks form. Gradually add caster sugar one tablespoon at a time, beating well after each addition until sugar fully dissolves. Add vinegar and cornflour, then beat until the mixture is glossy and well combined.
- Pipe the meringue trees: Spoon a quarter of the mixture into a large piping bag fitted with a 1cm plain nozzle. Pipe small mounds of meringue onto the prepared baking paper, using the circles as guides. Fill another piping bag fitted with a 0.5cm fluted nozzle with the remaining meringue. Starting at the base of each mound, pipe three rows of small vertical layers around each mound to create the shape of a Christmas tree.
- Bake and cool: Bake the meringue trees for 50 minutes to 1 hour until the edges are crisp but not colored. Switch off the oven and leave the meringues inside to cool with the door slightly ajar.
- Prepare pistachio crumbs: Place pistachios in a small food processor and pulse until finely crumbed.
- Whip cream and decorate: Beat the thickened cream with icing sugar and rosewater using an electric mixer until just firm peaks form. Transfer a quarter of the cream to a piping bag fitted with a small plain nozzle and pipe small rounds onto the meringue trees to help the silver cachous stick. Decorate with silver cachous, raspberries, and freeze-dried raspberry powder. Sprinkle pistachio crumbs over the top and serve alongside fresh strawberries and the remaining whipped cream.
Notes
- Ensure egg whites are at room temperature for best volume.
- Do not open the oven door during baking to avoid cracking the meringues.
- Use fresh pistachios for optimal flavor and texture.
- Freeze-dried raspberry powder adds a beautiful color and tartness without moisture.
- The rosewater imparts a subtle floral note but can be omitted if preferred.
- Store leftover meringues in an airtight container to maintain crispness.
Nutrition
- Serving Size: 1 pavlova tree
- Calories: 220
- Sugar: 18g
- Sodium: 20mg
- Fat: 14g
- Saturated Fat: 9g
- Unsaturated Fat: 4g
- Trans Fat: 0g
- Carbohydrates: 20g
- Fiber: 1g
- Protein: 3g
- Cholesterol: 0mg


