Hey friends, I have a treat for you that’s as fun and festive as it sounds—this Melted Snowman Cookie Recipe is a total crowd-pleaser! I absolutely love how playful and adorable these cookies turn out. They look like little snowmen melting right before your eyes, and they taste just as delightful as they look. If you’re ready to impress family or friends during the holidays (or anytime you want a smile-inducing sweet), keep reading because this Melted Snowman Cookie Recipe is going to become a favorite in your kitchen, just like it is in mine.
Why You’ll Love This Recipe
- Easy and Quick to Make: You won’t believe how fast these cookies come together—and kids can get involved too!
- Adorable Presentation: These cookies literally bring smiles with their “melted snowman” charm.
- Perfect Balance of Sweetness: The royal icing, marshmallows, and M&Ms create just the right mix of textures and flavors.
- Great For Holiday Gatherings: They’re a unique twist on classic sugar cookies that always get compliments.

Ingredients You’ll Need
When I bake these Melted Snowman Cookies, I like to choose high-quality sugar cookies and fresh ingredients to make sure the flavors shine and the decorations hold up well. Here’s a quick rundown of what you’ll need and why it works perfectly.

- Sugar Cookies: I usually start with a sturdy yet soft sugar cookie base, which holds the icing and toppings well without crumbling.
- Royal Icing: This is key for creating that smooth “melting snow” effect and piping details that stay sharp.
- Marshmallows: Cut in half, they form the snowman’s “head,” giving that 3D melted look I adore.
- Long Orange Sprinkles: These act as the carrot nose – a fun and easy substitute for piping.
- M&Ms: Bright and colorful, perfect for buttons or eyes.
- Black Gel Food Color: To dye some royal icing for arms and facial features with bold contrast.
Variations
One of my favorite things about this Melted Snowman Cookie Recipe is how easy it is to make your own tweaks. Whether you want to switch up colors or use alternative decorations, it adapts beautifully.
- Gluten-Free Version: I swapped the sugar cookies with a gluten-free dough once, and my celiac friends loved them—just be sure your royal icing is GF too!
- Nut-Free and Allergy Friendly: By skipping any nut-based cookie or toppings, this recipe is safe for most allergies.
- Flavored Characters: I’ve played around with adding a hint of peppermint extract to the icing for a festive twist that really brightens the flavor.
- Chocolate Snowman: Swap sugar cookies for chocolate cookies and use white royal icing—it’s a decadent change that everyone enjoyed at my last holiday party.
How to Make Melted Snowman Cookie Recipe
Step 1: Prepare the Black Icing for Details
Start by taking about ½ cup of your royal icing and adding black gel food color. I usually add a little at a time, mixing until I get a rich, dark black—don’t rush this step if you want striking details! Then, thin the icing until it flows easily, reaching what decorators call a “15-second consistency” (when you lift the spoon, the icing smooths over in about 15 seconds). Pop it into a piping bag and snip a tiny tip for fine lines.
Step 2: Thin and Pipe the White Frosting
Next, thin the remaining white royal icing to a slightly thicker “10-second consistency”—this makes sure it drips just right on your cookies, giving that melted snowman effect. Put this into another piping bag with a small tip as well. When you’re ready, frost each cookie generously with this white icing, letting it drip naturally over the edges for that perfectly imperfect look.
Step 3: Add the Marshmallow Head and Decorations
While the white icing is still wet (this part is key!), press a marshmallow half toward the back of each cookie to form the snowman’s head. Then tuck in some colorful M&Ms where the buttons go—they stick beautifully with the wet icing. Before it sets, pipe the black “stick arms” extending out from the marshmallow head, giving that fun floating effect. Let the cookies rest for 20-30 minutes to firm up before you move on.
Step 4: Draw the Face and Finish
Once the cookies have set, it’s time for the charming finishing touches! Use your black icing to pipe two eyes and a surprised “O” mouth on each marshmallow head—this expression cracks me up every time. For the snowman’s carrot nose, use a tiny dab of leftover white icing as glue to attach a single long orange sprinkle right in the center. And voilà — your melted snowmen are ready to wow!
Pro Tips for Making Melted Snowman Cookie Recipe
- Use Fresh Royal Icing: I learned that fresh royal icing holds its shape best and sets faster, making your details look crisp and clean.
- Work Quickly on Wet Icing: Adding the marshmallow and arms while the white icing is wet ensures everything sticks together perfectly without sliding off later.
- Practice the Piping Consistency: Getting the right thinness on icing takes a few tries, but once you do it, the dripping effect is so worth it!
- Avoid Overcrowding the Cookie: I once crammed too many decorations on and it got messy—keep it simple for the best melt effect.
How to Serve Melted Snowman Cookie Recipe

Garnishes
I like to keep the garnishes minimal since the cookies themselves are so visually fun. Sometimes, I add a light dusting of powdered sugar over the plate to mimic “fresh snow”—it adds a cute touch without overpowering. If you’re feeling fancy, a small drizzle of white chocolate really ups the cozy vibe.
Side Dishes
These cookies pair incredibly well with a warm cup of cocoa or a cinnamon-spiced latte—perfect for curling up by the fire. I’ve also served them alongside apple cider doughnuts at holiday brunch, creating a merry little spread everyone raved about.
Creative Ways to Present
For parties, I arranged the Melted Snowman Cookies standing upright on a platter lined with shredded coconut “snow.” Once, I even used small clear plastic bags tied with festive ribbon to gift them—they make the sweetest homemade gift! If you have kids helping, let them create their own snowmen with different colored sprinkles and candy—it’s such a fun interactive presentation.
Make Ahead and Storage
Storing Leftovers
I keep these cookies in an airtight container at room temperature. They stay fresh and keep their texture for about 3-4 days. When stored properly, the royal icing develops a nice slight crunch on top while the cookie inside remains soft—a perfect balance that I always look forward to.
Freezing
If you want to prep ahead for a party, you can freeze these cookies after they’ve fully dried. Just place them in a single layer on a baking sheet first, freeze until solid, then transfer to a sealed freezer bag. They keep well for up to 2 months. I recommend thawing at room temperature for a couple of hours before serving so the marshmallows soften back up.
Reheating
Honestly, these cookies are best served at room temperature, but if you want to warm them slightly, I pop them into a low oven (around 275°F) for 3-5 minutes. This reactivates that soft marshmallow texture and freshens them up without melting the icing again.
FAQs
-
Can I use store-bought sugar cookies for this Melted Snowman Cookie Recipe?
Absolutely! While I prefer homemade sugar cookies for that fresher flavor and texture, store-bought sugar cookies can work in a pinch—just make sure they’re sturdy enough to hold the royal icing and marshmallows without breaking.
-
What if I don’t have royal icing—can I substitute it?
Royal icing is ideal for this recipe because it sets hard and holds decorations in place. You could experiment with a thick glaze or buttercream, but it won’t dry as hard and might make the cookies a bit messy. If you want the classic look and structure, royal icing is the way to go.
-
How do I get the “melted” effect right on the cookies?
The trick is thinning the white royal icing to about a 10-second consistency and letting it drip naturally over the cookie edges. Don’t overcontrol it—embrace a little imperfection. Also, adding the marshmallow head and other decorations while the icing is still wet helps create that melting illusion.
-
Can I make these cookies without marshmallows?
The marshmallows give the 3D snowman head effect, which is a central charm of this recipe. However, if you’re out, you could try stacking mini powdered sugar-coated donuts or another soft treat, but the marshmallows are the easiest and tastiest option.
-
How long do these Melted Snowman Cookies last?
Stored in an airtight container at room temperature, they last about 3-4 days. Beyond that, the cookies might dry out and the marshmallows can get a bit stale, so they’re best enjoyed fresh or within a few days.
Final Thoughts
When I first tried this Melted Snowman Cookie Recipe, I was amazed at how much character a simple sugar cookie could have. Every time I bake them, they bring back that cozy holiday spirit and create smiles around the table. I hope you’ll find making them just as joyful—and that sharing them feels like giving a little seasonal hug. So go ahead, grab your icing bags and marshmallows, and make some melted magic! You’ll thank me later. 😊
Print
Melted Snowman Cookie Recipe
- Prep Time: 20 minutes
- Cook Time: 0 minutes
- Total Time: 20 minutes
- Yield: 12 cookies
- Category: Dessert
- Method: No-Cook
- Cuisine: American
Description
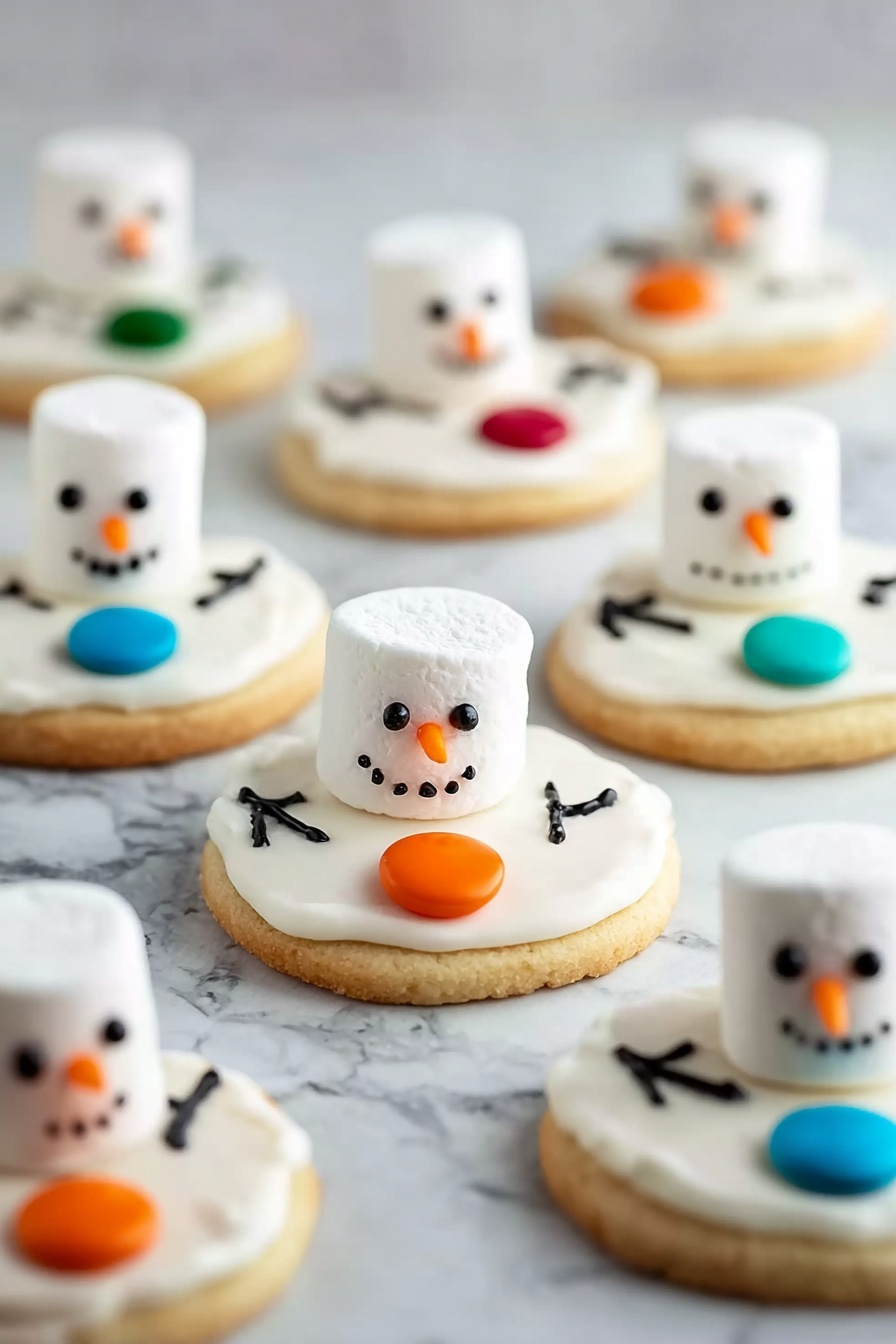
These Melted Snowman Cookies are a whimsical and festive treat perfect for the holiday season. Soft sugar cookies are topped with smooth royal icing that mimics melting snow, then decorated with marshmallow halves, colorful M&Ms, and playful black icing stick arms and facial features to resemble snowmen melting into winter magic.
Ingredients
Cookies
- 12 sugar cookies
Icing & Decorations
- 2 cups royal icing
- Black gel food color
- Long orange sprinkles
Toppings
- 6 marshmallows, cut in half
- M&Ms (quantity to decorate 12 cookies)
Instructions
- Color the black icing: Take 1/2 cup of your royal icing and dye it black using black gel food coloring. Mix until you reach a deep black color, then thin the icing to a 15-second consistency by adding small amounts of water. Transfer this black icing to a piping bag and snip off a small tip for fine detail piping.
- Prepare the white icing: Thin the remaining white royal icing to a 10-second consistency by carefully adding small amounts of water. Place this thinned white icing into a separate piping bag and cut a small opening at the tip to make frosting application smooth and easy.
- Frost the cookies: Using the white icing, coat each sugar cookie generously, allowing the icing to drip slightly over the sides to mimic melting snow. Work quickly to keep the icing flowy and natural-looking.
- Add marshmallows and initial decorations: Immediately place marshmallow halves toward the back-top of each iced cookie to represent the snowman’s head. Next, press M&Ms onto the cookies beneath the head to resemble buttons or scarves. While the white icing is still wet, pipe black stick arms extending away from the marshmallow ‘head’ to create a floating effect.
- Let the cookies set: Allow the frosted cookies to sit undisturbed for 20 to 30 minutes so the icing hardens and decorations set firmly.
- Decorate the face: Once set, pipe two black dots for eyes and an “O” shape mouth on each marshmallow head using the black icing. Use a small amount of leftover white icing to adhere one long orange sprinkle as the snowman’s carrot nose.
- Final setting: Let the fully decorated cookies dry completely before serving or packaging to preserve their structure and delightful appearance.
Notes
- If royal icing thickens during decorating, gently stir in a few drops of water to maintain consistency.
- Ensure marshmallows are cut evenly for a balanced look on each cookie.
- Use gel food coloring to avoid thinning the icing too much when coloring.
- Cookies can be stored in an airtight container at room temperature for up to 3 days.
- Allow icing to harden fully to prevent smudging during transport or storage.
Nutrition
- Serving Size: 1 cookie
- Calories: 150
- Sugar: 20g
- Sodium: 100mg
- Fat: 2g
- Saturated Fat: 1g
- Unsaturated Fat: 1g
- Trans Fat: 0g
- Carbohydrates: 30g
- Fiber: 0g
- Protein: 1g
- Cholesterol: 5mg


