If you’re looking for a spooky yet super simple edible craft to enjoy with kids this October, you’ve got to try this Kid-Easy Halloween Cookie House Recipe. I absolutely love how this cookie house comes together with just a few decorating tricks — and trust me, it’s a total crowd-pleaser for both kids and adults alike. Whether you’re crafting this on a chilly weekend or planning a fun Halloween party activity, you’ll find that this recipe makes creativity deliciously easy and fun.
Why You’ll Love This Recipe
- Kid-Friendly and Fun: It’s designed for easy decorating, so kids can jump right in and feel like little artists.
- Minimal Prep & Mess: The kit comes with ready-to-decorate pieces and icing, cutting down on your prep time.
- Perfect for Halloween Vibes: With spooky details like spiderwebs and candy “bricks,” it’s a festive treat as much as a craft.
- Great For All Skill Levels: Whether you’re a cookie-building expert or a first-timer, this recipe makes success easy and stress-free.

Ingredients You’ll Need
You’ll find that the ingredients here are straightforward, mostly coming from the ready-made decorating kit which simplifies the assembly a ton. I like how all the flavors and textures work together to create that classic Halloween fun without any hassle.
- Ready-to-Decorate Halloween Chocolate Cookie House Decorating Kit: This is the absolute star of the show — it includes all cookie parts, colored icing, and fun candies!
- Black Sanding Sugar: Adds that extra sparkle and spooky vibe; perfect for sprinkling on the house base or roof.
- Gray Icing: Use this for outlining doors and windows with precision.
- Purple Icing: Great for icing larger sections like the roof, adding a pop of color.
- Black Tube Icing: Ideal for drawing spider webs and fine details.
- Yellow Fondant: I love rolling this into small accents like doorknobs and tiny logs — it adds texture and visual interest.
- Assorted Candy Pieces: These come in your kit and help bring the house to life with fun shapes and colors.
Variations
One of the best things about this Kid-Easy Halloween Cookie House Recipe is how easy it is to tailor to your preferences or dietary needs. I often adapt the candy choices depending on what my kids are into or swap icing colors to fit a different spooky theme.
- Diet-Friendly Swaps: I’ve swapped regular candies for allergen-free versions before and it worked like a charm without losing fun.
- Seasonal Themes: Beyond Halloween, try different icing colors and candies for Christmas or even birthday versions!
- Extra Detail: My kids like to add edible glitter or mini marshmallows to give their house a “snowy” or ethereal look.
How to Make Kid-Easy Halloween Cookie House Recipe
Step 1: Prepare Your Icing and Setup
Start by placing the gray icing into your decorating bag fitted with a fine tip. This will give you control when outlining the doors and windows. I discovered that prepping your icing this way before you dive into decorating makes the process way smoother — no scrambling for the right tip mid-decorate!
Step 2: Decorate Door and Windows
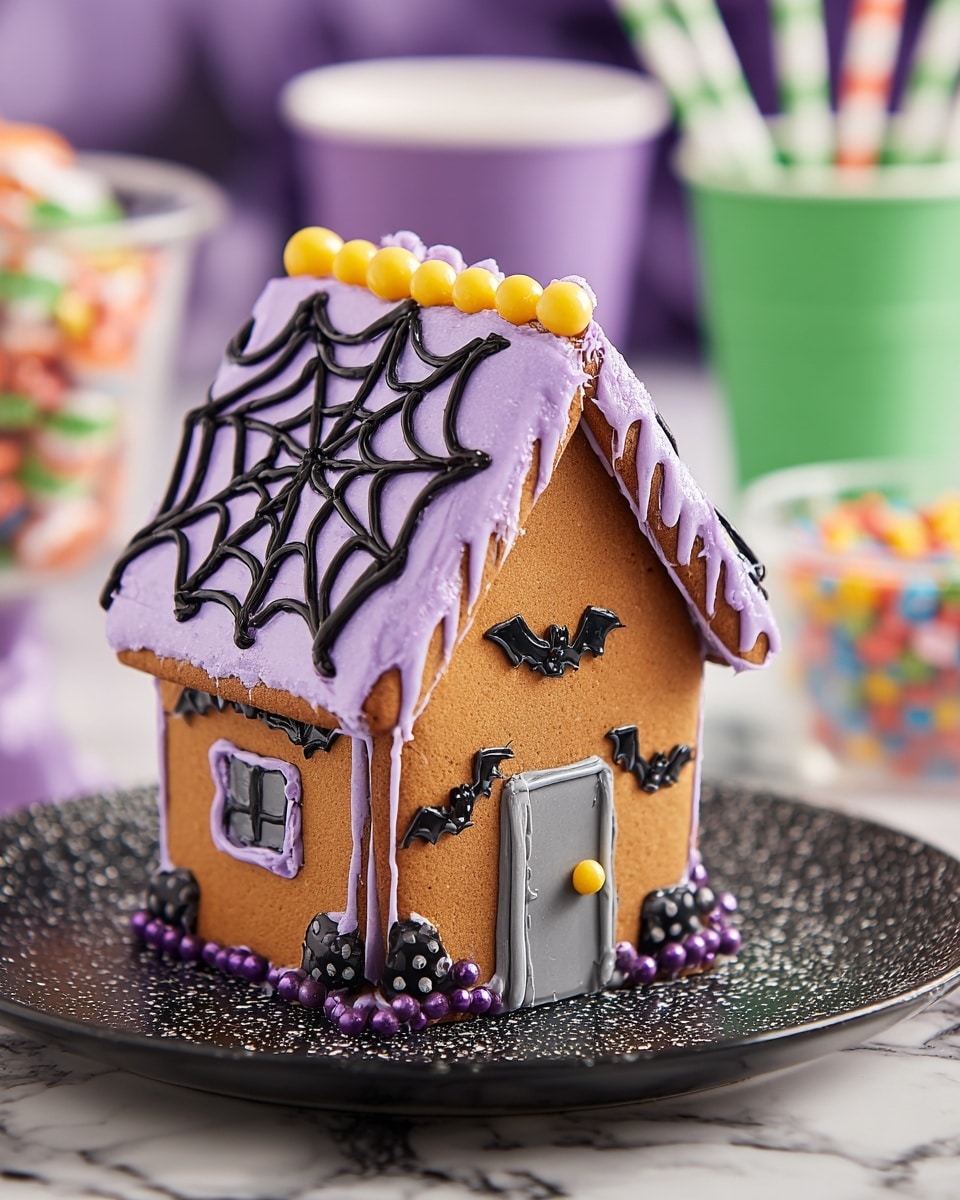
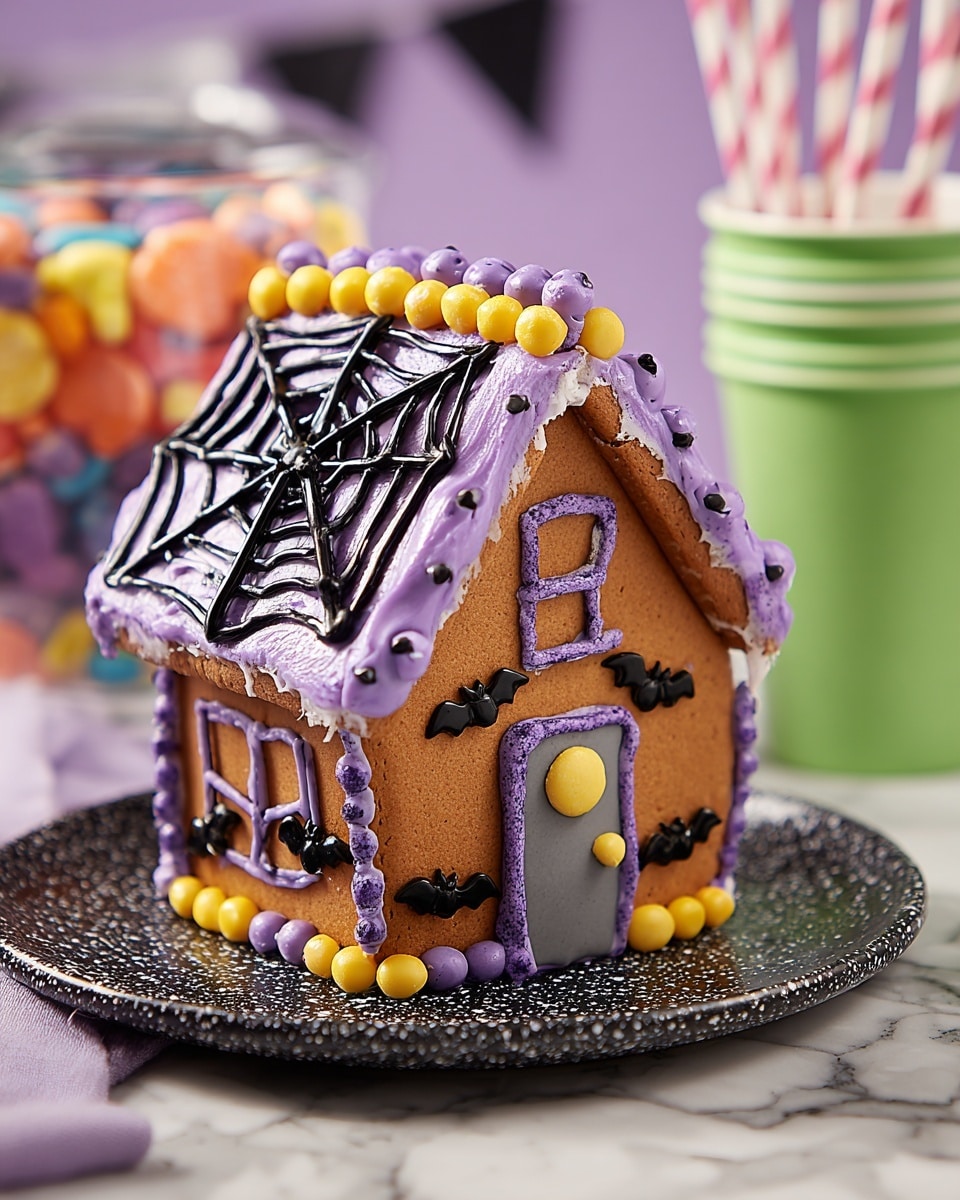
Use your gray icing to carefully outline the door, windows, and even windowpanes. It’s like sketching the frame before you add color. Then roll a small ball of yellow fondant to make a cute doorknob, sticking it on with a dab of icing. Attach any candy pieces you like for added charm — I love how this step brings the house to life so quickly.
Step 3: Ice and Decorate the Roof
Spread purple icing over the roof using the back of a spoon, which gives a nice rustic texture. Then, with the black tube icing, pipe a spider web outline for a perfectly spooky roof. Attach candy decorations wherever you want — I always let my kids get creative here. To finish, roll a “log” from yellow fondant and stick this on the roof peak with some icing for a fun architectural detail.
Step 4: Decorate the Front of the House
Using the black tube icing again, outline a spider web on the front, then adorn with candy pieces to your liking. This step is where your house starts showing its unique personality. My family goes crazy for these little details!
Step 5: Optional Base Decoration
If you want to go the extra mile, use a spoon and your icing to smear some on the base and sprinkle black sanding sugar on top for a sparkling ground effect. It’s a great finishing touch and makes the whole display feel complete.
Pro Tips for Making Kid-Easy Halloween Cookie House Recipe
- Let Icing Set Properly: I always wait at least 10 minutes after decorating each section to let the icing harden before moving on. It saves you from collapsing details.
- Use Fondant for Details: Fondant can be shaped easily by kids and holds well—try making little pumpkins or bats for extra flair.
- Keep It Simple: Sometimes less is more. My first attempt was overwhelmed with candy, and the house looked cluttered; now I recommend selecting a few favorite elements.
- Plan Where Candies Go: I sketch a quick layout on paper beforehand so decorating with kids goes smoothly—and it reduces frustration.
How to Serve Kid-Easy Halloween Cookie House Recipe
Garnishes
I love using extra candy corns, mini chocolate chips, and edible glitter as garnishes around the house when serving—it adds texture and sparkle that really captures that Halloween magic. Plus, the kids get to eat the “decorations,” which is always the best part for them!
Side Dishes
This cookie house pairs perfectly with a warm cup of spiced apple cider or a fun batch of Halloween-themed cupcakes. I usually set up a dessert table with colorful treats, which makes the house the star of the spooky snack show.
Creative Ways to Present
For a special party touch, try placing your cookie house on a mirrored tray with flickering LED tea lights underneath for a glowing effect. I’ve also used crumpled tissue paper in orange and black as a “yard,” which creates a festive scene that delights little guests.
Make Ahead and Storage
Storing Leftovers
I usually store leftover houses in an airtight container at room temperature to keep the cookie crisp and the icing firm. If I’m keeping it more than a day or two, I move it to a cool, dry spot away from sunlight to prevent the icing from melting or candies from getting sticky.
Freezing
Freezing the assembled cookie house isn’t something I recommend because the icing and candy decorations don’t usually fare well in the freezer—they can get brittle or lose texture. Instead, freeze individual cookies pre-decorated but unassembled if you want to save time later.
Reheating
Since this is a decorative cookie house, reheating isn’t really necessary. But if you want to bring out fresh flavors in leftover cookies, a quick 10 second zap in the microwave softens them nicely. Just be careful not to melt the icing!
FAQs
-
Can young children make this Kid-Easy Halloween Cookie House Recipe on their own?
Absolutely! The decorating kit is designed with kids in mind, but younger kids might need a bit of help with squeezing icing bags or placing small candies. It’s a great activity to foster creativity and hand-eye coordination with some adult supervision.
-
How long does it take to assemble and decorate the cookie house?
Depending on how detailed you want to get, the whole process usually takes about 45 minutes to an hour. I like to spread it out so kids can enjoy decorating at their own pace without rushing.
-
Can I use homemade cookies for this recipe instead of the kit?
You certainly can, but keep in mind that the kit cookies are perfectly sized and sturdy, which helps with assembly. If you bake your own, choose a firm gingerbread or sugar cookie dough and roll thick to avoid breakage.
-
What are the best candies to use for decorating?
Stick to smaller candies like mini chocolate chips, candy corn, and small gummies. They’re easier to attach and look charming. Avoid overly heavy or large candies to keep your house stable.
Final Thoughts
This Kid-Easy Halloween Cookie House Recipe has become a favorite in my household because it turns Halloween baking into an interactive adventure for the kids and me. I love how easy it is to pull off, and how the finished product is not just tasty but truly a work of art. If you’re looking for a fun project that doubles as a delicious treat, I highly recommend giving this a try — it’s a sweet way to make memories this spooky season.
Print
Kid-Easy Halloween Cookie House Recipe
- Prep Time: 15 minutes
- Cook Time: 0 minutes
- Total Time: 15 minutes
- Yield: 1 decorated Halloween cookie house
- Category: Dessert
- Method: No-Cook
- Cuisine: American
Description
Create a spooky and fun Halloween Chocolate Cookie House that’s perfect for kids and families to decorate together. Using a ready-to-decorate kit, this recipe guides you through icing and embellishing a charming Halloween-themed cookie house with vibrant colors and festive candy decorations.
Ingredients
Kit Ingredients
- Ready-to-Decorate Halloween Chocolate Cookie House Decorating Kit
- Black Sanding Sugar, 3.25 oz.
- Gray Icing (included in kit)
- Purple Icing (included in kit)
- Black Tube Icing (included in kit)
- Yellow Fondant (for doorknob and roof log)
- Assorted Candy (for decorating)
Instructions
- Prepare Icing: Place the gray icing into a decorating bag fitted with the appropriate decorating tip to prepare for outlining the details on the cookie house.
- Decorate Door and Windows: Using the gray icing and decorating bag, carefully outline the door, windows, and windowpanes. Roll a small ball of yellow fondant to create a doorknob and attach it to the door with icing. Embellish further by attaching assorted candy decorations around these areas.
- Decorate Roof: Spread purple icing evenly on the roof section using the back of a spoon to create a smooth layer. Use black tube icing to outline a spider web design on the icings of the roof. Attach assorted candy on the roof for extra decoration. Roll a log shape from yellow fondant and attach it along the roof peak with icing, then add more candy decorations.
- Decorate Front of House: Outline a spider web pattern on the front of the cookie house using the black tube icing. Continue decorating by attaching candies as desired to enhance the spooky look.
- Optional – Decorate Base: If desired, use a spoon to spread icing on the base of the cookie house and sprinkle with black sanding sugar for added texture and effect.
Notes
- Use a steady hand when piping icing to create neat outlines and designs.
- Allow icing to set slightly before attaching candies to prevent slipping.
- Fondant can be softened by warming slightly in hands to make rolling easier.
- For younger children, supervising the use of decorating bags and small candies is recommended to avoid mess and choking hazards.
- Store finished cookie house in a cool, dry place to preserve freshness.
Nutrition
- Serving Size: 1 decorated cookie house (approximate)
- Calories: 350
- Sugar: 45g
- Sodium: 150mg
- Fat: 12g
- Saturated Fat: 5g
- Unsaturated Fat: 6g
- Trans Fat: 0g
- Carbohydrates: 60g
- Fiber: 2g
- Protein: 3g
- Cholesterol: 10mg


