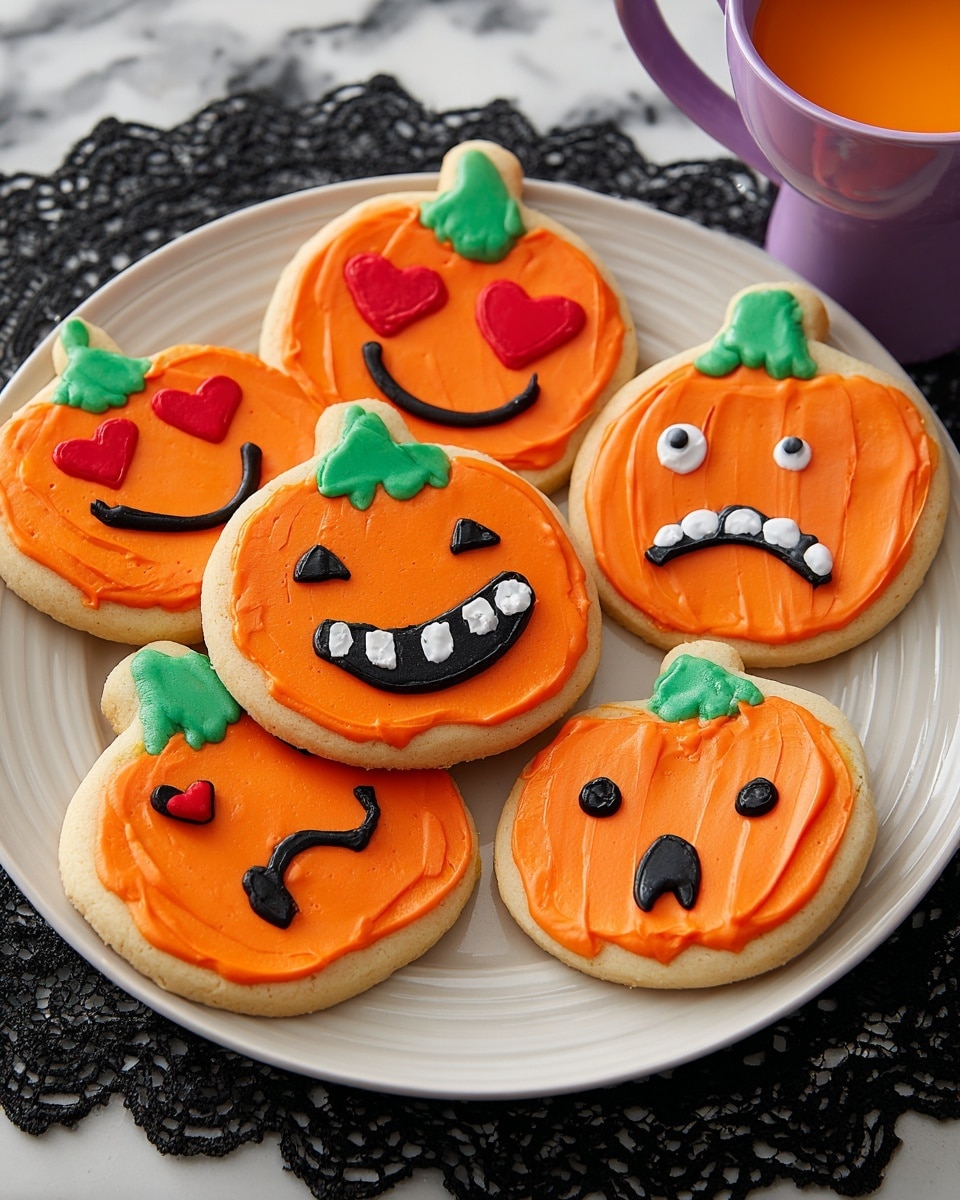
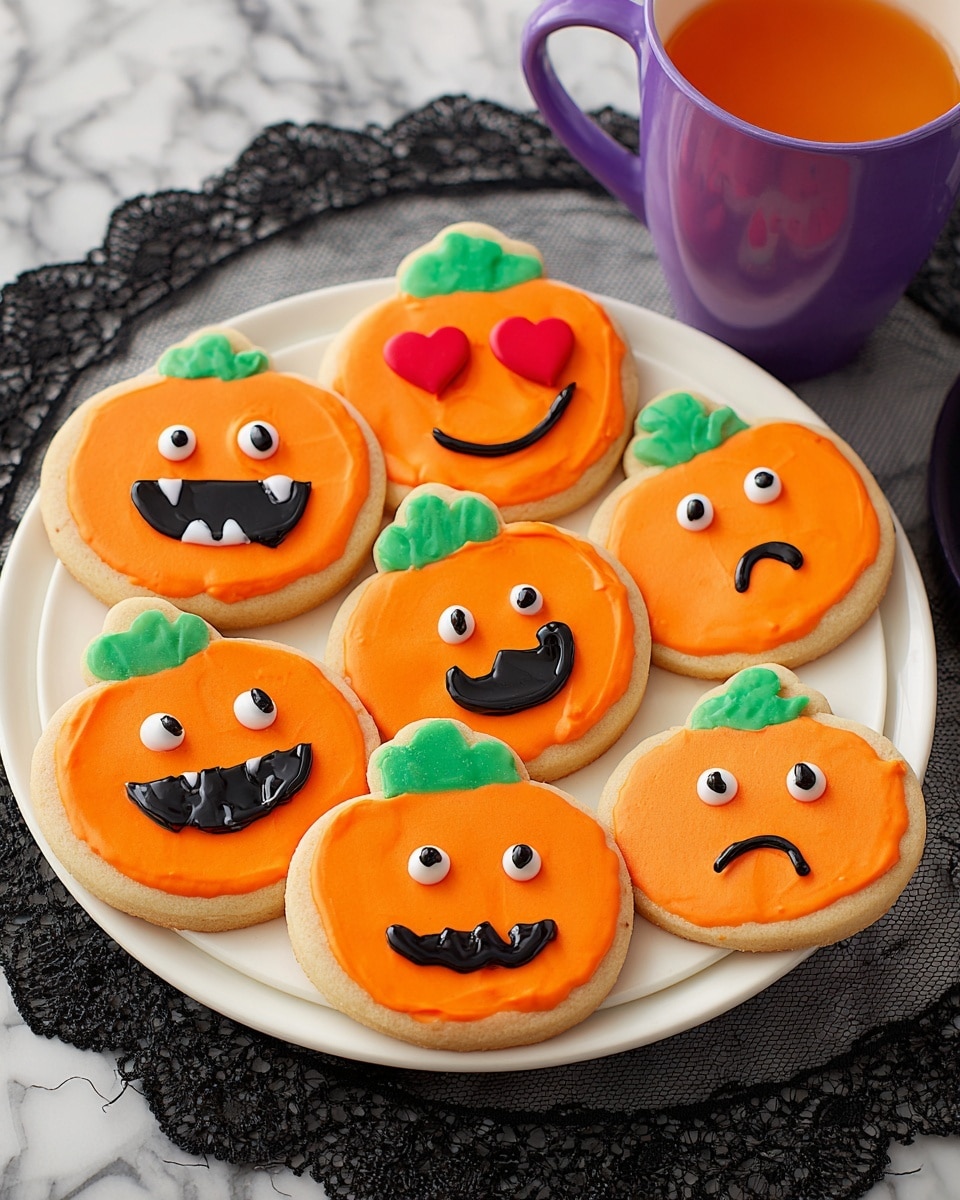
If you’re on the hunt for a festive, fun, and utterly charming treat to celebrate this spooky season, you’re going to adore this Halloween Pumpkin Cookies Recipe. I absolutely love how these cookies turn out — cute pumpkin shapes, perfectly soft bites, and colorful decorations that get everyone in the Halloween spirit. Whether you’re baking with kids or looking to wow your friends, this recipe is fan-freaking-tastic. Stick with me; I’ll walk you through every detail so your cookies come out picture perfect!
Why You’ll Love This Recipe
- Adorable and Festive: These pumpkin-shaped cookies decorated with vibrant icing are perfect for Halloween parties or classroom treats.
- Soft Yet Structured: The cookie dough bakes up soft, not hard, making every bite melt in your mouth while holding its shape beautifully.
- Customizable Decoration: I share tips on tinting icing and piping details, so you can make your pumpkins as spooky or sweet as you like.
- Family-Friendly Fun: This recipe is a hit with kids and adults alike, especially when decorating time doubles as a creative bonding activity.

Ingredients You’ll Need
Choosing quality ingredients means your Halloween pumpkin cookies will taste as great as they look. I like to use a sturdy roll-out cookie dough base because it’s easier to cut shapes and gives a consistent texture, while gel food coloring really brings the icing shades to life without watering it down.
- Roll-Out Cookie Dough: A firm dough helps the pumpkin shapes stay crisp and sturdy while baking.
- Orange Icing Color: Vital for giving your pumpkins that classic, vibrant orange hue.
- Kelly Green Icing Color: Perfect for coloring the stems with a fresh, leafy look.
- Black Icing Color: Ideal for the spooky facial features and details like eyebrows and teeth.
- Red-Red and Christmas Red Icing Colors: These shades combine beautifully for deep and bright reds, great for eyes and other little accents.
- White Decorator Icing: This is your base to mix with colors, plus it adds contrast to facial features.
Variations
I love that this Halloween pumpkin cookies recipe gives you so much room to play around. Sometimes I swap out the colors or add extra decorations, and feel free to experiment with your own festive twists!
- Spiced Pumpkin Cookies: Add cinnamon, nutmeg, and cloves to the dough for a warm, fall-inspired flavor that takes these pumpkins to the next level.
- Vegan or Gluten-Free Options: You can use your favorite vegan dough or gluten-free flour blend if you want to accommodate dietary preferences—just keep an eye on baking times.
- Glow-in-the-Dark Icing: For a party favorite, try edible glow-in-the-dark or neon gel colors to really make your pumpkins pop in the dim lighting.
How to Make Halloween Pumpkin Cookies Recipe
Step 1: Bake the Perfect Pumpkin-Shaped Cookies
Start by preparing your roll-out cookie dough according to package or your preferred recipe instructions. The key here is rolling it out evenly—not too thin, about 1/4 inch thickness works best. Use a pumpkin-shaped cookie cutter to cut out your shapes, then place them on a parchment-lined baking sheet. When baking, watch closely near the end: you want the edges lightly golden but not too browned to keep that soft texture. Once baked, transfer them to a wire rack and let them cool completely before decorating. Trust me, icing on warm cookies can turn into a melty mess!
Step 2: Get Your Icing Colors Just Right
This is the fun part where your pumpkins really start to come alive. Mix your white decorator icing with the gel colors following the color guide in the ingredients: about 1 cup orange, 1/4 cup green for stems, 1/2 cup black for facial features, and 1/4 cup red (a mix of red-red and Christmas red) for accent details. I love using gel food coloring because it gives such rich colors without thinning the icing. Stir slowly to get an even color, and test a little on a chip or piece of parchment to see if it’s the shade you want.
Step 3: Time to Decorate Your Pumpkins
Using a spatula, ice each cooled cookie with the orange icing and smooth it out perfectly for a neat pumpkin base. Prepare decorating bags with different tips: a coupler and black icing for outlining and details, and tip 5 for green, white, and red icing to pipe on stems, eyes, mouths, and funny pumpkin faces. Don’t rush the piping—steady hands make all the difference here. I found switching the black icing tip from 5 to 3 for sharp teeth and eyebrow details really adds character. And don’t worry if your first pumpkins look a little quirky—that’s part of the fun!
Pro Tips for Making Halloween Pumpkin Cookies Recipe
- Even Dough Thickness: Rolling your dough evenly ensures uniform baking so your pumpkins don’t lose shape or get burnt edges.
- Cool Completely Before Icing: Warm cookies make icing run and blur your clean designs—patience here really pays off.
- Use Gel Food Coloring: It gives you the brightest colors without making the icing too thin and runny like liquid coloring can.
- Practice Piping First: Try out your designs on parchment paper before you start decorating the cookies to avoid mistakes and stress.
How to Serve Halloween Pumpkin Cookies Recipe
Garnishes
I usually keep garnishes simple—sometimes a gentle dusting of edible glitter for sparkle or tiny candy eyes to make the pumpkins extra expressive. Adding a sprinkle of cinnamon sugar on top before icing sets can give a subtle hint of warmth and sweetness too.
Side Dishes
Pair these delightful pumpkin cookies with a hot cup of spiced apple cider or a creamy pumpkin spice latte to double down on the autumn vibes. A light cheese platter with some tangy cheeses and crackers also works surprisingly well alongside the sweetness.
Creative Ways to Present
I’ve had so much fun arranging these pumpkin cookies on a tray with fall leaves, mini pumpkins, and candles for Halloween gatherings. For kids’ parties, creating little pumpkin “patches” with green shredded paper as grass and chocolate chip “rocks” really brightens up the presentation and gets everyone excited to dig in.
Make Ahead and Storage
Storing Leftovers
Once iced and fully dry, store your Halloween pumpkin cookies in an airtight container layered with parchment paper between them. I usually keep them at room temperature up to 4 days to retain that soft texture. This way, they stay fresh and look lovely for snack time or last-minute get-togethers.
Freezing
I’ve frozen these cookies successfully by placing them undecorated in a single layer on a tray, freezing until firm, then stacking in freezer bags. After thawing, you can ice them fresh, or freeze decorated cookies wrapped very gently in plastic wrap, but I recommend fresh icing for the best look.
Reheating
These cookies are best enjoyed at room temperature, but if you want that “fresh-baked” vibe, pop a cookie in the microwave for 10-15 seconds. Just be careful not to heat too long or the icing might soften too much and lose shape.
FAQs
-
Can I use homemade cookie dough instead of roll-out dough?
Absolutely! Homemade dough works wonderfully as long as it’s firm enough to roll out and keep its shape during baking. I recommend chilling your dough well before cutting shapes to minimize spreading while baking.
-
How long does the decorating icing take to dry?
Icing typically takes about 1-2 hours to set completely at room temperature, though thicker layers and humid weather can add time. For best results, let your decorated cookies rest overnight before stacking or storing.
-
What’s the best way to avoid cookie spreading?
Chilling your cookie dough before cutting and baking is key. Also, avoid overworking the dough, roll it to consistent thickness, and bake on a parchment-lined sheet to keep the shapes crisp.
-
Can I prep these cookies in advance for a Halloween party?
Yes! You can bake and ice them up to 2 days ahead and store in airtight containers. Just make sure the icing is fully dry before stacking. For more time, freeze undecorated cookies and decorate closer to your event.
Final Thoughts
This Halloween pumpkin cookies recipe is truly one of my seasonal favorites because it brings together baking fun, eye-catching results, and delicious flavors all in one. I love how personal you can get with the decorations—there’s no better way to add your own touch to the season! So grab your pumpkin cutter, your icing bags, and a big cup of coffee (or cider)—you’re ready to create some magical, edible Halloween memories. Trust me, once you try this recipe, it’ll become a yearly tradition that your family looks forward to as much as I do.
Print
Halloween Pumpkin Cookies Recipe
- Prep Time: 1 hr
- Cook Time: 15 min
- Total Time: 2 hr 15 min
- Yield: 1 dozen cookies
- Category: Dessert, Cookies
- Method: Baking
- Cuisine: American
Description
These Halloween Pumpkin Cookies are delightful roll-out sugar cookies decorated with vibrant colored icings to resemble whimsical pumpkin faces. Perfect for festive celebrations, these cookies combine a classic pumpkin shape with creative icing designs in orange, green, black, red, and white colors to bring a playful Halloween spirit to your cookie platter.
Ingredients
Cookie Dough:
- Roll-Out Cookie Dough (quantity as per recipe instructions)
Icing Colors:
- Kelly Green Icing Color, 1 oz.
- Black Icing Color, 1 oz.
- Orange Icing Color, 1 oz.
- Christmas Red Icing Color, 1 oz.
- Red-Red Icing Color, 1 oz.
- White Decorator Icing, 4.5 lb.
Instructions
- Bake Cookies: Prepare the roll-out cookie dough following the recipe’s instructions. Roll out the dough evenly and use a pumpkin-shaped cookie cutter to cut out the pumpkin shapes. Place cookies on a baking sheet and bake according to dough recipe directions. Once baked, allow the cookies to cool completely before decorating.
- Tint Icing: Mix the Red-Red and Christmas Red icing colors to achieve the desired red hue. Then tint 1/4 cup of icing red with the combined colors. Tint 1 cup of icing orange using the orange icing color. Tint 1/4 cup of icing green using the Kelly Green icing color. Tint 1/2 cup of icing black using the black icing color. Ensure the colors are well mixed and vibrant.
- Decorate Cookies: Using a spatula, apply the orange tinted icing evenly over each cooled pumpkin cookie and smooth the surface. Fit a decorating bag with a coupler and fill it with black icing. Prepare three additional decorating bags with tip 5 filled separately with green, white, and red icing. Use the green icing to pipe stems on top of the pumpkins. Use black, red, and white icings from their respective bags to pipe facial features such as eyes and noses onto the pumpkins. Switch the black icing bag’s tip to a smaller tip 3 and pipe detailed features like teeth and eyebrows on each pumpkin to add expression and character.
Notes
- Ensure cookies are completely cool before icing to prevent melting.
- Use gel food coloring to achieve vibrant icing colors without thinning the icing.
- Practice piping on parchment paper before decorating cookies for better control.
- Store decorated cookies in an airtight container to maintain freshness.
- This recipe yields approximately one dozen cookies depending on cookie cutter size.
Nutrition
- Serving Size: 1 cookie
- Calories: 150
- Sugar: 12g
- Sodium: 90mg
- Fat: 6g
- Saturated Fat: 2g
- Unsaturated Fat: 3g
- Trans Fat: 0g
- Carbohydrates: 22g
- Fiber: 0.5g
- Protein: 1g
- Cholesterol: 10mg
