Description
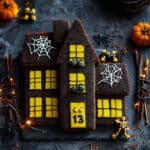
This Halloween brownie cake is a fun and festive treat perfect for spooky celebrations. Rich dark chocolate brownies are baked into a giant sheet cake, then creatively cut and decorated to resemble a haunted house complete with turrets, a spider, cobwebs, and creepy details made from colorful fondant icing, Matchmakers, and Smarties. The moist, fudgy brownies are topped with chocolate frosting and transformed into an eye-catching centerpiece that serves 24. It’s an ideal dessert to impress guests and delight kids during Halloween festivities.
Ingredients
Scale
For the Brownie
- 400g unsalted butter, cubed
- 400g dark chocolate (54% cocoa solids), broken into pieces
- 6 large eggs
- 500g caster sugar
- 1 tbsp vanilla extract
- 250g plain flour
- 1 tsp salt
To Decorate
- 300g chocolate flavour frosting
- 2 x 120g packs Matchmakers
- 100g yellow ready-to-roll fondant icing
- 5 biscuits (4 Nice and 1 halved jam sandwich cream)
- 20g white fondant icing
- 50g black fondant icing
- White and yellow coloured writing icing pens
- 3 purple Smarties
Instructions
- Preheat and Prepare: Preheat your oven to gas mark 4 (180°C) or 160°C with a fan setting. Line a 33 x 23 cm baking tin with nonstick baking paper so that the brownie doesn’t stick and bakes evenly.
- Melt Butter and Chocolate: Place the cubed butter and broken dark chocolate pieces in a heavy-based saucepan over low heat. Stir occasionally until the mixture is smooth and glossy. Remove from heat and allow to cool for 5 minutes.
- Mix Wet Ingredients: In a large bowl, whisk the eggs, caster sugar, and vanilla extract using an electric whisk for about 1 minute, until the mixture becomes pale and just combined. This will aerate the batter and help the brownies rise slightly.
- Combine Mixtures: Stir the cooled melted chocolate and butter mixture into the whisked eggs and sugar. Then gently fold in the plain flour and salt until just combined, being careful not to over-mix to maintain a fudgy texture.
- Bake the Brownie: Pour the batter into the prepared baking tin and spread evenly. Bake for 30-35 minutes until the top is pale brown and dry, and the center no longer wobbles when gently shaken. Let the brownie cool completely in the tin.
- Cut Out House Shapes and Turrets: With the brownie chilled and set, place it with a short edge facing you. Cut a vertical strip 4 x 16 cm from the top left corner, then slice this piece in half lengthwise twice diagonally to create two triangular turret shapes. Cut a second rectangle measuring 4 x 18 cm next to the first strip for additional turret structure. Arrange the triangular pieces to form turrets on top of the main brownie base.
- Ice the Brownie: Using a palette knife, spread a thin, even layer of chocolate frosting all over the brownie and turrets. This will act as the ‘glue’ for your decorative elements and add richness.
- Add Matchmakers Roofing: Cover the right roof turret entirely with full-length Matchmaker sticks, reserving one for later use. Cover the left turret with halved Matchmakers. Repeat this pattern at the lowest indentation of the brownie for the lower roof. Use smaller broken Matchmakers to cover the middle roof halfway across. Place the reserved Matchmaker stick between the turrets as a decorative separator.
- Create the Door: Cut one Matchmaker stick to 7.5 cm length and arrange it in the middle of the front of the brownie. Place three additional Matchmaker sticks on each side angled downward to form an arched door shape. Gently press them onto the frosting to adhere.
- Make the Windows: Roll out the yellow fondant icing to 2 mm thickness and cut into pieces slightly larger than your biscuits. Lightly dab water on the icing pieces and press them onto the biscuits, folding the edges to wrap the backs for a neat finish. Roll out white fondant icing to 2 mm and cut out a small ghost shape about 3 x 6 cm. Attach the ghost onto one window using a little water. Roll out half of the black fondant icing to 3 mm thickness and cut into 2 mm strips to mimic windowpane details, then glue these onto the yellow icing and press the windows onto the brownie.
- Craft the Spider and Ghost Details: Halve the remaining black fondant icing. Shape one half into an egg form to create the spider’s body. Roll the other half into a thin long sausage, cut into four equal segments to form legs, arrange legs parallel with a pinch in the middle for articulation and attach the body on top using water. Stick the spider onto a window, adding eyes drawn with white icing. Use leftover icing bits to create a door handle and ghost eyes.
- Draw Cobwebs and Final Decorations: Use white writing icing to draw spooky cobwebs on the windows and roof areas and add eyes to the spider. Attach purple Smarties where you want mini spiders and draw their legs and eyes with yellow writing icing. Add a number to the door as a fun finishing touch.
- Storage: Keep the decorated Halloween brownie cake in a cool, dry place for up to 5 days. The undecorated brownie can be frozen for longer storage.
Notes
- The brownie can be baked in advance and frozen undecorated to save time on the day of your Halloween event.
- Using low heat to melt the butter and chocolate prevents the mix from seizing or burning, which is essential for a smooth batter.
- Be careful not to overbake; the center should still be moist and just set to keep the brownie fudgy.
- Use a sharp knife for clean cuts when shaping the brownie to avoid crumbling.
- If fondant icing is not available, colored buttercream piping can be used as an alternative decoration.
- Adjust decorations and colors based on personal preference or Halloween themes.
Nutrition
- Serving Size: 1 slice (1/24th of cake)
- Calories: 350 kcal
- Sugar: 30 g
- Sodium: 150 mg
- Fat: 22 g
- Saturated Fat: 13 g
- Unsaturated Fat: 7 g
- Trans Fat: 0.2 g
- Carbohydrates: 38 g
- Fiber: 3 g
- Protein: 5 g
- Cholesterol: 110 mg