If you’re looking for a fun, spooky dessert that’s as delicious as it is charming, you’re going to absolutely love this Graveyard Pudding Recipe. It’s one of those treats that’s perfect for Halloween parties, kids’ celebrations, or just because — honestly, my family asks for it all year round! This pudding combines creamy chocolate, crunchy Oreos, and a playful “graveyard” decoration that will have everyone smiling before they even take a bite. I can’t wait to share all my tips to help you nail it the first time!
Why You’ll Love This Recipe
- Easy and Quick to Make: You can whip this up in under 30 minutes, with just a bit of chilling time.
- Kid-Friendly and Fun: The gummy worms and Oreo “dirt” make it a total crowd-pleaser for little ones.
- No Baking Required: It’s a no-fuss dessert that doesn’t heat up your kitchen at all.
- Highly Customizable: There are so many ways to add your own twist while keeping the spooky vibes.

Ingredients You’ll Need
The magic of this Graveyard Pudding Recipe is in its simple, mixing-friendly ingredients that everyone loves. I usually keep these basics stocked because they come together beautifully to create that dirt-and-tombstone feel without fuss.
- Oreos: I like using original Oreos crushed fresh for the best “dirt” texture. You can even save Oreo dust from the package for topping!
- Instant chocolate pudding mix: This saves so much time compared to cooking pudding yourself and tastes creamy and rich.
- Milk: Whole milk works great here for that creamy consistency, but 2% is fine too.
- Whipped topping: Adds fluffy lightness and softens the pudding in the top layer perfectly.
- Milano cookies: These become your adorable “grave stones” — sturdy yet tasty!
- Gummy worms: For that classic creepy crawl feel, and they add a fun chewiness.
- Black gel decorating icing: This is how you write “RIP” on your Milano cookies — the details really bring the dessert to life.
- Clear plastic cups: Perfect for layering so everyone can see the spooky layers inside.
Variations
One of the best things about the Graveyard Pudding Recipe is how easy it is to make your own. Whether you want it healthier, more decadent, or themed for other holidays, there’s plenty of room to play around.
- Variation: When I need a gluten-free version, I swap Oreos for gluten-free chocolate cookies. The texture’s just as crumbly and delicious.
- Variation: For a richer pudding, I sometimes fold in cream cheese to the pudding mixture before adding the whipped topping — it gives a luscious cheesecake vibe.
- Variation: You can switch gummy worms for candy bones or jelly spiders, depending on your spooky theme that year.
- Variation: Try layering in crushed peanut butter cups for a surprise twist — my family LOVES that one!
How to Make Graveyard Pudding Recipe
Step 1: Mix Your Pudding Base
Start by whisking together the instant chocolate pudding mix and milk in a large bowl. I usually give it a really good whisk so there are no lumps, then let it sit for about five minutes to thicken up. This wait can be tempting to skip, but trust me — the pudding sets better and gives you that creamy, rich texture we all want.
Step 2: Layer the “Dirt” and Pudding
Next, spray a thin layer of crushed Oreos at the bottom of each clear plastic cup — this is your “dirt” foundation! Then carefully spoon half of the pudding on top, spreading it smoothly. Don’t rush this part; a gentle hand will keep your layers neat. After that, sprinkle another layer of crushed Oreos over the pudding, adding texture and that authentic “dirt” look.
Step 3: Whip the Topping and Add the Final Layers
Fold the whipped topping into the remaining pudding — this softens and lightens the mixture nicely. Divide this blend evenly into each cup, smoothing the tops. Finish by sprinkling the last of the crushed Oreos over the top. At this point, it starts looking like a real graveyard! Pop the cups into the fridge and chill for at least an hour so everything firms up just right.
Step 4: Decorate the Grave Stones and Worms
This is my favorite part — taking Milano cookies and using black gel icing to write “RIP” on each one. It’s easier than you think, and the kids love helping here. Press one cookie gently into each chilled pudding cup, then top it off with a gummy worm wriggling out of the “dirt.” It’s not just cute — the contrasting textures from crunchy cookie to chewy gummy to silky pudding make every bite a little party.
Pro Tips for Making Graveyard Pudding Recipe
- Crush Oreos Just Before Layering: To keep your “dirt” crunchy and fresh, don’t crush the cookies too far in advance.
- Use a Piping Bag for “RIP” Letters: For neater writing on the Milano cookies, a piping bag or small zip-top bag with a corner snipped works wonders.
- Chill Thoroughly: I learned the hard way that skipping the chill step makes the cups harder to decorate without making a mess.
- Keep Gummy Worms Fresh: Add these right before serving to avoid them sticking or changing texture.
How to Serve Graveyard Pudding Recipe

Garnishes
I like keeping it simple: Oreos, Milano cookies with “RIP,” and gummy worms do all the work. But sometimes I add mini chocolate chips or a dusting of edible glitter for a little extra flair. If you want to make it extra festive, a few candy bones placed atop the “dirt” layer adds cool spooky vibes.
Side Dishes
This pudding pairs wonderfully with other Halloween-themed snacks like caramel apples or pumpkin-shaped sugar cookies. For a party, I like to serve it alongside simple fruit skewers or even a warm cup of apple cider to balance the creamy richness.
Creative Ways to Present
One year, I made a “graveyard” tray with a large rectangular pan instead of cups, layering everything and then using Milano cookies as tombstones placed upright around the edges. It made for a fun communal dessert experience! Clear mini mason jars also work if you want a rustic vibe, and Halloween-themed cupcake liners add a festive touch if you’re serving at a kids’ party.
Make Ahead and Storage
Storing Leftovers
I keep leftovers in their original clear cups, covered tightly with plastic wrap. This way, they’re ready to grab and go for a quick treat. The pudding stays fresh for about 2-3 days in the fridge, though the gummy worms may get a bit sticky over time.
Freezing
Freezing isn’t my go-to with this dessert because the pudding texture changes once thawed. But if you want to, remove the Milano cookies and gummy worms first, freeze the pudding layers in airtight containers, and thaw them overnight in the fridge for best results.
Reheating
This dessert is best enjoyed cold, so I never reheat it. If you want to soften it slightly, just leave it at room temperature for about 10–15 minutes before serving. That way the pudding feels luxuriously smooth but still holds all the layers nicely.
FAQs
-
Can I prepare the Graveyard Pudding Recipe without instant pudding?
Absolutely! You can make homemade chocolate pudding by cooking cocoa powder, sugar, cornstarch, milk, and butter on the stove until it thickens, then cool it before layering. It takes a bit longer but tastes fantastic. Just make sure it’s fully chilled before assembling your graveyard layers.
-
What can I use instead of Milano cookies for tombstones?
If you don’t have Milano cookies, other sturdy cookies or rectangular biscuits like shortbread or biscotti work well. Just make sure they’re firm enough to stand upright and won’t crumble when you write “RIP” on them.
-
How far in advance can I make the Graveyard Pudding Recipe?
You can prepare and assemble everything up to the point of decorating one day ahead. I recommend adding the gummy worms and “RIP” cookies just before serving, so they stay fresh and look their best.
-
Can I make this recipe dairy-free?
Yes! Use a dairy-free instant chocolate pudding mix and substitute cow’s milk with almond, oat, or coconut milk. For whipped topping, many brands offer dairy-free versions that work just as well. Just keep an eye on texture, which might differ slightly.
Final Thoughts
I’ve made the Graveyard Pudding Recipe countless times, and it never fails to bring smiles and lots of “oohs” and “ahs.” It’s one of those recipes that’s simple yet imaginative—and the perfect excuse for everyone to indulge in a little fun dessert magic. Seriously, just give it a try once and you’ll see why it’s become such a beloved treat in my kitchen. You’ll enjoy the ease, the playful layers, and most of all, the joy it sparks at the table!
Print
Graveyard Pudding Recipe
- Prep Time: 15 minutes
- Cook Time: 0 minutes
- Total Time: 1 hour 15 minutes
- Yield: 5 servings
- Category: Dessert
- Method: No-Cook
- Cuisine: American
Description
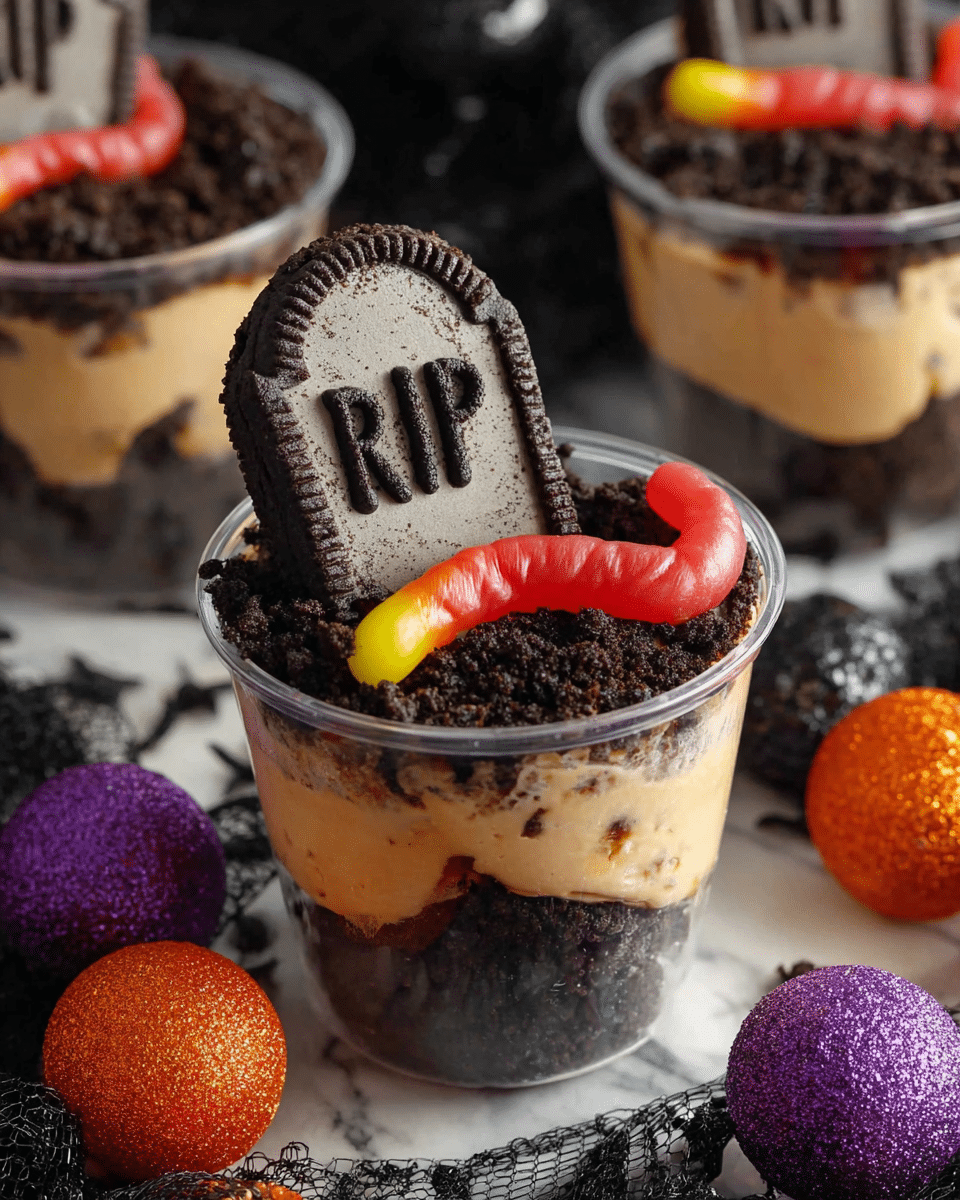
Graveyard Pudding is a fun and spooky dessert perfect for Halloween or themed parties. Layers of crushed Oreo cookies and creamy chocolate pudding are topped with whipped topping, decorated with Milano cookies stamped with ‘RIP’ and gummy worms to create a graveyard effect that is both delicious and visually striking.
Ingredients
Base Ingredients
- 20 Oreos, crushed
- 1 (3.4 ounce) box instant chocolate pudding mix
- 2 cups milk
Toppings and Decorations
- 1 cup whipped topping
- 5 Milano cookies
- 5 gummy worms
- Black gel decorating icing
- Clear plastic cups
Instructions
- Prepare the pudding: In a large bowl, whisk together the instant chocolate pudding mix and milk until well combined. Let the mixture sit for five minutes to allow it to thicken properly.
- Make the first cookie layer: Spread a thin layer of crushed Oreo cookie crumbs evenly in the bottom of each clear plastic cup to form the base of the dessert.
- Add the first pudding layer: Divide half of the prepared pudding evenly among the cups, spreading a smooth layer on top of the crushed cookie base.
- Add the second cookie layer: Sprinkle a second layer of crushed Oreo cookies over the pudding layer in each cup.
- Mix remaining pudding with whipped topping: Stir the whipped topping into the remaining pudding mixture until fully combined to create a lighter, creamier layer.
- Add the final pudding layer: Divide the pudding and whipped topping mixture evenly across the cups and smooth the tops carefully.
- Add the final cookie crumbs: Sprinkle the remaining crushed Oreos over the top of each pudding cup for a dirt-like appearance.
- Chill: Place the assembled pudding cups in the refrigerator and chill for at least one hour to allow the layers to set and flavors to meld.
- Decorate the graveyard: Using black gel decorating icing, write ‘RIP’ on each Milano cookie to create grave markers. Press one decorated cookie into each pudding cup and top each with a gummy worm to simulate creepy crawlies in the graveyard.
Notes
- For best results, use a large whisk to ensure pudding mix is fully dissolved and thickened smoothly.
- You can prepare the crushed Oreos ahead of time and store them in an airtight container.
- Feel free to substitute whipped topping with homemade whipped cream for a fresher flavor.
- This dessert can be made several hours in advance and kept refrigerated until serving.
- Use clear plastic cups to best showcase the layered “graveyard” effect.
Nutrition
- Serving Size: 1 cup
- Calories: 280
- Sugar: 26g
- Sodium: 150mg
- Fat: 12g
- Saturated Fat: 5g
- Unsaturated Fat: 5g
- Trans Fat: 0g
- Carbohydrates: 39g
- Fiber: 2g
- Protein: 3g
- Cholesterol: 15mg


