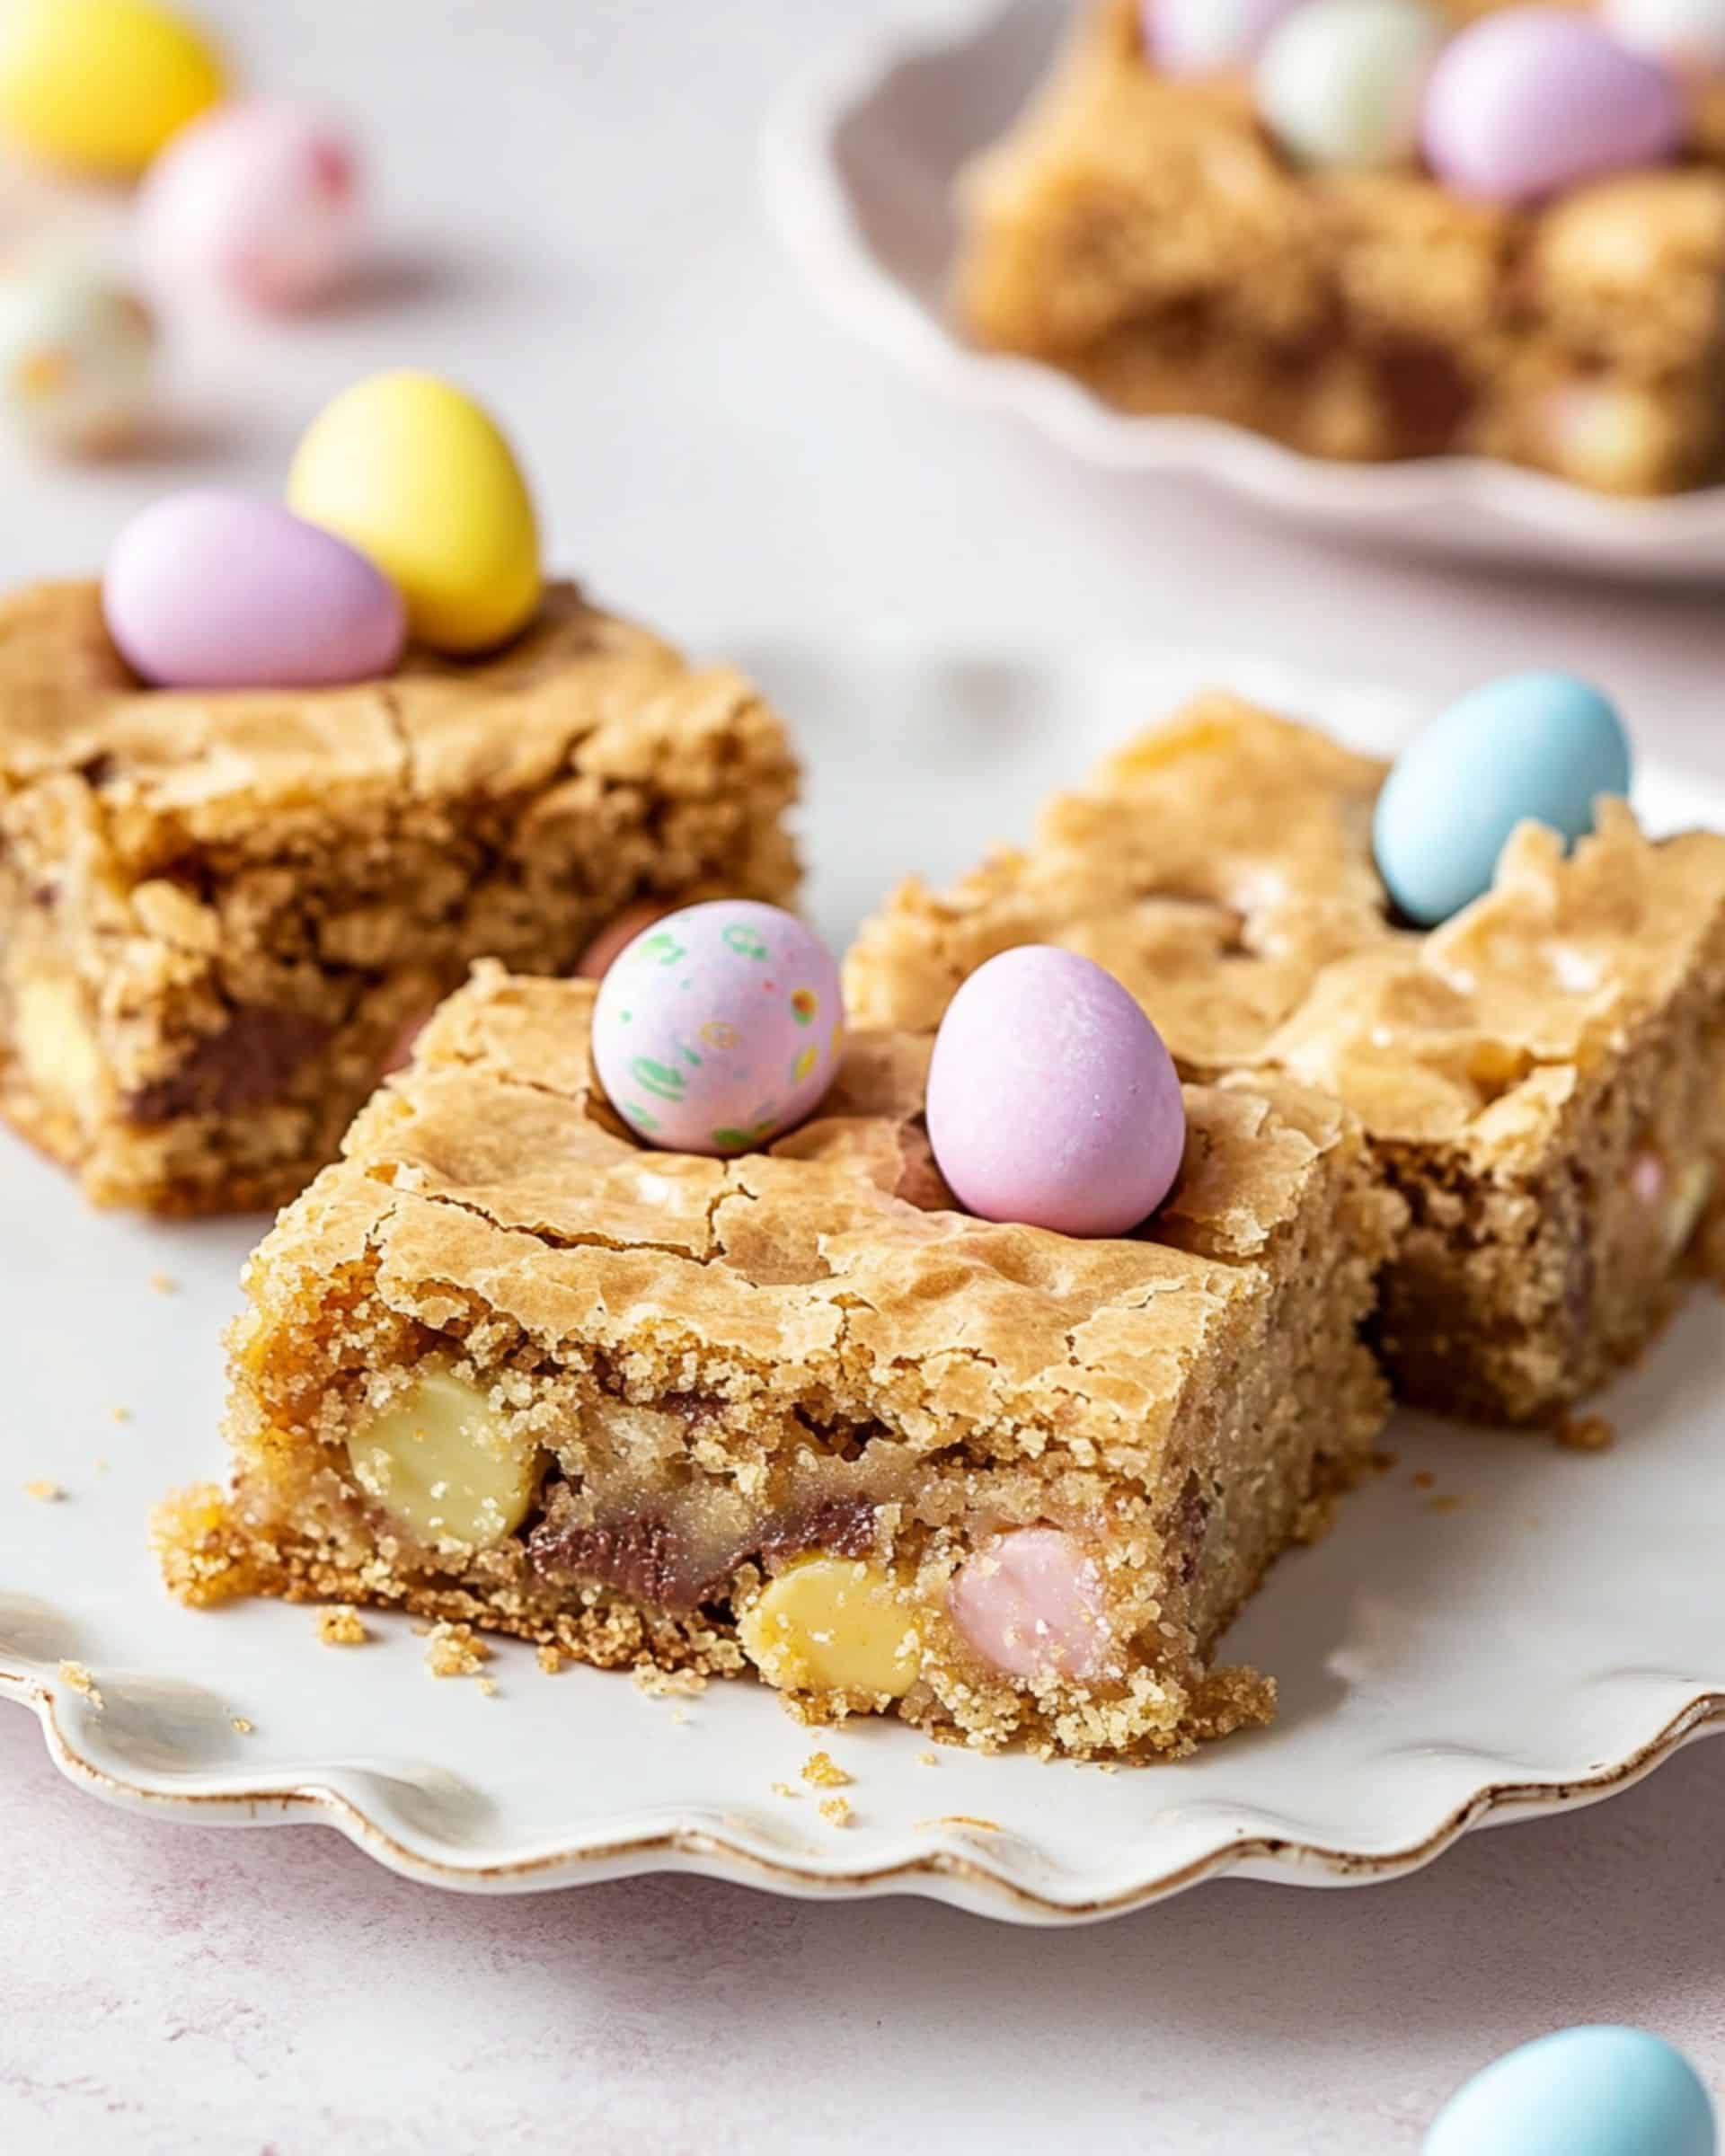
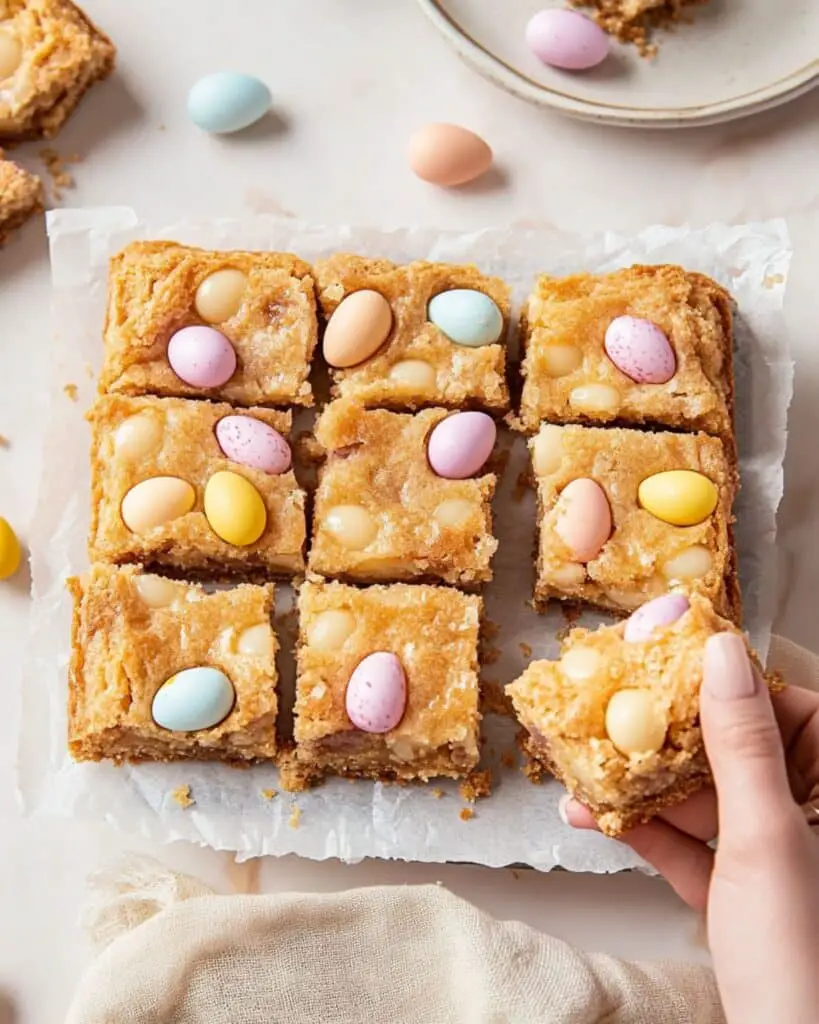
These Gluten-Free Mini Egg Blondies are a game-changer for anyone craving a delicious treat without the gluten. Buttery, chewy, and studded with colorful chocolate eggs, these blondies offer the perfect balance of sweetness and texture. They’re incredibly simple to make, requiring just basic ingredients and minimal prep time—perfect for satisfying your sweet tooth without spending hours in the kitchen!
Why You’ll Love This Recipe
- Gloriously Simple: Even if you’re new to gluten-free baking, these blondies are practically foolproof. Mix, bake, cool, and enjoy!
- Perfect Texture: These blondies have that ideal chewy center with slightly crisp edges that make you go back for seconds (maybe thirds).
- Festive Appearance: The colorful mini eggs make these blondies visually appealing—great for spring celebrations, Easter, or whenever you need to brighten someone’s day.
- Quick Preparation: From start to finish, these treats can be ready in under an hour—most of which is hands-off baking time.

Ingredients You’ll Need
- Gluten-free all-purpose flour blend: The foundation of our blondies. Different brands can yield slightly different results, so stick with one you trust.
- Cornstarch: Adds tenderness and helps create that perfect chewy texture we’re looking for.
- Baking powder: Provides just the right amount of lift without making these cakey.
- Salt: Enhances all the flavors and balances the sweetness.
- Unsalted butter: Melted butter creates a richer, more intense flavor than simply using softened butter.
- Brown sugar: Brings moisture, caramel notes, and that classic blondie flavor. Don’t substitute with white sugar!
- Eggs: Provide structure and richness. Using a whole egg plus an extra yolk creates the perfect fudgy texture.
- Vanilla extract: Adds depth of flavor that complements the buttery, caramel notes.
- Gluten-free mini chocolate eggs: The star ingredient! They add color, texture, and chocolate goodness throughout.
Note: You’ll find the complete list of ingredients, along with their exact measurements, in the printable recipe card at the bottom of this post.
Variations
Want to customize these blondies? Here are some delicious ideas:
- White Chocolate Wonder: Add white chocolate chips alongside the mini eggs for extra sweetness.
- Nutty Delight: Fold in a half cup of chopped walnuts or pecans for added crunch and flavor.
- Coconut Twist: Mix in 1/2 cup of toasted coconut flakes for a tropical flair.
- Caramel Swirl: Drizzle some caramel sauce into the batter before baking for pockets of gooey caramel.
- Seasonal Switch: Swap the mini eggs for other gluten-free candies depending on the season—try peppermint candies for Christmas or candy corn for Halloween.
How to Make Gluten-Free Mini Egg Blondies
Step 1: Prepare Your Space
Preheat your oven to 325°F (180°C). Line an 8×8-inch square baking pan with parchment paper, leaving some overhang for easy removal later.
Step 2: Mix Dry Ingredients
In a medium mixing bowl, whisk together the gluten-free flour blend, cornstarch, baking powder, and salt until well combined.
Step 3: Create the Base
In a large bowl, mix the melted butter and brown sugar until thoroughly combined. The mixture should be smooth and glossy.
Step 4: Add Wet Ingredients
Add the egg, egg yolk, and vanilla extract to your butter mixture. Stir until the mixture is smooth and well incorporated.
Step 5: Combine Wet and Dry
Add your dry ingredients to the wet mixture, stirring until no streaks of flour remain. The batter will be quite thick—that’s exactly what we want!
Step 6: Prepare the Eggs
Roughly chop about three-quarters of your mini chocolate eggs into pieces. Leave the remaining quarter whole for topping.
Step 7: Add the Chocolate
Fold the chopped mini eggs into your batter, distributing them evenly throughout.
Step 8: Fill the Pan
Transfer the batter to your prepared pan, spreading it evenly with a spatula. Press the reserved whole mini eggs gently into the top of the batter.
Step 9: Bake to Perfection
Bake for 25-29 minutes. You’ll know they’re done when the edges are golden brown and a toothpick inserted in the center comes out with moist crumbs (not wet batter).
Step 10: Cool and Cut
Allow the blondies to cool in the pan for at least 15 minutes before lifting them out using the parchment paper. Cut into squares once they’re cool enough to handle.
Pro Tips for Making the Recipe
- Don’t Overmix: Once you add the dry ingredients, mix just until combined. Overmixing can make your blondies tough.
- Watch the Baking Time: The difference between fudgy and dry blondies can be just a few minutes. Start checking at the 25-minute mark.
- Room Temperature Eggs: This might seem fussy, but room temperature eggs incorporate much better into the batter.
- Cool Completely for Clean Cuts: For picture-perfect squares, allow the blondies to cool completely before cutting.
- Measuring Gluten-Free Flour: For best results, measure by weight (grams) rather than volume if you have a kitchen scale.
How to Serve
These blondies are wonderfully versatile when it comes to serving:
Simple Serving
Enjoy them as is for a delightful treat with afternoon tea or coffee.
Dessert Upgrade
Warm a blondie slightly and top with a scoop of vanilla ice cream and a drizzle of caramel sauce for an elevated dessert.
Gift Giving
Stack a few blondies in a cellophane bag tied with a pretty ribbon for a thoughtful homemade gift.
Special Occasions
Arrange on a platter with other gluten-free treats for a beautiful dessert table at parties or holiday gatherings.
Make Ahead and Storage
Storing Leftovers
Store blondies in an airtight container at room temperature for up to 3 days. Place parchment paper between layers to prevent sticking.
Freezing
These blondies freeze beautifully! Wrap individual pieces tightly in plastic wrap, then store in a freezer-safe container for up to 3 months.
Reheating
For that fresh-baked taste, warm refrigerated or frozen blondies in the microwave for 10-15 seconds before serving.
FAQs
-
Can I use regular flour instead of gluten-free flour?
Absolutely! If you don’t need these to be gluten-free, you can substitute all-purpose flour in equal measure and omit the cornstarch. The texture will be slightly different but equally delicious.
-
My blondies turned out too cakey. What went wrong?
Cakey blondies usually mean they were overbaked or had too much leavening. Next time, try reducing the baking time by 2-3 minutes and double-check your baking powder measurement.
-
Can I use different chocolate candies in this recipe?
Definitely! Any similar chocolate candies will work wonderfully. Just make sure they’re gluten-free if that’s a concern. M&Ms, chocolate chips, or chopped chocolate bars are all great alternatives.
-
My blondies sank in the middle. How can I prevent this?
Sinking usually happens when blondies are underbaked or when the oven temperature is too high. Make sure your oven is correctly calibrated, and try baking them for a few minutes longer next time.
Final Thoughts
These Gluten-Free Mini Egg Blondies are proof that gluten-free baking can be both simple and scrumptious. With their buttery flavor, chewy texture, and pops of chocolate from the mini eggs, they’re bound to become a favorite in your recipe collection. Whether you’re serving them at a spring celebration or simply treating yourself on a Tuesday afternoon, these blondies bring joy in every bite. Happy baking!
Print
Gluten-Free Mini Egg Blondies Recipe
- Prep Time: 10 minutes
- Coll time: 15 minutes
- Cook Time: 5 minutes
- Total Time: 35 minutes
- Yield: 9 servings
- Category: Desserts
- Method: Baking
- Cuisine: American
Description
Delightfully chewy and indulgent, these Gluten-Free Mini Egg Blondies are the perfect treat for holidays or anytime you crave a rich and satisfying dessert. Packed with mini chocolate eggs and easy to make, these blondies are a sweet way to celebrate while catering to gluten-free diets.
Ingredients
Dry Ingredients
- 1 cup gluten-free all-purpose flour blend (144g)
- 2 tbsp cornstarch (16g)
- 1/2 tsp baking powder
- 1/2 tsp salt
Wet Ingredients
- 1/2 cup unsalted butter, melted (113g)
- 1 cup brown sugar, packed (200g)
- 1 large egg, room temperature (50g)
- 1 egg yolk, room temperature (18g)
- 2 tsp vanilla extract
Add-ins
- 1 cup gluten-free mini chocolate eggs, divided (190g)
Instructions
-
Preheat the Oven and Prepare the Baking Dish
Preheat your oven to 325°F (180°C). Line an 8×8-inch square baking pan with parchment paper to ensure easy removal. Set the prepared pan aside. -
Combine the Dry Ingredients
In a medium-sized mixing bowl, whisk together the gluten-free flour blend, cornstarch, baking powder, and salt. This ensures an even distribution of dry ingredients and prevents clumping. -
Mix the Butter and Sugar
In a large mixing bowl, add the melted unsalted butter and packed brown sugar. Mix until fully combined and smooth, creating a rich base for the batter. -
Add the Eggs and Vanilla
Add the large egg, egg yolk, and vanilla extract to the sugar mixture. Whisk until smooth and fully combined. -
Incorporate the Dry Ingredients
Gradually add the dry ingredients into the wet mixture, stirring until no streaks of gluten-free flour remain. Be cautious not to overmix to maintain the desired texture. -
Fold in Mini Chocolate Eggs
Roughly chop 3/4 cup of the mini chocolate eggs into small pieces, reserving the remaining 1/4 cup whole for topping. Gently fold the chopped mini eggs into the batter until evenly distributed. -
Pour and Smooth the Batter
Transfer the blondie batter into the prepared baking dish. Use a spatula or knife to evenly spread and smooth out the top. Sprinkle the reserved 1/4 cup of whole mini chocolate eggs over the surface for added appeal. -
Bake the Blondies
Bake the blondies in the preheated oven for 25-29 minutes. The edges should be lightly browned, and a toothpick inserted into the center should come out with moist crumbs. Avoid overbaking, as the blondies may become dry. -
Cool and Slice
Allow the blondies to cool in the pan for at least 15 minutes. Once cooled, transfer them to a cutting board and slice into squares. Enjoy!
Notes
- Cadbury Mini Eggs were used in this recipe. While they are made in a facility containing wheat, they do not have gluten-containing ingredients or share production lines with wheat. If you’re uncomfortable with potential cross-contamination, opt for an alternative gluten-free chocolate candy.
- You can customize this recipe with different gluten-free chocolate candies or mix-ins.
Nutrition
- Serving Size: 1 blondie
- Calories: 272kcal
- Sugar: 28g
- Sodium: 180
- Fat: 12g
- Saturated Fat: 7g
- Unsaturated Fat: 4g
- Trans Fat: 0g
- Carbohydrates: 40g
- Fiber: 1g
- Protein: 3g
- Cholesterol: 47

