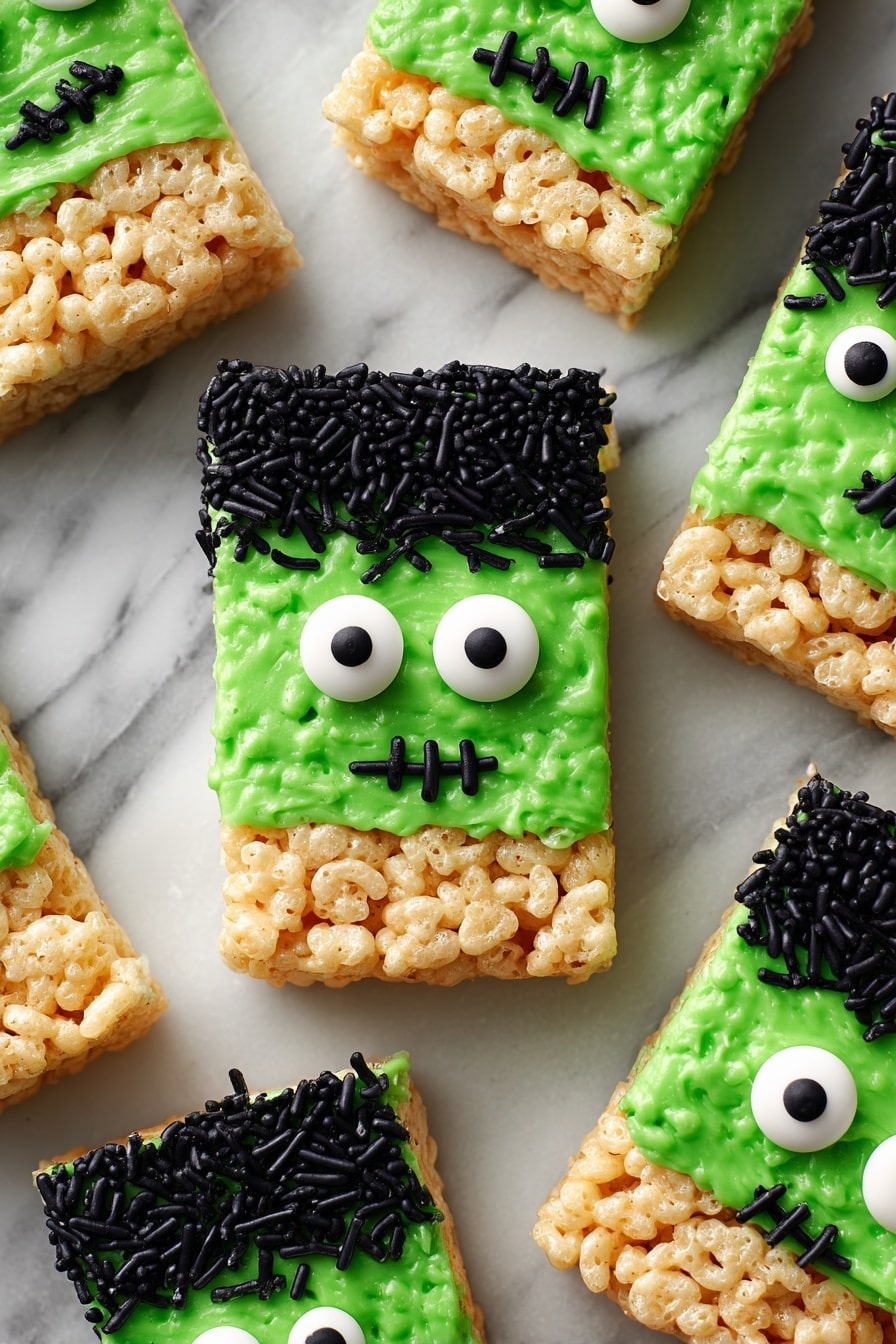
If you’re on the hunt for a festive, fun, and downright adorable Halloween treat, you’ve got to try this Frankenstein Halloween Rice Krispie Treats Recipe. I absolutely love how these treats capture the spooky spirit with a playful twist, thanks to the green candy coating and little stitched details that bring Frankenstein’s monster to life. Plus, they’re easy enough to whip up with the kids or for a party, but impressive enough to wow your guests. Stick around, and I’ll walk you through every step from mixing to the final, delightful decoration!
Why You’ll Love This Recipe
- Easy to Make: You don’t need fancy equipment or rare ingredients—perfect for last-minute Halloween fun.
- Kid-Friendly Fun: Decorating the treats is a blast with little helpers and creates fantastic memories.
- Perfect Texture: Crispy and gooey in just the right balance, so every bite melts in your mouth.
- Customizable Design: You get to pipe the signature Frankenstein stitches and add eyes for that eerie charm.

Ingredients You’ll Need
These ingredients come together to create a brilliantly festive treat that’s as fun to make as it is to eat. Each element plays a role in texture, flavor, or appearance, especially those candy melts that make the whole Frankenstein motif pop!
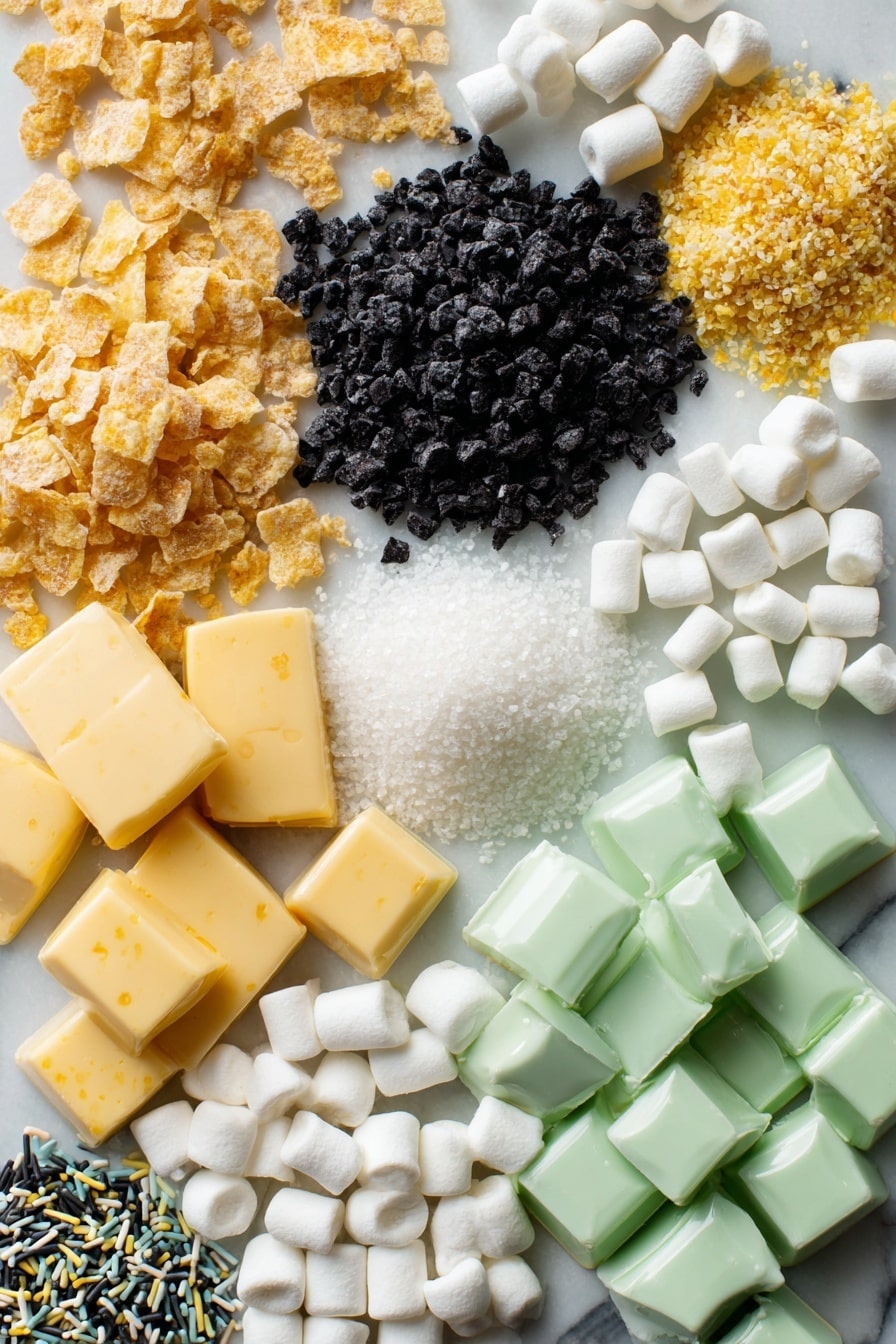
- Rice Krispie cereal: The crispy base—make sure to use the original for that classic crunch.
- Mini marshmallows: They melt easily and give you that gooey, sticky binding you need.
- Unsalted butter: Adds richness and helps everything melt smoothly without overpowering sweetness.
- Green candy melts: These are essential for Frankenstein’s iconic skin tone; they melt easily and give a smooth coating.
- Black candy melts: Perfect for piping the stitched-on scars and details.
- Royal icing eyes: They bring the monsters to life with a simple but effective touch.
- Black jimmies sprinkles: Adds texture and that signature “hair” effect on top when combined with the candy melts.
Variations
I love customizing this Frankenstein Halloween Rice Krispie Treats Recipe to match my mood or party theme. You can easily swap out some elements or add fun twists—and I encourage you to experiment too!
- Using white chocolate: I once swapped green candy melts for white chocolate tinted with green gel food coloring, and it gave a creamier finish. Just make sure to use gel, not liquid, to keep the coating firm.
- Dietary tweaks: For a dairy-free version, try coconut oil instead of butter and vegan marshmallows—they still turn out great and keep the treats accessible.
- Color variations: You can get creative with neon green or glow-in-the-dark candy melts for an extra spooky effect at night.
- Mixed shapes: Instead of rectangles, I sometimes cut mine into rectangles with jagged edges to simulate Frankenstein’s bolts or scars for an artistic touch.
How to Make Frankenstein Halloween Rice Krispie Treats Recipe
Step 1: Prepare Your Pan and Melt the Butter
Start by buttering your 9″ x 13″ casserole dish. This step is key because it helps prevent the sticky rice krispies from clinging to the pan, making it easier to remove them once set. Then, over low to medium heat, melt your butter in a large pot—keep an eye on it so it doesn’t brown or burn.
Step 2: Melt the Marshmallows Until Smooth
Once the butter is melted, add in the mini marshmallows. Stir gently but constantly to ensure they melt evenly without sticking to the bottom. As soon as the mixture is silky smooth, remove it from the heat to avoid hardening later on—this trick keeps your treats perfectly chewy.
Step 3: Stir in the Rice Krispies Cereal
Pour your rice krispie cereal into the pot and fold it gently using a spatula so each piece is coated. Don’t over-stir, or you’ll crush the cereal and lose that satisfying crunch. You’ll feel the mixture come together when it’s evenly coated with marshmallow goo.
Step 4: Press Into the Pan and Let Set
Spoon the sticky mixture into your prepared dish. Using a buttered spatula or wax paper, press it firmly and evenly until it fills the dish and the top is smooth. This is where I like to really pack it in gently—not too hard, just firm. Let it cool completely, about 30 minutes.
Step 5: Cut and Prepare the Candy Melts
Once your treat slab is set, carefully remove it from the pan and slice into rectangles of different sizes—this adds a quirky Frankenstein vibe. Melt the green candy melts over a double boiler or microwave in 10-second bursts, stirring frequently. If you find your candy melts too thick for dipping, add a teaspoon of vegetable shortening—it’s a game-changer for smooth coverage.
Step 6: Dip, Decorate, and Add Details
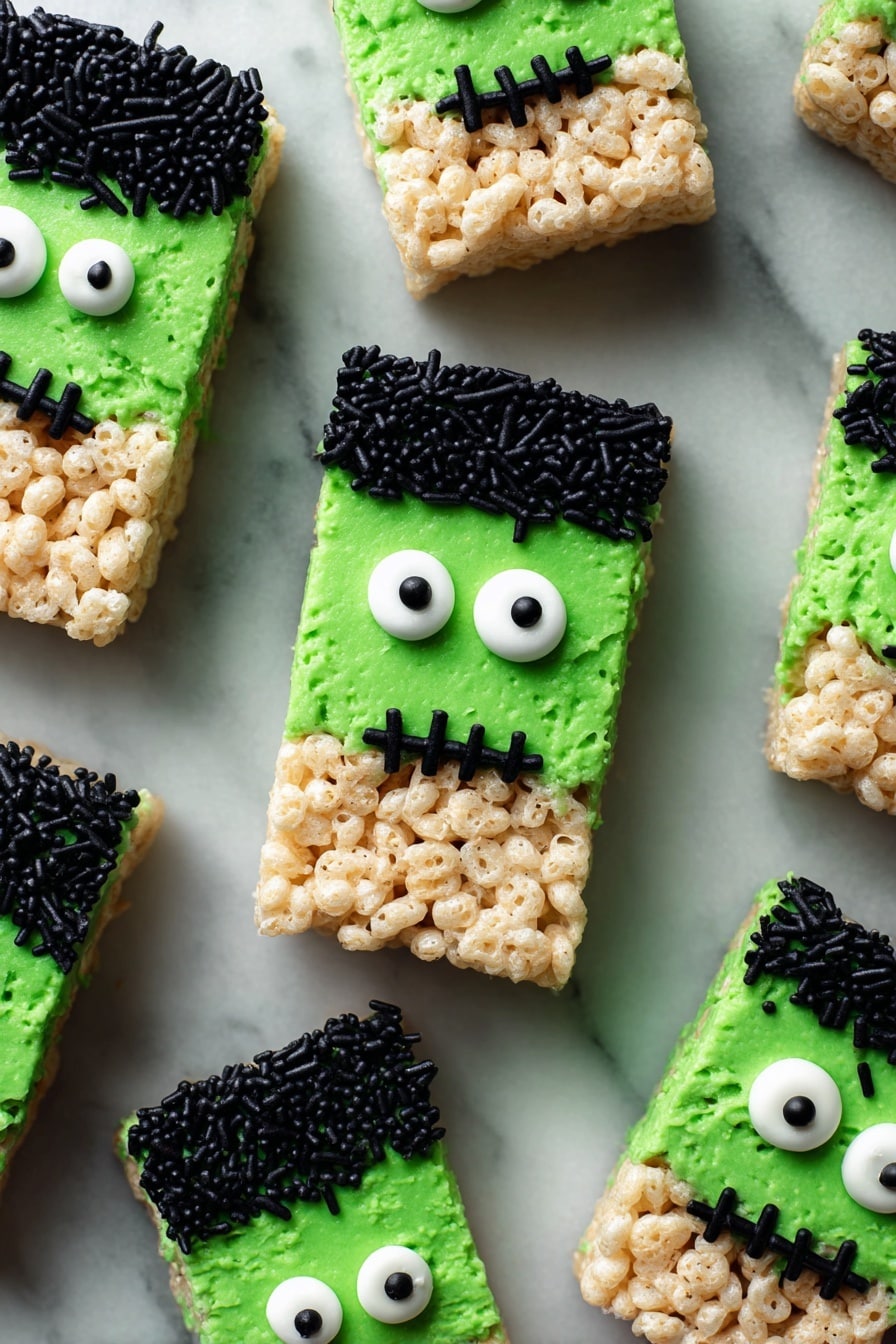
Dip the top of each rectangular treat into the melted green candy melt, then immediately into the black jimmies sprinkles—this adds texture and simulates Frankenstein’s “hair.” Place two royal icing eyes on top while the coating is still soft, so they stick perfectly.
For the stitches, melt the black candy melts in the microwave in short increments. Transfer to a piping bag and carefully pipe stitch lines across each treat. This is the fun part—I love seeing those little monster faces come to life!
Let your treats sit at room temperature until the coating is completely set—usually about an hour—before you package or serve them.
Pro Tips for Making Frankenstein Halloween Rice Krispie Treats Recipe
- Don’t Overheat Marshmallows: Overcooking will make the mixture tough once cooled—remove the pot from heat as soon as marshmallows melt.
- Keep Utensils Dry: Even a little water can cause candy melts to seize up, so drying your bowls and spatulas is crucial.
- Smooth Dipping with Shortening: Adding a tiny bit of vegetable shortening thins candy melts and helps coat your treats evenly.
- Use a Piping Bag for Precision: Whether you’re a beginner or pro, piping the stitches freehand keeps the Frankenstein look sharp and consistent.
How to Serve Frankenstein Halloween Rice Krispie Treats Recipe
Garnishes
I usually stick with the royal icing eyes and black jimmies sprinkles—they’re simple but effective. But for bigger parties, I’ve added edible glitter and even tiny candy bolts made from licorice to play up the Frankenstein theme. It’s a fun conversation starter and adds a bit more festive flair.
Side Dishes
These treats go amazingly well alongside a spooky punch—think green or purple punch with floating “eyeball” ice cubes made from lychee and blueberries. For something savory, I like serving popcorn seasoned with black lava salt to balance the sweetness with a little crunch.
Creative Ways to Present
For Halloween parties, I like to arrange the treats on a vintage silver tray surrounded by mini pumpkins, fake cobwebs, and candles (battery-operated for safety, of course). Another hit was placing each treat in clear cellophane bags tied with black and green striped ribbon—instant party favors!
Make Ahead and Storage
Storing Leftovers
Leftover Frankenstein Halloween Rice Krispie Treats keep best stored in an airtight container at room temperature. I usually stash mine in a cool, dry pantry and they stay perfectly fresh and chewy for about three days. Beyond that, the texture can get a little too firm, so I recommend enjoying them soon.
Freezing
If you want to freeze these treats, wrap them individually in plastic wrap and place them in a freezer-safe bag. They freeze well for up to a month. When ready to eat, thaw at room temperature—avoid microwaving right away since candy melts and sprinkles can get damaged.
Reheating
I prefer to enjoy these treats cold or room temp, but if you want to soften them up a bit, I gently warm them for about 5-10 seconds in the microwave. Just be sure to watch carefully, as overheated marshmallow treats become sticky and lose their structure.
FAQs
-
Can I use regular chocolate instead of candy melts for this Frankenstein Halloween Rice Krispie Treats Recipe?
Absolutely! If you don’t have candy melts, you can substitute white chocolate tinted with green gel food coloring for the green coating, and dark chocolate with black gel food coloring for the black details. Just be sure to add a little vegetable shortening if the chocolate is too thick to get a smooth finish.
-
How do I prevent my candy melts from seizing up?
Keep all your tools completely dry and avoid any water getting into the candy melts. This means drying your bowls and utensils well and stirring carefully. If your candy still seizes, sometimes gently warming and stirring can help, but it’s best to start with dry equipment.
-
What’s the best way to store Frankenstein Halloween Rice Krispie Treats?
Store them in an airtight container at room temperature away from heat and humidity. They’re best enjoyed within three days to keep the perfect chewy texture and vibrant decoration.
-
Can kids help make these treats?
Definitely! Kids can help stir marshmallows into the cereal and sprinkle the black jimmies. The decorating with eyes and piping stitches might need adult assistance, but it’s a fun team activity.
Final Thoughts
This Frankenstein Halloween Rice Krispie Treats Recipe has become one of my all-time favorite Halloween snacks—not just because of how cute they look, but because they’re so reliably delicious and fun to make. Whether you’re cooking with kids or looking for a quirky dessert to impress guests, you’ll find these treats hit the sweet spot (literally and figuratively). Give them a try and watch your family and friends go crazy over these spooky, sticky, and oh-so-satisfying creations!
Print
Frankenstein Halloween Rice Krispie Treats Recipe
- Prep Time: 20 minutes
- Cook Time: 10 minutes
- Total Time: 1 hour
- Yield: 12 servings
- Category: Dessert
- Method: Stovetop
- Cuisine: American
Description
These Frankenstein Halloween Rice Krispie Treats are a fun and festive twist on the classic marshmallow cereal bar. Perfect for Halloween parties, they feature green candy-coated tops, spooky royal icing eyes, and piped black candy melt stitches to resemble Frankenstein’s monster. Easy to make and delightfully chewy, these treats combine the nostalgic taste of Rice Krispies with creative holiday decoration.
Ingredients
Main Ingredients
- 6 cups rice krispie cereal
- 1 (10 oz) bag mini marshmallows
- 4 tbsp unsalted butter
Decoration
- 10 oz green candy melts
- 3 oz black candy melts
- Royal icing eyes
- Black jimmies sprinkles
Instructions
- Prepare the Dish: Butter a 9″ x 13″ casserole dish to ensure the treats don’t stick.
- Melt Butter: In a large pot over low-medium heat, melt the butter gently to avoid burning.
- Add Marshmallows: Add the mini marshmallows to the melted butter and stir continuously until fully melted and smooth.
- Mix Cereal: Pour in the rice krispie cereal, stirring with a spatula until the cereal is evenly coated with the marshmallow mixture.
- Shape Treats: Spoon the mixture into the prepared casserole dish, pressing firmly and evenly so the top is flat and the cereal fills the dish completely.
- Set the Base: Allow the Rice Krispie mixture to set and cool for 30 minutes at room temperature.
- Cut into Rectangles: Once cooled, remove the treats from the dish and cut into rectangles of various sizes to resemble Frankenstein’s face shapes.
- Melt Green Candy Coating: Using a double boiler method, melt the green candy melts by placing a bowl over a small pot of boiling water. Stir until smooth. If the candy is too thick for dipping, add a teaspoon of vegetable shortening and stir well.
- Dip Treats: Dip the top of each Rice Krispie treat into the melted green candy coating, then immediately dip into black jimmies sprinkles for texture.
- Add Eyes: Attach two royal icing eyes onto each dipped treat while the coating is still wet to secure them.
- Melt Black Candy Melts: In a small bowl, melt black candy melts in the microwave using 10 to 15-second increments, stirring between each until smooth.
- Pipe Stitches: Transfer the black melted candy to a piping bag and carefully pipe on Frankenstein-like stitches across the treats to complete the look.
- Allow to Set: Let the treats sit at room temperature until all candy melts are fully hardened before packaging or serving.
Notes
- Cook the butter and marshmallows over medium heat and remove immediately once melted to prevent hard Rice Krispie treats.
- Ensure all kitchen utensils and equipment are completely dry when melting chocolate or candy melts to avoid seizing.
- If substituting candy melts with regular chocolate, use white chocolate tinted with green gel food coloring and dark chocolate colored with black gel food coloring.
- If a double boiler is unavailable for melting candy melts, microwave in short 10-second bursts, stirring frequently to avoid overheating.
- To thin thick candy melts, add a small amount of vegetable shortening gradually until desired consistency is reached.
- Store treats in an airtight container at room temperature and consume within three days for best freshness.
Nutrition
- Serving Size: 1 piece
- Calories: 190
- Sugar: 15g
- Sodium: 90mg
- Fat: 7g
- Saturated Fat: 4g
- Unsaturated Fat: 2.5g
- Trans Fat: 0g
- Carbohydrates: 30g
- Fiber: 0.5g
- Protein: 2g
- Cholesterol: 15mg


