If you’re on the hunt for a festive treat that’s as fun to make as it is to eat, you’re in the right spot. This Easy Halloween Sugar Cookies Recipe is one of my absolute favorites for the spooky season. I love how the dough comes together easily and the decorating options let you get really creative (even if you’re not a pro!). Whether you’re baking with kids or just craving some sweet Halloween vibes, you’ll find that these cookies bring both charm and flavor to your holiday celebrations.
Why You’ll Love This Recipe
- Super Simple Dough: No chilling required, and the dough is easy to handle every step of the way.
- Perfect for Decorating: The cookies hold their shape and take icing beautifully–perfect for your Halloween designs.
- Fun for All Ages: Whether you’re baking solo or with kids, this recipe is approachable and enjoyable.
- Crowd-Pleaser: My family always goes crazy for these, and neighbors love when I share them!

Ingredients You’ll Need
The ingredients in this Easy Halloween Sugar Cookies Recipe are straightforward pantry staples that come together into a soft, tender cookie perfect for decorating. The magic is really in the flour blend and the two extracts, which give a subtle depth of flavor. Plus, the icing colors help turn them into festive masterpieces.
- Granulated sugar: Sweetens the dough without overpowering—make sure it’s fresh for the best texture.
- Butter (softened): I use real butter for that rich flavor; softened is key to creaming properly with sugar.
- Egg: Helps bind and add moisture—no substitutions here if you want perfect cookies.
- Vanilla extract: Essential for classic warmth and aroma in the dough.
- Almond extract: Just a touch adds that irresistible nutty note, making these cookies stand out.
- All-purpose flour: Provides structure; measure carefully to avoid dense cookies.
- Baking powder: Gives a little lift to keep cookies light without spreading too much.
- Salt: Balances sweetness and enhances all the flavors.
- Orange and black cookie icing: These colors bring your Halloween theme to life; warming the icing makes decorating a breeze.
- Candy eyeballs and Halloween sprinkles: Fun edible accents that add personality and festive charm.
Variations
I like to switch things up depending on the mood or who I’m baking for. This Easy Halloween Sugar Cookies Recipe is perfect for playing with flavors and decorations — you’re only limited by your imagination! Don’t hesitate to make it your own.
- Gluten-free version: I swapped in a gluten-free all-purpose flour blend once, and while the texture was slightly different, they still tasted great and held their shape for decorating.
- Extract twists: Try substituting almond for peppermint or pumpkin spice extracts for a spooky seasonal spin.
- Colorful icing: While orange and black are classic, I’ve used purple and green icing for a creepy-crawlies theme and it was a hit with the kids.
- Nutty crunch: Adding chopped pecans into the dough gave a lovely texture contrast, but keep these away from little ones with allergies!
How to Make Easy Halloween Sugar Cookies Recipe
Step 1: Cream Butter and Sugar Like a Pro
Start by preheating your oven to 350°F — making sure that’s ready prevents any last-minute scrambling. Using a stand or hand mixer, cream together your softened butter and granulated sugar until the mixture looks light and fluffy. This usually takes about 3-4 minutes and is key for that tender, melt-in-your-mouth texture. I like to scrape down the bowl once or twice so everything mixes evenly. Next, beat in the egg, vanilla, and almond extracts until smooth and aromatic.
Step 2: Bring the Dry Ingredients Together
Whisk the flour, baking powder, and salt in a separate bowl. Adding these dry ingredients to your butter mixture gradually (about a cup at a time) will help prevent lumps and keep the dough from getting tough. Once the dough starts to pull together into a ball, stop mixing. The dough should feel a little sticky but not cling to your fingers — this balance means it’ll roll out nicely without cracking or sticking. Trust me, skipping dough chilling saves so much time without sacrificing texture!
Step 3: Shape and Roll the Dough
Divide your dough into two balls, then press each into a 2-inch thick rectangular disc. The shape helps the dough stay together and makes rolling easier. Dust your work surface with flour and roll out each disc into about a 12-inch circle, aiming for roughly 1/8 inch thickness—that thinness lets the cookies get that perfect gentle crunch around the edges while staying soft inside. Before cutting, dip your cookie cutters into flour so the dough doesn’t stick. This is a little trick I discovered that keeps the shapes crisp and clean.
Step 4: Bake Until Lightly Golden
Place your cut-out shapes on an ungreased baking sheet (parchment paper works great for easy cleanup), spacing them a couple inches apart. Bake for 8 to 11 minutes, watching closely towards the end. You’re aiming for just a hint of golden edges, not browning all over. Once baked, transfer them immediately to a wire rack to cool completely—this helps keep their shape and texture just right.
Step 5: Get Creative with Your Halloween Icing
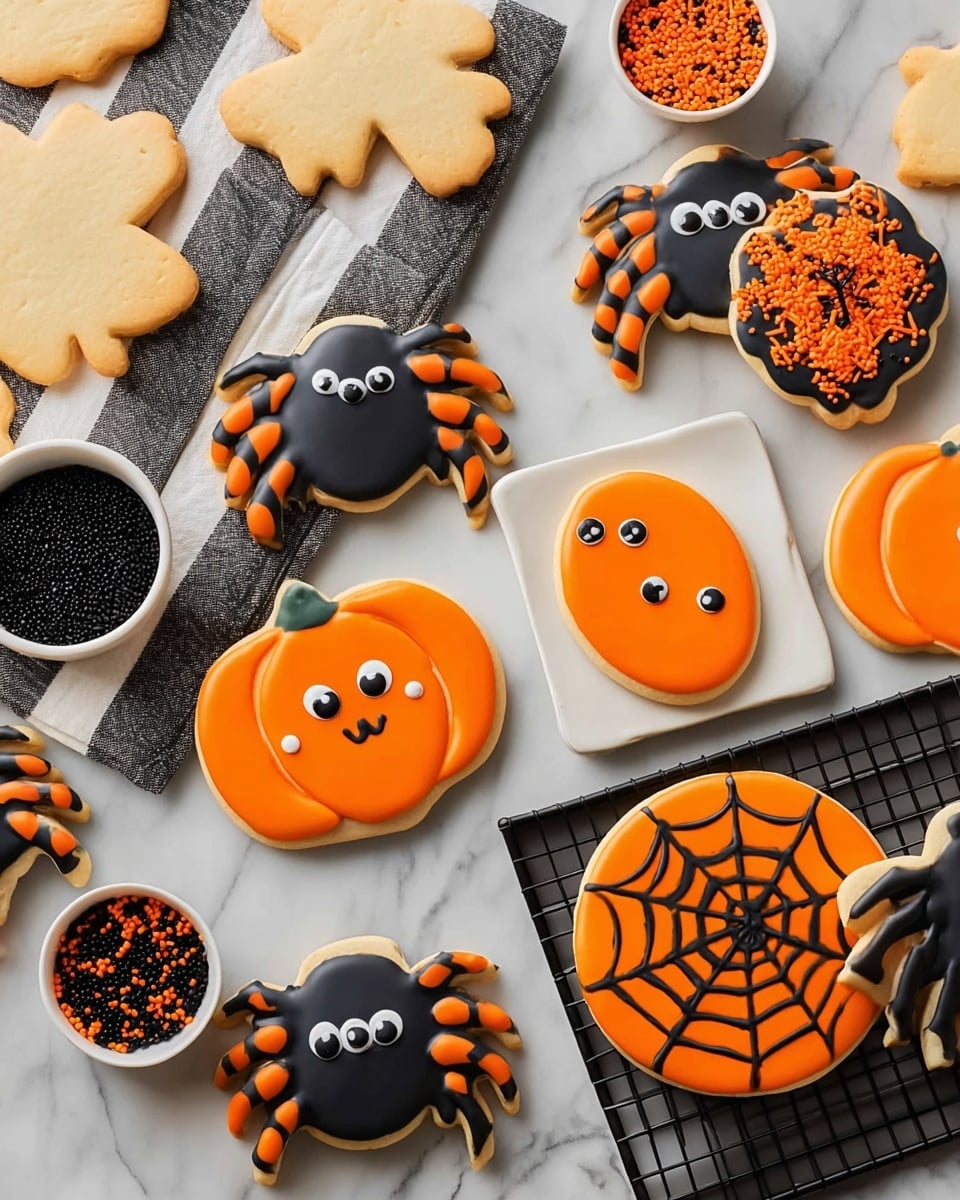
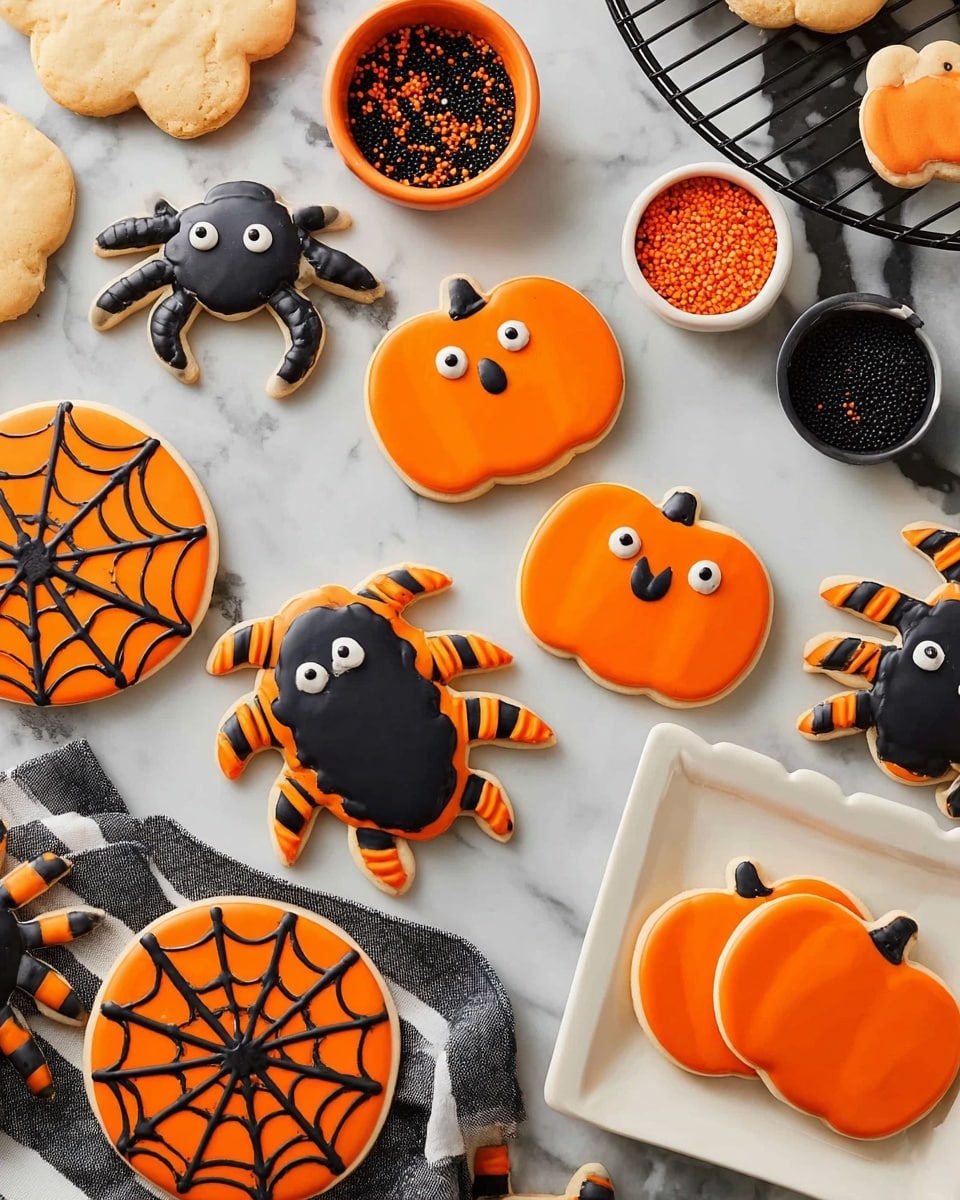
While the cookies cool, gently warm your orange and black icings following the package instructions; warm icing spreads easier and helps with crisp designs. Using a cookie decorating set—if you have one—will make this part less frustrating (trust me on this!). For pumpkins, spiders, and webs, there are fun little tricks: fill shapes with icing quickly and add sprinkles or candy eyeballs before the icing dries. If you’re piping details, let the base icing set for about 15 minutes first so you don’t end up with blurred lines. I’ve learned this the hard way, and patience here is definitely rewarded.
Pro Tips for Making Easy Halloween Sugar Cookies Recipe
- Don’t Chill the Dough: This saves time and the dough rolls out easier without cracking or sticking in my experience.
- Use Floured Cutters: I dip my cutters in flour every time to keep clean, crisp shapes—it’s a game changer for neat cookies.
- Warm Your Icing: Warming the icing before decorating makes spreading and piping smoother and less frustrating.
- Patience is Key: Let the base layers of icing fully set before adding details to avoid smudging—your patience will pay off with professional-looking cookies.
How to Serve Easy Halloween Sugar Cookies Recipe
Garnishes
I always keep a stash of candy eyeballs and Halloween-themed sprinkles on hand—they bring these cookies to life with minimal effort. For extra fun, adding edible glitter or sanding sugar creates a little sparkle that kids (and adults) love. I’ve found that black and orange are classics, but don’t hesitate to mix in purples and greens for a magical touch.
Side Dishes
These sugar cookies pair beautifully with warm drinks like pumpkin spice lattes or hot chocolate—perfect for cozy Halloween gatherings. I’ve also served them alongside a platter of fresh fruit or a simple cheese board, which balances the sweetness nicely and makes for a festive spread.
Creative Ways to Present
For Halloween parties, I love arranging these cookies on a tiered dessert stand alongside mini gourds and faux spider webs for a spooky display. Wrapping a few cookies in clear treat bags tied with orange and black ribbons also makes great party favors. Once, I made a “cookie graveyard” with crumbled chocolate cookies as “dirt” and these decorated sugar cookies as tombstones—such a hit and conversation starter!
Make Ahead and Storage
Storing Leftovers
I keep leftover cookies in an airtight container at room temperature—this keeps them fresh and soft for up to a week. Placing parchment between layers prevents the icing from sticking, which saves the design and texture intact.
Freezing
I freeze undecorated cookie dough discs wrapped tightly in plastic wrap and foil. When I want fresh cookies, I defrost overnight in the fridge and bake just like fresh dough. I’ve also frozen fully decorated cookies on a baking sheet, then transferred them to freezer bags—a quick thaw on the counter makes them almost as good as fresh.
Reheating
If you want to refresh slightly stale cookies, a quick zap in the microwave for about 10 seconds (covered with a damp paper towel nearby to keep moisture) works wonders. Just be gentle so you don’t melt the icing. Alternatively, a few minutes in a 300°F oven keeps them crisp and delicious.
FAQs
-
Can I make this Easy Halloween Sugar Cookies Recipe without almond extract?
Absolutely! Almond extract adds a lovely nutty hint, but if you don’t have it or prefer to skip it, simply omit it or add a little extra vanilla extract instead. The cookies will still be delicious and perfect for decorating.
-
Why don’t I need to chill the dough for these sugar cookies?
This recipe is designed for a soft, slightly sticky dough that’s easy to roll and cut without chilling. Chilling can actually make the dough harder to roll and sometimes results in cracking when slicing shapes. Skipping this step saves time while still producing tender cookies.
-
How do I prevent my cookies from spreading too much during baking?
Make sure you measure your flour carefully—too little can cause spreading. Also, use baking powder, not baking soda, which helps maintain shape but still provides a gentle lift. Baking on a cooler sheet or using parchment paper can also help keep edges defined.
-
What’s the best way to decorate for neat icing outlines?
Warm your icing before starting, and use a piping bag with a fine tip or a cookie decorating tool. Let base layers set completely before adding detail piping. Using a scribe tool or toothpick helps you pull icing toward edges crisply and fix small mistakes quickly.
-
Can I store decorated cookies long-term?
You can store decorated cookies in an airtight container for several days at room temperature. For longer storage, freeze fully decorated cookies in a single layer on a baking sheet, then transfer them to airtight freezer bags. Thaw at room temperature before serving.
Final Thoughts
This Easy Halloween Sugar Cookies Recipe has become a seasonal favorite in my house because it’s approachable and lets you get creative with your decorations without fuss. I remember the first time I made these and invited neighborhood kids over to decorate—they left with smiles as big as the cookies! Whether it’s your first time or you’re a cookie-decorating veteran, these biscuits bring joy and a little holiday magic every time. I can’t wait for you to try them and see your own spooky creations come to life.
Print
Easy Halloween Sugar Cookies Recipe
- Prep Time: 45 minutes
- Cook Time: 11 minutes per batch
- Total Time: 2 hours 15 minutes
- Yield: 3 dozen cookies
- Category: Dessert
- Method: Baking
- Cuisine: American
Description
Celebrate Halloween with these easy and festive sugar cookies that are perfect for beginners. This recipe yields soft and chewy sugar cookies decorated with vibrant orange and black icings and fun Halloween-themed toppings like candy eyeballs and sprinkles. Whether you’re hosting a party or just craving a spooky treat, these cookies are sure to delight kids and adults alike.
Ingredients
Roll-Out Sugar Cookies
- 1 cup granulated sugar
- 1 cup (2 sticks) butter, softened
- 1 egg
- 2 teaspoons vanilla extract
- 1/2 teaspoon almond extract
- 3 1/4 cups all-purpose flour
- 1 teaspoon baking powder
- 1/2 teaspoon salt
Cookie Icing and Decorations
- Orange Cookie Icing (quantity as needed)
- Black Cookie Icing (quantity as needed)
- Candy Eyeballs (amount to decorate about 3 dozen cookies)
- Halloween Sprinkles (amount to decorate about 3 dozen cookies)
Instructions
- Preheat Oven: Set your oven to 350°F (175°C) to prepare for baking the cookies.
- Cream Butter and Sugar: In a large bowl, use an electric stand mixer or hand mixer to cream the softened butter and granulated sugar together until the mixture is light and fluffy. Then, beat in the egg, vanilla extract, and almond extract until well combined.
- Combine Dry Ingredients: In a separate bowl, whisk together the all-purpose flour, baking powder, and salt. Add these dry ingredients to the butter mixture gradually, about 1 cup at a time, mixing after each addition. Continue mixing until the dough forms a ball that is sticky but holds its shape and doesn’t stick to your fingers. Do not chill the dough.
- Shape the Dough: Divide the dough into two equal balls. Form each into a 2-inch thick rectangular disc to make rolling and cutting easier.
- Roll Out Dough: On a floured surface, roll each dough disc into a circle approximately 12 inches in diameter and 1/8 inch thick.
- Cut Out Shapes: Dip your cookie cutter in flour before each use to prevent sticking, then cut out your desired Halloween shapes from the dough.
- Bake Cookies: Place the cutout cookies on an ungreased baking sheet, with or without parchment paper. Bake them in the preheated oven for 8 to 11 minutes, or until the edges are lightly browned. Once baked, transfer the cookies to a wire cooling rack to cool completely.
- Heat Icing: Warm the orange and black cookie icings according to their package instructions to prepare for decorating.
- Decorate Cookies: Use a cookie decorating tool set to help control icing placement and create clean edges. For black pumpkin cookies, fill the pumpkin shape with warm black icing and add sprinkles immediately. For orange pumpkins, fill with orange icing, allow to set for 15 minutes, then pipe black details.
- Decorate Web Cookies: For orange web cookies, fill the base with orange icing, pipe black circles from edge to center, then drag icing lines inward to create web patterns using a scribe tool. For black web cookies, fill with black icing, sprinkle black sanding sugar immediately, let set for 15 minutes, then pipe orange web lines horizontally, vertically, diagonally, and curve lines to complete the web.
- Decorate Spider Cookies: For orange spider cookies, pipe orange icing center, add candy eyes and nonpareils, then pipe black icing legs. For black spider cookies, place cookies on a cooling rack over parchment, pipe black icing center allowing some dripping, immediately add candy eyeballs, then pipe alternating black and orange legs. Adjust drips as needed by gentle movement on the rack.
- Set and Finish: Allow all decorated cookies to set completely for about 1 hour before serving or storing.
Notes
- The dough should be sticky but not stick to your fingers to ensure the right texture for rolling and cutting.
- Do not chill the dough as it can make rolling difficult and affect the cookie texture.
- Dipping cookie cutters in flour prevents dough from sticking and helps cut clean shapes.
- Use a cookie decorating tool set with scribe and scraping tools for precise icing placement and clean edges.
- Allow certain icings to set between layers for best decorating results, especially with multi-layered designs like the pumpkins and webs.
- Cookies should be stored in an airtight container once fully set to keep them fresh.
Nutrition
- Serving Size: 1 cookie
- Calories: 120
- Sugar: 8g
- Sodium: 90mg
- Fat: 6g
- Saturated Fat: 3.5g
- Unsaturated Fat: 2g
- Trans Fat: 0g
- Carbohydrates: 15g
- Fiber: 0.5g
- Protein: 1g
- Cholesterol: 25mg


