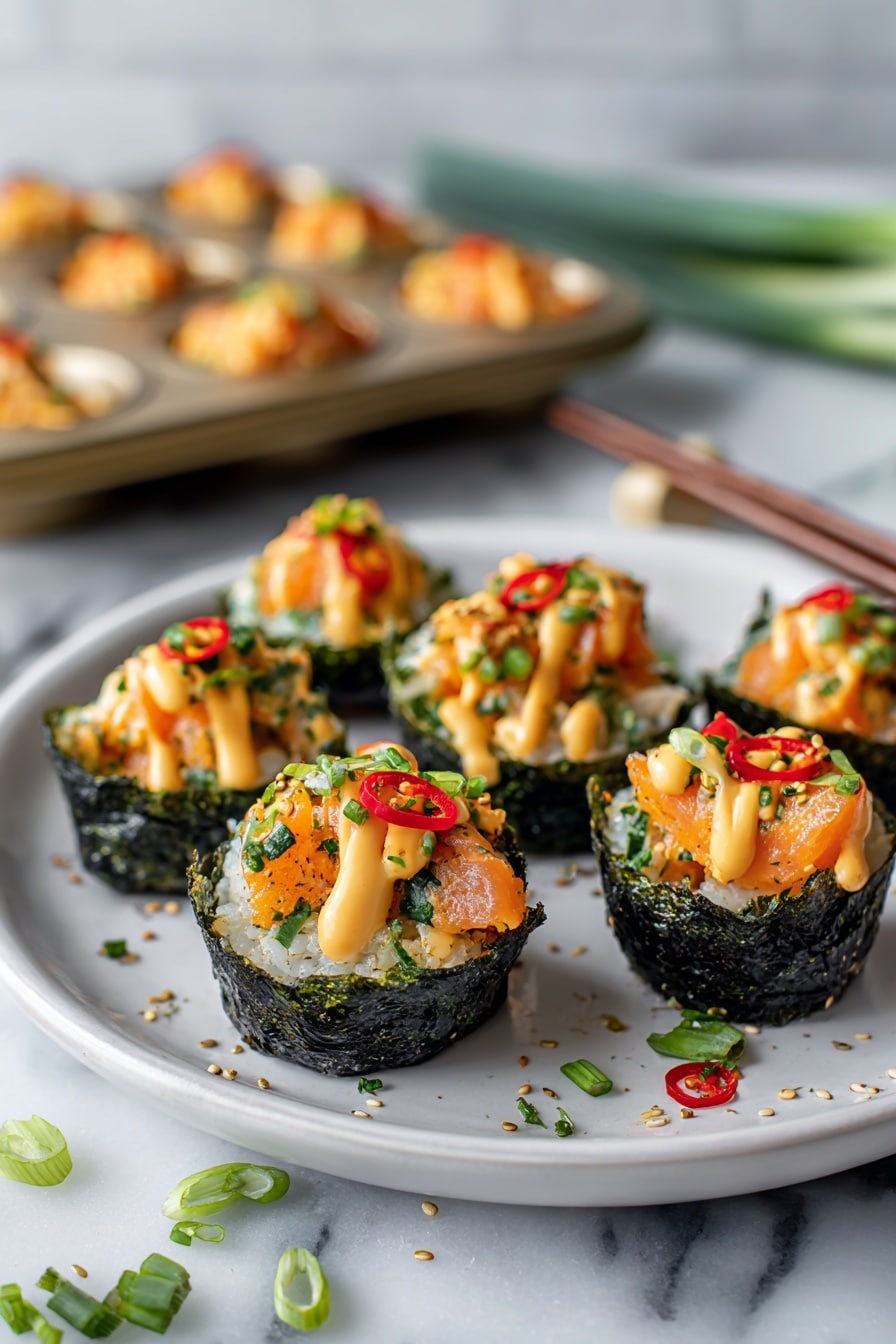
If you’re looking to impress with minimal fuss, I absolutely love sharing this Easy Baked Salmon Sushi Cups Recipe because it combines all the flavors you crave from sushi with an unbelievably simple baking method. These sushi cups are a total crowd-pleaser — perfect for when you want sushi vibes without the rolling hassle. Trust me, once you try this, it’ll become a go-to whenever you want something fresh, delicious, and a little bit fancy without trudging through complicated sushi prep.
Why You’ll Love This Recipe
- Super Easy Prep: No rolling rice or fish — just layered in muffin tins and baked.
- Flavor Packed: The combo of Kewpie mayo, sriracha, and sesame oil brings sushi bar vibes home.
- Fun Presentation: These cups look beautiful and are totally Instagram-worthy when garnished.
- Great For Any Occasion: Perfect appetizer for parties or just a fun weeknight dinner twist.

Ingredients You’ll Need
These ingredients come together beautifully — the sushi rice provides that perfect sticky base, while the baked salmon mixture gives you a creamy, spicy, and savory topping that melts in your mouth. When shopping, I recommend using high-quality sushi rice and fresh salmon fillets for the best taste and texture.
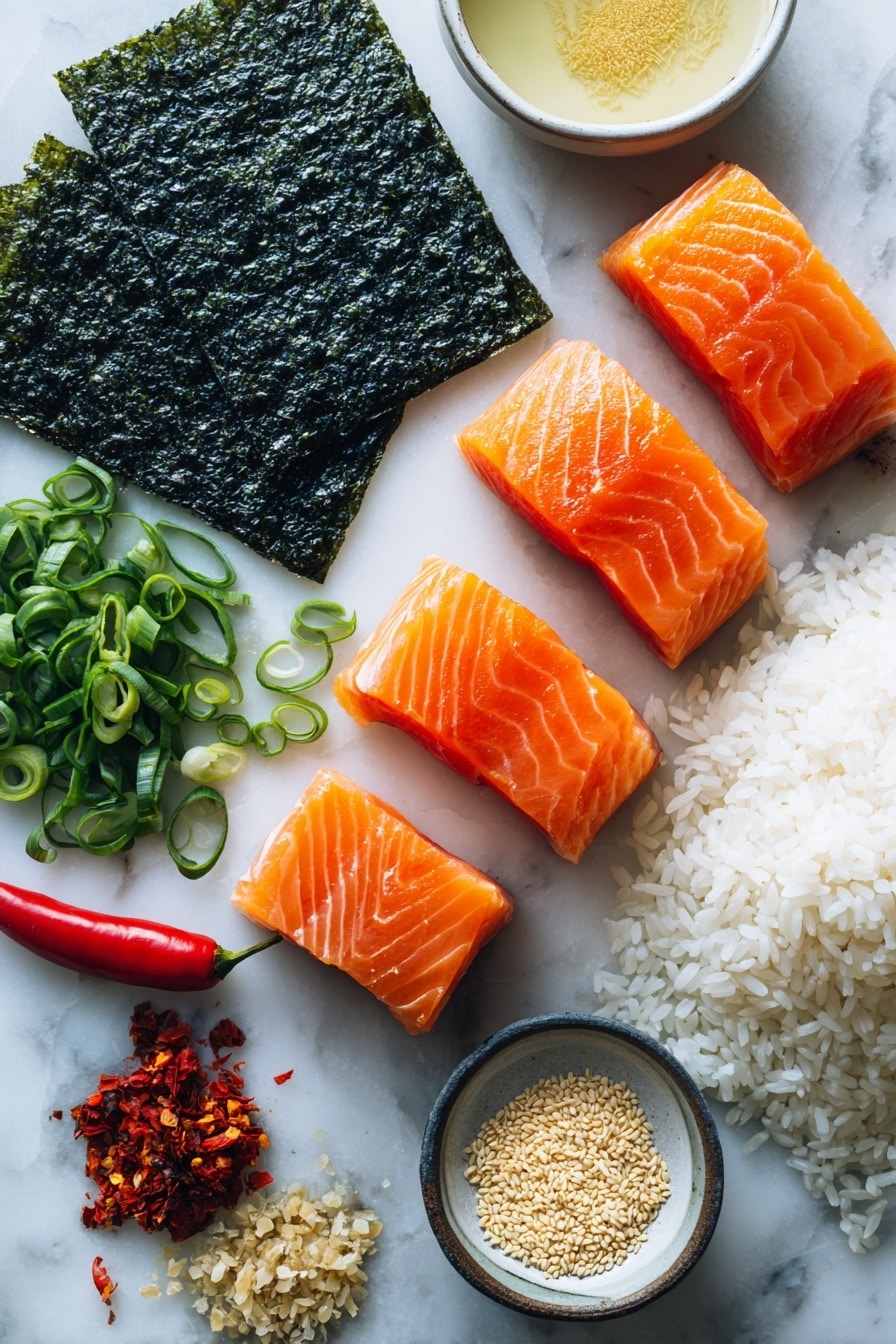
- Salmon: Fresh, cubed salmon works best here; it bakes perfectly without drying out.
- Light soy sauce: Adds that subtle salty depth without overpowering the salmon.
- Kewpie mayo: Creamy and slightly sweet Japanese mayo that makes this recipe shine.
- Sriracha: Brings just the right amount of heat and tang to balance the richness.
- Sesame oil: A little goes a long way to add that toasty, nutty flavor.
- Sushi rice: Key for sticky, fluffy rice cups—don’t skip the special sushi rice.
- Rice vinegar: Sweetened with sugar, it seasons the rice beautifully.
- White sugar: Helps balance the acidity of the vinegar.
- Nori sheets: Cut into squares; they act as the perfect edible “cup” for your sushi creations.
- Furikake: This Japanese rice seasoning adds texture and burst of umami as garnish.
- Green onion: Adds fresh sharpness and color on top.
- Cooking spray: Ensures your nori-lined muffin tins don’t stick when baking.
Variations
I love how versatile this recipe is — it’s easy to tweak depending on what you have on hand or your spice preference. Feel free to customize and make it your own!
- Make it milder: If spicy food isn’t your thing, just cut back or skip the sriracha — it still tastes amazing!
- Swap the protein: Tried it once with cooked shrimp instead of salmon and got rave reviews from friends.
- Make it vegetarian: Replace salmon with grilled tofu marinated in soy and sesame oil for a fun plant-based twist.
- Add crunch: Sprinkle chopped toasted almonds or tempura flakes on top for texture contrast.
How to Make Easy Baked Salmon Sushi Cups Recipe
Step 1: Prepare the Sushi Rice
Start by cooking your sushi rice according to the package instructions — I like to rinse the rice well beforehand to remove excess starch which keeps it fluffy but sticky enough to hold shape. While the rice is still hot, stir together rice vinegar and sugar (microwaved for about 30 seconds until sugar dissolves), then fold this seasoning gently into the rice. Let it cool slightly while you prep the salmon.
Step 2: Mix Up the Salmon Topping
In a bowl, combine the cubed salmon with light soy sauce, Kewpie mayo, sriracha, and sesame oil. When I first made this, I underestimated how well the mayo and sriracha blend to create a creamy yet spicy sauce — it makes all the difference! Mix until everything is evenly coated, then set aside.
Step 3: Prep the Nori and Muffin Tin
Cut your nori sheets into 4 rectangular or square pieces, sized to fit comfortably into your muffin tin cups. Lightly spray each muffin cup with cooking spray to prevent sticking—this little trick saved me so much frustration my first time!
Step 4: Assemble Your Sushi Cups
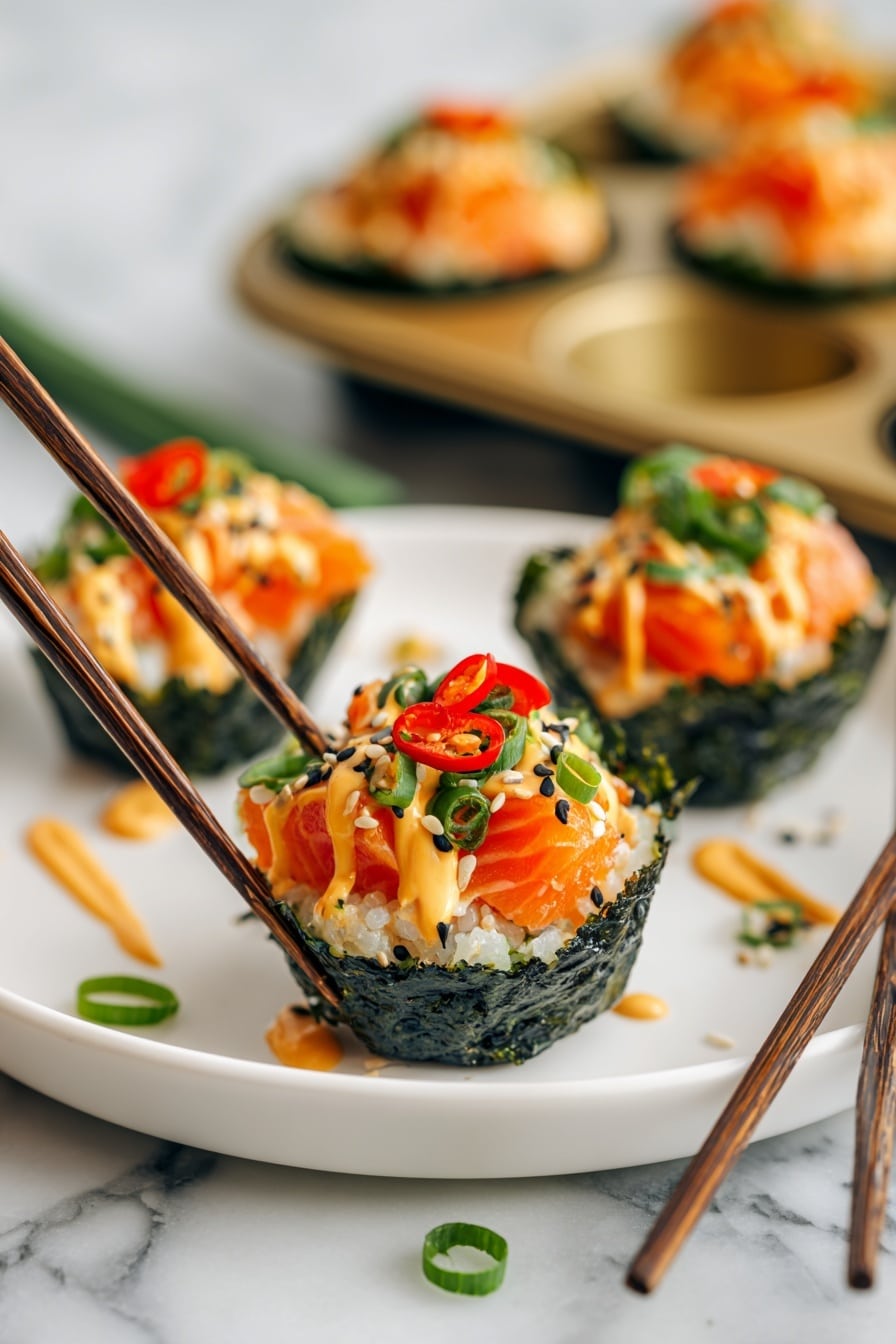
Place each nori square in the muffin cups, then spoon a layer of the sushi rice onto the nori, pressing down gently but firmly so it holds its shape. Top each cup with a generous amount of the salmon mixture. An easy way to avoid overfilling is to keep your spoonfuls consistent. This step is where it all comes together visually and flavor-wise.
Step 5: Bake and Garnish
Bake at 400℉ for about 15 minutes. You’ll know it’s done when the salmon looks cooked through and the tops start to get just a little golden. Remove from the oven and let cool slightly—this makes them easier to handle. I like to drizzle a little extra sriracha or spicy mayo on top for an added kick, then sprinkle with furikake and chopped green onions before serving. These garnishes just elevate the whole experience.
Pro Tips for Making Easy Baked Salmon Sushi Cups Recipe
- Rice Rinsing: Rinse sushi rice until water runs clear before cooking to get that perfect sticky but fluffy texture.
- Balanced Flavors: Adjust sriracha and mayo quantities to suit your spice tolerance — you can’t really mess this up!
- Avoid Soggy Nori: Make sure to bake right after assembling so the nori stays crisp and doesn’t get too soft.
- Uniform Scoop Size: Use a small cookie scoop or measuring spoon to keep rice portions even and tidy in each cup.
How to Serve Easy Baked Salmon Sushi Cups Recipe
Garnishes
I always top mine with furikake because it adds that savory crunch and burst of umami that takes these cups from good to unforgettable. Chopped green onions add freshness and a pop of color, which makes serving a breeze when you want it to look as good as it tastes.
Side Dishes
For sides, I love serving these with a simple seaweed salad or pickled ginger to keep things light and refreshing. A crisp cucumber salad with a sesame dressing also pairs beautifully, giving you different textures to enjoy alongside.
Creative Ways to Present
Hosting a party? I like to arrange these salmon sushi cups on a platter with edible flowers and extra furikake sprinkled around. Using colorful mini muffin tins makes the presentation fun and festive. You can even add small dollops of wasabi mayo on the side for guests to customize their heat levels.
Make Ahead and Storage
Storing Leftovers
If you have leftovers, pop them in an airtight container and refrigerate within two hours of baking. They’ll stay good for up to 2 days. I’ve found the texture holds up well overnight, making them perfect for next-day lunches or snacks.
Freezing
Freezing isn’t my favorite route with these because the rice texture changes a bit, but if you’re careful to wrap each sushi cup tightly in plastic wrap before freezing, they’ll keep for a couple of weeks. Thaw overnight in the fridge before reheating gently.
Reheating
I recommend reheating in the oven at 300℉ for 8-10 minutes to keep the nori crisp and the salmon moist. Microwaving is faster, but the nori might get soft and chewy, so oven reheating preserves the texture best.
FAQs
-
Can I use other fish besides salmon in this recipe?
Absolutely! While salmon is flavorful and rich, you can substitute with cooked shrimp, tuna, or even crab meat. Just adjust the baking time accordingly if your fish is pre-cooked, as you don’t want it to dry out.
-
Is it necessary to use Kewpie mayo?
Kewpie mayo has a unique creamy, slightly sweet taste different from regular mayo. If you can’t find it, regular mayonnaise will work fine, but adding a splash of rice vinegar or a pinch of sugar can mimic its flavor more closely.
-
How do I prevent the nori from becoming soggy?
To keep your nori crisp, assemble the sushi cups shortly before baking and serve immediately after. Avoid making them too far in advance and storing, as moisture from the rice can soften the nori.
-
Can I make these gluten-free?
Yes! Just make sure to use gluten-free soy sauce (tamari is great) and confirm your other seasonings are gluten-free. The rest of the ingredients like rice, salmon, and nori are naturally gluten-free.
Final Thoughts
I gotta say, this Easy Baked Salmon Sushi Cups Recipe feels like the magic shortcut I wish I discovered earlier! It’s simple but gives you that restaurant-quality sushi experience without the fancy equipment or hours of prep. Whether you make it for a laid-back dinner or to wow guests, it’s always a hit. Give it a try—you might just find yourself making this again and again, just like I do!
Print
Easy Baked Salmon Sushi Cups Recipe
- Prep Time: 15 minutes
- Cook Time: 15 minutes
- Total Time: 30 minutes
- Yield: 12 sushi cups
- Category: Appetizer
- Method: Baking
- Cuisine: Japanese
Description
These Easy Baked Salmon Sushi Cups are a delicious and innovative twist on traditional sushi, featuring tender salmon mixed with a flavorful spicy mayo sauce layered over perfectly seasoned sushi rice and baked in nori-lined muffin tins for a fun, handheld appetizer or snack. Ready in just 30 minutes, this viral recipe combines savory, spicy, and umami flavors with a crispy baked finish.
Ingredients
Salmon Mixture
- 1 lb salmon, cubed
- 1 tbsp light soy sauce
- 1 tbsp Kewpie Mayo
- 1 tbsp Sriracha
- 1 tsp sesame oil
Sushi Rice
- 1 ½ cup uncooked sushi rice
- 1 tablespoon rice vinegar
- 2 teaspoon white sugar
Assembly & Garnish
- 3 large nori sheets
- Furikake, for garnish
- 1 green onion, chopped, for garnish
- Cooking spray
Instructions
- Cook the sushi rice: Prepare the sushi rice according to the package instructions. Once cooked, set it aside to slightly cool.
- Make the sushi rice seasoning: In a microwave-safe bowl, combine the rice vinegar and sugar. Microwave for about 30 seconds or until the sugar dissolves. Pour this mixture over the cooked sushi rice and gently fold to combine evenly. Set aside.
- Preheat the oven: Set your oven to 400℉ (200℃) to preheat while preparing the salmon mixture.
- Prepare the salmon mixture: In a medium bowl, combine the cubed salmon, light soy sauce, Kewpie mayo, sriracha, and sesame oil. Mix well until all ingredients are evenly incorporated. Set aside.
- Cut the nori sheets: Slice each nori sheet into 4 rectangles or squares to fit into muffin tin cups.
- Assemble the sushi cups: Lightly grease a 12-cup muffin tin with cooking spray. Place one nori square inside each muffin cup. Add a spoonful of the seasoned sushi rice onto each nori sheet, pressing lightly to form a base. Then add a layer of the salmon mixture on top of the rice in each cup.
- Bake the sushi cups: Place the muffin tin in the preheated oven and bake at 400℉ for 15 minutes or until the salmon is cooked through and the tops are slightly golden.
- Garnish and serve: Remove baked sushi cups from the oven and allow to cool for a few minutes. Drizzle additional sriracha or spicy mayo on top if desired. Sprinkle with furikake and chopped green onions. Serve immediately and enjoy!
Notes
- You can substitute salmon with tuna or cooked shrimp for a different protein option.
- Adjust the amount of sriracha to control the spiciness level according to your taste.
- If you don’t have Kewpie mayo, regular mayonnaise works but Kewpie adds a richer umami flavor.
- Use a sharp knife to cut the nori sheets cleanly to prevent tearing when lining muffin tins.
- The sushi rice should be slightly sticky but not mushy for best structure in cups.
- Serve immediately after baking for the best texture and freshness.
Nutrition
- Serving Size: 1 sushi cup
- Calories: 140
- Sugar: 2g
- Sodium: 290mg
- Fat: 6g
- Saturated Fat: 1g
- Unsaturated Fat: 4g
- Trans Fat: 0g
- Carbohydrates: 14g
- Fiber: 1g
- Protein: 10g
- Cholesterol: 35mg


