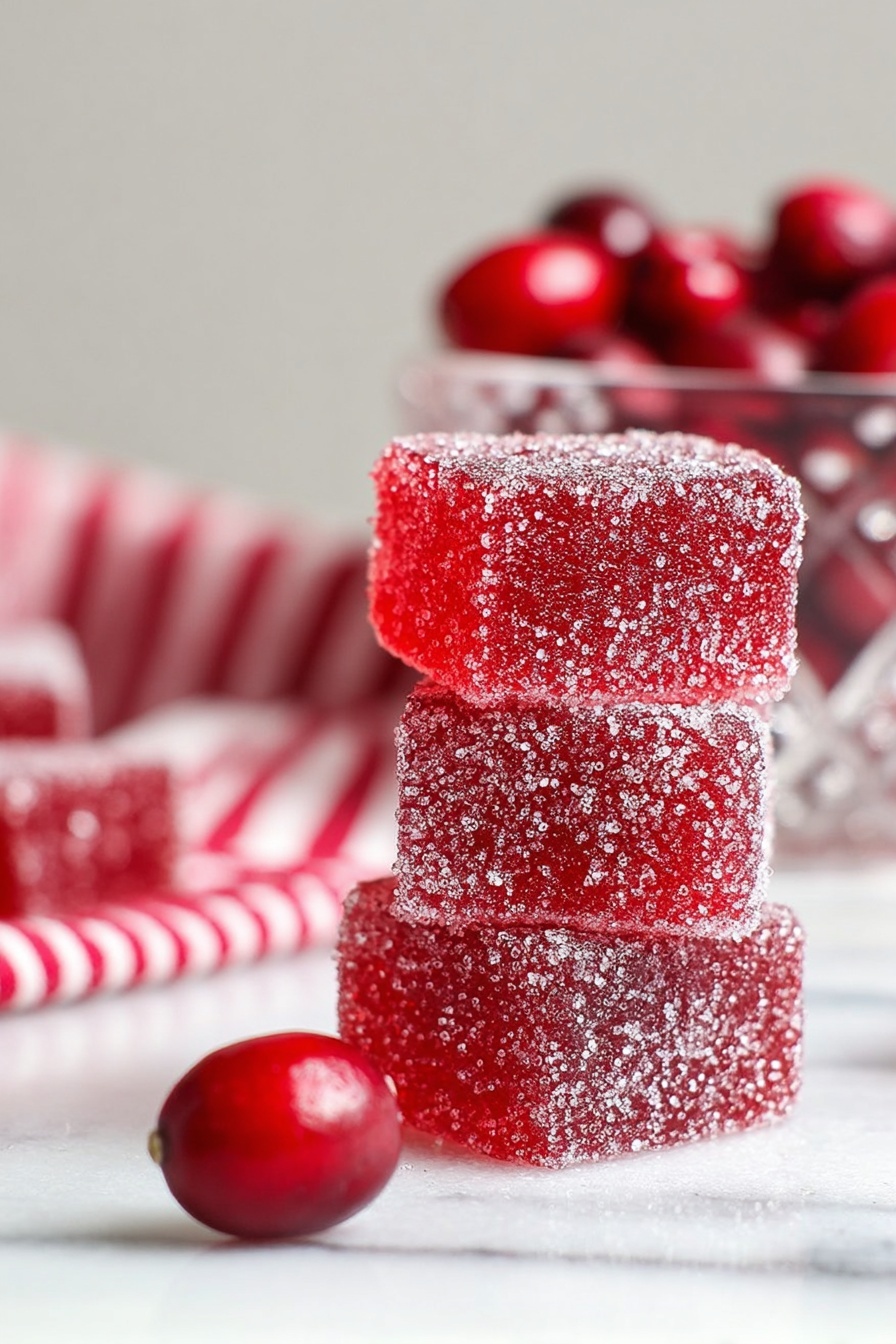
If you’ve ever wanted to make a homemade candy that dazzles with tartness, chewy texture, and that perfect sugar-coated crunch, then I have just the recipe for you. This Cranberry Jelly Candy Recipe is one of my all-time favorites, especially around the holidays when cranberries are at their peak. It’s a fan-freaking-tastic treat that feels fancy but is surprisingly straightforward to pull off. Once you make it, you’ll find it hard to stop at just one piece!
Why You’ll Love This Recipe
- Bursting Cranberry Flavor: The fresh, tangy cranberry juice keeps these candies vibrant and refreshingly tart.
- Textural Perfection: That chewy interior dusted with a crunchy sugar coating is downright addictive.
- Impressively Homemade: It looks and tastes like a fancy candy you’d buy, but you made it yourself!
- Flexible and Kid-Friendly: The process is simple enough for an afternoon of kitchen fun with family.

Ingredients You’ll Need
The beauty of this cranberry jelly candy recipe is that it calls for just a handful of pantry and fridge staples, coming together to create something far more special than the sum of its parts. Here’s what you’ll want to have on hand—and a few notes I’ve picked up along the way.
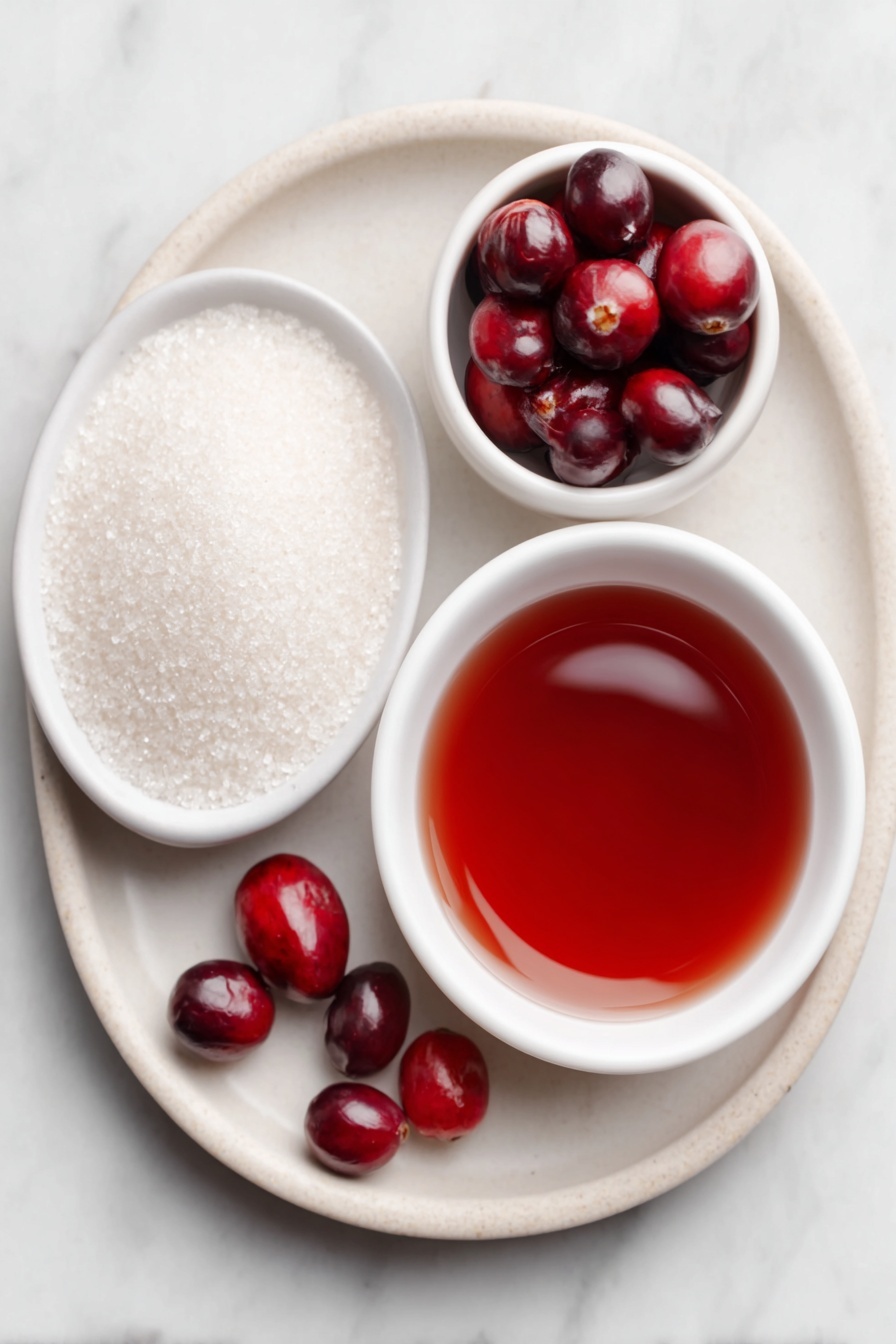
- Cranberry Juice: Make sure it’s 100% cranberry juice, not cocktail or blends; the pure tartness makes all the difference.
- Powdered Gelatin: This is your gelling agent—powdered works well, but leaf gelatin is a great alternative if you have it on hand.
- Sugar: Granulated sugar sweetens and helps create that signature crunchy coating your candies will get.
- Nonstick Spray: To grease your pan and knife, so releasing and cutting the candy is a breeze and no sticky mess to stress over!
Variations
I love that you can tweak this cranberry jelly candy recipe to fit your mood and crowd. Whether you want to turn down the sweetness or add a twist, there’s room to play here. Your candies can be as classic or as creative as you want!
- Lemon Zest: Adding a teaspoon of finely grated lemon zest brightens the tartness and adds a fresh zing—my family loves it.
- Spiced Version: A pinch of ground cinnamon or ginger stirred in with the sugar adds warmth and a holiday vibe.
- Alternative Juices: Feel adventurous? Try substituting half of the cranberry juice with pomegranate for a deeper fruit flavor. Just watch the sweetness balance!
- Gelatin Options: If you want a vegetarian version, using agar-agar instead of gelatin is an option, but the texture won’t be quite the same—experiment and see what you like.
How to Make Cranberry Jelly Candy Recipe
Step 1: Prep and Gelatin Blooming
First things first: line an 8×8-inch pan with parchment paper in a criss-cross fashion so you’ll have an easy way to lift the candies later. Generously spray the parchment with nonstick spray—this step is a game changer for easy cleanup. Next, sprinkle your powdered gelatin over the cold cranberry juice. I usually whisk gently to blend and let it sit for a minute while the gelatin blooms and softens—this helps it dissolve evenly when you add the hot liquid later.
Step 2: Combine Ingredients & Bring to Boil
Pour in the boiling cranberry juice and add the granulated sugar. Whisk everything together until fully combined, then crank up the heat to bring it to a rolling boil. This part takes patience—I’ve found it usually takes 5 minutes to reach that bubbling point. The real key is the next phase.
Step 3: Simmer to the Magic Temperature
Reduce heat to medium and let the mixture simmer, stirring occasionally. Here’s the trick: use a digital thermometer! You want to reach exactly 107°C (225°F). This can take 20-25 minutes or more, so don’t rush it or you might end up with too soft or too hard candy. I’ve made this mistake before! Keep stirring and testing, and once you hit the target temperature, immediately remove the pot from the heat.
Step 4: Remove Bubbles and Set the Jelly
Using a skimmer or fine mesh strainer, gently fish out any large bubbles floating on top—that helps your candy look smooth. Then pour the sticky mixture into your prepared pan. Don’t worry if you see some white streaks or foam; once coated with sugar, they’ll disappear. Pop the pan in the fridge and chill for at least 4 hours or overnight until it’s firm and jelly-like.
Step 5: Cutting and Sugar Coating
This step is where your candies start to come to life! Flip the firm jelly slab onto a large chopping board sprinkled with granulated sugar (this keeps it from sticking). Gently peel off the parchment, then use your hands to dust the slab thoroughly with sugar on both sides. Lightly score squares—7×7 or 8×8 depending on how big you want your candies—to guide your cuts.
Then, with a sharp, well-oiled knife (trust me, oiling the knife is a small hack that makes a world of difference), carefully cut along your lines. Roll each square individually in sugar to fully coat all sticky sides. Place them on a parchment-lined tray, making sure they’re not touching so they don’t stick together later.
Step 6: Dry and Store
Allow your candies to dry uncovered at room temperature for 1-2 days. This drying time is essential to develop that irresistible crunchy sugar shell. Once dry, stack them between parchment sheets in an airtight container, and they’ll keep beautifully for up to a month. I love making mine well ahead of holiday parties—it’s such an impressive and thoughtful homemade gift.
Pro Tips for Making Cranberry Jelly Candy Recipe
- Use a Reliable Digital Thermometer: This recipe hinges on hitting that 225°F mark, so a good thermometer saves a lot of guesswork and frustration.
- Oil Your Knife Seriously: Applying nonstick spray or a light coating of oil to your knife prevents the candies from sticking and tearing when cutting.
- Don’t Skip the Drying Time: That crunchy sugar shell is worth the wait—if you cut drying short, the candy can be overly sticky and a bit of a mess.
- Be Patient When Simmering: Rushing this step can cause candies to be too soft or brittle; low and slow is your friend.
How to Serve Cranberry Jelly Candy Recipe

Garnishes
I like to sprinkle a tiny bit of extra powdered sugar or edible glitter on top for a festive sparkle, especially when serving these at parties. Another fun touch: a small fresh cranberry or mint leaf alongside creates a beautiful contrast and hints at the candy’s lively flavor.
Side Dishes
This candy pairs wonderfully with a hot cup of spiced tea or mulled wine—perfect for chilly evenings. I also enjoy serving it as a sweet finish alongside a cheese platter, where the tart candy balances out rich cheeses like brie or aged cheddar.
Creative Ways to Present
I’ve found that arranging these candies in clear glass jars tied with a festive ribbon makes an instant gift. And for holiday gatherings, arranging them on a wooden serving board with seasonal sprigs of rosemary creates a beautiful, rustic display that always impresses guests.
Make Ahead and Storage
Storing Leftovers
I store leftover cranberry jelly candies layered between parchment in an airtight container at room temperature. They keep their texture and flavor beautifully for up to a month, though honestly, they usually don’t last that long in my house!
Freezing
I’ve personally never frozen these candies because they’re best enjoyed fresh with their crisp sugar coating. Freezing might cause moisture issues that make the sugar coating sticky or dissolve. If you try it, let me know how it goes!
Reheating
Since these are candy jellies, reheating isn’t really necessary or recommended. But if they lose a bit of their crunch from humidity, letting them air dry at room temperature uncovered for a few hours can help restore their texture.
FAQs
-
Can I use cranberry juice cocktail instead of 100% cranberry juice?
It’s best to use 100% cranberry juice for this candy recipe because cocktail or blends contain extra sugars that alter the balance, making your candies overly sweet and affecting the final texture.
-
What happens if I don’t reach the target temperature of 225°F?
If the mixture doesn’t reach 225°F, your candies won’t set properly and could end up too soft or sticky instead of firm and chewy. Using a reliable digital thermometer ensures perfect results.
-
Can I use leaf gelatin instead of powdered gelatin?
Yes! Leaf gelatin can be substituted but remember that one sheet of leaf gelatin typically equals about 2.5 teaspoons of powdered gelatin. Adjust accordingly and bloom the leaves in liquid before using.
-
How long do cranberry jelly candies last?
When properly stored layered between parchment paper in an airtight container at room temperature, these candies keep well for up to one month without losing flavor or texture.
-
Is there a vegetarian alternative to gelatin for this recipe?
You can try agar-agar as a vegetarian substitute, but keep in mind it sets differently and the texture won’t exactly match traditional gelatin-based candy. Experiment in small batches first.
Final Thoughts
I absolutely love how this Cranberry Jelly Candy Recipe turns out every time—the balance of tart, sweet, chewy, and crunchy is just irresistible. When I first made these, I couldn’t believe something so simple could feel so special. Whether you’re gearing up for the holidays or looking for a unique homemade treat, I genuinely hope you give these candies a try. Trust me, once you taste them, you’ll want to keep making them year after year—and maybe sneak a few pieces before anyone else finds them!
Print
Cranberry Jelly Candy Recipe
- Prep Time: 30 minutes
- Cook Time: 30 minutes
- Total Time: 5 hours plus 1-2 days drying time
- Yield: 50-60 squares
- Category: Candy
- Method: Stovetop
- Cuisine: American
Description
These Festive Cranberry Jelly Candies are a delightful homemade treat, combining the tartness of cranberry juice with a sweet, chewy texture coated in granulated sugar. Perfect for holiday gifting or a festive dessert, these candies require a bit of patience but reward you with a beautiful, crunchy-coated jelly candy bursting with true cranberry flavor.
Ingredients
For the Candies
- Nonstick spray, for greasing tin and knife
- 240 milliliters cold cranberry juice (1 cup)
- 35 grams powdered gelatin (five 7-gram packets, about 3 1/2 tablespoons)
- 650 grams granulated sugar (about 3 1/4 cups, plus more for coating candies)
- 180 milliliters boiling cranberry juice (3/4 cup)
Instructions
- Prepare the Pan: Line an 8×8-inch square tin with parchment paper in a criss-cross pattern, allowing a 1-inch overhang on all sides, and generously grease with nonstick spray. Set aside.
- Mix Gelatin and Juice: In a large stock pot, add the cold cranberry juice and sprinkle powdered gelatin over the top. Whisk together until combined.
- Add Hot Juice and Sugar: Pour in the boiling cranberry juice along with the granulated sugar, then whisk until the sugar dissolves and the mixture is well combined.
- Cook the Mixture: Bring the mixture to a boil over high heat, which should take about 5 minutes. Then reduce to medium heat and simmer, stirring occasionally with a heat-resistant spoon, until the candy thermometer reads 107°C / 225°F. This process takes approximately 20-25 minutes or more, so patience is key.
- Remove Bubbles: Remove the pot from heat. Using a skimmer or fine mesh strainer, gently remove any large bubbles that have formed on the surface.
- Pour and Chill: Pour the hot mixture evenly into the prepared pan. Do not worry if some bubbles or foam remain as these will not affect the finished candy once coated. Refrigerate until firm, at least 4 hours or preferably overnight.
- Prepare to Cut: Line a large tray with parchment or a silicone baking mat and coat a large chopping board with 2-3 scoops of granulated sugar. Flip the chilled cranberry slab onto the sugared board and peel away the parchment lining.
- Coat the Candy Slab: Using your hands, thoroughly spread granulated sugar over the slab on both sides to fully coat.
- Mark the Cutting Guide: With the back of a knife, lightly mark squares on the sugar-coated slab as a cutting guide. You can create either 7 x 7 rows for 49 candies or 8 x 8 rows for 64 candies depending on the size you prefer.
- Cut the Candies: Using a sharp, well-oiled chef’s knife, carefully cut along the marked lines to separate the candies.
- Sugar Coat Each Piece: Roll each individual square in granulated sugar to completely coat all sticky surfaces.
- Dry the Candies: Arrange the coated candies on the prepared tray ensuring they do not touch. Allow them to dry uncovered at room temperature for 1-2 days until the sugar crystallizes and the candy is crunchy on the outside.
- Store Properly: Layer the dried cranberry jelly candies between sheets of parchment paper and store them in an airtight container at room temperature for up to 1 month.
Notes
- Use 100% cranberry juice for best flavor. Avoid cranberry juice cocktail or blends as they add unwanted sweetness.
- A digital candy thermometer is necessary to achieve the correct cooking temperature of 107°C / 225°F. Use a clamp or probe thermometer for convenience.
- The recipe uses powdered gelatin, but leaf gelatin can be substituted with proper conversion.
- Plan ahead as the candies require 1-2 days at room temperature to develop a firm, crunchy sugar coating.
- Nonstick spray helps with easy removal and cutting—the knife should be lightly oiled for clean cuts.
Nutrition
- Serving Size: 1 square (approx. 10 grams)
- Calories: 60
- Sugar: 15 grams
- Sodium: 0 mg
- Fat: 0 g
- Saturated Fat: 0 g
- Unsaturated Fat: 0 g
- Trans Fat: 0 g
- Carbohydrates: 16 g
- Fiber: 0 g
- Protein: 1 g
- Cholesterol: 0 mg


