
If you’re like me, holiday treats are one of the best parts of Christmas season—and these delicate, adorable little delights are no exception! Today, I’m excited to share my tried-and-true Christmas Tree Meringue Cookies Recipe with you. These light, crisp, and sweet meringue cookies shaped like festive Christmas trees are guaranteed to bring joy to your kitchen and wow your friends and family. Plus, they’re easier to make than you might think. Stick with me, and I’ll show you all the tips and tricks to get them just right!
Why You’ll Love This Recipe
- Easy to Make: You don’t need fancy ingredients, and the step-by-step process is straightforward, even if you’ve never made meringues before.
- Festive & Fun: Shaped like Christmas trees with sprinkles, these cookies add that perfect seasonal charm to your holiday spread.
- Light & Crisp Texture: Unlike heavy holiday sweets, these melt in your mouth and are wonderfully airy, making them a tasty treat that won’t weigh you down.
- Make Ahead Friendly: You can prepare them days in advance, which is a lifesaver when the holiday hustle is on.

Ingredients You’ll Need
What I love about this Christmas Tree Meringue Cookies Recipe is how minimal and straightforward the ingredient list is. Each component plays a special role to create that perfect meringue texture and holiday look. Plus, you might already have everything in your pantry!
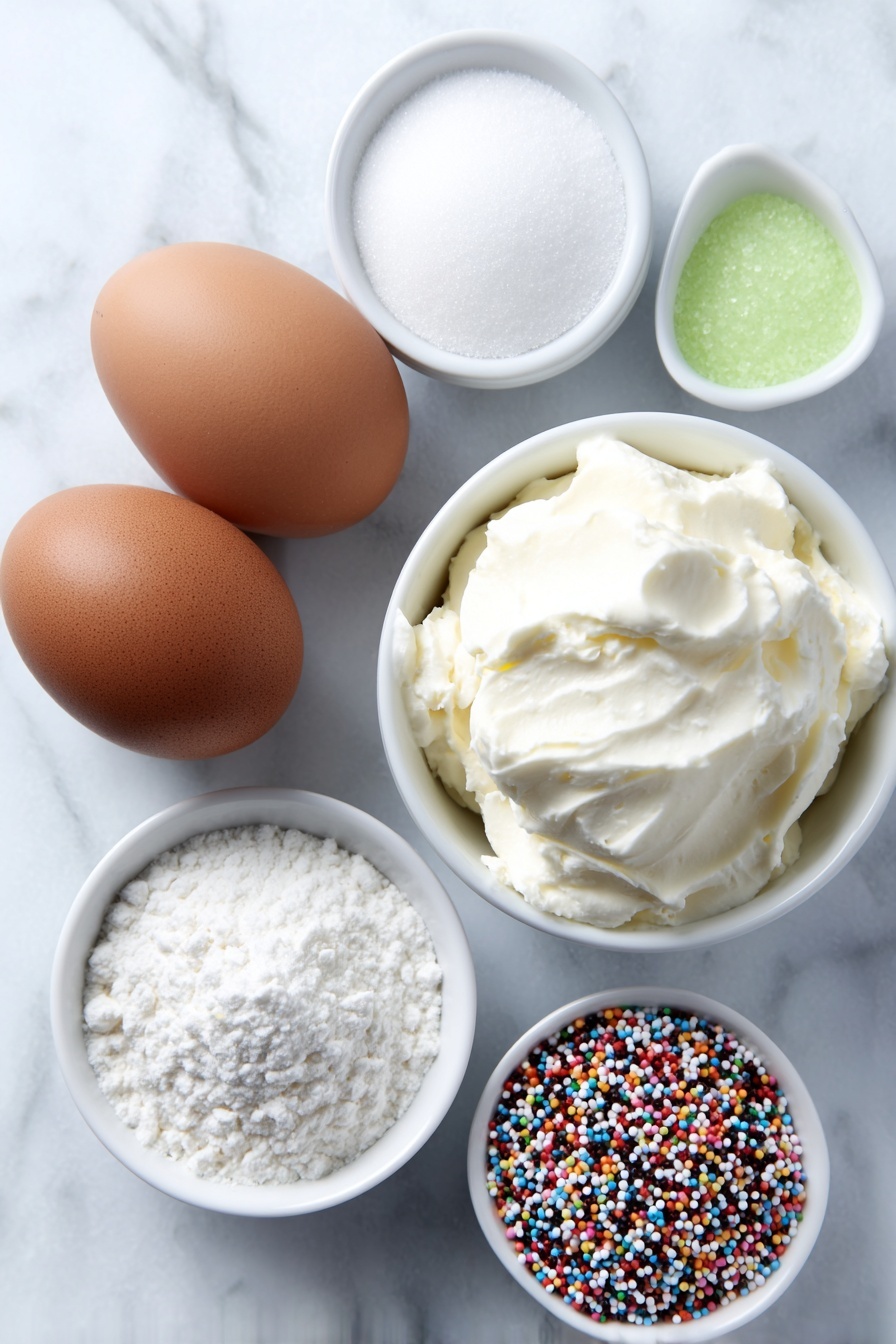
- Egg Whites: Using large egg whites at room temperature helps them whip up better and gives you that stiff peak meringue we’re aiming for.
- Cream of Tartar: This acts as a stabilizer, helping the egg whites hold their shape and volume.
- Granulated Sugar: It sweetens and also helps the meringue structure firm up during baking.
- Green Gel Food Colouring: Gel is vibrant and won’t thin out your meringue like liquid colorings might.
- Sprinkles: For that festive, sparkly finish—pick your favorites to make each cookie uniquely charming!
Variations
One of my favorite things about the Christmas Tree Meringue Cookies Recipe is how easy it is to tweak according to your taste and style. Whether you want to get creative with colors or make them suitable for special diets, there’s room to play around.
- Color Variations: I sometimes add a little shimmer dust or use different shades of green to give a more dimensional tree effect. It’s so simple but makes such a difference!
- Flavored Meringues: You could add a drop of peppermint or almond extract to the meringue before whipping for a festive twist—I did this last year and everyone loved it.
- Diet-Friendly: Since meringues are naturally gluten-free and dairy-free, they’re perfect for many dietary needs. Just double-check your sprinkles to be sure.
- Mini Trees: If you want smaller cookies, just pipe smaller dollops. Great for gift tins or party trays!
How to Make Christmas Tree Meringue Cookies Recipe
Step 1: Prep your oven and equipment
Start by preheating your oven to a very low temperature—200°F (about 93°C). This low-and-slow baking is what dries out the meringue without browning it. Line your baking sheet with parchment paper; this is crucial because meringues can stick to metal surfaces and make removal tricky.
Step 2: Whip the egg whites until frothy
Using a stand or hand mixer fitted with a whisk attachment, beat the room temperature egg whites and cream of tartar on medium speed. You want that lovely fluffy, frothy texture that looks like cappuccino foam. This step is important to build volume before adding sugar.
Step 3: Gradually add sugar and beat to stiff peaks
Sprinkle in the granulated sugar one spoonful at a time, making sure it dissolves into the mixture before adding the next. This slow addition prevents graininess and helps you achieve that stiff, glossy peak meringue. Keep beating until the mixture holds firm peaks that stand straight up when you lift the whisk.
Step 4: Add gel food coloring and combine gently
Add a few drops of green gel food colouring and gently mix it in just until the color blends evenly. The gel color works best because it won’t water down the meringue and cause it to collapse.
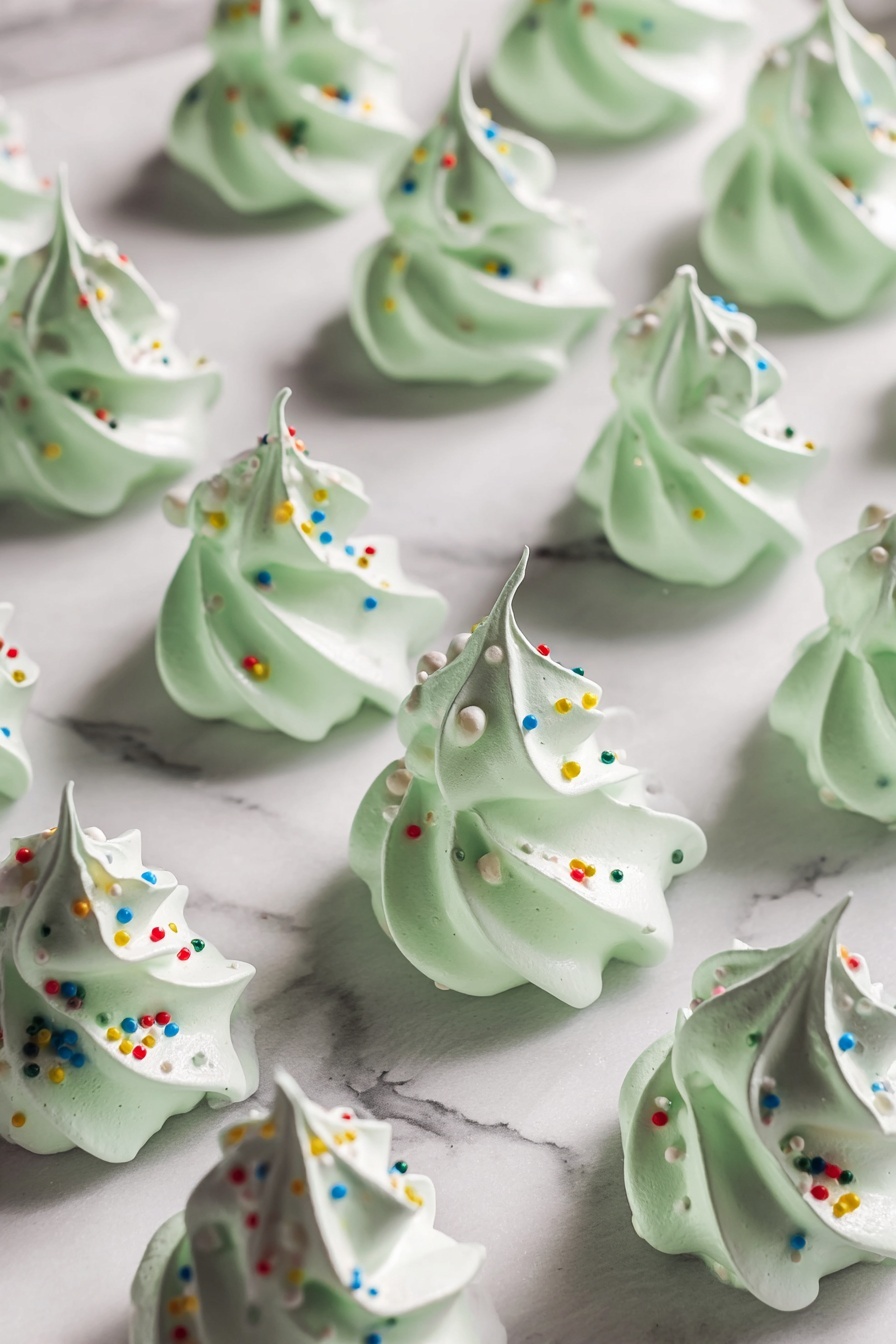
Step 5: Pipe your Christmas tree shapes
Transfer the meringue into a piping bag fitted with a large star tip. To create your Christmas trees, pipe three dollops stacked on top of one another, starting with a large base, then medium, then small on top. Here’s where the fun really starts! Don’t forget to sprinkle your festive decorations over each tree before baking.
Step 6: Bake low and slow, then cool completely
Bake the meringues in the preheated oven for 45-50 minutes. You’re looking for dry sides and meringues that lift cleanly off the parchment paper. The key here is patience—once you turn off the oven, leave the meringues inside overnight or prop the door open and cool for about an hour. This ensures they dry out fully and stay crisp.
Pro Tips for Making Christmas Tree Meringue Cookies Recipe
- Use Room Temperature Egg Whites: When eggs are cold, they don’t whip up as well—warming them slightly makes a huge difference.
- Add Sugar Slowly: I discovered this trick through trial and error; it’s key for smooth, glossy peaks and avoids gritty texture.
- Low Oven Temp is Essential: The gentle heat dries the meringues evenly without browning or cracking.
- Don’t Skip the Cooling Time: Leaving the cookies in the oven to cool ensures they crisp perfectly—rushing this step can lead to sticky centers.
How to Serve Christmas Tree Meringue Cookies Recipe
Garnishes
When it comes to garnishes, I love using tiny multicolored sprinkles to mimic Christmas ornaments. Sometimes I even add edible pearl dust on top, which gives the trees a magical shimmer that really wows guests. It’s those little finishing touches that make these cookies stand out on dessert tables.
Side Dishes
Since these meringue cookies are super light, they pair beautifully with a cup of hot cocoa or a sprinkle of powdered sugar dusted over a gingerbread latte. I’ve also served them alongside sugar cookie platters for a festive holiday dessert assortment.
Creative Ways to Present
One year, I arranged these meringue Christmas trees on a tiered cake stand, with strands of fairy lights woven around them for a cozy glow. Another time, I placed them in clear cellophane bags tied with ribbon as charming gifts. You’ll find, getting creative with presentation makes sharing these treats even more delightful.
Make Ahead and Storage
Storing Leftovers
I usually store leftover Christmas tree meringue cookies in an airtight container at room temperature. They stay crisp and fresh for up to a week, as long as there’s no humidity around. A quick note: moisture is their enemy, so keep them away from the steam of hot drinks or humid rooms.
Freezing
I’ve frozen these cookies before by placing them carefully in a single layer inside a freezer-safe container, separated by parchment paper. When thawed at room temp, they keep their delicate crunch—just avoid condensation by not wrapping them too tightly.
Reheating
Honestly, with meringues, heating isn’t really necessary—and can risk altering texture. But if they feel a bit soft, I sometimes pop them in a low oven (around 200°F) for 5-7 minutes to refresh their crispiness. Just watch them closely so they don’t brown.
FAQs
-
Can I use liquid food coloring instead of gel?
It’s best to use gel food coloring for this recipe since it adds color without thinning the meringue. Liquid food coloring contains more water, which can cause the meringue to lose volume and not hold its shape well.
-
How do I know when the meringues are done baking?
You want the meringue’s edges to be completely dry, and the cookies should peel off the parchment paper easily without sticking. If they still feel sticky, bake a little longer and then let them cool in the oven for proper drying.
-
Can I make these meringue cookies ahead of time?
Absolutely! In fact, I recommend making them a day or two ahead. Store them in an airtight container, and they’ll stay crisp and delicious through the holidays.
-
What if my meringue mixture seems too runny?
This usually means the egg whites weren’t whipped enough or sugar wasn’t added gradually. Try beating longer on medium-high speed until stiff peaks form. Make sure no yolk is in the whites, and equipment is clean and dry.
Final Thoughts
I absolutely love how this Christmas Tree Meringue Cookies Recipe turns out every single time. These light, colorful treats have become one of my favorite holiday traditions to bake and share. When I first tried making meringues, I struggled with getting the perfect texture, but once I discovered these techniques, it was smooth sailing. You’ll find that making these festive cookies is not only rewarding but also a fun way to get into the holiday spirit. Trust me—you’re going to impress your guests, and your family will go crazy for these sweet little trees. So grab your mixer and your favorite sprinkles, and give this recipe a try this season—you won’t regret it!
Print
Christmas Tree Meringue Cookies Recipe
- Prep Time: 30 minutes
- Cook Time: 50 minutes
- Total Time: 2 hours 20 minutes
- Yield: 30 meringues
- Category: Dessert
- Method: Baking
- Cuisine: Western
- Diet: Vegetarian
Description
These delightful Meringue Christmas Trees are a festive and airy treat perfect for holiday celebrations. Whipped to stiff peaks with cream of tartar and sugar, tinted green with gel food coloring, and decorated with colorful sprinkles, these meringue cookies are piped into charming tree shapes and baked low and slow until crisp. They make a beautiful, light dessert centerpiece or gift during the Christmas season.
Ingredients
Ingredients
- 2 large egg whites, room temperature
- ¼ teaspoon cream of tartar
- 100 g granulated sugar
- Green gel food colouring, a few drops
- Sprinkles, for decorating
Instructions
- Preheat Oven and Prepare Baking Sheet: Preheat your oven to 200°F (93°C). Line a baking sheet with parchment paper and set it aside for later.
- Whip Egg Whites: In a large mixing bowl, use an electric hand mixer or stand mixer with a whisk attachment to beat the egg whites and cream of tartar on medium speed until the mixture becomes frothy and resembles cappuccino foam.
- Add Sugar Gradually: Sprinkle in one spoonful of sugar at a time, mixing well after each addition. Continue this process until all the sugar is incorporated and the mixture forms stiff peaks.
- Add Colouring: Add a few drops of green gel food colouring to the meringue and mix gently until the color is evenly combined.
- Pipe the Meringue Trees: Transfer the coloured meringue into a piping bag fitted with a large star tip. Pipe three dollops on top of each other on the prepared baking sheet, starting with the largest dollop at the bottom and gradually getting smaller to form a tree shape. Decorate each meringue with sprinkles.
- Bake: Bake in the preheated oven for 45-50 minutes or until the sides are dry and the bottoms easily peel away from the parchment paper.
- Cool: After baking, turn off the oven and either leave the meringues inside overnight to cool completely or crack the oven door open and let them cool for about an hour before removing.
- Store: Once cooled, store the meringue Christmas trees in an airtight container to maintain their crisp texture.
Notes
- Ensure egg whites are at room temperature for better whipping volume.
- Adding cream of tartar stabilizes the egg whites and helps achieve stiff peaks.
- Use gel food colouring instead of liquid to avoid deflating the meringue.
- Do not open the oven door during the initial baking time to prevent meringues from cracking.
- Store meringues in an airtight container away from humidity to keep them crisp.
Nutrition
- Serving Size: 1 meringue (approx. 10g)
- Calories: 15
- Sugar: 3.5g
- Sodium: 3mg
- Fat: 0g
- Saturated Fat: 0g
- Unsaturated Fat: 0g
- Trans Fat: 0g
- Carbohydrates: 3.8g
- Fiber: 0g
- Protein: 0.3g
- Cholesterol: 0mg

