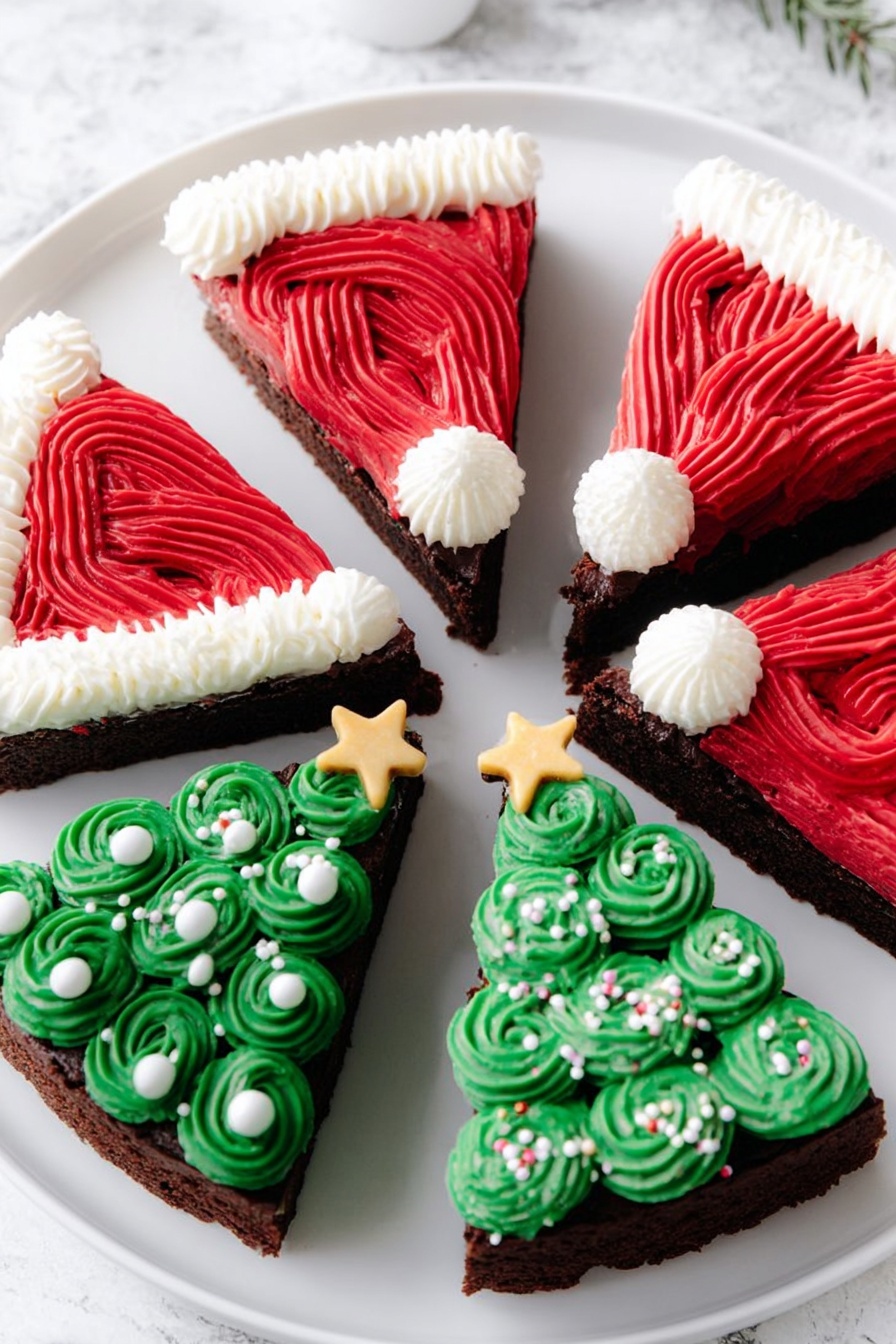
If you’re looking for a festive and fun treat to wow your guests this holiday season, you absolutely have to try my Christmas Tree & Santa Frosted Brownies Recipe. It’s the perfect blend of fudgy brownies with playful, colorful frosting decorations that bring those holiday vibes right into your kitchen. I promise you, once you see those adorable green Christmas trees and Santa hats frosted on rich chocolate brownies, you won’t want to stop at just one bite!
Why You’ll Love This Recipe
- Holiday Cheer Made Easy: This recipe transforms simple brownies into festive masterpieces with minimal effort.
- Customizable Decor: You get to play with colors and sprinkles, making each brownie uniquely charming.
- Family Favorite: My kids and friends always ask for seconds — it’s a guaranteed crowd-pleaser!
- Perfect Texture: Using a double batch gives you thick, fudgy brownies that hold up beautifully under all that frosting.

Ingredients You’ll Need
I love that this recipe combines straightforward ingredients you probably already have or can easily find — plus, the frosting colors add such a joyful touch. When shopping, look for a brownie mix you enjoy or feel free to make your own from scratch for an even richer flavor.
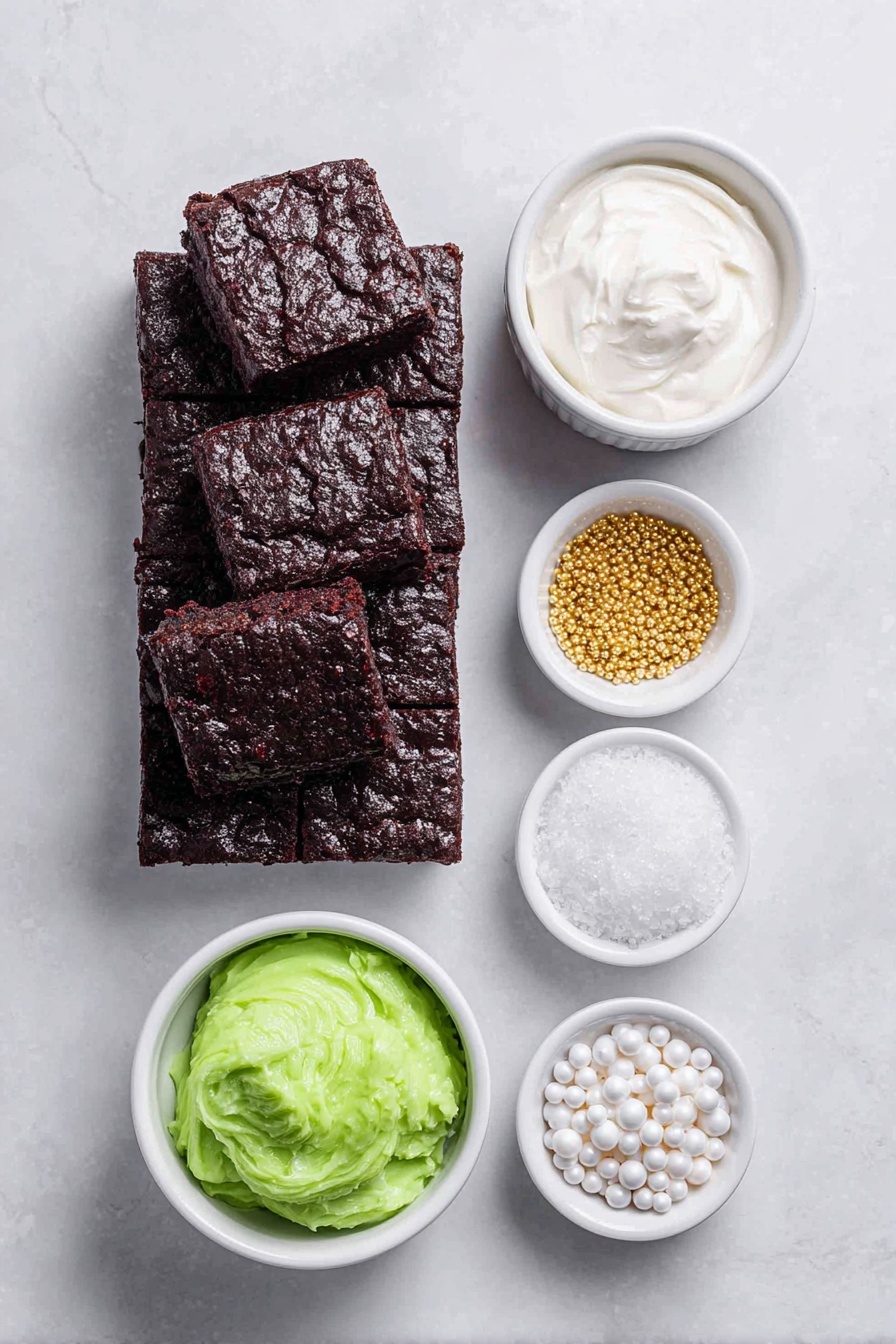
- Brownie Mix: I recommend using two boxes to get those extra thick, fudgy brownies that are so rewarding to bite into.
- White Frosting: This is your blank canvas—choose a creamy one that’s easy to pipe and holds shape well.
- Edible Gel Food Coloring: Gel colors give you vibrant reds and greens without watering down your frosting.
- Edible Gold Stars: Because what’s Christmas without a little sparkle, right?
- White Pearl Sprinkles: These add a classy, wintry feel to your tree decorations.
- Icing Bags and Frosting Tips: A large star tip (1M) works beautifully to pipe festive shapes with smooth edges.
Variations
I love experimenting with colors and sprinkles for this Christmas Tree & Santa Frosted Brownies Recipe. Feel free to switch up the frosting colors or use natural food dyes if you prefer. You can also swap out the sprinkles for mini candy canes or crushed peppermint for an extra festive crunch!
- Vegan or Gluten-Free: I’ve successfully made this recipe using a gluten-free brownie mix and dairy-free frosting—just make sure the decorations are also allergy-friendly.
- Holiday Flavor Twist: Adding a teaspoon of cinnamon or peppermint extract to your frosting can give these brownies an extra seasonal kick.
- Mini Brownies: If you want bite-sized treats, bake the brownies in mini muffin tins and keep the decorating just as fun and easy.
How to Make Christmas Tree & Santa Frosted Brownies Recipe
Step 1: Prep and Bake Your Brownies
Start by preheating your oven according to the brownie mix instructions. I always use a 9-inch springform pan because it gives those thick, cakey edges I love. Spray the pan with non-stick spray so the brownies come out easily. Mix together both brownie boxes (or a double batch if you’re going homemade), then pour the batter evenly into the pan. Since this is a thicker batter, I found it takes a little longer to bake than usual—so keep a close eye and test with a toothpick; it should come out clean or with just a few moist crumbs.
Step 2: Cool and Cut Into Perfect Triangles
Once baked, let your brownies cool completely right in the pan. When cooled, unlock and remove the springform walls carefully, then transfer the brownie slab to a cutting board. I cut mine into 8 triangles — perfect shape for Christmas trees or Santa hats! This is where the fun really begins, so make sure your brownies are cool enough to frost without melting your decorations.
Step 3: Color Your Frosting and Get Creative
In separate small bowls, mix some white frosting with red gel food coloring to create a vibrant red, and some with green gel for your trees. Don’t be shy — add a little at a time until you get the shade you love. Keep plain white frosting on standby as well. Spoon each color frosting into its own piping bag fitted with a large star tip for easy, pretty application. Now you’re ready to pipe your Christmas trees, layer Santa hats, and add all those magical sprinkles and edible gold stars. It’s easier than it looks, and I think decorating these brownies is my favorite part!
Step 4: Decorate, Serve, and Enjoy
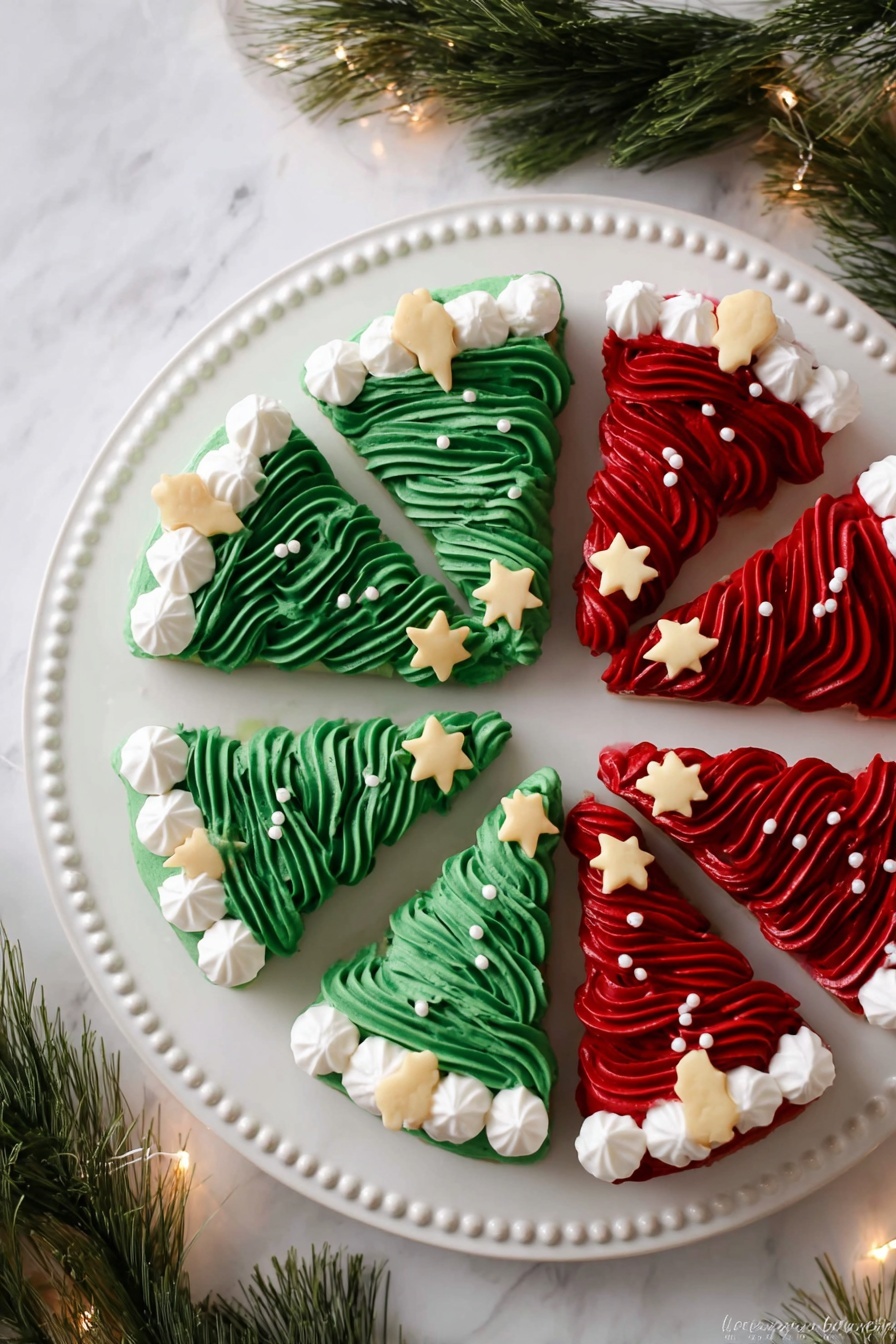
Pipe green frosting as your Christmas tree base, then add pearl sprinkles and edible stars for ornaments and the star on top. Use your red and white frosting to craft adorable Santa hats on other brownies — the classic combination looks so festive and fun. Once decorated, let the frosting set for a bit, then serve these beauties to your holiday crowd. They’ll instantly become the star of your holiday dessert table!
Pro Tips for Making Christmas Tree & Santa Frosted Brownies Recipe
- Double the Mix for Thickness: Using two boxes of brownie mix gives you a satisfyingly thick base that holds frosting well without getting soggy.
- Gel Colors for Vivid Frosting: I learned early that gel food coloring makes frosting bright without thinning it out — trust me, it’s worth it.
- Cool Completely Before Frosting: Warm brownies make frosting slide off or melt, so patience here is key to neat decorations.
- Use a Springform Pan: This trick saves your brownies from sticking and breaking when you remove them for cutting and decorating.
How to Serve Christmas Tree & Santa Frosted Brownies Recipe
Garnishes
I personally love topping my Christmas trees with white pearl sprinkles and those edible gold stars because they look like tiny snowballs and twinkling holiday lights. You can also add a dusting of powdered sugar for a light snowy effect — it’s simple but adds so much charm!
Side Dishes
These frosted brownies pair beautifully with a cup of hot cocoa or a fresh cup of coffee to balance out the sweetness. If you’re serving at a party, consider adding a bowl of whipped cream or vanilla ice cream on the side for anyone who loves that extra indulgence.
Creative Ways to Present
For a festive presentation, arrange your brownies on a holiday-themed platter lined with pine sprigs or candy canes. I once set up a “build-your-own” brownie decorating station where guests added their own sprinkles and frosting — it was a huge hit and made the party extra memorable!
Make Ahead and Storage
Storing Leftovers
I usually store leftover frosted brownies in an airtight container at room temperature for up to 3 days — just make sure they’re on a flat surface to keep the frosting looking its best. If your kitchen is warm, I prefer to refrigerate them and bring them to room temp before serving.
Freezing
Freezing frosted brownies can be tricky because the frosting might lose texture, but if you want to freeze ahead, frost after thawing. I usually freeze uncut brownies wrapped tightly in plastic wrap and foil, then decorate fresh once thawed for best results.
Reheating
Since these are best served cool or at room temperature, reheating isn’t necessary; however, if you want warm brownies, I recommend warming a clean unfrosted portion slightly before frosting or serving alongside cold frosting. Microwaving frosted brownies can melt the decorations quickly.
FAQs
-
Can I use homemade brownies instead of boxed mix for the Christmas Tree & Santa Frosted Brownies Recipe?
Absolutely! Homemade brownies work wonderfully here. Just make sure they’re thick and fudgy, and remember that baking times might vary. The key is letting them cool completely before cutting and frosting so your decorations stay neat.
-
How do I avoid frosting melting or sliding off the brownies?
The secret is to let your brownies cool completely. Warm or hot brownies carry moisture that will soften or melt the frosting. Also, using a thick, creamy frosting that holds its shape well helps keep your decorations intact.
-
Can I make this Christmas Tree & Santa Frosted Brownies Recipe without edible sprinkles or stars?
Yes! The sprinkles and gold stars add festive flair, but if you don’t have them on hand, simple frosting decorations alone still look adorable and delicious. You can even use small candies or nuts as alternate toppings.
-
What’s the best way to pipe the frosting for neat Christmas trees and Santa hats?
Using a piping bag fitted with a large star tip (like the 1M) lets you create nicely textured shapes quickly. Practice a few strokes on parchment paper if you’re new to piping—once you get the hang of pressure and movement, you’ll see how easy it is to decorate beautifully.
Final Thoughts
This Christmas Tree & Santa Frosted Brownies Recipe quickly became one of my favorite holiday traditions because it’s not just about the delicious brownies—but also the memories made decorating them. Whether you’re baking with kids or preparing for a festive gathering, these frosted brownies bring that cozy holiday spirit right into your home. Trust me, once you try them, you’ll be making these every year. So grab your piping bags, get creative, and enjoy every sweet, delightful moment!
Print
Christmas Tree & Santa Frosted Brownies Recipe
- Prep Time: 15 minutes
- Cook Time: 35-45 minutes
- Total Time: 50-60 minutes
- Yield: 8 large brownies
- Category: Dessert
- Method: Baking
- Cuisine: American
Description
Delightfully festive Frosted Christmas Brownies featuring rich, thick brownies decorated with colorful white, red, and green frostings, edible gold stars, and white pearl sprinkles. Perfect for holiday celebrations, these brownies are cut into tree and Santa hat shapes to amplify the Christmas spirit.
Ingredients
Brownie Base
- 2 Boxes of Brownie Mix, or a double batch of homemade brownies
- Spray oil for greasing pan
Frosting
- 1-3 jars White Frosting
- Edible Gel Food Coloring (red and green, or alternative no artificial dye food coloring)
- Edible Gold Stars
- White Pearl Sprinkles
- Icing Bags
- Frosting Tips (large star tip – 1M)
Instructions
- Preheat and Prepare Pan: Preheat your oven as directed on the brownie mix box. Spray a 9-inch springform pan with cooking spray to prevent sticking.
- Mix Brownies: Combine both boxes of brownie mix or prepare a double batch of homemade brownies following your recipe or package instructions. Pour the batter evenly into the prepared springform pan.
- Bake Brownies: Bake according to package instructions or until a toothpick inserted in the center comes out clean. For a double batch, baking time may be longer than usual.
- Cool and Slice: Once baked, allow brownies to cool completely. Remove from the springform pan and place on a cutting board. Cut the brownies into 8 triangular pieces.
- Prepare Frostings: In separate small bowls, tint white frosting with red food coloring in one bowl and green food coloring in another. Leave some frosting white. Adjust the amount of coloring for desired shade and amount of frosting thickness.
- Fill Icing Bags: Dispense red, green, and white frostings into individual icing bags fitted with large star tips (1M).
- Decorate Brownies: Use green frosting to create Christmas tree designs on some brownies, decorating with white pearl sprinkles and edible gold stars. For Santa hat brownies, combine green and white frosting for decoration.
- Serve: Serve decorated brownies immediately and enjoy your festive treats!
Notes
- You can opt to use only one box or batch for less thick brownies.
- Baking time will vary: a double batch may take longer than the typical package recommended time.
- Adjust the amount of frosting and food coloring based on desired coverage thickness and color intensity.
Nutrition
- Serving Size: 1 brownie (approx. 1/8 of batch)
- Calories: 350
- Sugar: 30g
- Sodium: 150mg
- Fat: 18g
- Saturated Fat: 7g
- Unsaturated Fat: 9g
- Trans Fat: 0g
- Carbohydrates: 42g
- Fiber: 2g
- Protein: 3g
- Cholesterol: 35mg
