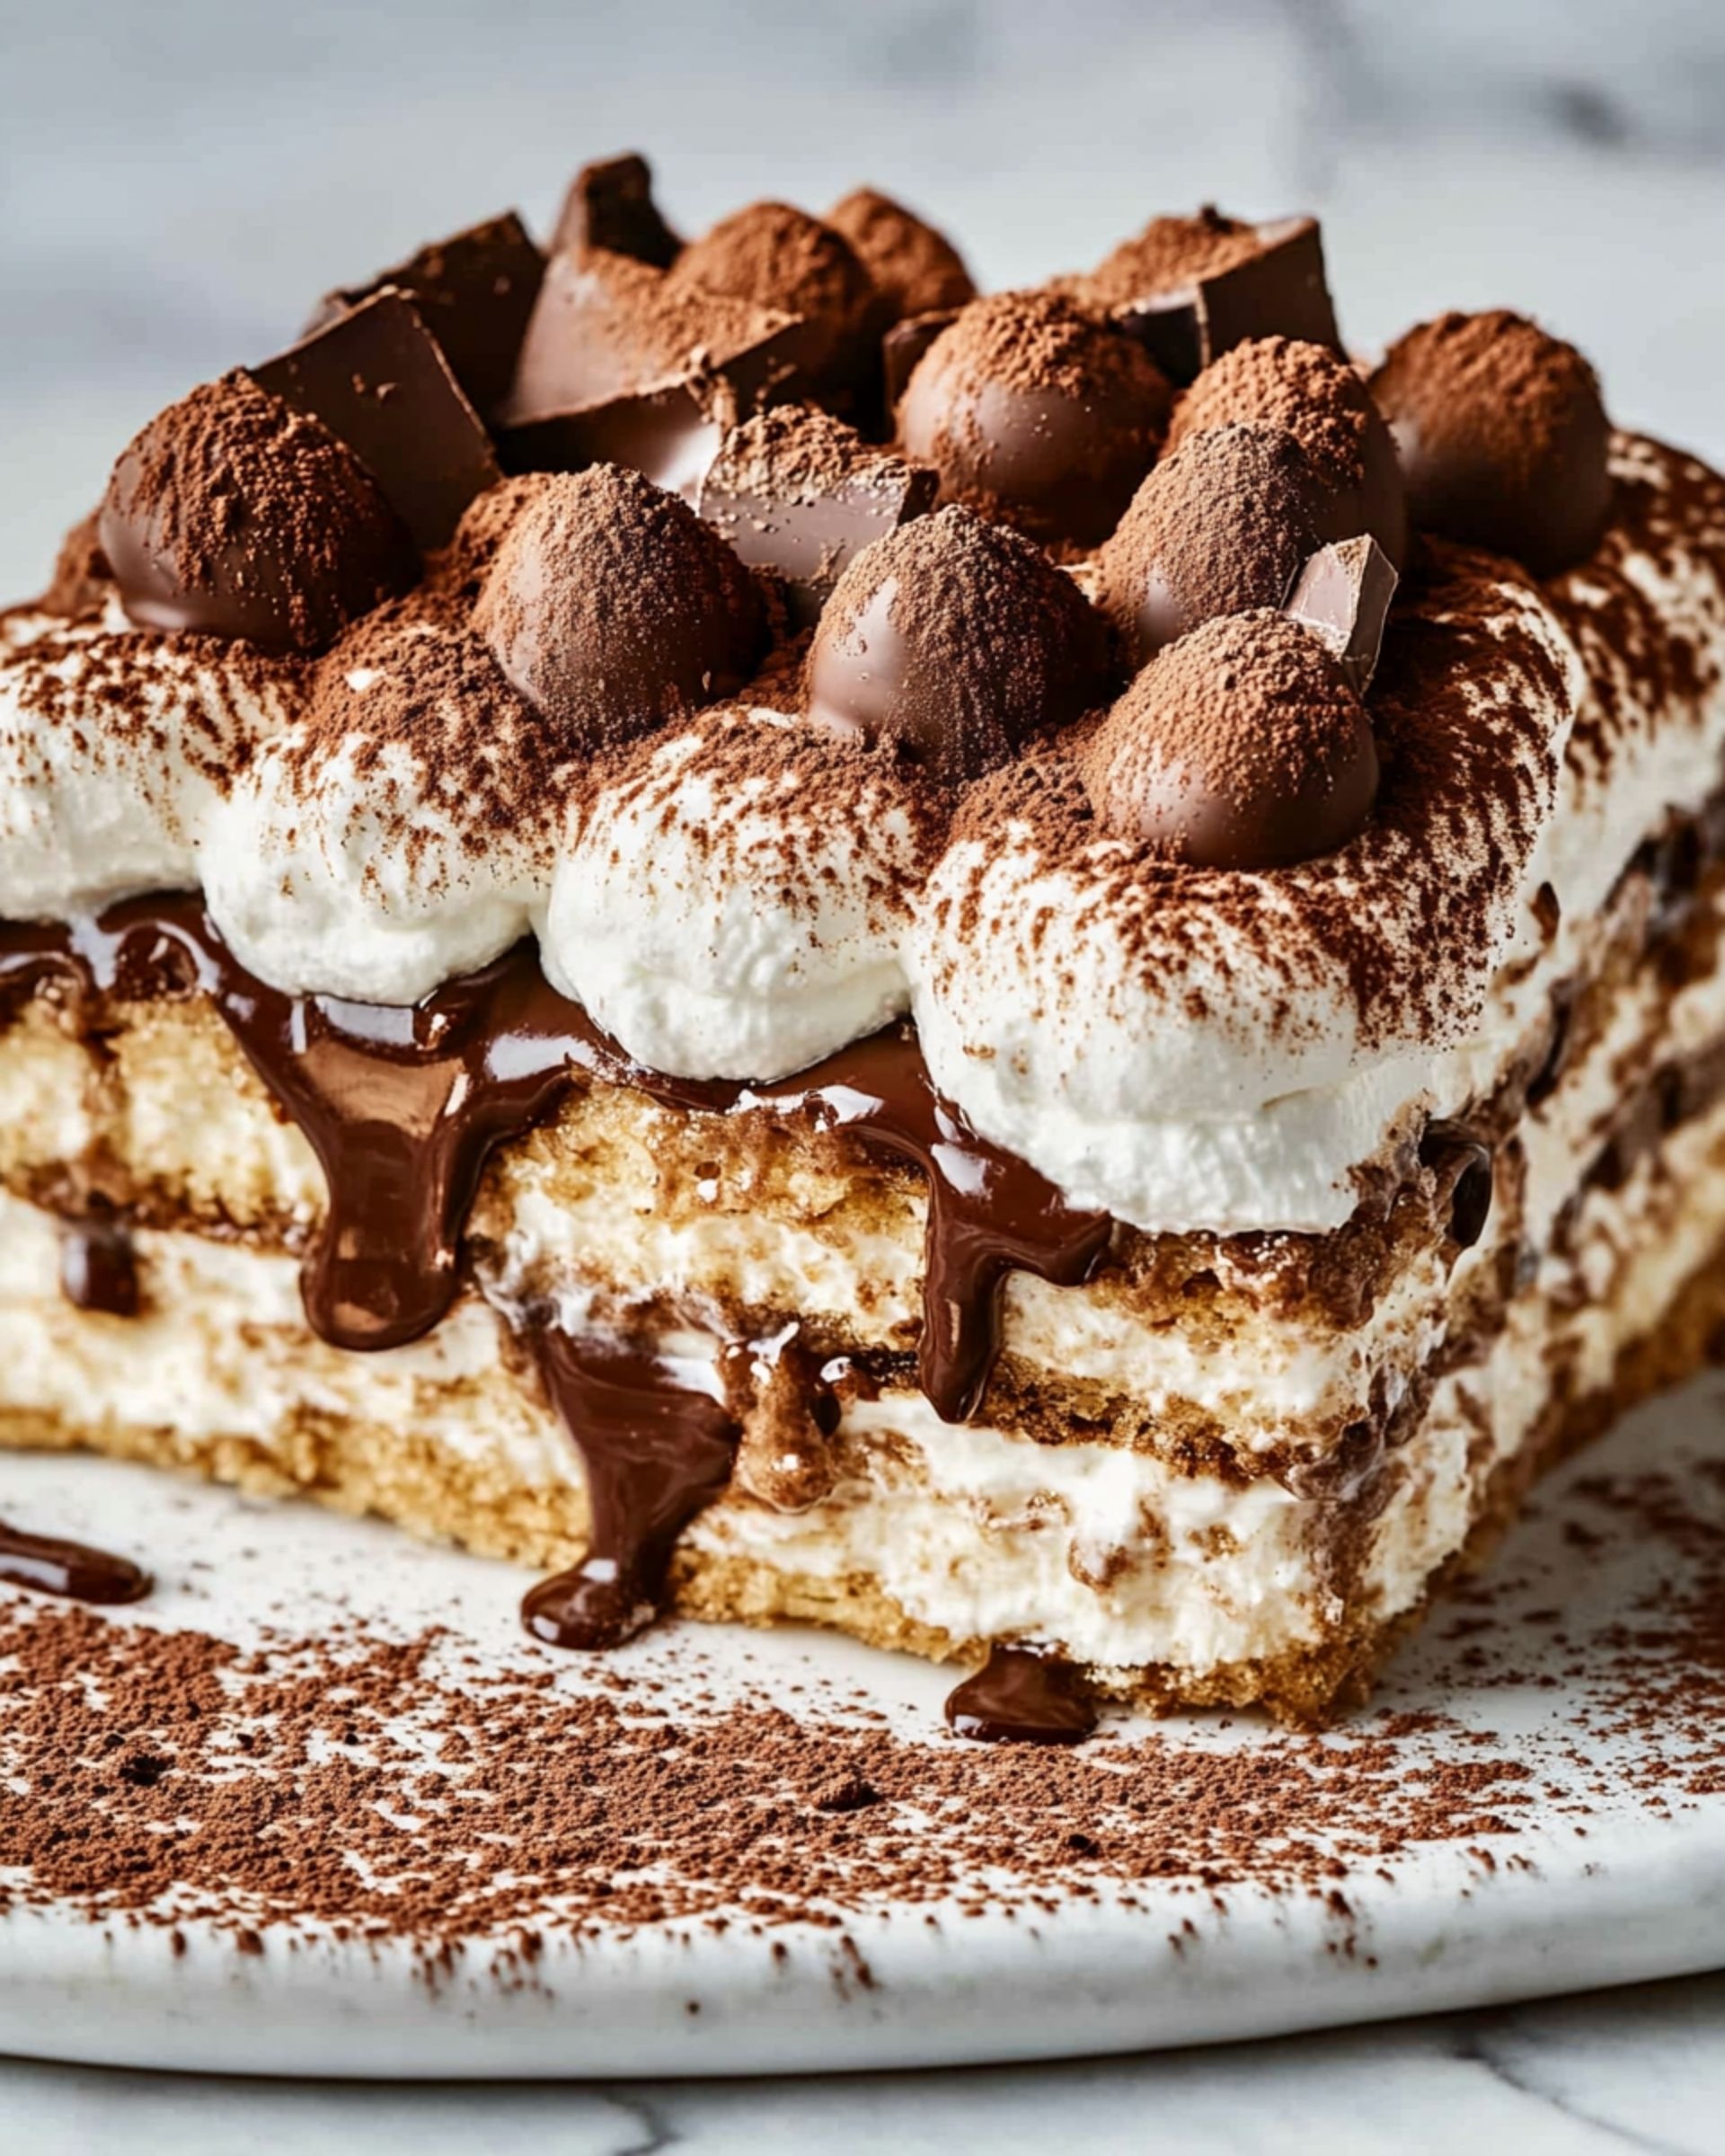
Chocolate Tiramisu is a dreamy dessert that takes the classic Italian tiramisu and turns up the indulgence with a luscious chocolate custard and creamy mascarpone layers. This recipe combines all the best things about tiramisu—airy ladyfingers soaked in vanilla-kissed hot chocolate, fluffy whipped cream, and ultra-rich chocolate custard—into one show-stopping, yet wonderfully easy treat. Whether you’re looking for a crowd-pleaser for a special occasion or a fast fix for a sweet craving on a wild weeknight, this Chocolate Tiramisu is truly a revelation.
Why You’ll Love This Recipe
- Effortlessly Elegant: It looks and tastes like something you’d find in a fancy Italian restaurant, but couldn’t be easier to pull together.
- Quick to Prepare: The actual hands-on time is surprisingly short, and most of the magic happens in the fridge while you go about your day.
- Chocolate Lover’s Dream: The layers of velvety chocolate custard, cocoa, and shavings make every bite pure bliss.
- No-Fuss for Busy Days: Minimal cooking, no baking, and completely make-ahead friendly—this dessert was made for busy lives.
- Customizable: There are countless ways to tweak the flavors or presentation, so you can truly make it your own.

Ingredients You’ll Need
Here’s what brings this Chocolate Tiramisu to life and some tips to get the best out of each component:
- Granulated Sugar: Sweetens both the custard and mascarpone layers; adjust to taste if you like your dessert less sweet.
- Cornstarch: Essential for thickening the chocolate custard so every layer stays creamy and luscious.
- Milk: Adds richness to the custard, and helps balance the chocolate.
- Heavy Cream: Whipped for billowy volume in the mascarpone layer, and enriches the custard for mouth-coating smoothness.
- Dark Chocolate or Chocolate Chips: Go for good-quality chocolate for deeper flavor—chips or chopped bars both work.
- Egg Yolks: They give the custard its silky texture.
- Butter: Stirs in at the end for extra shine and richness.
- Vanilla Extract: Adds warmth and rounds out all the flavors.
- Ladyfingers: Store-bought is perfectly fine, and makes for quick assembly. Stale ones soak up more flavor!
- Hot Chocolate: Used to soak the ladyfingers; make it strong for the fullest flavor.
- Mascarpone Cheese: This is non-negotiable for traditional tiramisu taste—its creamy tang is unbeatable.
- Chocolate Curls or Cocoa Powder: For a knockout finish, dust with cocoa or shower with chocolate shavings right before serving.
- Tip: If you want even more chocolate drama, sprinkle mini chocolate chips between layers!
Note: You’ll find the complete list of ingredients, along with their exact measurements, in the printable recipe card at the bottom of this post.
Variations
No two tiramisus are ever quite alike, and that’s half the fun. Try these ideas:
- Mocha Twist: Swap half the hot chocolate for strong coffee, or add a shot of espresso for a grown-up kick.
- Berry Layer: Slip in a layer of sliced strawberries or raspberries between the cream for a fruity finish.
- Nutty Crunch: Sprinkle toasted hazelnuts or almonds on top.
- White Chocolate Version: Use white chocolate for the custard instead of dark, or create a striking marbled effect by swirling both together.
- Gluten-Free: Opt for gluten-free ladyfingers if needed—most stores carry them now.
How to Make Chocolate Tiramisu
Step 1: Make the Chocolate Custard
Start with the custard. In a saucepan, whisk together sugar, cornstarch, milk, cream, and chocolate. Stir until it gently bubbles and thickens—watch for that glossy, pudding-like texture. Next, “temper” the egg yolks so they don’t scramble—whisk a bit of the hot chocolate mix into the yolks separately, then return it all to the pan and cook for another minute or so. Off the heat, stir in butter and vanilla for a satiny finish. Let it cool in the fridge until you’re ready to layer.
Step 2: Prepare the Ladyfingers
Mix hot chocolate and vanilla in a bowl. Dip ladyfingers quickly—just a second per finger, so they stay soft but don’t fall apart. Arrange the first layer (about 14) in your pan. If they don’t fit exactly, break them in half to cover the whole base.
Step 3: Make the Mascarpone Cream
In a mixing bowl, beat the heavy cream and half the sugar with a hand mixer until stiff peaks form. Gently fold in the mascarpone. This fluffy, tangy mix will be the (literal) glue that holds your tiramisu together.
Step 4: Assemble the Layers
Spread half the mascarpone mixture over the first layer of ladyfingers. Add another layer of dipped ladyfingers, then spoon over all your cooled chocolate custard. Create a final layer of ladyfingers—again, dip briefly. Finish with the remaining mascarpone mixture spread evenly on top.
Step 5: Chill and Finish
Pop the tiramisu in the fridge for at least two hours. This time lets the flavors become friends and the layers set to scoopable perfection. Just before serving, dust with cocoa powder or add chocolate shavings for a swoon-worthy look.
Pro Tips for Making the Recipe
- Don’t Over-Soak the Ladyfingers: Dip, don’t soak, to avoid a soggy base.
- Chill Well: The dessert needs at least two hours (overnight is even better) to let the flavors develop and the layers firm up.
- High-Quality Chocolate: For the deepest chocolate flavor, shell out for the best bar chocolate you can afford.
- Gently Fold: When combining whipped cream and mascarpone, use a light hand to keep the mixture fluffy.
- Use a Glass Dish: It looks stunning and lets you show off those beautiful layers.
How to Serve

Chocolate Tiramisu is naturally the star of any dessert table and makes a memorable finish to even the simplest dinner. Cut neat squares and lift with a spatula, or serve in individual glasses for a more modern presentation. Pair with espresso or a little glass of dessert wine if you want to feel seriously Italian. Add fresh berries on the side for a touch of color and a hint of tartness to balance all that chocolatey goodness.
Make Ahead and Storage
Storing Leftovers
Cover tightly with plastic wrap or a lid, and store in the fridge for up to four days. The flavor only gets better as it sits!
Freezing
Chocolate tiramisu freezes surprisingly well—just wrap tightly and freeze for up to one month. Thaw overnight in the fridge for best texture.
Reheating
No need to reheat—this dessert is meant to be served chilled. In fact, it’s even better if you let it rest at room temperature for 10-15 minutes before serving to take the chill off.
FAQs
-
Can I make Chocolate Tiramisu ahead of time?
Absolutely! In fact, making it ahead is ideal. The longer it sits, the better the flavors meld. Overnight in the fridge is perfect, but just a two-hour chill will do in a pinch.
-
What if I can’t find ladyfingers?
No ladyfingers? No problem. Try using pieces of sponge cake or even pound cake slices, dried out a bit, for a similar texture. Just dip lightly so they don’t get mushy.
-
Is raw egg safe in the custard?
In this recipe, the egg yolks are gently cooked in the hot custard mixture, which ensures food safety. Just follow the directions and make sure your custard comes to a gentle simmer.
-
Can I substitute cream cheese for mascarpone?
Mascarpone really gives tiramisu its signature taste, but in a pinch, you can use full-fat cream cheese for a firmer, tangier cream. Soften well and blend with a splash of cream for a smoother finish.
Final Thoughts
This Chocolate Tiramisu isn’t just a recipe—it’s a little taste of celebration that fits right into even the busiest days. Each creamy, chocolatey bite is totally worth the (minimal!) effort, and you’ll find yourself coming back to this one again and again. Don’t hesitate to put your own spin on it, share it with friends, or sneak a square straight from the fridge. Dive in, have fun, and let this dessert become your new go-to favorite!
Print
Chocolate Tiramisu Recipe
- Prep Time: 30 minutes
- Cook Time: 30 minutes
- Total Time: 1 hour
- Yield: 10 servings
- Category: Desserts
- Method: No-cook
- Cuisine: Italian
- Diet: Vegetarian
Description
This delectable Chocolate Tiramisu is a heavenly twist on the classic Italian dessert, featuring layers of chocolate-infused custard, creamy mascarpone, and coffee-soaked lady fingers. Perfect for chocolate lovers, this no-bake, make-ahead dessert is rich, decadent, and sure to impress at any gathering.
Ingredients
Chocolate Custard
- 1/4 cup granulated sugar
- 3 tablespoons cornstarch
- 1/2 cup milk
- 1/2 cup heavy cream
- 2 ounces dark chocolate, chopped (or 1/4 cup chocolate chips)
- 2 egg yolks
- 1 tablespoon butter
- 1/2 teaspoon vanilla extract
Chocolate Tiramisu Assembly
- 42 lady fingers
- 2 cups hot chocolate, cooled
- 2 teaspoons vanilla extract
- 1 cup heavy cream
- 16 ounces mascarpone cheese
- 2 tablespoons granulated sugar, divided
- 1/2 cup chocolate curls (for garnish)
- Cocoa powder or additional chocolate shavings (for dusting, optional)
Instructions
- Prepare the Chocolate Custard: In a small saucepan over medium heat, whisk together the granulated sugar, cornstarch, milk, heavy cream, and chocolate. Stir constantly until the mixture starts to bubble and thickens. Place the egg yolks in a separate mixing bowl. Pour a small amount of the hot chocolate mixture into the yolks, whisk rapidly to temper, then pour the egg mixture back into the saucepan. Cook, whisking constantly, for another 90 seconds. Remove from heat and stir in the butter and vanilla until melted and smooth. Transfer to a glass bowl and refrigerate until completely cool.
- Prepare the Lady Fingers: Combine the hot chocolate and vanilla extract in a shallow bowl. One at a time, dip the lady fingers into the hot chocolate mixture just long enough to absorb some liquid but not become soggy. Arrange 14 dipped lady fingers in the bottom of a 9×9-inch pan or on a serving platter to form the first layer. Break the lady fingers as needed to fit.
- Make the Mascarpone Cream: In a medium bowl, use a hand mixer to beat the heavy cream and 1 tablespoon granulated sugar until stiff peaks form. Gently fold in the mascarpone cheese until just combined and smooth.
- Layer the Tiramisu: Spread half of the mascarpone cream evenly over the first layer of lady fingers. Add a second layer by dipping 14 more lady fingers in the hot chocolate and placing them over the mascarpone. Spread the cooled chocolate custard over this layer. Add a final layer with the remaining 14 dipped lady fingers.
- Finish and Chill: Top with the remaining mascarpone cream. Refrigerate the tiramisu for at least 2 hours, or until fully set and chilled.
- Garnish and Serve: Before serving, dust the top with cocoa powder or garnish with chocolate curls using a vegetable peeler to shave chocolate on top. Slice and enjoy cold.
Notes
- For the best flavor and texture, allow tiramisu to chill overnight before serving.
- Don’t oversoak the lady fingers to prevent a soggy dessert.
- Use high-quality chocolate for a richer custard.
- If desired, substitute coffee or espresso for the hot chocolate for a less sweet, more traditional flavor.
- Tiramisu can be made up to 2 days in advance.
Nutrition
- Serving Size: 1/10 of recipe
- Calories: 440
- Sugar: 17g
- Sodium: 125mg
- Fat: 30g
- Saturated Fat: 17g
- Unsaturated Fat: 11g
- Trans Fat: 0g
- Carbohydrates: 38g
- Fiber: 2g
- Protein: 7g
- Cholesterol: 145mg


