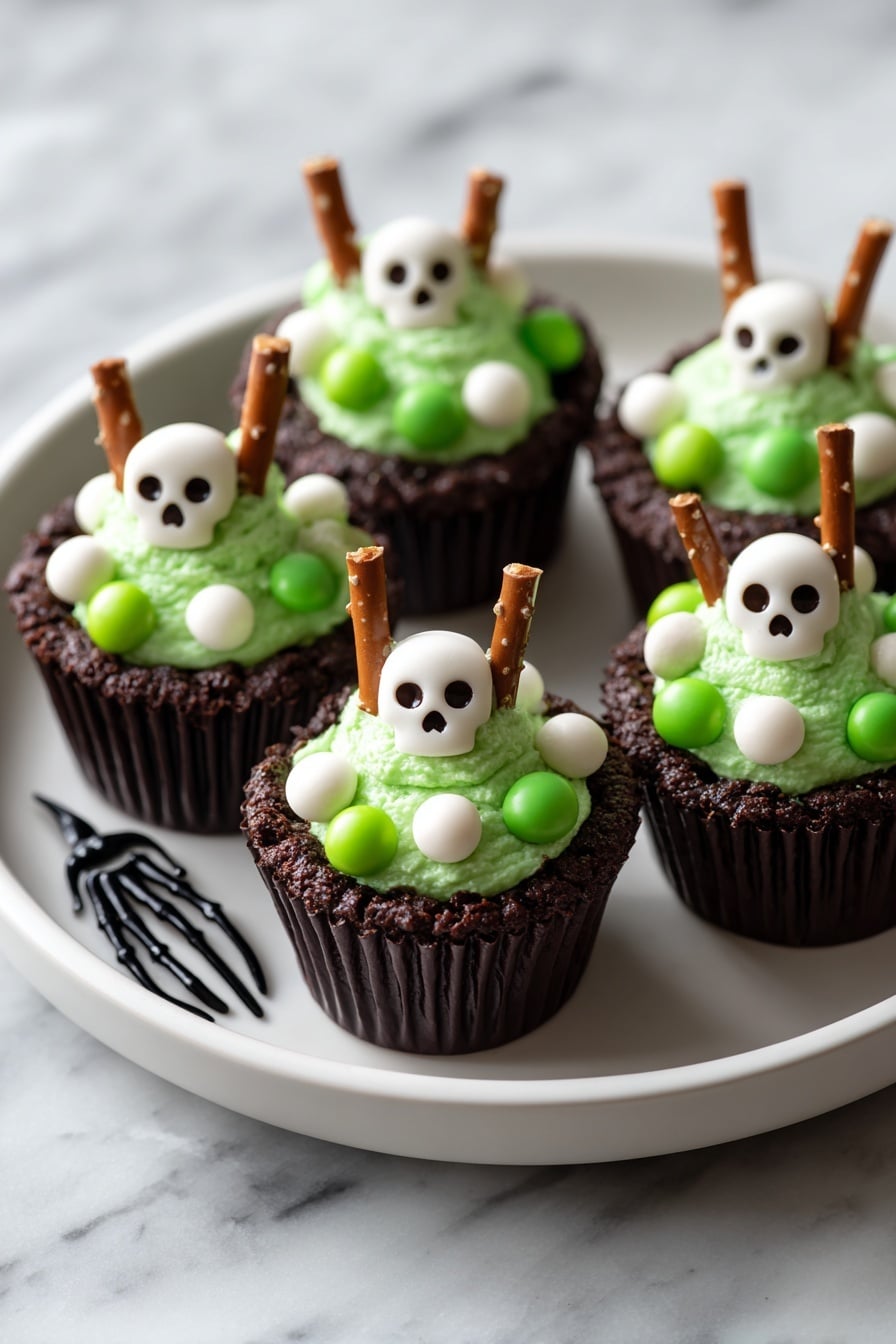
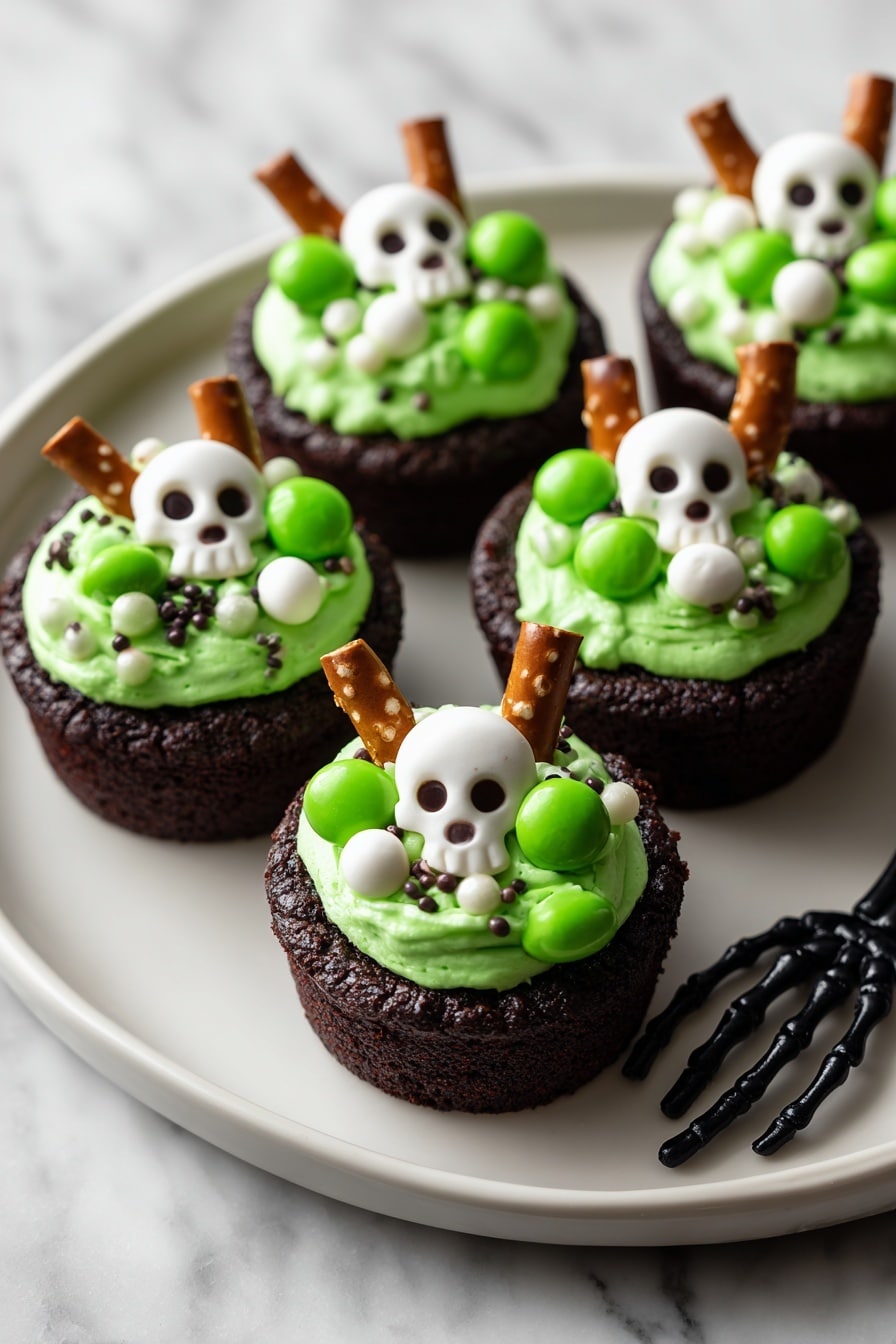
If you’re looking for a fun and festive treat to wow your guests (or just indulge yourself), you’re going to love this Cauldron Cookie Cups Recipe. I absolutely love how these spooky little delights come together — they’re like mini edible witch cauldrons filled with vibrant green frosting that looks like a bubbling potion. When I first tried this recipe, it was a huge hit at my Halloween party, and I’m excited to share all the tips that make it super easy to nail every time.
Why You’ll Love This Recipe
- Easy to Make: You’ll find the simple steps straightforward, even if you’re new to baking cookie “cups.”
- Perfect for Holidays: These cute cauldrons add just the right spooky vibe for Halloween or any witchy-themed gathering.
- Customizable Decorating: You get to play around with eyeballs, sprinkles, and pretzel “stir sticks” which makes it a fun project.
- Soft Yet Crisp Cookie Base: The Devil’s Food cake mix creates cookie cups that are soft around the edges but maintain their shape beautifully.

Ingredients You’ll Need
This recipe blends the rich chocolate flavor of Devil’s Food cake mix with homemade green buttercream frosting — a pairing that always delivers flavor and texture magic. I recommend choosing a good-quality cake mix and fresh butter for that decadent frosting.
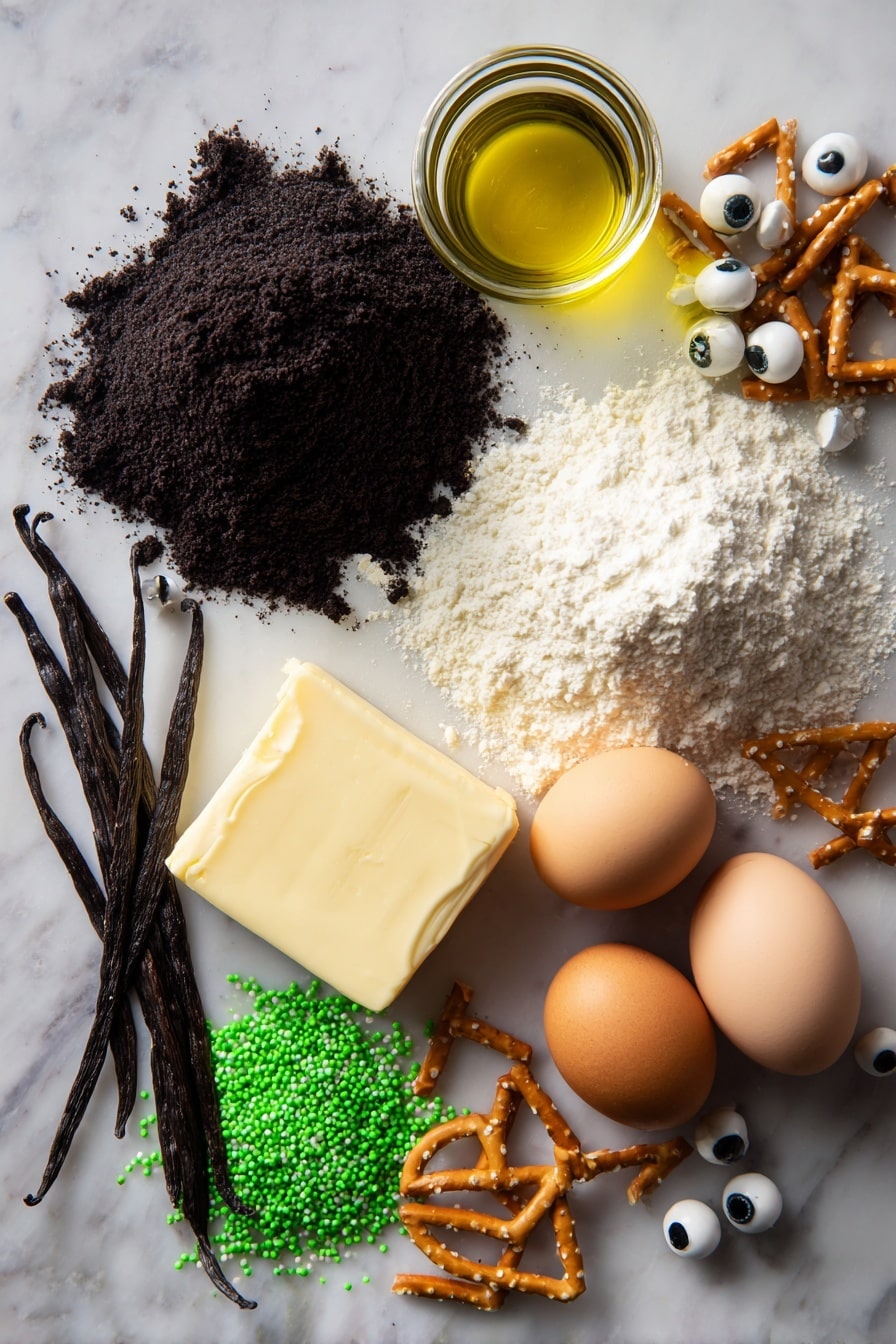
- Devil’s Food cake mix: This gives the cookie cups their chocolatey depth and keeps them moist yet firm.
- Eggs: Binders that help the cookies hold their shape.
- Canola or vegetable oil: Keeps the cookie tender and adds moisture without overwhelming the flavor.
- Black food coloring (optional): Adds a deeper, more mystical color to the cookie base — totally optional but fun for effect.
- Unsalted butter: For the frosting; makes it creamy and rich without extra saltiness.
- Powdered sugar: Essential for sweetening and thickening the buttercream.
- Vanilla extract: Adds warmth and depth to the frosting flavor.
- Salt: Balances sweetness in the frosting.
- Milk: Adjusts the buttercream consistency so it’s pipeable and smooth.
- Green food coloring: Turns your frosting into a spooky “potion” color — you can tint it as light or as bright as you like.
- Round green sprinkles, Halloween sprinkles, candy eyeballs: Decorations that bring spooky charm and fun texture.
- Pretzel sticks: Little “stir sticks” that add a playful touch and a salty crunch contrast.
Variations
I love experimenting with this Cauldron Cookie Cups Recipe — it’s super versatile. You can switch up the frosting colors or decorations to match different themes or holidays, and it’s really fun to get creative with the details!
- Frosting colors: I’ve tried purple, orange, and neon blue icing for other holidays — each one transforms the mood dramatically and keeps things interesting.
- Gluten-free base: You can use a gluten-free cake mix, just make sure it behaves like regular cake mix for best results.
- Vegan option: Substitute eggs with chia eggs and use vegan butter to make these friendly for plant-based diets; it may slightly affect texture but still delicious.
- Decorations: My family goes crazy for crushed candy canes or edible glitter for a sparkly twist!
How to Make Cauldron Cookie Cups Recipe
Step 1: Mix Your Cookie Cup Dough
Start by preheating your oven to 350°F and greasing three 12-count mini muffin pans—you want to avoid any cookie sticking mishaps. In a large bowl, whisk together the Devil’s Food cake mix, eggs, oil, and black food coloring if you’re using it. The dough will be slightly sticky but manageable. I discovered that adding the black food coloring makes the cookies look extra spooky and fun, but it’s totally optional if you want a classic chocolate look!
Step 2: Shape and Bake the Cookie Cups
Scoop about 1/2 tablespoon of dough into each mini muffin cup and flatten it gently with your fingers. I like to lightly grease my fingertips to prevent sticking here. Bake for 8-10 minutes until you see the edges firming up but the centers are still soft. As soon as you take the pans out of the oven, press the back of a tablespoon measuring spoon into each warm cookie to create the “cauldron” shape. This is a key step — I learned that doing this right away while the cookie is warm helps keep that perfect dip without cracking!
Step 3: Make Your Bubbling Potion Frosting
While the cookie cups cool completely, whip up your buttercream. Beat softened butter until creamy, then gradually add powdered sugar, vanilla extract, and salt. Add milk one tablespoon at a time until your frosting is smooth and pipeable. Then mix in green food coloring until you get the perfect shade of spooky green potion. You’ll find that stirring in the coloring slowly will help avoid an overly dark or uneven color.
Step 4: Fill and Decorate Your Cauldron Cookie Cups
Load your frosting into a piping bag (or a plastic bag with a tiny cut at the tip) and fill each cooled cookie cup generously. Your frosting should look like a bubbling witch’s brew ready to spill over! Finish by sprinkling round green sprinkles, candy eyeballs, and Halloween sprinkles on top. Break pretzel sticks in half and pop one in each cup to serve as a fun “stir stick.” My kids especially love this step — it makes the cookies interactive and silly.
Pro Tips for Making Cauldron Cookie Cups Recipe
- Timing is Everything: Press the cauldron indent immediately after baking while cookies are warm to avoid cracking.
- Use Mini Muffin Pans: I’ve tried regular muffin pans before, but the mini size gives the perfect bite-sized cauldron shape.
- Frosting Consistency: Don’t rush adding milk to buttercream, add slowly to keep the perfect texture for piping bubbling effects.
- Decoration Storage: Add candy eyes and sprinkles right before serving to keep them looking fresh and vibrant.
How to Serve Cauldron Cookie Cups Recipe
Garnishes
I usually stick with classic candy eyeballs and assorted green sprinkles because they look eerily perfect for Halloween. Sometimes I add edible glitter or shimmer dust to give the frosting a magical shimmer that glows under black light. If I want a less sweet option, a few finely chopped nuts scatter nicely on top without overpowering the look.
Side Dishes
These cookie cups pair beautifully with a simple glass of cold milk, hot cocoa, or even a bright green punch for parties. For adult gatherings, I like to set them alongside cocktails with themed names – a fun way to tie the whole party together.
Creative Ways to Present
I’ve served these on a dark tray lined with faux spider webs and dry ice mist for that mystical cauldron effect. Another time, I created a dessert table with different themed cookie cups — Poison Apple, Wicked Pumpkin, and these beloved Cauldron Cookie Cups — which was a total crowd-pleaser. Presentation really elevates the fun!
Make Ahead and Storage
Storing Leftovers
Storing these cookie cups at room temperature in an airtight container works well for 3 to 4 days, and they keep their texture beautifully. If you want to keep them longer, refrigeration extends freshness up to a week but keep them in a sealed container to avoid frosting drying out.
Freezing
I love that you can freeze the undecorated cookie cups for up to three months. It’s a huge time-saver if you want to prep in advance—just thaw fully before adding frosting and decorations to keep everything fresh and vibrant.
Reheating
While I usually serve these at room temperature, if you want to warm them slightly, pop the cookie cups (without frosting) in the microwave for 10-15 seconds to get that just-baked feel. Adding frosting after warming is best to avoid melting your decorations.
FAQs
-
Can I use a different cake mix for the Cauldron Cookie Cups Recipe?
Absolutely! While I recommend Devil’s Food for that rich chocolate flavor, you can experiment with other flavors like red velvet or chocolate fudge for a unique twist. Just keep in mind that texture might vary slightly, but it’s a fun way to customize your cauldrons.
-
What if I don’t have mini muffin pans?
If mini muffin pans aren’t handy, you can use small silicone molds or even make larger cups in regular muffin pans, but the baking time will need adjustment and you won’t get those perfect bite-size cauldrons. Mini pans really do the job best here!
-
How do I keep the frosting from melting or running?
Use softened but not melted butter for your frosting, and don’t pipe the frosting onto warm cookie cups. Make sure the cookie cups are completely cooled before filling and decorating. Also, keeping the finished cookies at room temperature or cool (not hot) environments helps maintain the look.
-
Can I make the frosting dairy-free?
Yes! You can substitute the butter with dairy-free margarine or solid coconut oil (chilled) and use a non-dairy milk alternative. The texture will differ slightly, but the overall taste and piping consistency can be very similar.
Final Thoughts
This Cauldron Cookie Cups Recipe holds a special place in my kitchen because it’s one of those recipes that brings joy, creativity, and a little magic to any occasion. Whether you’re baking for a party or just for fun, these treats will impress your guests and make your day sweeter. I can’t recommend enough giving this recipe a try—you’ll enjoy the whole process as much as you enjoy eating the results. Happy baking, and may your cauldrons bubble with delight!
Print
Cauldron Cookie Cups Recipe
- Prep Time: 20 minutes
- Cook Time: 8-10 minutes
- Total Time: 28-30 minutes
- Yield: 36 mini cookie cups
- Category: Dessert
- Method: Baking
- Cuisine: American
Description
Delightfully spooky and fun, Cauldron Cookie Cups are perfect Halloween treats. These mini cookie cups are made from a rich Devil’s Food cake mix, baked to a soft, chewy texture, then filled with vibrant green buttercream frosting to mimic bubbling potions. Decorated with candy eyeballs, sprinkles, and pretzel stick stirrers, these festive treats are easy to make and sure to impress at any party.
Ingredients
Cookies
- 1 (15.25 ounce) box Devil’s Food cake mix
- 2 large eggs
- 1/2 cup canola or vegetable oil
- Black food coloring (optional)
Frosting
- 1 cup unsalted butter, softened
- 3 cups powdered sugar
- 1 teaspoon vanilla extract
- 1/2 teaspoon salt
- 1-3 tablespoons milk
- Green food coloring
Decorations
- Round green sprinkles
- Halloween sprinkles
- Candy eyeballs
- Pretzel sticks
Instructions
- Preheat and Prepare: Preheat your oven to 350°F (175°C) and lightly grease three 12-count mini muffin pans to prevent sticking.
- Make Cookie Dough: In a large bowl, mix together the Devil’s Food cake mix, 2 large eggs, 1/2 cup canola or vegetable oil, and black food coloring if desired. Stir until the dough is well combined.
- Form and Bake Cookie Cups: Scoop about 1/2 tablespoon of dough into each mini muffin cup and flatten it slightly with your fingers. Bake for 8-10 minutes, or until the edges appear set.
- Create Indentations: Remove the cookie cups from the oven and while still warm, press an indentation into the center of each cookie cup using the back of a 1 tablespoon measuring spoon. Allow the cookie cups to cool completely in the pans.
- Make Buttercream Frosting: In a medium bowl, beat 1 cup of softened unsalted butter until creamy. Gradually add 3 cups powdered sugar, 1 teaspoon vanilla extract, and 1/2 teaspoon salt, beating until smooth. Add 1 to 3 tablespoons of milk a little at a time until the frosting reaches a smooth and pipeable consistency. Stir in green food coloring until you achieve the desired shade.
- Fill Cookie Cups: Pipe the green buttercream into the cooled cookie cups, filling each one generously to resemble bubbling potions.
- Decorate: Garnish each cookie cup with round green sprinkles, Halloween-themed sprinkles, candy eyeballs, and insert a pretzel stick (broken in half) into each cup as a stirring stick.
- Serve and Enjoy: Your spooky Cauldron Cookie Cups are now ready to delight guests! Serve fresh and enjoy the festive flavors.
Notes
- Store cookie cups in an airtight container at room temperature for 3-4 days or refrigerate for up to one week.
- Undecorated cookie cups can be frozen for up to three months; thaw before frosting and decorating.
Nutrition
- Serving Size: 1 mini cookie cup
- Calories: 150
- Sugar: 14g
- Sodium: 90mg
- Fat: 8g
- Saturated Fat: 4.5g
- Unsaturated Fat: 3g
- Trans Fat: 0g
- Carbohydrates: 18g
- Fiber: 1g
- Protein: 1g
- Cholesterol: 20mg

