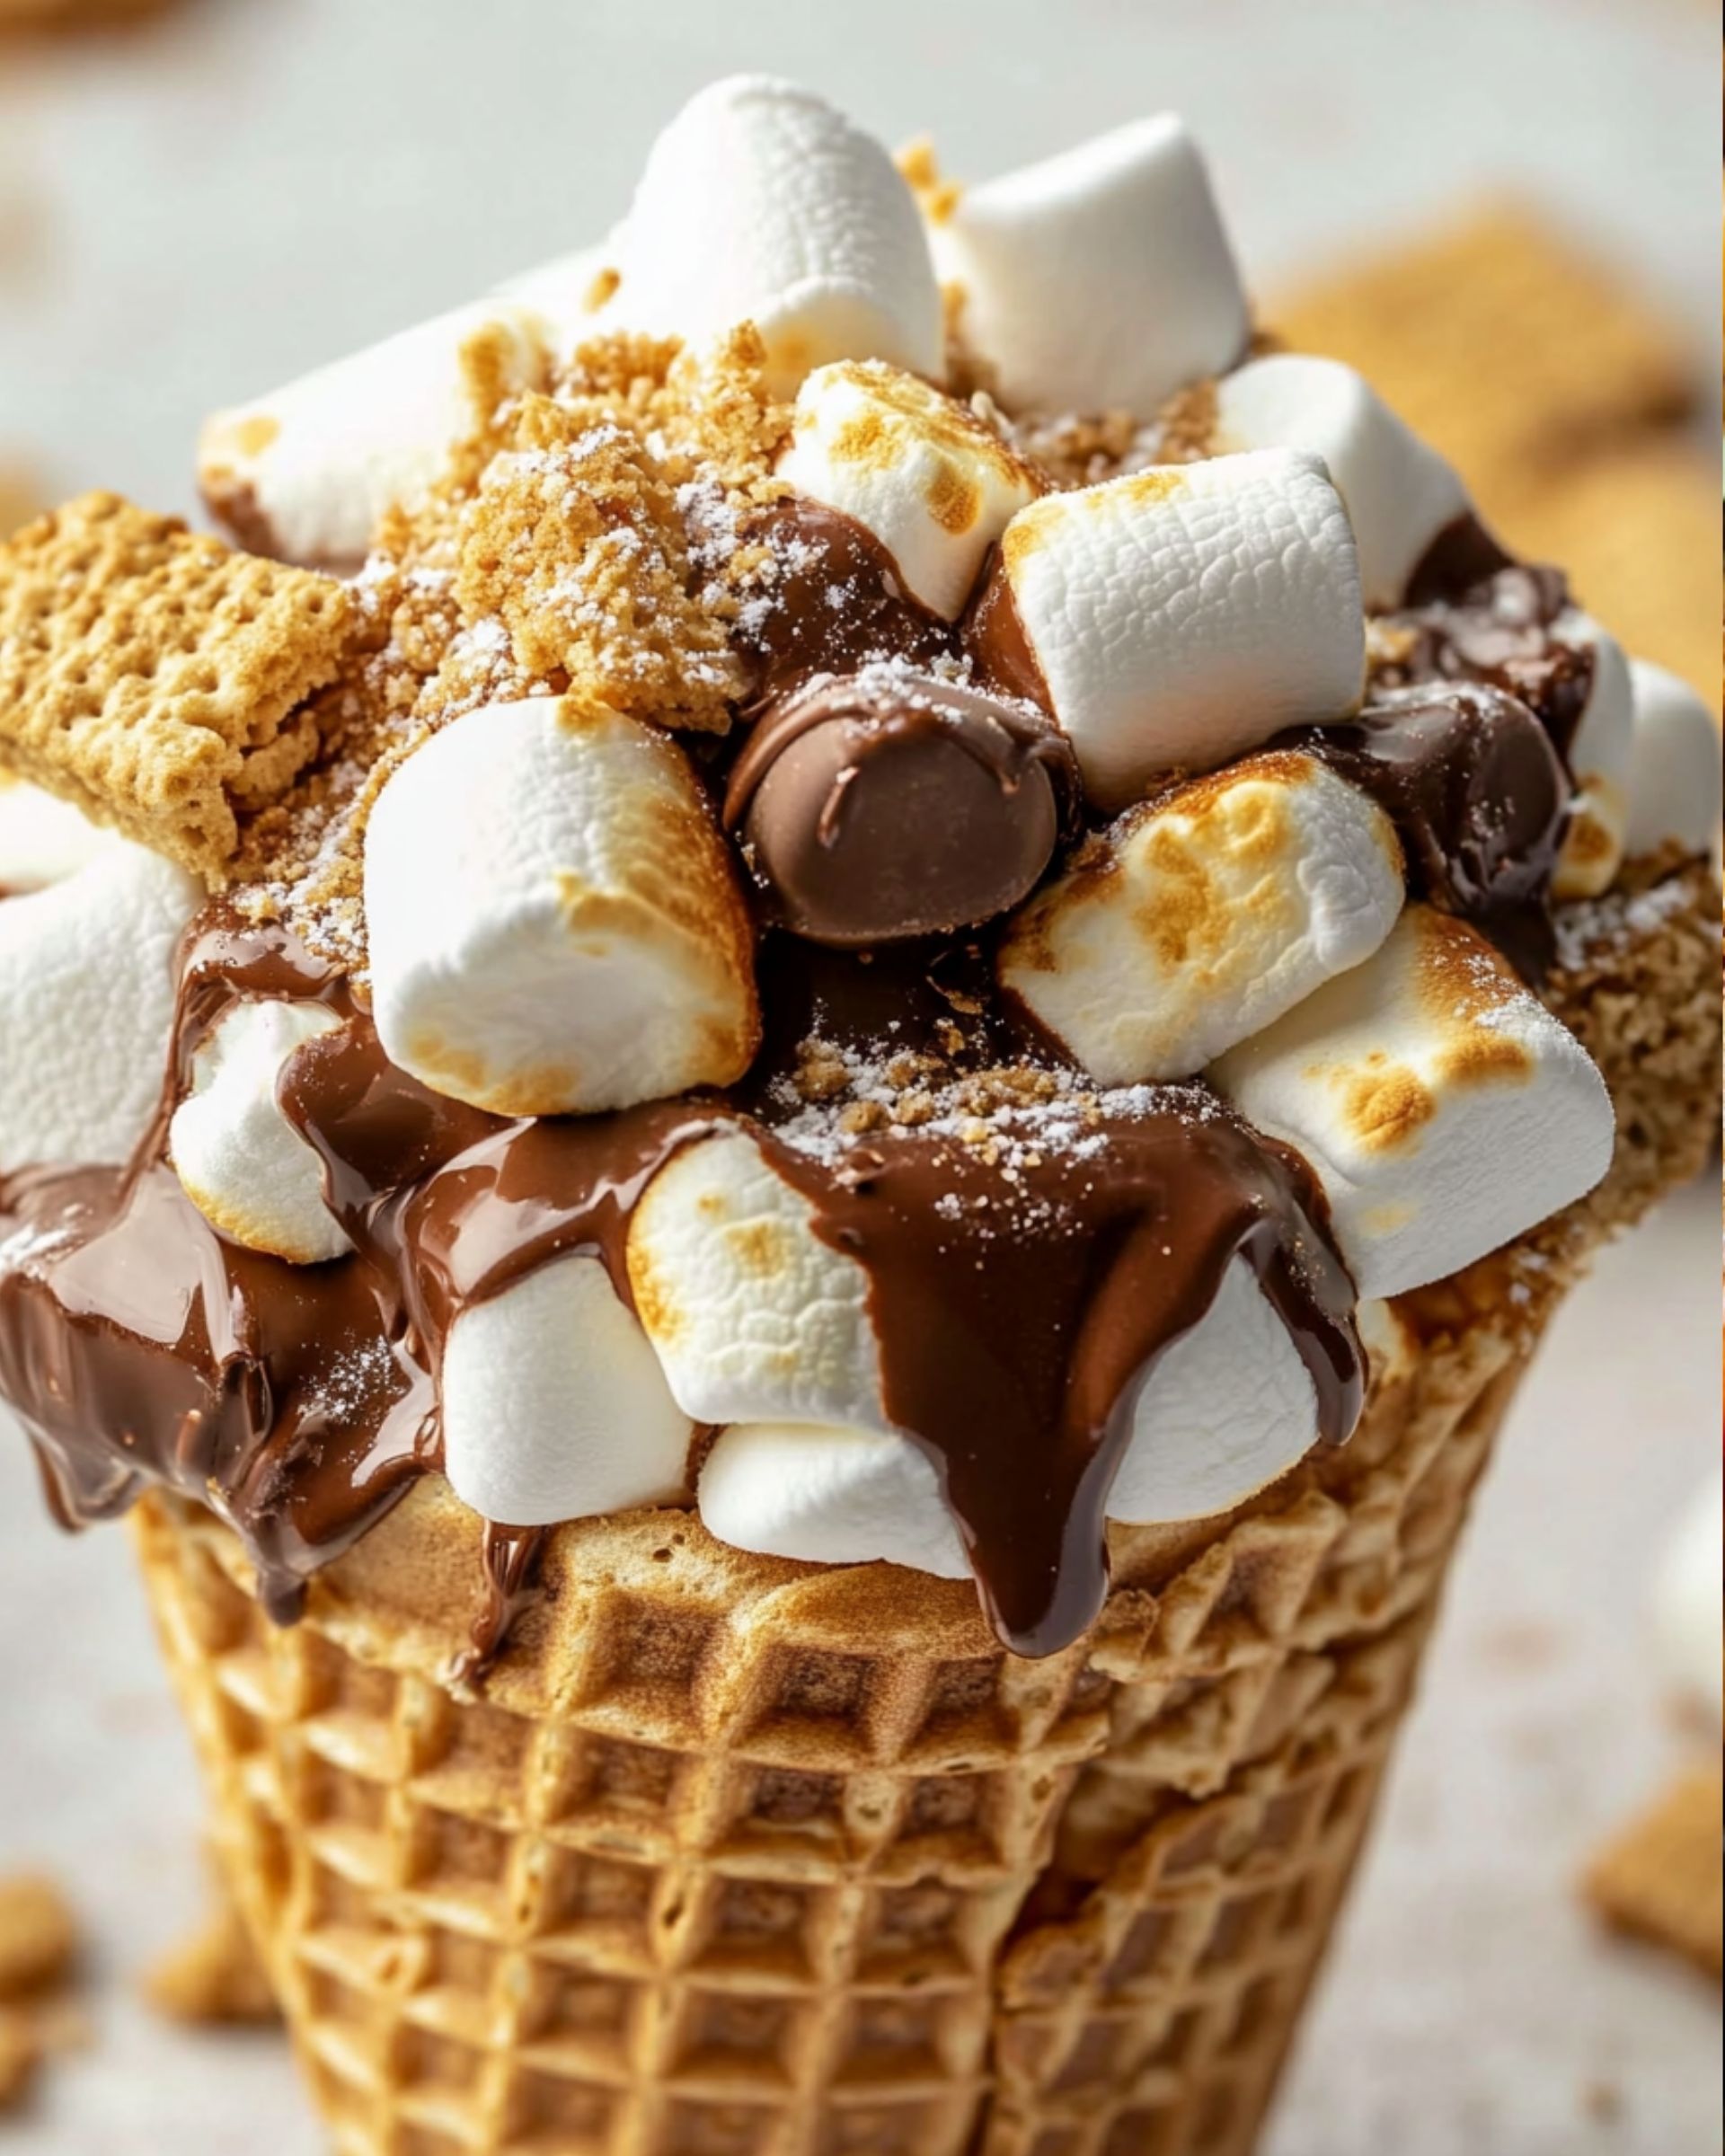
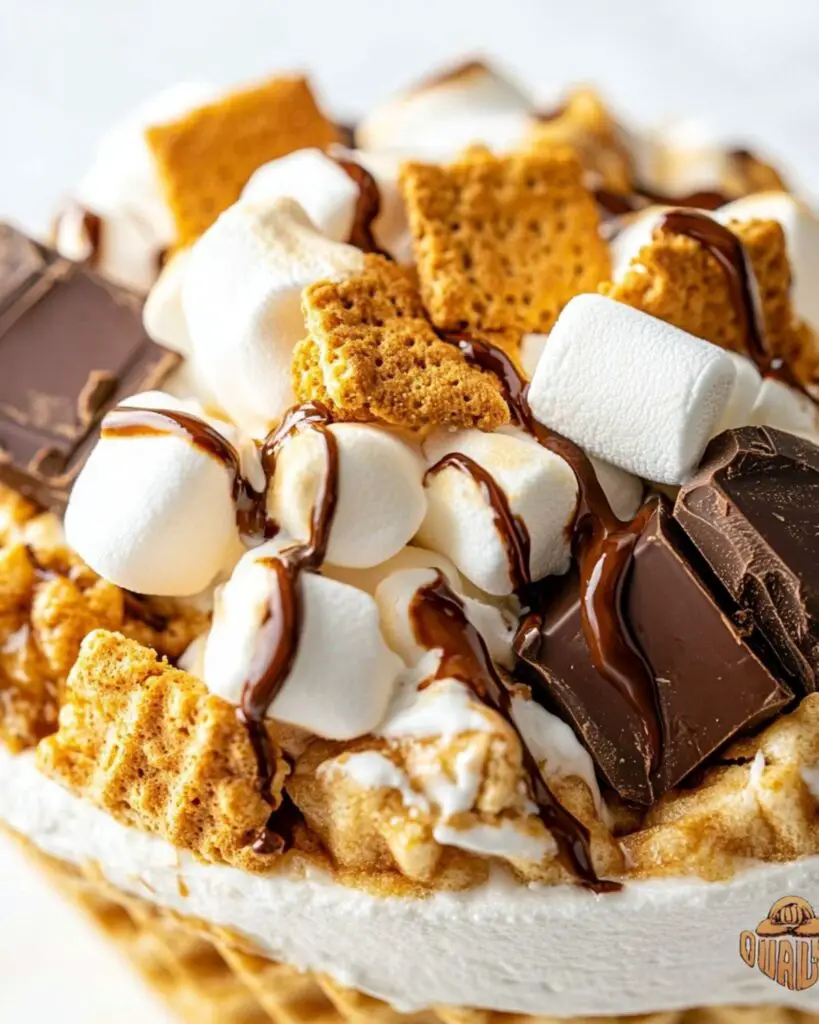
Want the classic taste of s’mores without the fuss of balancing gooey treats over a sticky campfire? Enter Campfire S’mores Cones—your new weeknight dessert hero! Imagine everything you love about s’mores: melty chocolate, perfectly toasted marshmallows, and crunchy graham crackers—all stuffed inside a crispy waffle cone. These cones are easy to prep, bake in minutes, and are completely mess-free. They’re the ideal sweet treat for family nights, quick backyard barbecues, or anytime that s’mores craving strikes.
Why You’ll Love This Recipe
- Ridiculously Quick: No fire-building skills or special equipment required. These cones are ready to enjoy in less than 10 minutes from prep to first bite!
- Minimal Cleanup: Say goodbye to sticky fingers and melted marshmallows everywhere—every delicious morsel is tucked neatly inside a cone.
- Kid-Friendly: It’s interactive and fun—little hands can help build their own cones, making dessert a true family affair.
- Customizable: Can you resist experimenting? Go wild with your favorite add-ins and chocolates, or try them over the grill, in the oven, or even a campfire.

Ingredients You’ll Need
- Waffle Cones: The sturdy, sweet base that holds everything together and adds a satisfying crunch. Waffle cones are essential—don’t use sugar cones, they’re too fragile for all that gooey goodness!
- Mini Marshmallows: For that classic s’mores goo, mini marshmallows melt quickly and nestle perfectly among the chocolate and crackers. If you only have large marshmallows, tear them up to fit—just don’t skip them!
- Graham Crackers: Broken into bite-sized pieces, they deliver the iconic graham flavor and help scoop up the melted chocolate.
- Hershey Bar Pieces: Classic milk chocolate is a must for authentic s’mores taste. Break them into small pieces to ensure every layer gets some melty chocolate.
Note: You’ll find the complete list of ingredients, along with their exact measurements, in the printable recipe card at the bottom of this post.
Variations
- Add Peanut Butter: Spoon a little into the cone before adding the rest for an extra decadent twist.
- Try Different Chocolates: Swap in dark chocolate, white chocolate, peanut butter cups, or caramel-filled candies for a creative upgrade.
- Fruity S’mores: Add sliced strawberries, bananas, or raspberries for a fresh punch of flavor.
- Crunch It Up: Sprinkle in some chopped nuts or mini chocolate chips for extra texture and flavor.
- Gluten-Free Option: Use gluten-free cones and crackers to make it allergy-friendly.
How to Make Campfire S’mores Cones
Step 1: Build Your S’mores Cones
Take a waffle cone and start layering mini marshmallows, broken graham cracker pieces, and Hershey bar chunks. Alternate layers as you go, pressing down gently, until the cone is stuffed to the brim. The more you pack in, the gooier the result!
Step 2: Wrap in Foil
Wrap each filled cone tightly in aluminum foil. This keeps all the good stuff inside and helps the ingredients melt evenly while heating.
Step 3: Heat Your Cones
You’ve got options! Place the foil-wrapped cones on a grill over indirect heat, next to the campfire (not in the flames), or even in a preheated oven at 350°F. Let them heat for about 5–7 minutes, just until the chocolate and marshmallows start to melt. There’s no need to guess; if you start smelling chocolate, they’re probably ready!
Step 4: Unwrap and Enjoy
Carefully (they’ll be hot!) unwrap each cone, let it cool a minute, and dig in. You’ll get that caramelized marshmallow and chocolate in every bite, with none of the mess.
Pro Tips for Making the Recipe
- Don’t Overstuff: It’s tempting, but too much filling can make the cones leak. Fill generously but leave a little space at the top.
- Seal Well: Make sure your foil is wrapped tightly to keep everything snug and melted.
- Watch for Overheating: Every grill and oven is a bit different. Check a cone after 5 minutes so nothing burns.
- Cool Slightly Before Eating: Hot marshmallow is delicious, but it can burn—let them cool for a minute before tucking in, especially for kids.
How to Serve
These s’mores cones are perfectly portable and built for sharing. Hand them out straight after unwrapping for a walk-around dessert at your backyard cookout or cozy night in. They also make fun centerpieces—set up a “cone bar” with fillings and let everyone create their own masterpiece. Serve with chilled milk or hot cocoa for the classic s’mores-and-chocolate combo. For a summer party, pair with fresh fruit platters or homemade lemonade to balance the sweetness.
Make Ahead and Storage
Storing Leftovers
If you’ve made too many (does that ever actually happen?), wrap leftover cones in fresh foil and store in an airtight container for up to two days. The marshmallows will get a bit chewier, but they’ll still taste absolutely delicious.
Freezing
While you can freeze filled, unheated cones for a week, marshmallows and chocolate can change texture. For best results, fill and wrap them right before you plan to bake or grill.
Reheating
To rewarm, pop the foil-wrapped cones back in a 350°F oven or on the grill for a few minutes until the chocolate and marshmallows re-melt. Microwave is not recommended—it’ll make your cones soggy!
FAQs
-
Can I use regular-sized marshmallows instead of mini marshmallows?
Yes! Simply tear or cut them into smaller pieces so they fit inside the cone and melt more evenly. Mini marshmallows just nestle better among the chocolate and graham crackers, but use what you have.
-
Can I make these without a grill or campfire?
Absolutely. The oven works perfectly—just bake the foil-wrapped cones on a tray at 350°F for 5–7 minutes. You’ll get all the melted goodness right from your kitchen.
-
What’s the best way to keep the cones from getting soggy?
Make sure to eat them soon after heating! If possible, don’t let the cones sit for too long once unwrapped—enjoy that crispiness while it lasts.
-
Can I prepare these ahead of time for a party?
Definitely. Assemble and wrap the cones with all your fillings, then store them in the fridge until ready to bake or grill. They’ll be ready to heat and eat whenever dessert time rolls around.
Final Thoughts
Bringing together the nostalgic charm of s’mores with the convenience of a waffle cone, these Campfire S’mores Cones are the ultimate no-fuss dessert. Whether you’re hosting a crowd or treating yourself on a busy evening, enjoy all the classic flavors with barely any cleanup. Whip them up, make them your own, and savor each gooey, chocolatey, crunchy bite—you’ll wonder why you ever made s’mores any other way!
Print
Campfire S’mores Cones Recipe
- Prep Time: 10 minutes
- Cook Time: 7 minutes
- Total Time: 17 minutes
- Yield: 6 cones
- Category: Desserts
- Method: Roasting
- Cuisine: American
- Diet: Vegetarian
Description
Campfire S’mores Cones are a fun, mess-free twist on traditional s’mores, using waffle cones filled with gooey marshmallows, melted chocolate, and crunchy graham crackers. Perfect for camping, BBQs, bonfires, or easy summer desserts, these cones can be cooked over a fire, grill, or even in an oven for quick, delicious, and portable treats everyone will love.
Ingredients
Waffle Cones
- 6 waffle cones
Fillings
- 3 cups mini marshmallows
- 3 graham crackers, broken into small pieces
- 1.55 ounces Hershey bars, broken into pieces
Instructions
- Prepare the Filling: In a bowl, combine mini marshmallows, graham cracker pieces, and Hershey bar pieces. Mix gently so the chocolate does not break into tiny bits.
- Fill the Cones: Evenly distribute the marshmallow, graham cracker, and chocolate mixture into each waffle cone, pressing lightly to fit as much filling as desired without breaking the cone.
- Wrap the Cones: Tightly wrap each filled cone in aluminum foil to keep the contents secure and to ensure even melting. Make sure the foil is sealed at the top.
- Cook the Cones: Place the wrapped cones over a campfire, on a grill, or in a preheated oven at 350°F (175°C) for about 5–7 minutes, turning occasionally. Cook until the marshmallows and chocolate are melted and gooey.
- Cool and Serve: Carefully remove the cones from the heat source using tongs, and let them sit for 1–2 minutes (they will be hot). Unwrap the foil and enjoy the gooey, melty s’mores cones immediately.
Notes
- Get creative and add extra toppings like peanut butter chips, caramel bits, or sliced bananas.
- For oven baking, place foil-wrapped cones directly on the oven rack.
- Monitor the cones carefully; cooking times may vary depending on heat intensity.
- Allow cones to cool slightly before unwrapping as the filling will be very hot.
Nutrition
- Serving Size: 1 cone
- Calories: 210
- Sugar: 19g
- Sodium: 70mg
- Fat: 6g
- Saturated Fat: 3g
- Unsaturated Fat: 2g
- Trans Fat: 0g
- Carbohydrates: 38g
- Fiber: 1g
- Protein: 2g
- Cholesterol: 5mg


