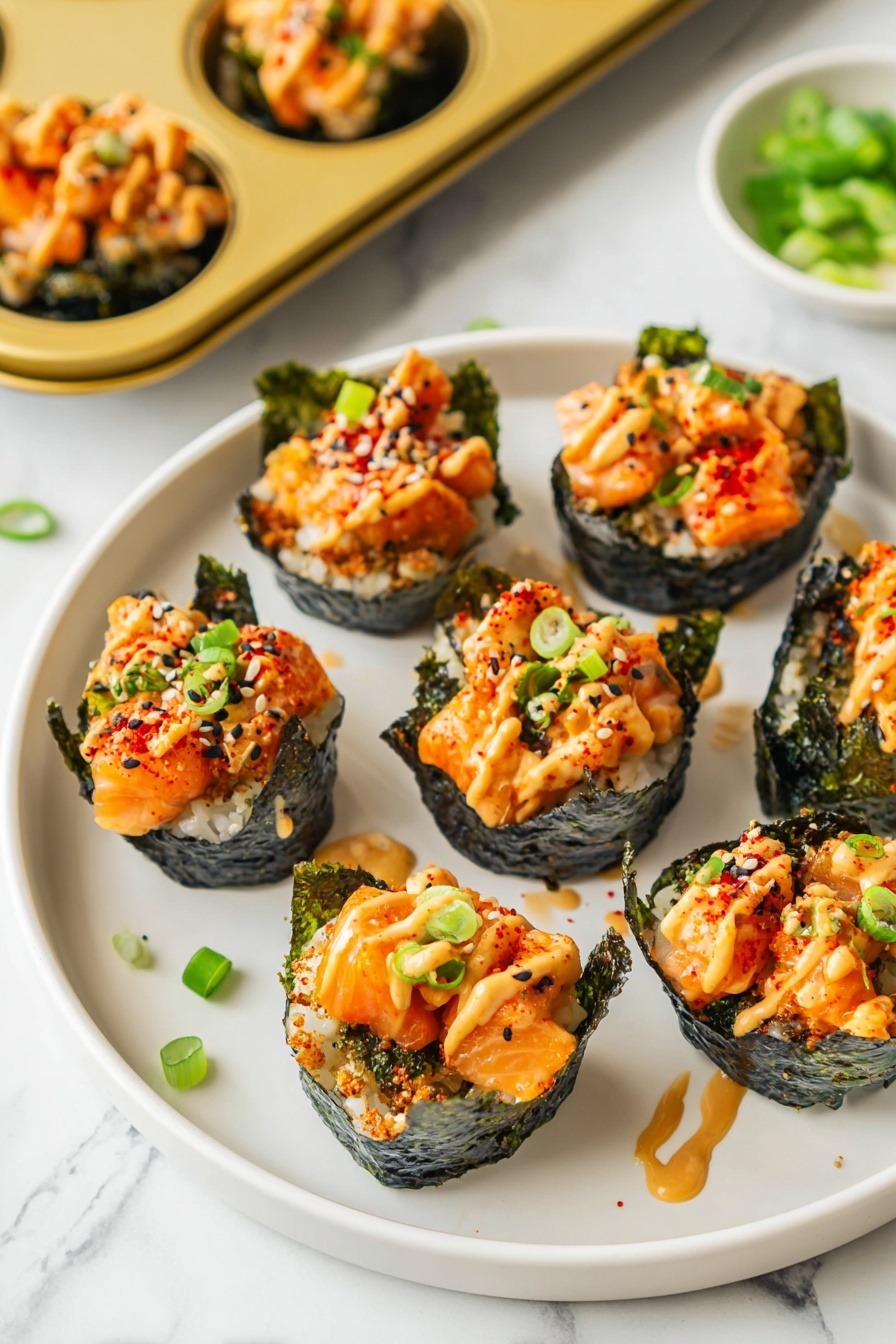
If you’re looking for a fun, flavorful way to enjoy sushi at home without the fuss of rolling, you’ve got to try this Baked Salmon Sushi Cups Recipe. I absolutely love how these bite-sized cups bring together tender, spicy salmon and perfectly seasoned sushi rice wrapped in crispy nori. Whether you’re hosting a party or craving a quick snack, these sushi cups deliver a new twist on classic flavors that’s super approachable and incredibly satisfying.
Why You’ll Love This Recipe
- Easy to Make: No rolling or complicated sushi techniques—just simple assembly and baking.
- Perfect Party Bites: These sushi cups are great finger food that impress guests without stress.
- Flavor-Packed: The combo of spicy mayo, soy sauce, and sesame oil makes the salmon irresistibly tasty.
- Customizable: Swap out ingredients or adjust spice levels to suit your taste easily.

Ingredients You’ll Need
The magic of this Baked Salmon Sushi Cups Recipe happens because of the balance between fresh salmon, well-seasoned sushi rice, and crispy nori. I always recommend picking the freshest salmon you can find and a good-quality sushi rice—it makes a noticeable difference!
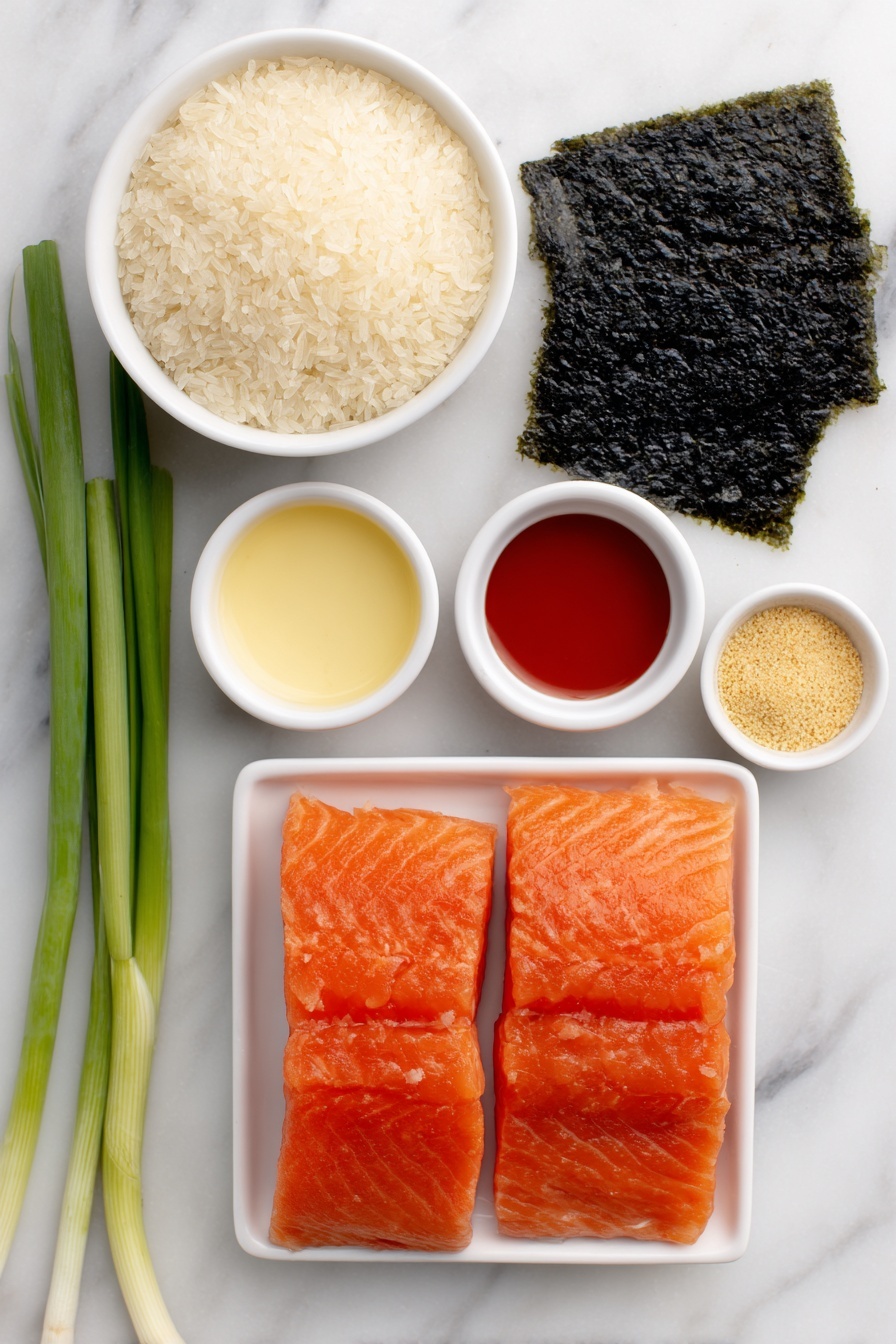
- Salmon: Fresh, cubed salmon is key to juicy, flavorful bites.
- Light soy sauce: Adds umami without overpowering the salmon’s natural flavor.
- Kewpie Mayo: This Japanese mayo gives a rich, creamy texture with a hint of sweetness.
- Sriracha: For a gentle but exciting kick of heat.
- Sesame oil: Just a splash brings that classic nutty aroma you want.
- Sushi rice: The rice that soaks up all the flavors and sticks perfectly when cooked.
- Rice vinegar and white sugar: To season the rice with that signature sushi rice tanginess.
- Nori sheets: Cut into squares to form the cup structure.
- Furikake: A sprinkling of this Japanese seasoning adds extra flavor and crunch.
- Green onion: For fresh, sharp garnish that brightens the dish.
- Cooking spray: To lightly grease your muffin tin and prevent sticking.
Variations
I love making this recipe my own depending on what we have on hand or the mood we’re in. The beauty of the Baked Salmon Sushi Cups Recipe is how adaptable it is—feel free to add your spin or tweak the spice level to suit your family and friends.
- Spicy Level: If you like things hotter, double the sriracha or add a sprinkle of chili flakes—I promise it wakes up the flavor.
- Avocado Addition: I sometimes add thin slices of avocado on top post-bake for creaminess and a fresh contrast.
- Vegetarian Twist: Swap salmon with baked tofu or mushrooms marinated in the same sauce.
- Different Fish: Tried it with cooked shrimp or crab meat and the results were just as delightful!
How to Make Baked Salmon Sushi Cups Recipe
Step 1: Prepare the Sushi Rice
First things first, cook your sushi rice according to the package. While it’s still warm, mix rice vinegar and sugar in a microwave-safe bowl and heat for 30 seconds to dissolve the sugar. Pour this tangy mixture over your rice and fold gently. You’ll find this step so crucial—it makes the rice sticky, shiny, and full of the classic sushi flavor we all love.
Step 2: Mix the Salmon Topping
In a bowl, combine the cubed salmon with light soy sauce, Kewpie mayo, sriracha, and sesame oil. Stir it well so every salmon cube is coated with that addictive sauce. I discovered this marinade when I wanted a creamy yet spicy finish without ruining the delicate fish texture—it works wonders!
Step 3: Prep the Nori Cups
Cut your nori sheets into squares large enough to line each muffin cup. Lightly grease the muffin tin with cooking spray to prevent sticking. This step helps the nori crisp up a bit while holding the filling, so don’t skip it. I remember the first time I tried without greasing—I ended up with a handful of broken cups, lesson learned!
Step 4: Assemble and Bake
Place one nori square into each muffin cup, press a spoonful of seasoned rice into the bottom, then add a layer of the salmon mixture on top. Don’t be shy here; it’s all about layering flavor. Bake at 400°F for about 15 minutes—when the salmon is cooked through and starts getting a light golden top, you know it’s done. The smell alone will make your mouth water!
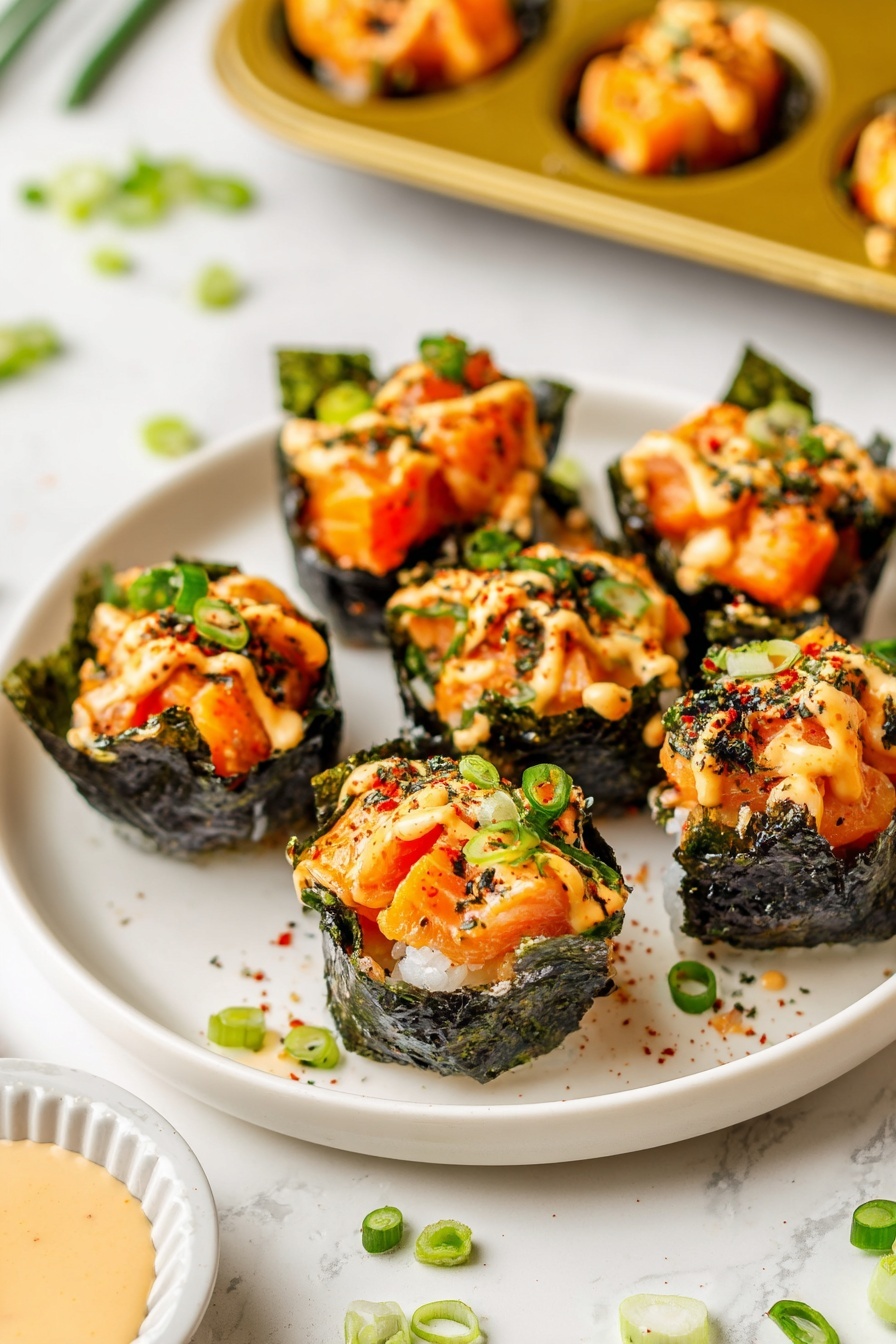
Step 5: Garnish and Serve
Let the cups cool for a few minutes once out of the oven, then drizzle more spicy mayo or sriracha on top. A sprinkle of furikake and chopped green onions adds the perfect pop of flavor and color. Serve these immediately and watch your family or guests go crazy for them.
Pro Tips for Making Baked Salmon Sushi Cups Recipe
- Use Fresh Ingredients: Fresh salmon and good-quality nori make a difference you’ll notice in both taste and texture.
- Don’t Overpack the Muffin Cups: Press the rice and salmon firmly but don’t squash—this helps keep the cups intact after baking.
- Let Cups Cool Slightly: Cooling helps the structure set and makes them easier to remove without breaking.
- Watch the Bake Time: Overbaking dries out the salmon. Aim for just-cooked with slightly golden tops for the best results.
How to Serve Baked Salmon Sushi Cups Recipe
Garnishes
I’m a huge fan of topping these sushi cups with a drizzle of spicy mayo and a sprinkle of furikake for that extra umami kick. Chopped green onions add freshness and crunch. Sometimes, I toss on tiny sesame seeds or even a dollop of pickled ginger if I’m feeling fancy—these little touches really elevate the bite.
Side Dishes
These sushi cups pair beautifully with a simple cucumber salad or edamame for a light, balanced meal. I often serve them alongside a miso soup to round out the flavors and make it a comforting yet elegant dinner.
Creative Ways to Present
For parties, I like arranging these sushi cups on a slate platter garnished with edible flowers or radish slices. Another fun presentation is serving them in little ceramic spoons as appetizers—makes every bite feel special and Instagram-worthy!
Make Ahead and Storage
Storing Leftovers
I store any leftovers in an airtight container in the fridge for up to 2 days. Just keep in mind that the nori tends to lose some crispness over time but the flavor remains delicious. When I’ve had leftovers, my family still enjoys them cold or reheated.
Freezing
I haven’t frozen these sushi cups before because fresh texture is best, but if you need to, wrap them tightly in plastic wrap and place in a freezer-safe container. They’re best thawed overnight in the fridge and gently reheated to avoid sogginess.
Reheating
I reheat leftovers in a 350°F oven for about 5-7 minutes—just enough to warm without drying out the salmon. Avoid microwaving if possible, as it can make the rice gummy and the nori chewy.
FAQs
-
Can I use frozen salmon for this recipe?
Yes, you can use frozen salmon, just be sure to thaw it completely and pat it dry before cubing. This prevents excess moisture, which can affect the texture and cause sogginess in your sushi cups.
-
Can these sushi cups be made without an oven?
This recipe shines with the baking step because it cooks the salmon gently and crisps the nori edges. If you don’t have an oven, you could try pan-searing the salmon separately and assembling cold sushi cups, but the texture and presentation will differ.
-
What’s the best way to prevent the nori from getting soggy?
Greasing your muffin tin lightly and baking at a high temperature helps the nori hold shape and stay crispy. Also, avoid assembling too early; assemble and bake shortly after preparing the rice and salmon.
-
How spicy is the baked salmon mixture?
The spice level is moderate thanks to the sriracha mixed with creamy Kewpie mayo. You can easily adjust the heat by reducing or increasing the sriracha amount based on your preference.
Final Thoughts
I truly think this Baked Salmon Sushi Cups Recipe is a game-changer for sushi lovers who want something fun, easy, and delicious without the rolling hassle. I’ve made this for casual family dinners and small get-togethers, and every time it’s a hit. Try it out—you’ll be surprised how quickly it becomes a favorite in your kitchen, just like it did in mine!
Print
Baked Salmon Sushi Cups Recipe
- Prep Time: 15 minutes
- Cook Time: 15 minutes
- Total Time: 30 minutes
- Yield: 12 sushi cups
- Category: Appetizer
- Method: Baking
- Cuisine: Japanese
Description
These Easy Baked Salmon Sushi Cups are a delightful twist on traditional sushi, combining tender salmon with flavorful sushi rice and a spicy, creamy topping. Perfect as bite-sized appetizers or a fun main dish, these sushi cups are baked to perfection with a crispy, golden top and garnished with furikake and green onions for an extra burst of flavor.
Ingredients
Sushi Rice
- 1 1/2 cup uncooked sushi rice
- 1 tablespoon rice vinegar
- 2 teaspoon white sugar
Salmon Mixture
- 1 lb salmon, cubed
- 1 tbsp light soy sauce
- 1 tbsp Kewpie Mayo
- 1 tbsp Sriracha
- 1 tsp sesame oil
Other Ingredients
- 3 large nori sheets
- furikake, for garnish
- 1 green onion, finely chopped, for garnish
- cooking spray
Instructions
- Cook the Sushi Rice: Prepare the sushi rice according to package instructions until fully cooked and tender.
- Prepare Vinegar Mixture: In a microwave-safe bowl, combine rice vinegar and white sugar. Microwave for about 30 seconds or until the sugar dissolves. Pour the mixture over the cooked rice and gently mix to combine well. Set aside to cool slightly.
- Preheat Oven: Set your oven to 400℉ (200℃) to get it ready for baking the sushi cups.
- Prepare Salmon Mixture: In a mixing bowl, combine the cubed salmon, light soy sauce, Kewpie mayo, Sriracha, and sesame oil. Mix thoroughly until all ingredients are well incorporated. Set aside.
- Prepare Nori Sheets: Cut the nori sheets into 4 rectangles or squares large enough to fit into each muffin tin cup.
- Assemble Sushi Cups: Lightly grease a muffin tin with cooking spray. Place a nori square into each muffin cup. Add a spoonful of sushi rice into the center of each nori square and press lightly to form a base. Top the rice with an even layer of the salmon mixture.
- Bake: Place the muffin tin in the preheated oven and bake at 400℉ for 15 minutes, or until the salmon is cooked through and the edges of the topping are slightly golden brown.
- Garnish and Serve: Remove the sushi cups from the oven and allow to cool for a few minutes. Drizzle additional Sriracha or spicy mayo if desired. Garnish with furikake and finely chopped green onions. Serve immediately and enjoy!
Notes
- Make sure to press the rice gently into the nori but avoid compacting it too tightly to keep the texture light.
- You can adjust the spiciness by varying the amount of Sriracha added in both the salmon mixture and as a drizzle.
- Use fresh sushi-grade salmon for best taste and safety.
- If you prefer a milder flavor, reduce or omit the Sriracha.
- These sushi cups are best enjoyed fresh but can be stored in the fridge for up to 1 day.
Nutrition
- Serving Size: 1 sushi cup
- Calories: 120
- Sugar: 2 g
- Sodium: 230 mg
- Fat: 5 g
- Saturated Fat: 1 g
- Unsaturated Fat: 3 g
- Trans Fat: 0 g
- Carbohydrates: 12 g
- Fiber: 1 g
- Protein: 8 g
- Cholesterol: 35 mg


