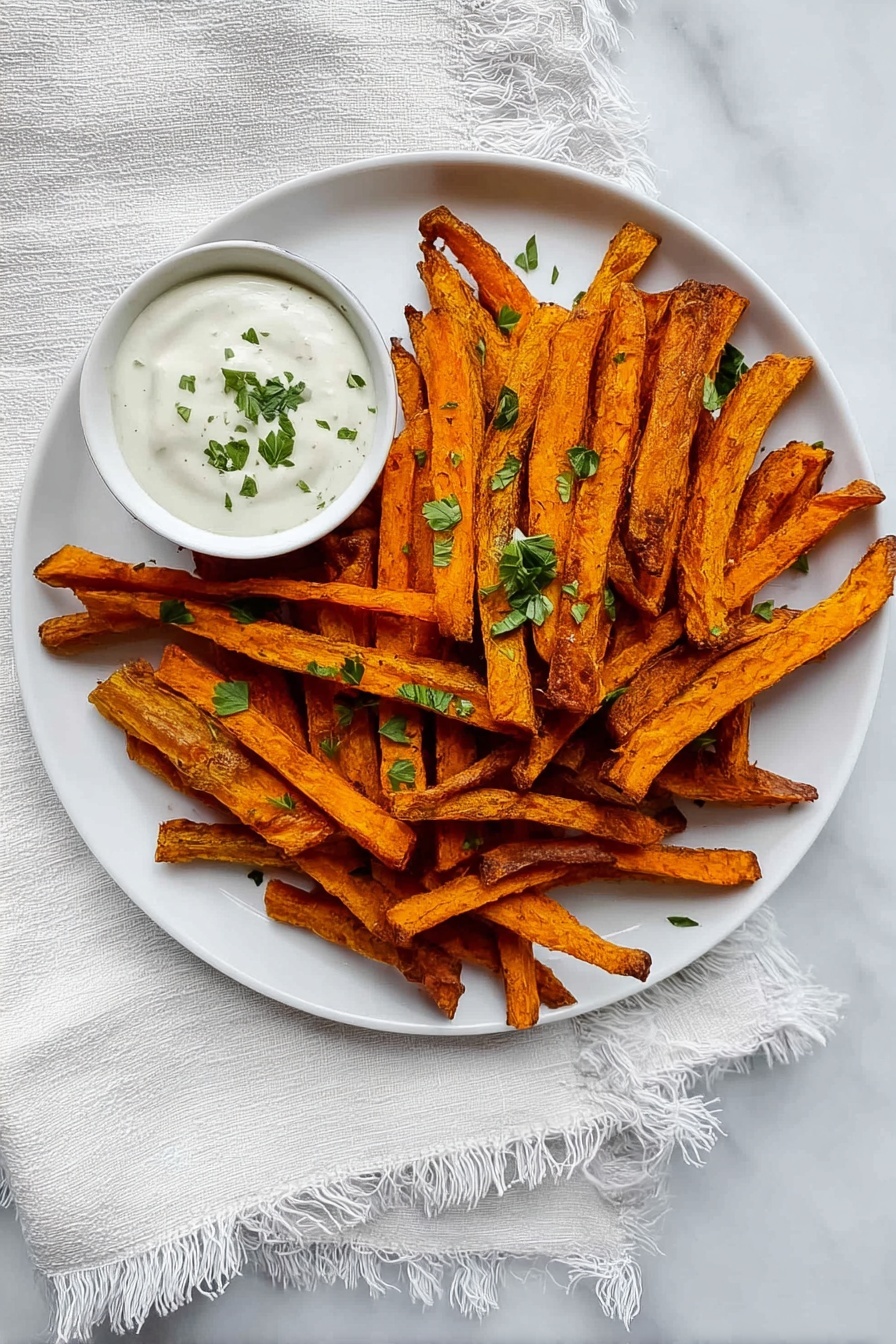
If you’re on the hunt for a snack or side that’s both cozy and crunchy, you’re going to fall head over heels for this Baked Butternut Squash Fries Recipe. I absolutely love how these fries come out golden, crispy on the outside, and tender on the inside—without any deep frying! When I first tried making baked fries with butternut squash, I struggled to get that perfect crispiness. But with this recipe, you’ll find the sweet spot that makes these fries irresistible.
Why You’ll Love This Recipe
- Healthy and Guilt-Free: These fries are baked, not fried, so you get all the crunchy goodness with less oil.
- Perfectly Crispy Every Time: The cornstarch coating is the secret trick that gives an irresistible crisp exterior.
- Simple Ingredients: You likely have everything in your pantry already, making it a hassle-free snack or side.
- Versatile and Flavorful: The combination of garlic, paprika, and thyme adds just the right balance of savory and earthy notes.

Ingredients You’ll Need
To nail this Baked Butternut Squash Fries Recipe, it’s all about fresh butternut squash and a few pantry staples that bring out its natural sweetness while adding that coveted crunch. I always recommend picking a firm squash with no soft spots for the best texture.
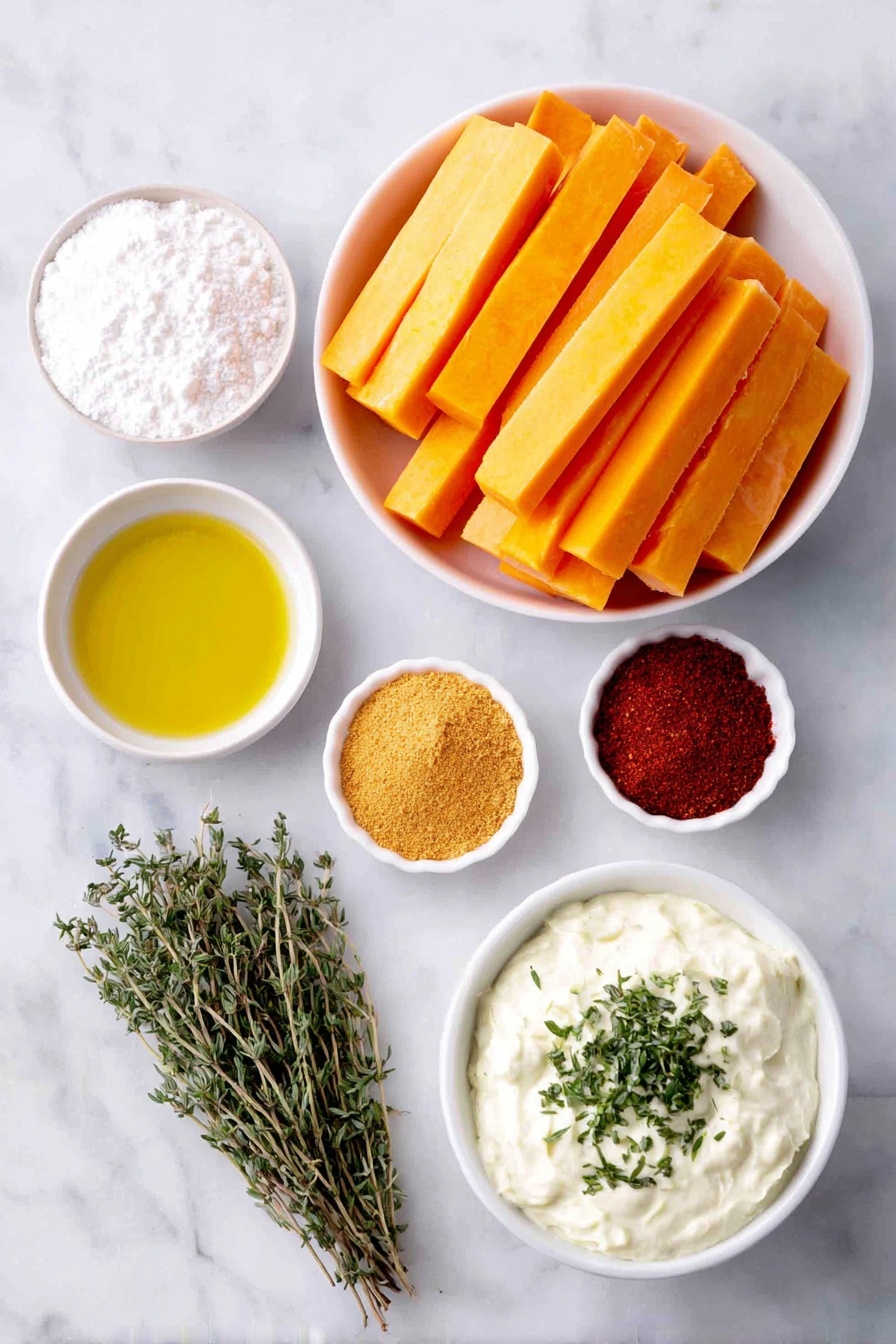
- Butternut squash: Use only the long neck part; it’s easier to cut into sticks and cooks evenly.
- Cornstarch: This is the game-changer for crispiness—don’t skip this step!
- Olive oil: Adds flavor and helps the spices stick while promoting browning.
- Garlic powder: Offers that warm, savory depth without overpowering the squash’s sweetness.
- Paprika: Adds a subtle smokiness and gorgeous color.
- Dried thyme: A lovely herbaceous touch that pairs beautifully with the squash.
- Salt and pepper: Essential to highlight all those flavors.
- Mayo & herbs for dipping: I love mixing mayo with fresh herbs for a creamy dipping sauce that’s a perfect match.
Variations
I love making this Baked Butternut Squash Fries Recipe my own by switching up the herbs or dipping sauces depending on mood or season. It’s a super adaptable base, so feel free to experiment!
- Spicy kick: Once, I tossed the fries with a pinch of cayenne and smoked chili powder—my family went crazy for the extra heat.
- Herb swaps: Thyme is fantastic, but rosemary or sage work beautifully too, especially in fall.
- Gluten-free tweaks: Cornstarch keeps it naturally gluten-free, but you can swap for arrowroot powder if you have it on hand.
- Dipping sauces: Try garlic aioli, chipotle mayo, or even a honey mustard—it changes everything.
How to Make Baked Butternut Squash Fries Recipe
Step 1: Prep Your Oven and Squash
Start by preheating your oven to 425°F and line two large baking sheets with parchment paper. This high temperature is key to getting that crispy crust without drying out the squash. Next, peel the butternut squash carefully—using only the long neck part makes cutting easier and yields perfect fry-sized sticks. Be sure to pat them dry to avoid sogginess later.
Step 2: Coat with Cornstarch
Pop the butternut squash sticks into a big bowl, then sprinkle the cornstarch over them. Use your hands to toss and coat every stick completely—this is how you’ll get that crave-worthy crunch. After coating, transfer the fries to a colander and gently shake off any extra cornstarch, so you don’t end up with clumps.
Step 3: Season and Oil
Return your fries to the bowl, drizzle with olive oil, then sprinkle on the garlic powder, paprika, dried thyme, plus salt and pepper. Toss everything together, making sure each fry is evenly coated. This seasoning blend is what turns them from “good” to “OMG, can I have another?”
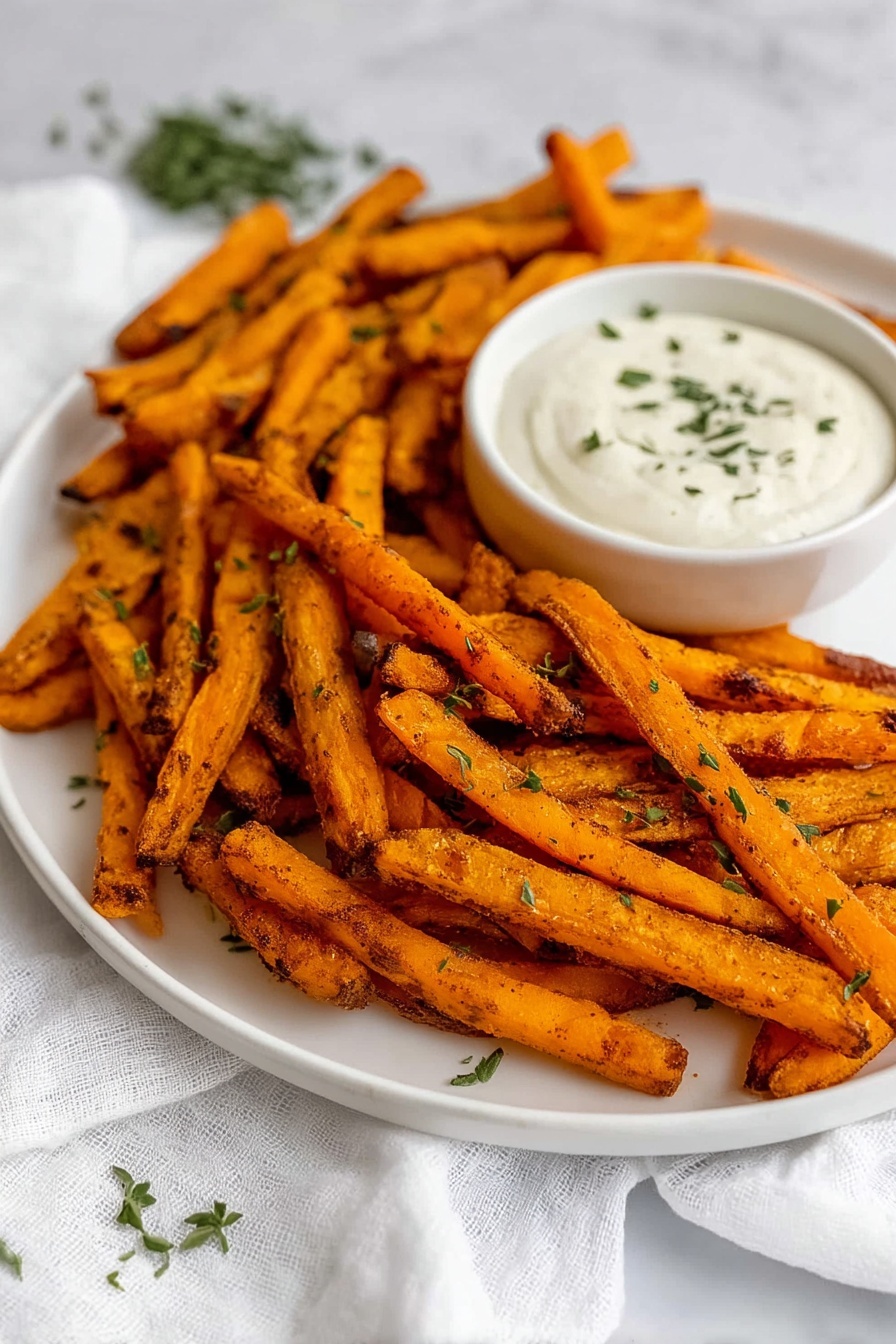
Step 4: Bake Until Crispy and Tender
Spread the fries in a single layer on your prepared baking sheets—crowding will cause steaming, so give them space. Bake for 30 to 35 minutes, flipping them halfway through for even browning. Keep an eye on them during those last few minutes; you’re aiming for a golden crunch while retaining a tender inside. Let them cool for 5-10 minutes before diving in.
Pro Tips for Making Baked Butternut Squash Fries Recipe
- Dry Before Cornstarch: Always pat fries dry before coating; moisture is the enemy of crispiness.
- Don’t Skip Flipping: Turning the fries halfway through ensures even color and crunch on all sides.
- Use Parchment Paper: It prevents sticking and makes clean-up a breeze—trust me, it’s worth it!
- Space Them Out: Crowding the pan traps steam and leads to soggy fries, so use two baking sheets if needed.
How to Serve Baked Butternut Squash Fries Recipe
Garnishes
I love shaking fresh chopped parsley or a sprinkle of grated Parmesan cheese over these fries right before serving. The herb adds freshness, and the Parmesan brings a salty, nutty finish that makes everyone swoon. A drizzle of a zesty lemon aioli is another favorite of mine—it brightens up the sweetness beautifully.
Side Dishes
These baked butternut fries pair wonderfully with grilled chicken or a juicy burger, especially with a cool slaw on the side. I’ve also served them alongside a hearty lentil salad for a cozy vegetarian meal that always gets rave reviews.
Creative Ways to Present
For parties or special dinners, I like to serve these fries in rustic paper cones placed in mason jars or a wooden tray with small bowls of different dips—think garlic mayo, herbed yogurt, or spicy ketchup. It makes snacking feel festive and encourages everyone to mingle and share.
Make Ahead and Storage
Storing Leftovers
If you find yourself with leftovers (which is rare in my house), store them in an airtight container in the fridge. They’ll keep well for up to 3 days. Make sure they’re completely cool before sealing to avoid sogginess.
Freezing
I’ve had mixed results freezing these fries. The texture sometimes softens after thawing, but if you freeze them flat on a baking sheet and then bag them, you can re-crisp them in the oven for a decent snack on busy days. Just keep expectations moderate with freezing.
Reheating
To bring back that fresh-out-of-the-oven crunch, I reheat leftovers in a 350°F oven for about 5 minutes or pop them in the toaster oven. Microwaving tends to make them limp, so I try to avoid it.
FAQs
-
Can I use other types of squash for this recipe?
Absolutely! While butternut squash is ideal because of its natural sweetness and texture, you can also try delicata or kabocha squash. Just keep in mind that cooking times might vary slightly due to differences in moisture content.
-
Why is cornstarch important in the Baked Butternut Squash Fries Recipe?
Cornstarch creates a light coating that crisps up beautifully in the oven, preventing the fries from becoming soggy. Without it, your fries will be softer and less crunchy.
-
Can I make these fries vegan-friendly?
Yes! The fries themselves are vegan since they’re baked with olive oil and spices. Just use a vegan mayo or plant-based dipping sauce to keep it entirely vegan-friendly.
-
How do I get the fries evenly crispy without burning?
Make sure your fries are in a single layer without crowding. Flip them halfway through baking to promote even cooking and keep an eye on the last few minutes—the edges should be golden, not burnt.
-
What dipping sauce pairs best with these fries?
I highly recommend a garlic herb mayo or a simple aioli. The creamy tanginess complements the sweet and earthy squash so well and elevates the whole experience.
Final Thoughts
Honestly, this Baked Butternut Squash Fries Recipe has become a staple in my kitchen because it strikes the perfect balance between comforting and healthy. They’re easy enough to whip up any night but special enough to impress guests. I encourage you to give them a try—once you taste that crispy, spiced coating with the sweet squash inside, you’ll understand why I keep making them over and over!
Print
Baked Butternut Squash Fries Recipe
- Prep Time: 10 minutes
- Cook Time: 30 minutes
- Total Time: 40 minutes
- Yield: 4 servings
- Category: Side Dish
- Method: Baking
- Cuisine: American
- Diet: Vegetarian
Description
Crispy and flavorful baked butternut squash fries that are a perfect healthy alternative to traditional fries. Coated in cornstarch and a blend of garlic, paprika, and thyme, these fries are oven-baked to a golden perfection and served warm with a herby mayo dipping sauce.
Ingredients
Main Ingredients
- 1 medium butternut squash, peeled and cut into sticks (use only long neck part)
- 3 tablespoons cornstarch
- 3 tablespoons olive oil
- 1 teaspoon garlic powder
- ½ teaspoon paprika
- ½ teaspoon dried thyme
- Salt and pepper, to taste
Dipping Sauce
- Mayo
- Fresh or dried herbs (such as parsley, chives, or dill) mixed into mayo for dipping
Instructions
- Preheat Oven: Preheat your oven to 425°F (220°C) and line two large baking sheets with parchment paper to prevent sticking and facilitate even cooking.
- Prepare Butternut Squash Sticks: Place the peeled and cut butternut squash sticks into a large bowl. Pat them dry thoroughly with a paper towel to remove excess moisture, which helps achieve crispiness. Sprinkle the cornstarch evenly over the squash sticks and use your hands to toss and coat them completely. Transfer the coated sticks to a colander and shake gently to remove any excess cornstarch.
- Season the Fries: Return the coated butternut squash sticks to the bowl. Add olive oil, garlic powder, paprika, dried thyme, salt, and pepper. Toss everything together until the fries are evenly coated with the oil and spices.
- Arrange for Baking: Spread the prepared fries in a single layer on the lined baking sheets, ensuring they are not overcrowded. Overcrowding can cause them to steam instead of crisp.
- Bake the Fries: Place the baking sheets in the preheated oven and bake for 30-35 minutes, flipping the fries halfway through the cooking time to promote even browning and crispness.
- Cool and Serve: Once baked until tender and crisp, allow the fries to cool for 5-10 minutes. Serve them warm with your favorite herbed mayo dipping sauce for a delicious snack or side dish.
Notes
- Storage: Store any leftover fries in an airtight container in the refrigerator. To reheat and crisp them up, bake in the oven at 350°F (175°C) for 5 minutes or use a toaster oven.
- Substitutes: For a variation, you can substitute cornstarch with flour. You can also experiment with different herbs according to your taste preferences.
Nutrition
- Serving Size: 1 serving (about 1 cup fries)
- Calories: 140 kcal
- Sugar: 3 g
- Sodium: 150 mg
- Fat: 7 g
- Saturated Fat: 1 g
- Unsaturated Fat: 6 g
- Trans Fat: 0 g
- Carbohydrates: 18 g
- Fiber: 3 g
- Protein: 2 g
- Cholesterol: 0 mg

