
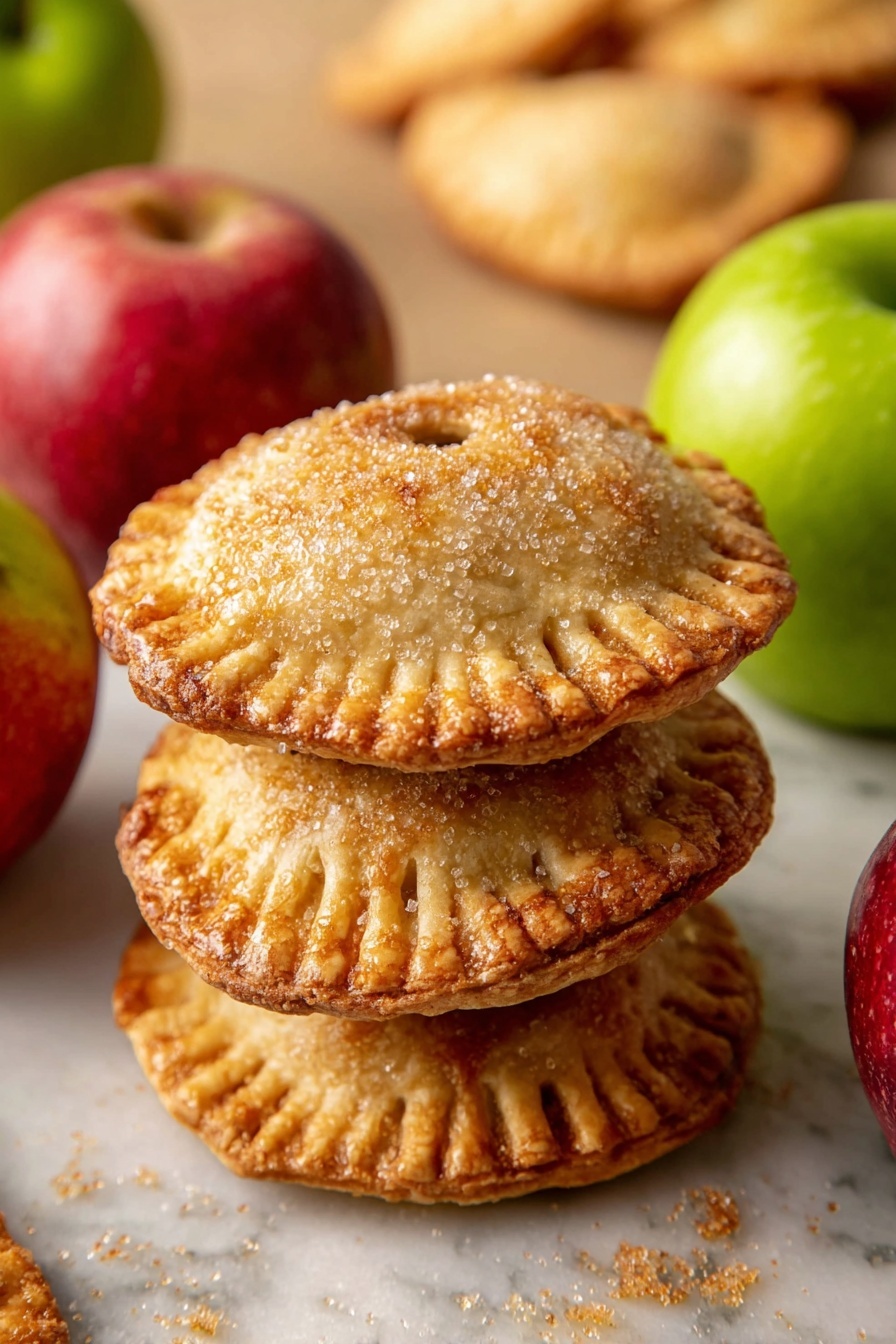
If you’re anything like me, you’ll absolutely adore this Apple Hand Pies Recipe. These little personal pies pack all the comforting flavors of a classic apple pie but in a cute, portable form that’s perfect for snack time, dessert, or even breakfast on the go. I discovered this recipe while searching for something cozy yet simple to make when the apple season hits, and let me tell you, it quickly became a family favorite. Stick around, because you’ll want to try this out ASAP!
Why You’ll Love This Recipe
- Simple Ingredients: You probably have most of these staples right in your kitchen, making it easy to whip up these pies anytime.
- Portable Comfort: Hand pies are perfect for kid lunches, picnics, or a quick snack on the go without the mess.
- Customizable Filling: You can tweak the spices and sweetness to match your family’s tastes, which I always appreciate.
- Quick and Delicious: From start to finish, you can have these warm and golden in just over an hour.

Ingredients You’ll Need
The ingredients for this Apple Hand Pies Recipe balance sweet, tart apples with warm spices and buttery crusts — simple yet incredibly satisfying. Using a good quality pie crust (homemade or store-bought) makes all the difference in texture and flavor.
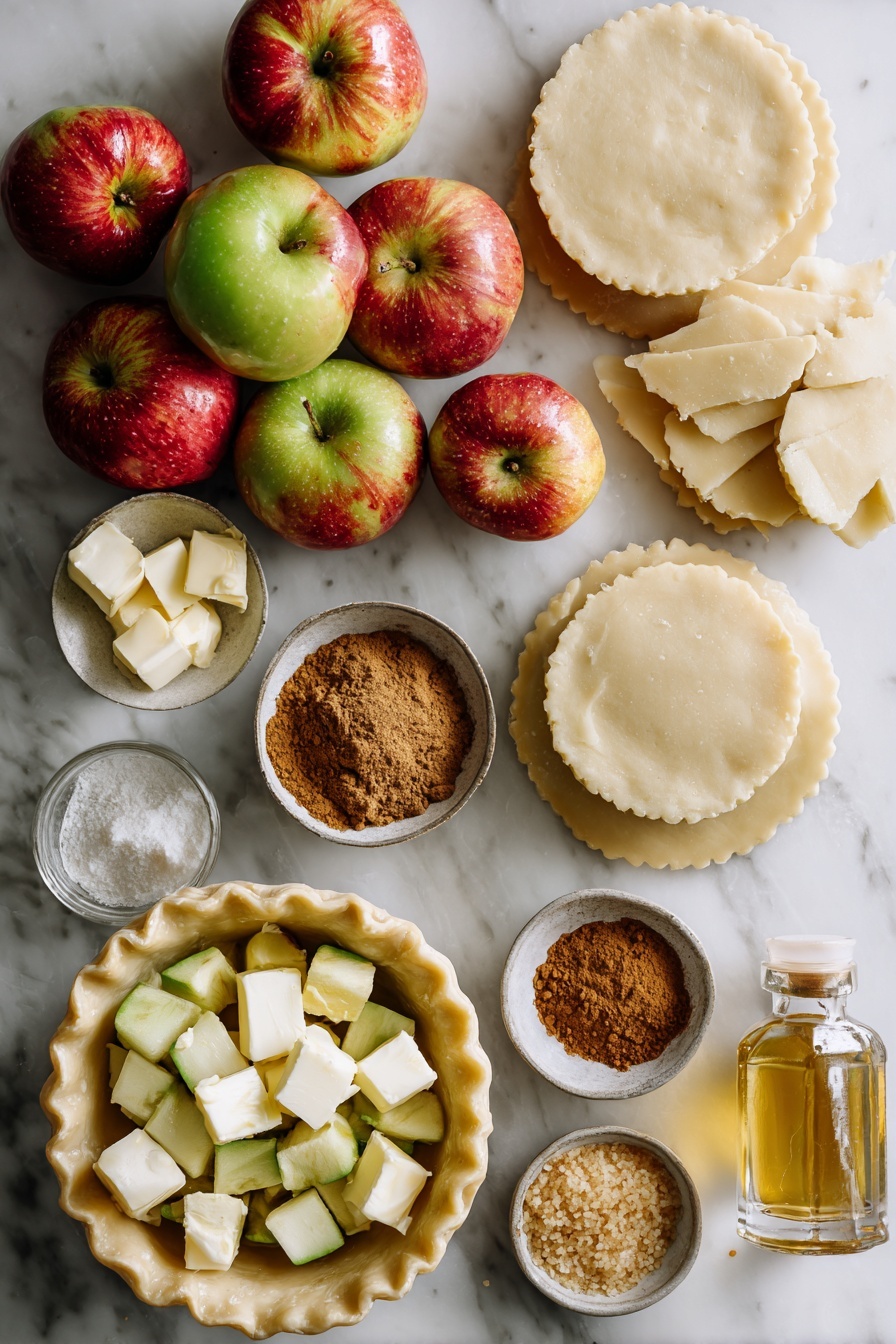
- Pie Crusts: Store-bought saves time, but homemade crust brings that extra flaky, buttery goodness.
- Chopped Apples: I love using firm apples like Granny Smith or Honeycrisp to keep that perfect bite.
- Granulated Sugar: Balances the tartness without overpowering the natural apple flavor.
- All-Purpose Flour: Helps thicken the juicy filling, so you avoid soggy pies.
- Pure Vanilla Extract: Adds a subtle depth of flavor that makes the filling extra special.
- Ground Cinnamon: The star spice here—adjust to your liking!
- Ground Nutmeg: Just a pinch enhances the warmth of the mix.
- Large Egg: Used for the egg wash, giving the pies a beautiful golden finish.
- Milk: Mixed with the egg for brushing.
- Butter: Optional cubes on top of the filling add richness and a slight caramelization.
- Coarse Sugar: For sprinkling on top, to add a pretty sparkle and crunch.
Variations
One thing I love about this Apple Hand Pies Recipe is how easy it is to tweak. Whether you want to make it gluten-free, add extra spice, or even turn it vegan, the possibilities are wide open. Don’t be afraid to make it your own!
- Gluten-Free Version: Swap in gluten-free pie crusts and a bit more thickener like cornstarch for the filling.
- Spiced Up: Try adding ground cloves or cardamom for a bolder spice profile—I’ve done this and it’s heavenly.
- Vegan Adaptation: Use a plant-based pie crust and an aquafaba or maple syrup glaze instead of egg wash.
- Fruit Mix: Sometimes I add diced pears or cranberries with the apples for a twist that my guests rave about.
How to Make Apple Hand Pies Recipe
Step 1: Chill and Cut the Pie Crusts
Start by rolling out your pie crusts on a lightly floured surface to about 1/8-inch thickness. I use a 3.5-inch cookie cutter or even a sturdy glass to cut out circles — the perfect size for hand pies. Pro tip: keep those dough scraps, reroll them, and cut out more circles so you don’t waste any dough! Place the circles on a baking sheet lined with parchment paper and pop them in the fridge while you prepare the filling. This chilling step helps keep the dough firm and easier to work with later.
Step 2: Make the Apple Filling
In a mixing bowl, toss the chopped apples with sugar, flour, vanilla extract, cinnamon, and nutmeg until every piece is nicely coated. The flour thickens the juices, so the filling doesn’t get too runny during baking — trust me, you’ll want a filling that sets up well. Adjust cinnamon based on how much spice you love; I usually go for about a teaspoon since I adore the warmth it adds.
Step 3: Assemble the Pies
Remove the chilled pie crust circles from the fridge. Spoon a generous amount of the apple filling onto half of the circles, leaving some space around the edges for sealing. Add 1-2 small cubes of butter on top of each pile — this little touch creates a luscious, buttery melt in the center that’s so worth it. Place the other pie crust circles on top, then seal the edges by dampening them with water or the egg wash and pressing together with a fork. This step can be a bit fiddly, but taking your time pays off with neat, sealed hand pies.
Step 4: Egg Wash and Bake
Brush the tops of the pies with the egg beaten together with milk — it makes the crust golden and shiny. Then, sprinkle coarse sugar on top for a subtle crunch and a pretty finish. Don’t forget to cut 2-3 small slits in the top to allow steam to escape or you’ll end up with a pie mess! Bake at 400°F (204°C) for 18 to 22 minutes until they’re beautifully golden brown and you can see the filling bubbling inside. The smell alone will have you jumping out of your seat!
Pro Tips for Making Apple Hand Pies Recipe
- Chill All the Way: Chilling the crust before filling prevents the dough from getting too soft and tearing, so don’t skip this step.
- Don’t Overfill: Leave enough room to seal the edges—you’ll thank me when your pies don’t burst open during baking.
- Use Firm Apples: Softer apples turn mushy; firmer varieties maintain texture and flavor through baking.
- Egg Wash Magic: The egg and milk glaze not only gives color but helps pinch the crust edges stay sealed tight.
How to Serve Apple Hand Pies Recipe
Garnishes
I love topping these Apple Hand Pies with a light dusting of powdered sugar or a drizzle of warm caramel sauce when serving. It adds a little extra sweetness and elegance without overpowering the apple flavor. If you want a bit of texture, sprinkle some toasted chopped nuts on top alongside the caramel—it’s heavenly!
Side Dishes
Although these pies can stand alone, my family loves pairing them with a scoop of vanilla ice cream or a dollop of whipped cream for a comforting dessert. For a brunch spread, they go beautifully with a sharp cheddar cheese and slices of prosciutto for an unexpected sweet-savory combo that’s a big hit at parties.
Creative Ways to Present
For special occasions, I’ve wrapped each hand pie in cute parchment bundles tied with twine for gifting or serving at fall gatherings. You can also arrange them on a large wooden board with small bowls of various dips—like spiced apple butter or honey cream cheese—for a fun interactive dessert display that guests love.
Make Ahead and Storage
Storing Leftovers
I store leftover Apple Hand Pies in an airtight container either at room temperature for 3 days or refrigerated for up to 4 days. I’ve found keeping them at room temp maintains the crust’s flakiness better, but refrigeration is safer if your kitchen tends to be warm.
Freezing
Freezing these hand pies works like a charm! Once cooled, freeze them on a baking sheet until solid, then wrap tightly in plastic wrap and place in a freezer-safe bag. They’ll keep for up to 3 months. This trick saves me tons of time during busy holiday seasons or when I want a treat ready to bake whenever cravings hit.
Reheating
To reheat, I recommend baking the pies at 350°F (175°C) for about 10-12 minutes, just enough to warm through and crisp the crust. Avoid the microwave if you want to keep that flaky texture intact! If you’re short on time, a toaster oven works wonders too.
FAQs
-
Can I use frozen pie crust for this Apple Hand Pies Recipe?
Absolutely! Frozen pie crust works just as well as fresh. Just make sure to thaw it slightly so it’s pliable enough to roll and cut without cracking, and keep it chilled before assembling.
-
What type of apples are best for hand pies?
Firm apples like Granny Smith, Honeycrisp, or Braeburn hold up best during baking, giving you a nice bite without turning mushy. Softer apples tend to break down too much and release excess juice.
-
Can I prepare the pies ahead of time and freeze them before baking?
Yes! Assemble the pies, freeze them on a cookie sheet until firm, then wrap and store. When ready, bake them straight from frozen—just add a few extra minutes to the baking time.
-
Do I have to use butter in the filling?
The butter is optional but it adds a lovely richness and slight caramelization to the filling. If you want a dairy-free option, you can leave it out or try a plant-based butter substitute.
-
How do I prevent the crust from getting soggy?
Make sure to toss the filling ingredients with flour to absorb excess moisture and chill the crust well before filling and baking. Also, avoid overfilling the pies to keep the crust crisp.
Final Thoughts
There’s something so satisfying about these Apple Hand Pies Recipe that goes beyond just the delicious taste—they bring people together in the best way. I love sharing these at family gatherings or cozy weekends, and seeing everyone’s smiles as they bite into that warm, flaky crust and spiced-apple filling. If you haven’t tried making hand pies before, this recipe is the perfect way to start. Trust me, once you do, you’ll find yourself coming back to it over and over again!
Print
Apple Hand Pies Recipe
- Prep Time: 45 minutes
- Cook Time: 20 minutes
- Total Time: 1 hour 5 minutes
- Yield: 10 hand pies
- Category: Dessert
- Method: Baking
- Cuisine: American
Description
These Apple Hand Pies are perfectly flaky, portable treats filled with a spiced apple filling. Made with a flaky pie crust and a warm blend of cinnamon, nutmeg, and vanilla, they’re baked to golden perfection and sprinkled with coarse sugar for extra crunch. Ideal for a snack or dessert, these hand pies combine classic apple pie flavors in a convenient handheld form, perfect for any occasion.
Ingredients
Pie Crust
- 2 pie crusts (homemade or store-bought)
Filling
- 2 cups chopped apples (240 grams)
- ¼ cup granulated sugar (50 grams)
- 2 tablespoons all-purpose flour (15 grams)
- ½ teaspoon pure vanilla extract
- ½ to 1 teaspoon ground cinnamon (adjust to your personal preference)
- ⅛ teaspoon ground nutmeg
Egg Wash and Finishing
- 1 large egg lightly beaten
- 1 tablespoon milk (15 ml)
- 1 tablespoon butter (15 grams) cubed into small pieces (optional)
- Coarse sugar for sprinkling on top (optional)
Instructions
- Preheat Oven: Preheat your oven to 400°F (204°C). Line 1 to 2 large baking sheets with parchment paper or silicone baking mats to prevent sticking and ensure easy cleanup.
- Prepare Pie Crust Circles: Lightly flour a surface and roll out the pie crusts to about 1/8-inch thick. Use a 3.5-inch cookie cutter or cup to cut out approximately 18 to 20 circles. Reroll scraps as necessary. Place these circles on the prepared baking sheets and refrigerate to chill while preparing the filling.
- Make Apple Filling: In a mixing bowl, combine chopped apples with sugar, all-purpose flour, vanilla extract, ground cinnamon, and ground nutmeg, stirring well until the apples are evenly coated with the mixture.
- Mix Egg Wash: In a separate bowl, whisk together the beaten egg and milk thoroughly to create an egg wash. Set aside.
- Assemble Pies: Remove pie crust circles from the fridge. Spoon the apple filling onto half of the circles, leaving some space around the edges. Optionally, place 1 to 2 small cubes of butter on top of the filling in each pie to enhance richness.
- Seal Hand Pies: Place the remaining dough circles over the filled ones. Lightly dampen the edges with water or egg wash if needed, then press and crimp the edges with a fork to seal completely.
- Apply Egg Wash and Add Toppings: Brush the tops of each pie generously with egg wash. Sprinkle coarse sugar on top for extra texture and sweetness. Using a sharp knife, cut 2 to 3 small slits on the top of each pie to allow steam to escape during baking.
- Bake: Bake in the preheated oven for 18 to 22 minutes, or until the pies are golden brown and the filling is bubbling through the slits.
- Cool and Serve: Remove the pies from the oven and allow them to cool slightly on a wire rack before serving. This ensures the filling sets and the pies are easier to handle without the hot filling spilling out.
Notes
- Store pies in an airtight container at room temperature or in the refrigerator for 3 to 4 days.
- Freezing Instructions: After pies have cooled, freeze them individually on a lined baking sheet for 2 to 3 hours until firm. Wrap tightly with plastic wrap and store in a freezer bag or container for up to 3 months. Thaw to room temperature before serving.
- Adjust the ground cinnamon to taste; increasing it up to 1 teaspoon gives a stronger cinnamon flavor ideal for those who love the spice.
Nutrition
- Serving Size: 1 hand pie
- Calories: 220
- Sugar: 15g
- Sodium: 110mg
- Fat: 10g
- Saturated Fat: 4g
- Unsaturated Fat: 5g
- Trans Fat: 0g
- Carbohydrates: 29g
- Fiber: 2g
- Protein: 2g
- Cholesterol: 40mg


