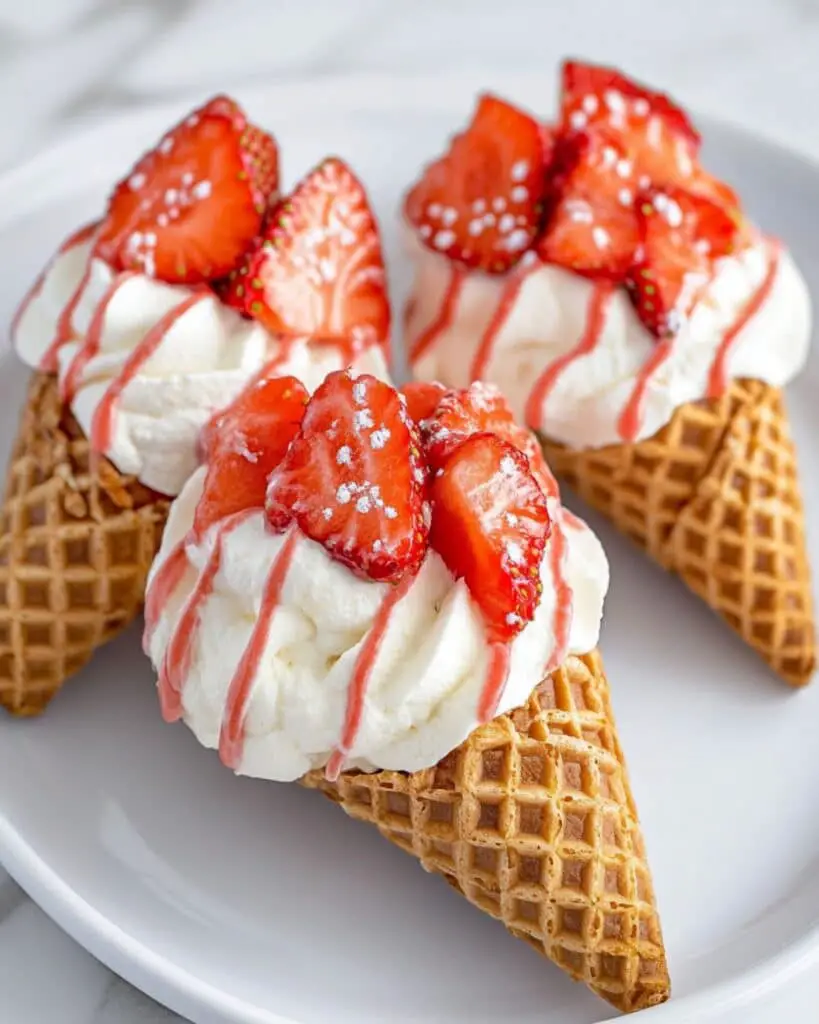
If you’re searching for a crowd-pleasing treat that’s as easy as it is irresistibly delicious, these Strawberry Crunch Cheesecake Cones might just be your new best friend in the kitchen. Imagine crunchy waffle cones coated in a golden strawberry-vanilla crumble, filled to the brim with fluffy, creamy cheesecake, then crowned with sweet strawberries and a dreamy vanilla drizzle. These cones have all the flavors of a nostalgic strawberry shortcake ice cream bar, but with a creamy cheesecake twist. They come together quickly, making them perfect for those busy weeknights when you want dessert to feel special—but not complicated.
Why You’ll Love This Recipe
- Fast and Fuss-Free: From start to finish, you’ll have these ready in about 35 minutes, with no fussy techniques or special tools.
- Incredible Flavor and Texture: Each bite hits you with creamy, sweet cheesecake, juicy strawberries, and that signature crispy, buttery crunch on the outside.
- Kid (and Adult) Friendly: Everyone loves the fun of eating dessert in a cone, and these are just as beloved at family gatherings as they are at potlucks or parties.
- Customizable: You don’t need to stick to strawberries—this recipe encourages you to get creative!
Ingredients You’ll Need
Here’s the lowdown on what you need and why it matters for maximum flavor and texture:
- Waffle Cones: The perfect crisp vessel for all that luscious filling—don’t skimp on quality here for the ultimate crunch.
- Fresh Chopped Strawberries: For juicy bursts of fruitiness in every bite. Make sure they’re ripe for the best flavor.
- White Cake Icing: Helps the crumble stick to the cones and adds a sweet base note.
- Golden Oreos: The secret to that signature crunch and buttery vanilla flavor—these take the crumble over the top.
- Melted Butter: Binds the Oreo crumbs together for perfect crispness after baking.
- Strawberry Jello Mix: A clever shortcut for bold strawberry flavor and that iconic pink color.
- Softened Cream Cheese: The backbone of the filling—it needs to be at room temperature for silky-smooth mixing.
- Cool Whip: Adds lightness and extra creaminess without the need for heavy whipping.
- Sugar: Keeps the filling sweet, but not overpowering.
- Vanilla Extract: Lends warmth and cozy bakery-style aroma to both the filling and drizzle.
- Flour: Just a bit thickens the filling, helping it stay inside the cone without dripping.
- Powdered Sugar: For a smooth drizzle that hardens just right.
- Heavy Whipping Cream: Adjusts the texture of the drizzle, making it pourable without being runny.
Note: You’ll find the complete list of ingredients, along with their exact measurements, in the printable recipe card at the bottom of this post.
Variations
Feeling adventurous? Try these easy swaps and tweaks:
- Berries Galore: Substitute or mix in chopped blueberries, raspberries, or blackberries.
- Chocolate Lovers’ Twist: Swap Golden Oreos for regular Oreos, use chocolate cake icing, and sprinkle with mini chocolate chips.
- Nuts for Texture: Mix finely chopped toasted pecans or walnuts into the crumb for a nutty crunch.
- Lemon Zest Upgrade: Add a teaspoon of fresh lemon zest to your cream cheese filling for bright, tangy notes.
- Gluten-Free Version: Use gluten-free cones and cookies—easy and just as delicious.
How to Make Strawberry Crunch Cheesecake Cones
Step 1: Prepare the Strawberry Crumble
Blitz those Golden Oreos in a food processor until they’re fine crumbs. Mix with melted butter, spread on a lined baking sheet, and bake at 350°F for 10 minutes—you want them fragrant and a little toasty. Once cooled slightly, toss the crumbs with strawberry Jello mix for that classic strawberry crunch coating.
Step 2: Coat the Cones
Generously spread white cake icing over the outside of each waffle cone, halfway down. This might get a little messy, but it’s worth it. Press the strawberry crumble into the icing, making sure the cones are thickly coated. Set them aside to set.
Step 3: Make the Creamy Cheesecake Filling
In a mixing bowl, beat the softened cream cheese until completely smooth. Add in sugar, flour, and vanilla extract, then keep mixing until you see a light, fluffy texture. Gently fold in the Cool Whip—don’t overmix, just enough to combine for that airy, cloudlike filling.
Step 4: Assemble the Cones
Spoon or pipe the cheesecake filling into each coated cone, filling generously. Top with plenty of chopped fresh strawberries—let them tumble over the top.
Step 5: The Finishing Drizzle
Whisk together powdered sugar, heavy cream (add a little at a time until you reach a thick, pourable consistency), and a touch of vanilla. Drizzle over the strawberries and filling.
Enjoy immediately, or pop them in the fridge for a quick chill—just try not to sneak one before serving!
Pro Tips for Making the Recipe
- Soften the Cream Cheese: Let it come fully to room temperature so your filling stays perfectly smooth.
- Use a Piping Bag: For stunning, bakery-style cones, transfer the cheesecake filling to a piping bag (or a zip-top bag with the corner snipped) before filling the cones.
- Don’t Overbake Crumble: Keep an eye on those crumbs—they should crisp up but not brown too much. Golden is perfect.
- Chill Before Serving: If you have the time, chilling filled cones 15-30 minutes firms up the cheesecake and intensifies the flavors.
How to Serve
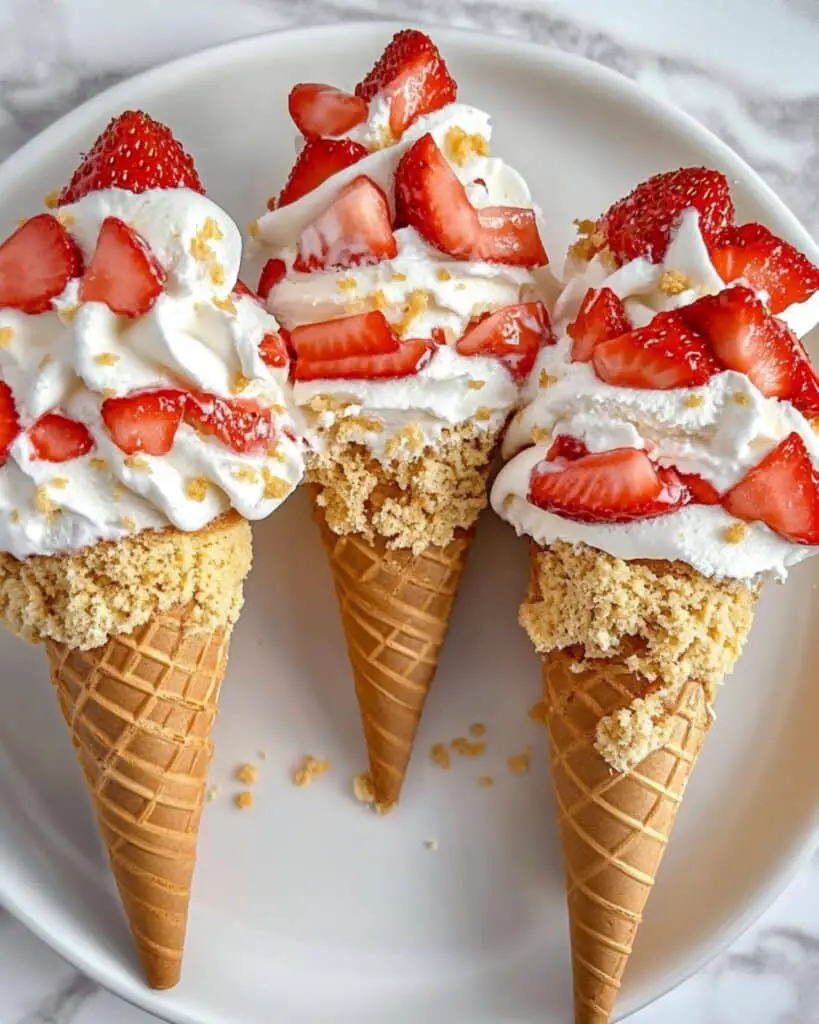
Strawberry Crunch Cheesecake Cones are best enjoyed fresh and chilled. Serve them upright in a tall glass or dessert stand to show off those beautiful coatings and luscious fillings. These cones pair wonderfully with:
- Cold Brew Coffee, Iced Latte, or Fresh Lemonade: The rich, creamy filling and sweet fruit balance out a slightly bitter or citrusy drink.
- A Bowl of Mixed Berries: For a little more fruit and freshness alongside.
- Chocolate Shavings or Sprinkles: For an extra touch of fun, especially for parties.
Tip: Hosting a gathering? Let guests build their own cones, assembly-bar style!
Make Ahead and Storage
Storing Leftovers
Pop any leftover filled cones in an airtight container in the fridge. They’ll stay delicious for about 2-3 days, though the cones will begin to soften over time.
Freezing
It’s best not to freeze the assembled cones (the texture just isn’t the same), but you can freeze the prepared cheesecake filling alone. Defrost in the fridge, stir, pipe, and serve as needed.
Reheating
Thankfully, these beauties need no reheating! Simply chill (if desired) and enjoy straight from the fridge.
FAQs
-
Can I make these cones a day ahead?
Absolutely! If making in advance, keep the coated cones and filling separate. Assemble and add strawberries and drizzle just before serving for crispest results.
-
Can I use homemade whipped cream instead of Cool Whip?
Yes, you can! Whip heavy cream with a bit of sugar until stiff peaks form, then fold into the cream cheese mixture. It will be a bit less sweet and ultra-light.
-
Are there nut-free alternatives for the crumble?
Definitely—just skip adding any nuts and stick to cookies, butter, and Jello mix for the classic version.
-
What if I don’t have a food processor to crush the cookies?
No problem! Place the Oreos in a sturdy zip-top bag and crush them with a rolling pin or heavy pan until fine. It’s a bit therapeutic, too.
Final Thoughts
Strawberry Crunch Cheesecake Cones are simply joyful: playful, beautiful, and outrageously tasty. They deliver everything you want in a dessert—sweet, creamy, and crunchy—in just minutes. Whether you’re making them for your family, friends, or just to treat yourself after a long day, don’t be surprised if they disappear fast. Give them a try; they’re guaranteed to become a new favorite!
Print
Strawberry Crunch Cheesecake Cones Recipe
- Prep Time: 25 minutes
- Cook Time: 10 minutes
- Total Time: 35 minutes
- Yield: 6 cones
- Category: Desserts
- Method: No-cook
- Cuisine: American
- Diet: Vegetarian
Description
Strawberry Crunch Cheesecake Cones are a delightful no-bake dessert featuring waffle cones coated in a strawberry Oreo crunch, filled with a creamy cheesecake mixture, topped with fresh strawberries, and finished with a sweet vanilla drizzle. This fun, hand-held treat combines the classic flavor of strawberry shortcake with creamy cheesecake, perfect for parties, summer gatherings, or any occasion where you want an easy yet impressive dessert.
Ingredients
For the Cones
- 6 Waffle cones
- Fresh chopped strawberries (for topping)
For the Crumb Coating
- 16 Golden Oreos
- 3 Tbsp. Melted butter
- 3 oz. box Strawberry Jello mix
- White cake icing (enough to spread on 6 cones)
For the Cheesecake Filling
- 16 oz. Cream cheese, softened
- 8 oz. Cool Whip (whipped topping)
- 1/2 cup Sugar
- 2 tsp. Vanilla extract
- 2 Tbsp. Flour
For the Drizzle
- 1 cup Powdered sugar
- 3-4 Tbsp. Heavy whipping cream
- 1/2 tsp. Vanilla extract
Instructions
- Prepare the Oven and Crumble: Preheat your oven to 350°F (175°C). Place the Golden Oreos in a food processor or blender and pulse until finely crumbled. Mix the cookie crumbs with the melted butter until well combined.
- Bake the Crumble: Spread the crumb and butter mixture on a parchment-lined baking sheet. Bake for 10 minutes until golden and slightly crisp. After baking, immediately mix in the strawberry Jello powder until thoroughly combined, then let the crumble cool.
- Coat the Cones: Using a small spatula or butter knife, spread white cake icing over the outside of each waffle cone, about halfway down. Roll or press each cone into the strawberry Oreo crumbles, ensuring a generous coating adheres to the icing. Set aside to firm up.
- Make the Cheesecake Filling: In a mixing bowl, beat the softened cream cheese with an electric mixer until smooth. Add sugar, flour, and 2 tsp. vanilla extract, and beat until fluffy and well combined. Gently fold in the Cool Whip until the filling is light and creamy.
- Assemble the Cones: Spoon or pipe the cheesecake filling into each prepared cone, filling nearly to the top. Sprinkle generous amounts of chopped fresh strawberries over the cheese filling.
- Prepare the Drizzle: In a small bowl, whisk together powdered sugar, heavy whipping cream (add gradually to reach desired consistency), and 1/2 tsp. vanilla extract until smooth and pourable.
- Finish and Serve: Drizzle the vanilla glaze over the filled cones using a spoon or piping bag. Serve immediately for best texture, or refrigerate until ready to serve.
Notes
- For a firmer filling, refrigerate the cheesecake mix for 30 minutes before piping into cones.
- Customize with other fresh fruit toppings if desired, like blueberries or raspberries.
- Fill cones just before serving to prevent sogginess.
- You can use homemade whipped cream instead of Cool Whip for a richer flavor.
Nutrition
- Serving Size: 1 cone
- Calories: 530
- Sugar: 39g
- Sodium: 320mg
- Fat: 31g
- Saturated Fat: 17g
- Unsaturated Fat: 10g
- Trans Fat: 0g
- Carbohydrates: 57g
- Fiber: 1g
- Protein: 6g
- Cholesterol: 75mg

