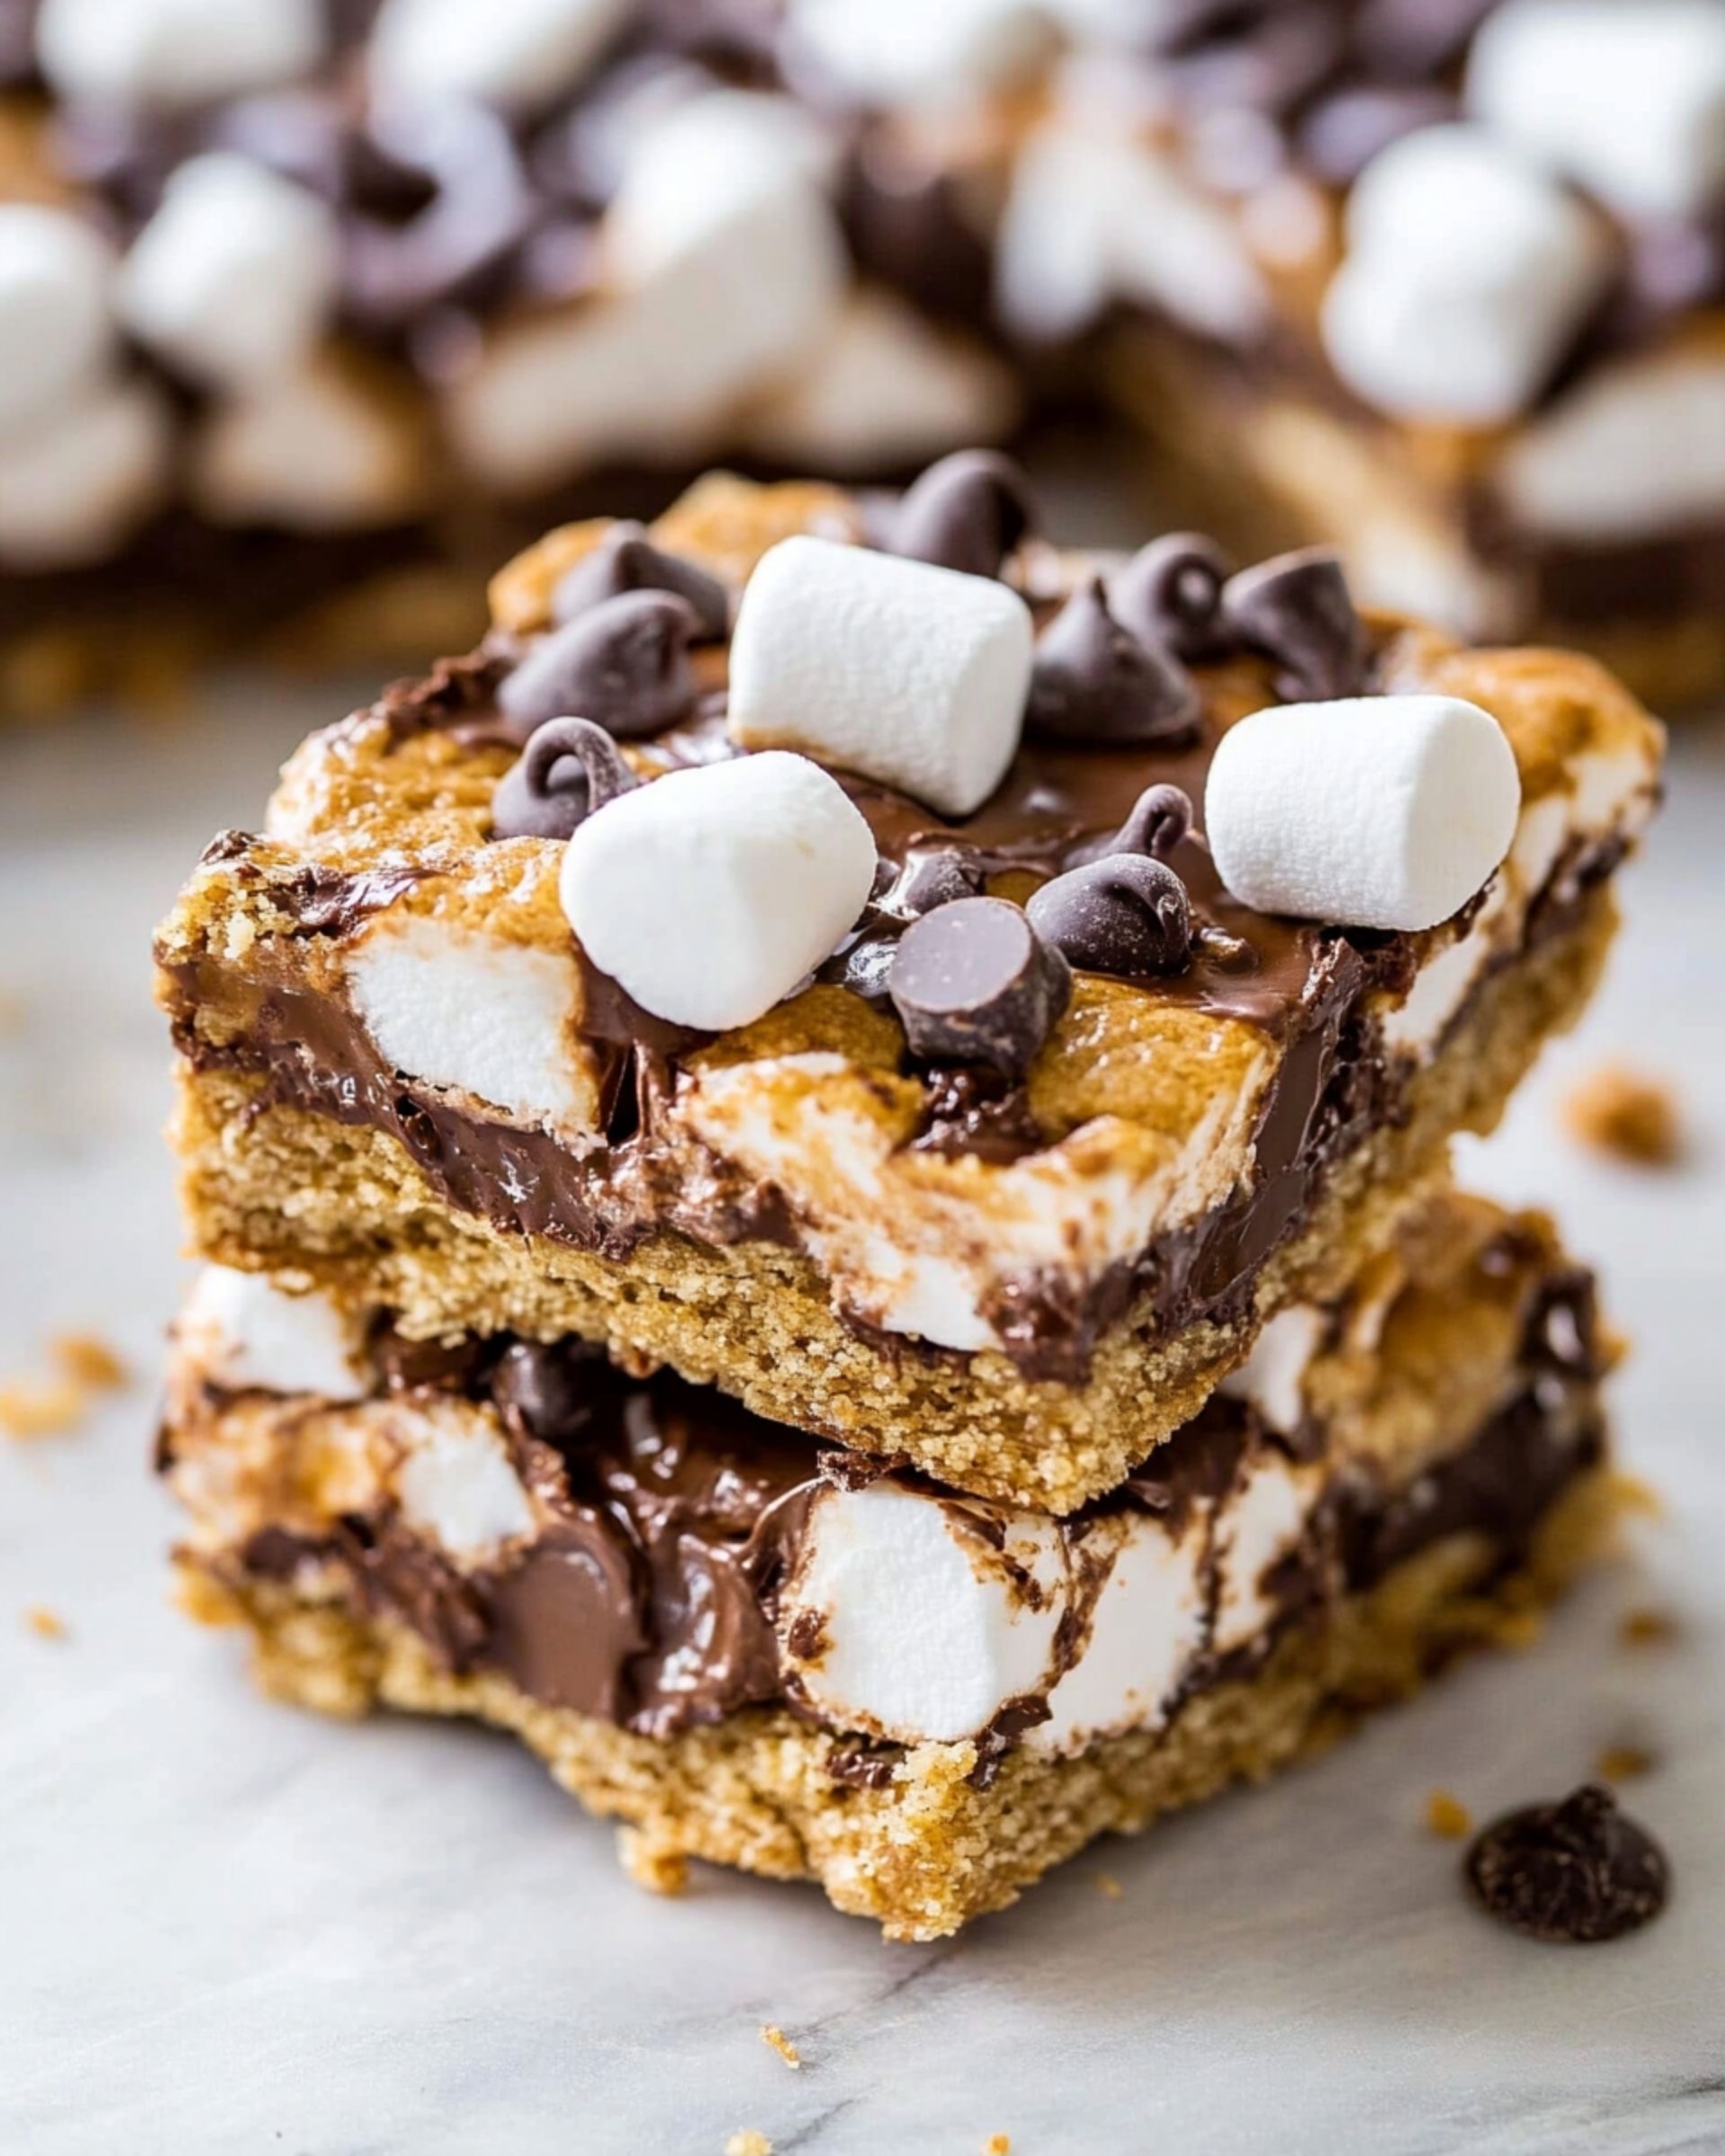
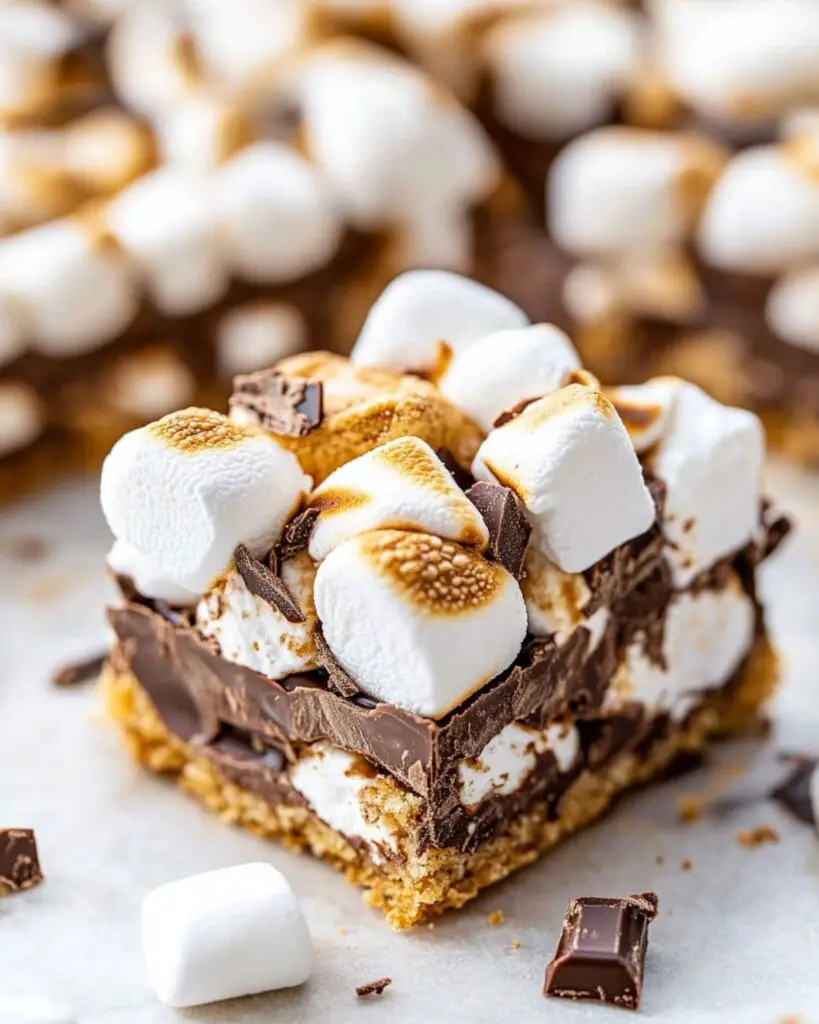
Imagine all the gooey, chocolatey, crispy magic of a campfire s’more—minus the sticky fingers and smokey hair! No Bake S’more Bars deliver everything you love about that classic treat in one ridiculously simple, no-fuss recipe. In just minutes, you’ve got the ultimate dessert bar that will make both kids and grown-ups do a happy dance. Sweet, chewy, a little crunchy, and loaded with melty chocolate, this recipe is your ticket to stress-free deliciousness any night of the week.
Why You’ll Love This Recipe
- Insanely Easy: These bars come together in a flash—no oven, no fuss, just a handful of pantry staples.
- Crowd Pleaser: Who doesn’t adore s’mores? These bars have all the flavors everyone loves, but served in a much neater package.
- Make-Ahead Friendly: Perfect for parties, lunch boxes, or last-minute guests—slice and stash, and you’re ready for anything.
- Customizable: Whether you’re craving extra chocolate or a sprinkle of sea salt, this recipe plays well with your personal twists.

Ingredients You’ll Need
Let’s talk about what makes these bars so special and how each ingredient shines:
- Cooking Spray: Keeps everything from sticking to your pan—trust, you don’t want to wrestle with gooey marshmallows!
- Salted Butter, Melted: Adds richness and that tiny bit of saltiness you need to really bring out the sweet flavors.
- Mini Marshmallows: The secret to gooey s’more texture—use most in the base, save a handful for those irresistible pockets of melty goodness.
- Golden Grahams Cereal: Truly, there’s no better substitute for that toasty, graham cracker crunch in every bite.
- Chocolate Chips: It’s s’mores, so you need plenty of chocolate. Use a mix of semi-sweet or milk chocolate for balance.
Note: You’ll find the complete list of ingredients, along with their exact measurements, in the printable recipe card at the bottom of this post.
Variations
There are so many ways to make these bars your own:
- Add a Crunch: Mix in a handful of chopped toasted nuts or pretzel pieces for salty-sweet flavor.
- Make It Gluten-Free: Use your favorite gluten-free cereal instead of Golden Grahams.
- Peanut Butter Boost: Swirl a spoonful of peanut butter into the melted marshmallow mixture—it’s a game changer!
- Go Dark: For a more grown-up take, use dark chocolate chunks and a sprinkle of flaky sea salt on top.
- Extra Marshmallowy: Add some mini marshmallows right on top (and even torch them lightly for that classic toasted look and taste).
How to Make No Bake S’more Bars
Prepare Your Pan
First, grab an 8×8-inch pan or similar. Line it with parchment paper for easy removal and give a good spray with cooking spray. Don’t skip this! Marshmallow stickage is real.
Melt the Butter and Marshmallows
In a large non-stick pot on medium-low heat, melt the salted butter. Toss in almost all your mini marshmallows (save a big handful for later). Stir gently until everything becomes smooth and glossy.
Mix in the Cereal
Turn off the heat. Right away, fold in the Golden Grahams cereal and stir until every piece is coated in the sticky marshmallow mixture. Then, add in that reserved handful of marshmallows and most of the chocolate chips—this approach gives you lovely gooey bits and melting chocolate ribbons throughout.
Press into the Pan
Pour the mixture into your prepared pan. Press down with a greased spatula or your clean hands (spray them with cooking spray first—trust me) to make an even layer.
Add More Chocolate
While the bars are still warm, scatter the remaining chocolate chips over the top. Let the heat from the bars soften the chocolate, then gently press them in. Want a little extra drama? Add a few more marshmallows and use a kitchen torch to toast them.
Set & Slice
Let your bars cool completely at room temperature (or speed things up with a short stint in the fridge if you’re in a hurry). Once they’re set, slice into squares and marvel at your handiwork!
Pro Tips for Making the Recipe
- Work Fast: Once the cereal and marshmallow mixture is combined, act quickly—marshmallow sets up fast.
- Parchment Paper is Your Best Friend: It’ll make lifting the bars out for slicing so much easier.
- Don’t Pack Too Hard: Press firmly, but don’t squish! You want a chewy, not brick-hard, bite.
- Spray Everything: From your spoon to your hands, a bit of cooking spray stops a sticky mess.
How to Serve
These bars shine all on their own, but pairing can take them up a notch:
Dessert Platter
Arrange them with fresh berries, strawberries, or graham cracker sticks for a fun dessert board.
Warm and Gooey
Pop a square in the microwave for 10 seconds for extra meltiness—especially good with a scoop of vanilla ice cream.
Party Treat
Wrap individually in wax paper or cellophane for a grab-and-go school snack or bake sale hit.
Make Ahead and Storage
Storing Leftovers
Keep your s’more bars in an airtight container at room temperature for 3-4 days. They’ll stay chewy and delicious—no fridge required.
Freezing
You can freeze the cut squares. Just separate layers with parchment paper and store in a freezer-safe bag for up to a month. Thaw at room temperature, and they’ll be as delightful as ever.
Reheating
There’s no real need to reheat these, but if you want gooey marshmallow vibes, a few seconds in the microwave works wonders.
FAQs
-
Can I use large marshmallows instead of mini?
Absolutely! Just chop them into smaller pieces so they melt evenly. The key is to get an even, creamy base without big lumps.
-
Do I have to use Golden Grahams cereal?
Golden Grahams really nail that s’mores flavor, but if you’re in a pinch, try a similar graham-tasting cereal or even broken graham crackers. The texture may be a bit different, but still delicious.
-
Can I make these bars dairy-free?
With simple swaps like dairy-free butter and chocolate chips, you can easily make a batch that works for everyone. The flavor and texture hold up beautifully.
-
The bars are hard after cooling—what went wrong?
This typically happens if the cereal is over-mixed or the bars are pressed down too firmly, compacting everything too tightly. Next time, mix and press just until combined for that soft, chewy bite.
Final Thoughts
No Bake S’more Bars are hands-down one of the easiest treats you’ll ever whip up, but they look (and taste) like something special. Whether you’re treating yourself on a busy weeknight or need a sweet for a last-second party, these bars deliver big on flavor and nostalgia—without the bonfire cleanup. It’s time to make your kitchen the coziest campfire around. Give this recipe a try and watch every bite disappear!
Print
No Bake S’more Bars Recipe
- Prep Time: 10 minutes
- Cook Time: 10 minutes
- Total Time: 20 minutes (plus 1-2 hours to cool/set)
- Yield: 16 bars
- Category: Desserts
- Method: No-cook
- Cuisine: American
- Diet: Vegetarian
Description
No Bake S’more Bars are an easy, delicious treat that channels classic campfire flavors with minimal effort. Using Golden Grahams cereal, melted butter, marshmallows, and chocolate chips, these bars are chewy, crunchy, sweet, and loaded with nostalgic s’mores flavor—perfect for picnics, parties, or a quick dessert fix.
Ingredients
Prep Ingredients
- Cooking spray (for greasing the pan)
Main Bars
- 3 Tablespoons salted butter, melted
- 10 ounces mini marshmallows, divided
- 5 cups Golden Grahams cereal
Chocolate
- 1 cup chocolate chips
- 1 small handful of chocolate chips (for topping)
Instructions
- Prepare the Pan: Spray a 9×9-inch (or similar size) baking pan with cooking spray to prevent sticking. Set aside.
- Melt Butter and Marshmallows: In a large pot over medium-low heat, melt the 3 tablespoons of salted butter. Add most of the mini marshmallows (reserve about 1 cup for later), and stir continuously until the marshmallows are completely melted and smooth.
- Mix Cereal and Extra Marshmallows: Remove the pot from heat. Immediately stir in the Golden Grahams cereal and the reserved 1 cup of mini marshmallows. Quickly and gently fold until the cereal and marshmallows are fully coated with the melted mixture.
- Add Chocolate Chips: Let the mixture cool for 1-2 minutes, then fold in 1 cup of chocolate chips (this helps prevent the chocolate from melting completely and lets you have visible chocolate pieces in each bar).
- Press into Pan: Spoon the mixture into the prepared pan. With buttered hands or a greased spatula, gently press the mixture evenly without compacting it too much (to keep the bars chewy).
- Toppings: While the mixture is still a bit warm, sprinkle a small handful of chocolate chips over the top, pressing them in lightly so they stick.
- Cool and Slice: Allow bars to cool completely at room temperature, about 1-2 hours. Once set, cut into squares and serve.
Notes
- For cleaner cuts, use a sharp, lightly greased knife.
- Do not overheat the marshmallow mixture to avoid hard bars.
- To speed up cooling, refrigerate bars for about 30 minutes, but serve at room temperature for best texture.
- Store bars in an airtight container at room temperature for up to 3 days.
Nutrition
- Serving Size: 1 bar
- Calories: 160
- Sugar: 12g
- Sodium: 110mg
- Fat: 6g
- Saturated Fat: 3g
- Unsaturated Fat: 2.5g
- Trans Fat: 0g
- Carbohydrates: 26g
- Fiber: 1g
- Protein: 1.5g
- Cholesterol: 8mg


