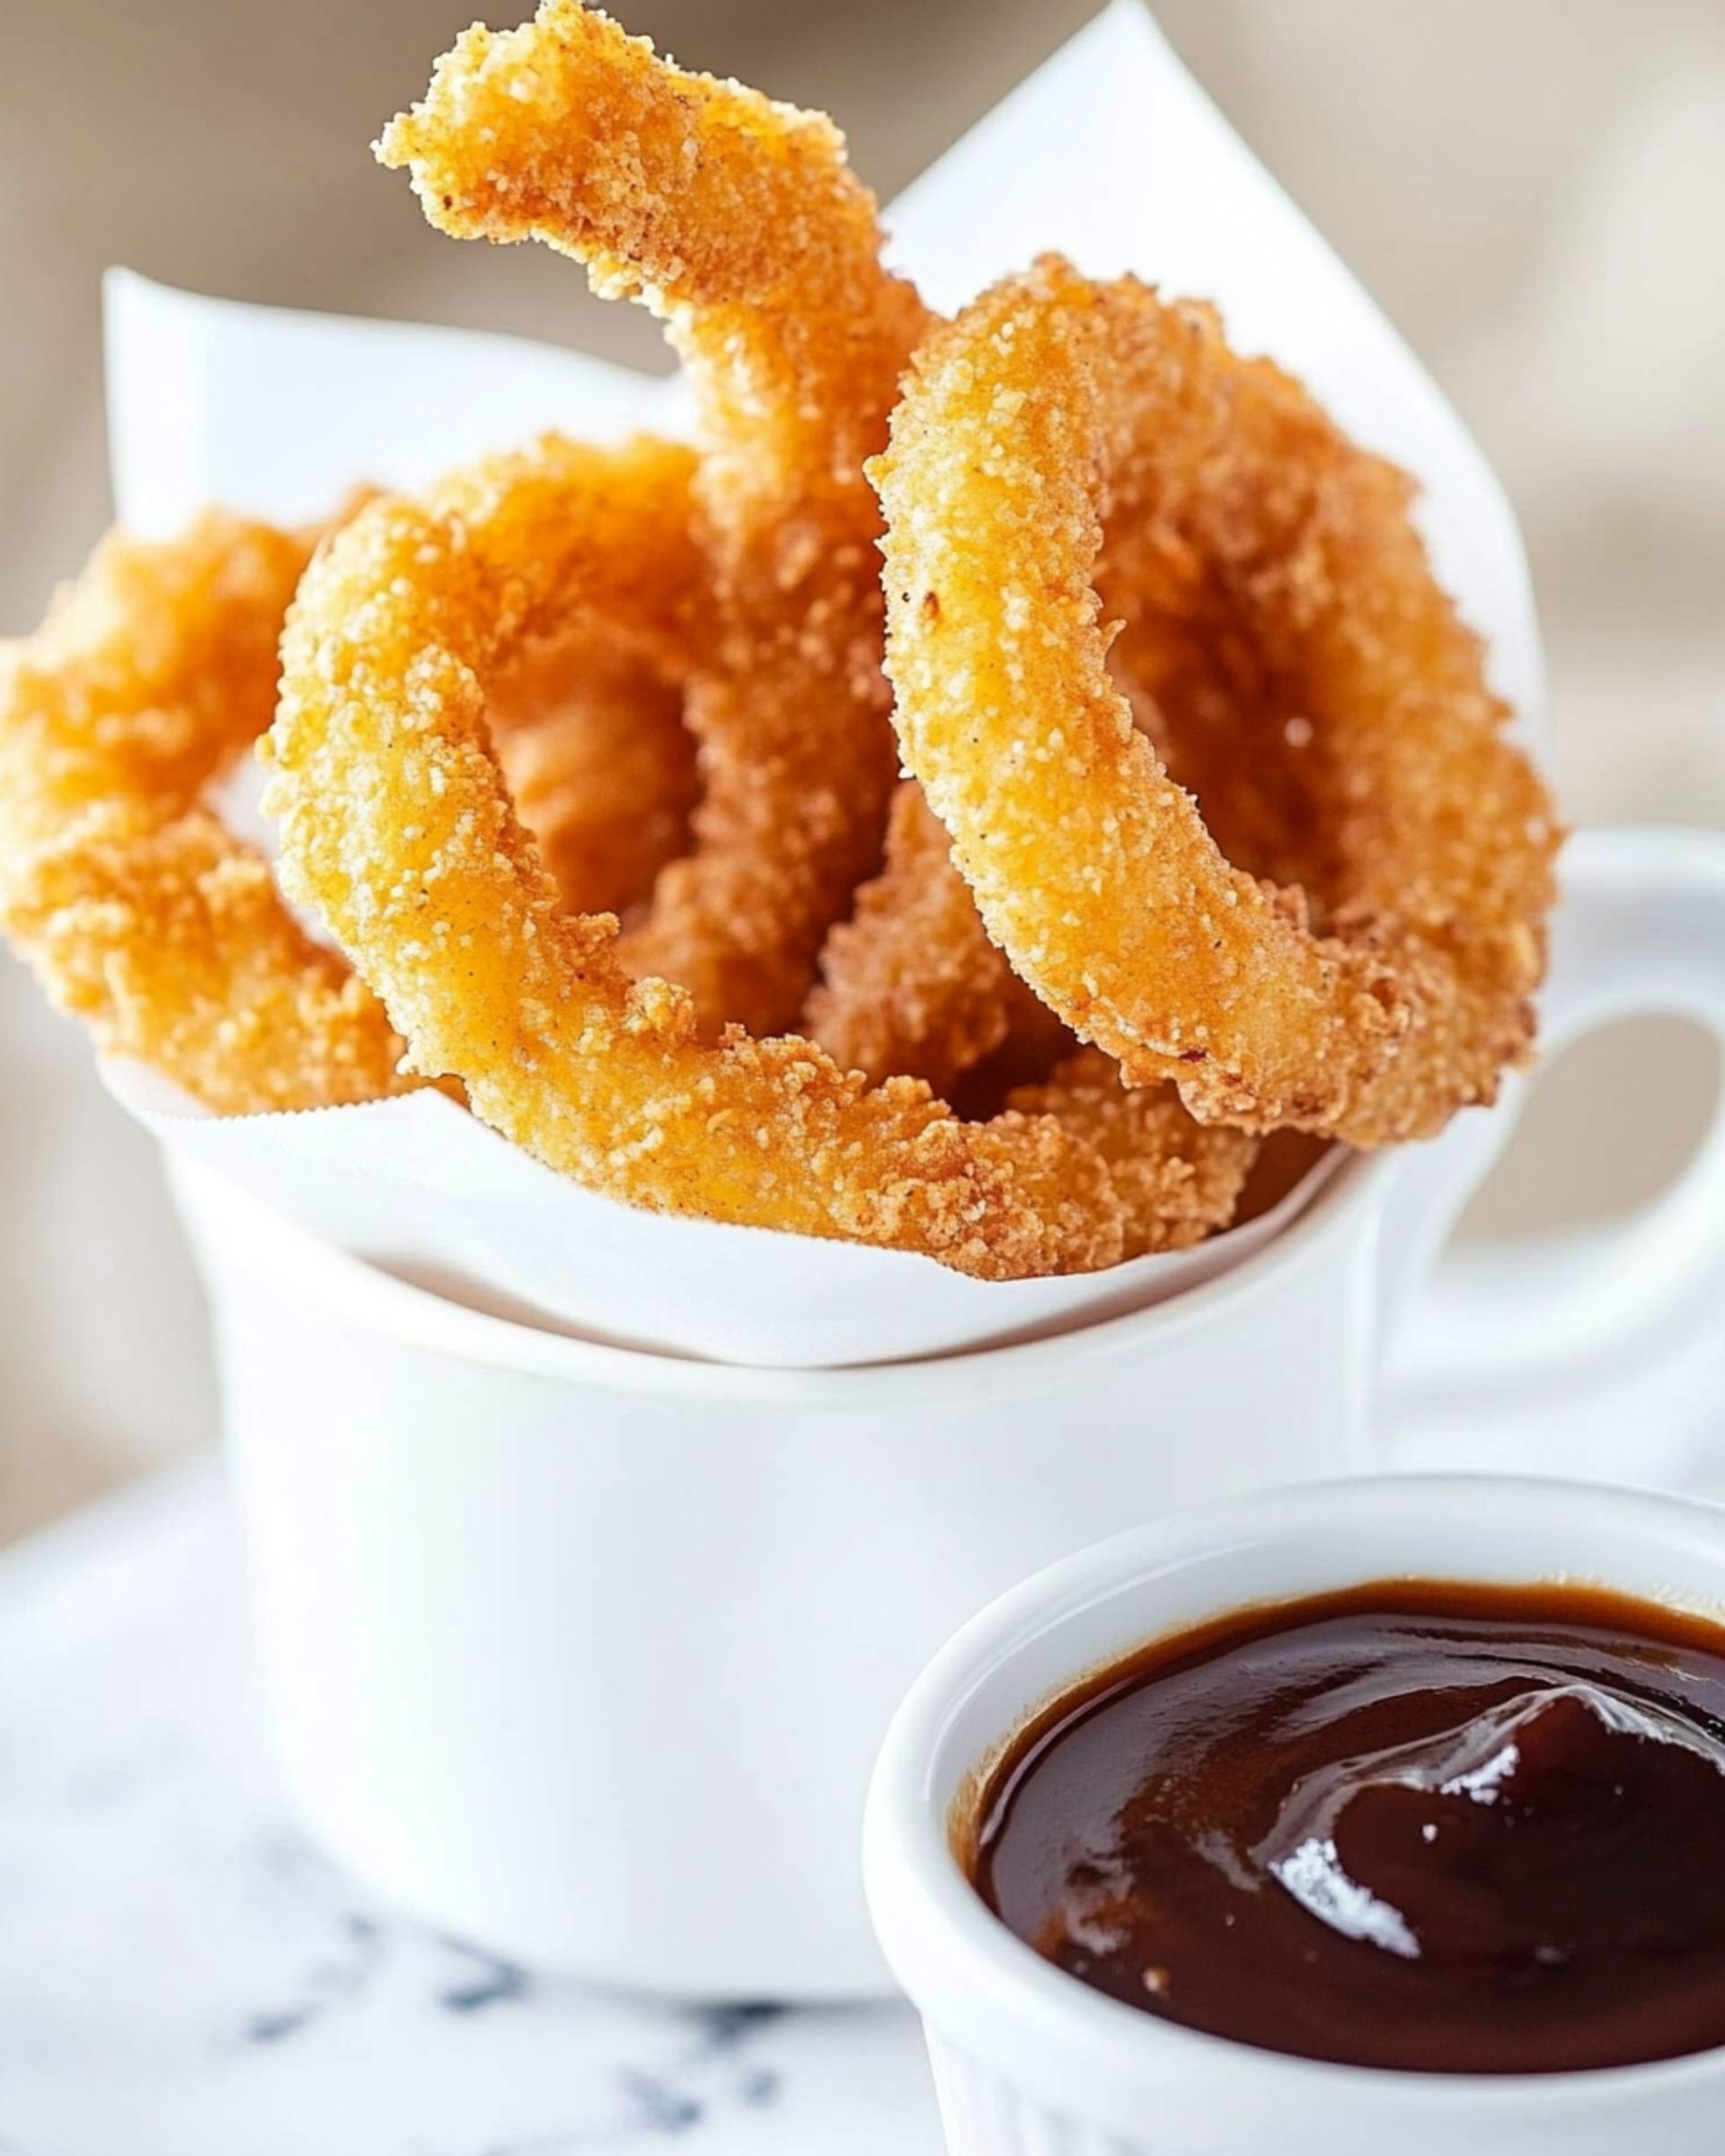
Crispy, golden-brown onion rings without the guilt of deep frying? Yes, please! These Air Fryer Onion Rings deliver that perfect crunch and sweet onion flavor you crave, but with significantly less oil. Ready in just over 20 minutes, they’re the ideal side dish or snack when you want something special without spending hours in the kitchen or dealing with the mess of traditional frying.
Why You’ll Love This Recipe
- Healthier Option: Get that irresistible crunch without submerging your onion rings in a vat of oil. The air fryer gives you that perfect golden exterior while using just a fraction of the oil.
- Restaurant-Quality Results: These aren’t your average homemade onion rings. The triple-dredge technique creates that satisfying crunch that rivals your favorite restaurant version.
- Quick and Easy: From start to finish in about 22 minutes, these onion rings are perfect for weeknight dinners or when unexpected cravings strike.
- Family Favorite: Even picky eaters tend to love these crispy delights. They’re the perfect gateway veggie for those who “don’t like vegetables.”
Ingredients You’ll Need
- Yellow Sweet Onion: The star of the show! Sweet onions have a milder, less pungent flavor that caramelizes beautifully when cooked. Slicing them 1/2-inch thick gives you that perfect ring that holds up well to the breading process.
- All-Purpose Flour: Creates the initial dry coating that helps everything else stick. It’s the essential first layer in our triple-dredge system.
- Paprika: Adds a subtle smoky flavor and beautiful color to the coating.
- Salt: Enhances all the flavors. Don’t skip it, as properly seasoned breading makes all the difference.
- Buttermilk: Provides tanginess and helps the breading adhere to the onion rings. The acidity in buttermilk also tenderizes the onions slightly.
- Egg: Acts as a binding agent, ensuring your coating stays put during the cooking process.
- Panko Breadcrumbs: The secret to extra crispiness! These Japanese-style breadcrumbs are airier than traditional breadcrumbs, creating that light, crunchy exterior.
- Olive Oil: Mixed with the panko to help it crisp up perfectly in the air fryer. This is the trick to getting that “fried” taste without deep frying.
- Oil Spray: Optional but recommended for that extra golden finish. A light spritz halfway through cooking helps achieve that perfect color.
Note: You’ll find the complete list of ingredients, along with their exact measurements, in the printable recipe card at the bottom of this post.
Variations
Flavor Boosters
Add garlic powder, onion powder, or cayenne pepper to the flour mixture for an extra flavor kick. Italian seasoning or ranch seasoning mix can also create delicious variations.
Gluten-Free Version
Substitute all-purpose flour with gluten-free flour and use gluten-free panko breadcrumbs. The texture may be slightly different, but they’ll still be delicious.
Spicy Onion Rings
Add hot sauce to the buttermilk mixture or cayenne pepper to the flour for a spicy kick that pairs wonderfully with cool dipping sauces.
Herb-Infused
Mix fresh chopped herbs like parsley, thyme, or rosemary into the panko mixture for an aromatic twist.
How to Make Air Fryer Onion Rings
Step 1: Prepare Your Dredging Stations
Set up 4 shallow bowls. In the first, combine flour, paprika, and ½ teaspoon salt. In the second, mix buttermilk, egg, and ¼ cup of the flour mixture from the first bowl. In the third, mix panko breadcrumbs, remaining ½ teaspoon salt, and olive oil until the oil is evenly distributed. Pour half the panko into a fourth bowl (this keeps your panko from getting too clumpy).
Step 2: Prep and Bread the Onion Rings
Pat the onion rings dry with paper towels to remove excess moisture (crucial for crispiness!). Using a fork, dredge each ring in the flour mixture, then dip in the buttermilk mixture, and finally coat thoroughly in panko. Place them on a baking sheet.
Step 3: Freeze (Optional but Recommended)
Freeze the breaded onion rings for 15 minutes. This helps the coating stick better during cooking and creates an even crispier exterior.
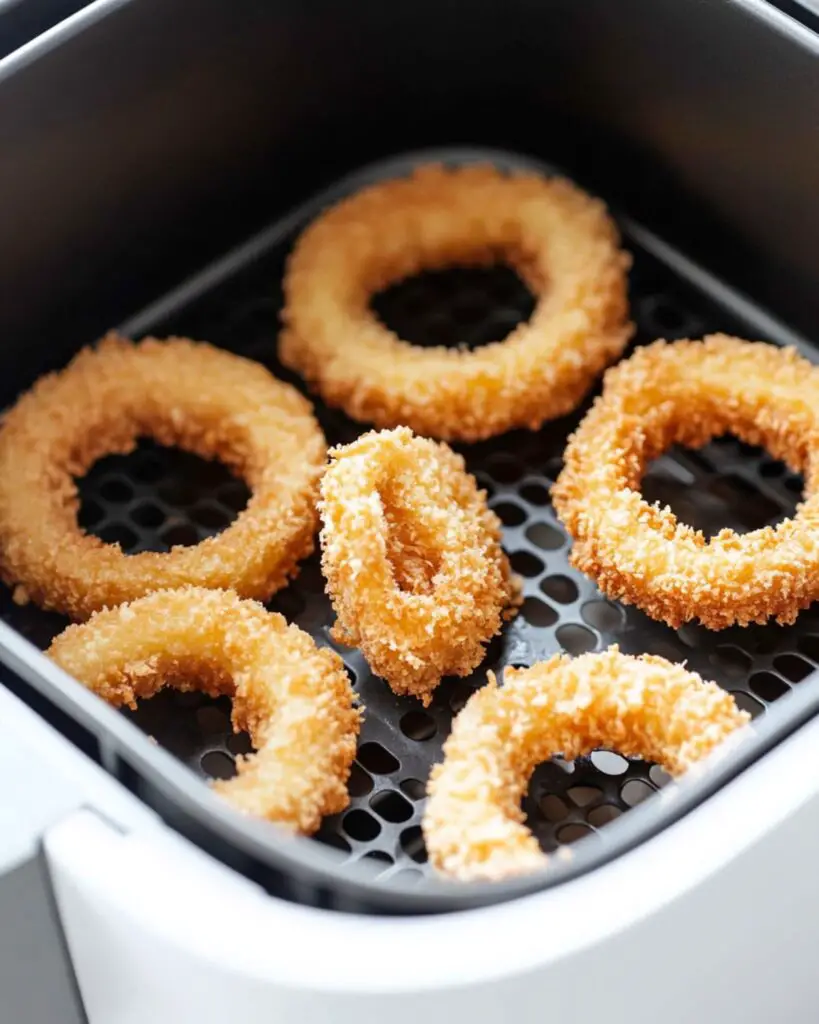
Step 4: Air Fry to Perfection
Spray your air fryer basket with oil. Arrange onion rings in a single layer, allowing space between them (you can place smaller rings inside larger ones to maximize space). Cook at 400°F for 11-15 minutes until golden brown and crispy. Spray lightly with cooking oil around the 6-minute mark for extra crispiness.
Step 5: Serve
Carefully remove the onion rings using a spatula or fork to avoid disturbing the coating. Serve immediately while hot and crispy!
Pro Tips for Making the Recipe
- Use Sweet Onions: Vidalia, Walla Walla, or other sweet onion varieties will give you the best flavor. They’re less pungent and caramelize beautifully.
- Dry Thoroughly: Don’t skip patting the onion rings dry. Excess moisture is the enemy of crispiness!
- Don’t Crowd the Basket: Cook in batches if necessary. Overcrowding leads to steaming instead of crisping.
- Make Your Own Buttermilk: No buttermilk? No problem! Add 1½ teaspoons of vinegar or lemon juice to ½ cup of milk and let it sit for 5 minutes.
- The Panko Trick: Dividing the panko between two bowls prevents all of it from getting clumpy from the wet batter, ensuring each ring gets a nice, dry coating.
- Freeze Before Cooking: Those 15 minutes in the freezer make a noticeable difference in how well the coating adheres during cooking.
How to Serve
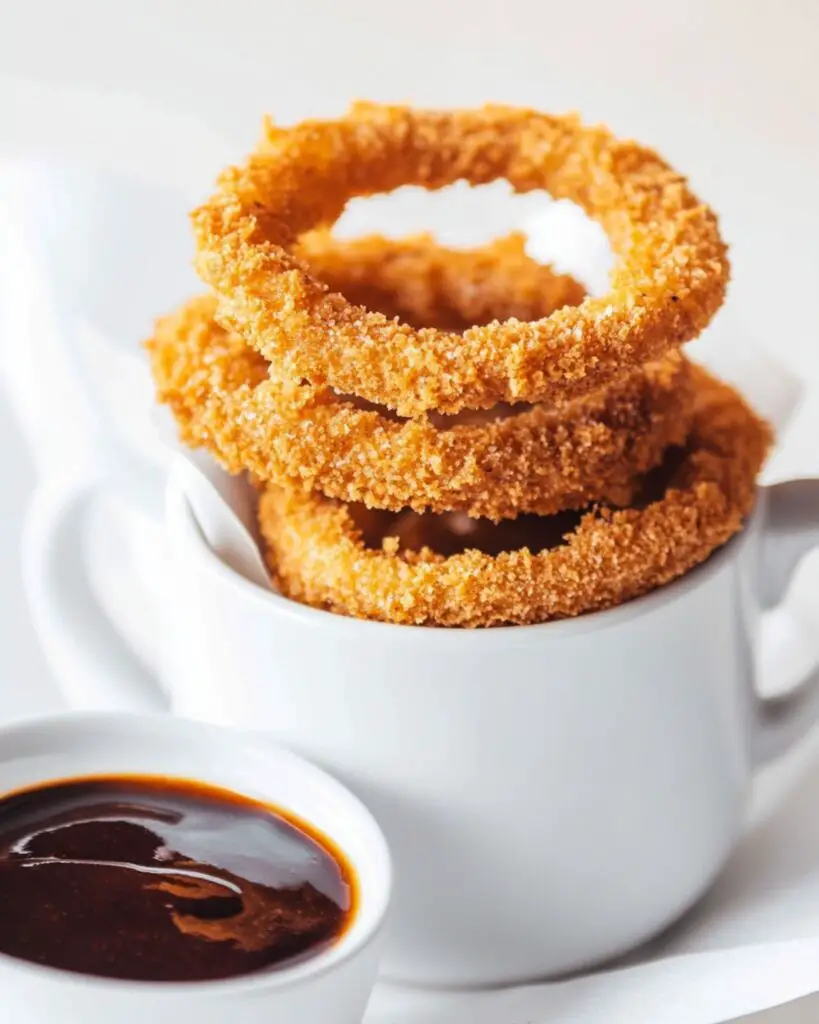
Dipping Sauces
These onion rings shine with classic dipping sauces like:
- Spicy mayo (just mix mayo with hot sauce)
- Ranch dressing
- BBQ sauce
- Honey mustard
- Ketchup with a dash of hot sauce
Perfect Pairings
Serve alongside:
- Burgers or sandwiches as the perfect sidekick
- Grilled chicken or fish for a complete meal
- As part of a game day spread with other finger foods
- Atop a salad for added crunch and flavor
Make Ahead and Storage
Storing Leftovers
Place cooled onion rings in an airtight container with paper towels between layers to absorb moisture. Refrigerate for up to 2 days, though they’re best enjoyed fresh.
Freezing
You can freeze the breaded, uncooked onion rings for up to 3 months. Place them in a single layer on a baking sheet until frozen solid, then transfer to a freezer bag. Cook directly from frozen, adding 2-3 minutes to the cooking time.
Reheating
For the best texture when reheating, place leftover onion rings in the air fryer at 370°F for 2-3 minutes. They’ll crisp right back up! Avoid the microwave, which will make them soggy.
FAQs
-
Can I make these onion rings without an air fryer?
Absolutely! Bake them in a preheated oven at 425°F for about 15-18 minutes, flipping halfway through. They won’t be quite as crispy as the air fryer version, but still delicious. For extra crispiness, place them on a wire rack over a baking sheet.
-
Why did my breading fall off during cooking?
This usually happens if the onions weren’t dried well enough or if you skipped the freezing step. Make sure to pat the onions thoroughly dry before dredging and consider freezing them briefly before air frying to help the coating adhere better.
-
What’s the best onion to use for onion rings?
Sweet onions like Vidalia or Walla Walla are ideal because of their milder, sweeter flavor. Yellow onions work well too. White onions can be used but tend to have a stronger, more pungent flavor. Red onions are beautiful but can sometimes be too strong for onion rings.
-
Can I make these ahead for a party?
For the best texture, I recommend breading the onion rings ahead of time and freezing them uncooked. Then air fry them just before serving. If you must cook them ahead, reheat them in the air fryer at 370°F for 2-3 minutes to crisp them back up before serving.
Final Thoughts
These Air Fryer Onion Rings bring the joy of a classic comfort food to your table without the guilt or mess of deep frying. The perfect combination of sweet onion wrapped in a golden, crunchy coating will have everyone reaching for seconds. Whether served alongside your favorite burger or enjoyed as a snack on their own, these crispy rings are guaranteed to impress. Give this recipe a try—I promise it’ll become a regular in your cooking rotation!
Print
Air Fryer Onion Rings Recipe
- Prep Time: 10 minutes
- Cook Time: 12 minutes
- Total Time: 22 minutes
- Yield: 2 servings 1x
- Category: Snacks
- Method: Air Frying
- Cuisine: American
- Diet: Vegetarian
Description
Crispy and flavorful Air Fryer Onion Rings are a healthier alternative to traditional deep-fried onion rings. Made with sweet yellow onions, a perfectly seasoned coating, and cooked to golden perfection in the air fryer, these rings are delightfully crunchy on the outside and tender on the inside.
Ingredients
Main Ingredients
- 1 large yellow sweet onion, sliced 1/2-inch thick and separated into rings
For the Coating
- 1/2 cup all-purpose flour
- 1 tsp paprika
- 1 tsp salt (divided)
- 1/2 cup buttermilk (see tips for homemade substitution)
- 1 egg
- 1 cup panko breadcrumbs
- 2 Tbsp olive oil
For Cooking
- Oil spray (optional, for spraying the air fryer basket and onion rings)
Instructions
- Prepare Coating Bowls – Arrange 4 shallow bowls or deep plates. In the first, whisk together flour, paprika, and 1/2 tsp salt. In the second, mix buttermilk and egg, then add 1/4 cup of the flour mixture from the first bowl. In the third, combine panko breadcrumbs, the remaining 1/2 tsp salt, and olive oil, using a fork to mix until oil is evenly distributed. Divide the panko mixture into the third and a fourth bowl, so you can switch bowls if the breadcrumbs get too sticky.
- Prep Onions – Pat the onion rings dry with paper towels to remove any excess moisture. This helps the coating stick better and ensures extra crispiness.
- Bread the Onion Rings – Using a fork, coat each onion ring first in the flour mixture, then dip into the buttermilk mixture, and finally dredge in the panko mixture until fully coated. TIP: For best results, place the breaded onion rings on a baking sheet and freeze for 15 minutes to help the coating adhere.
- Arrange in Air Fryer – Spray the air fryer basket lightly with oil spray. Place the breaded onion rings in a single layer in the basket. Smaller rings can fit inside larger ones as long as there’s space between them for air circulation.
- Air Fry the Onion Rings – Cook at 400°F for 11–15 minutes until the onion rings are golden brown and crispy. Spray lightly with cooking spray after 6 minutes to promote crispiness. There is no need to turn the onion rings.
- Serve – Carefully remove the onion rings from the basket using a cookie spatula or fork and enjoy immediately.
Notes
- Freeze breaded onion rings for 15 minutes before air frying to help the coating stick better.
- If you don’t have buttermilk, substitute with 1/2 cup milk mixed with 1/2 tablespoon lemon juice or white vinegar. Let it sit for 5 minutes to thicken.
- For the crispiest result, avoid overcrowding the air fryer basket. Cook in batches if needed.
- Use sweet yellow onions for best flavor and texture.
- Serve hot for maximum crispiness.
Nutrition
- Serving Size: 1/2 recipe (about 1/2 onion + coating)
- Calories: 270
- Sugar: 5g
- Sodium: 700mg
- Fat: 13g
- Saturated Fat: 2g
- Unsaturated Fat: 10g
- Trans Fat: 0g
- Carbohydrates: 34g
- Fiber: 3g
- Protein: 6g
- Cholesterol: 60mg

