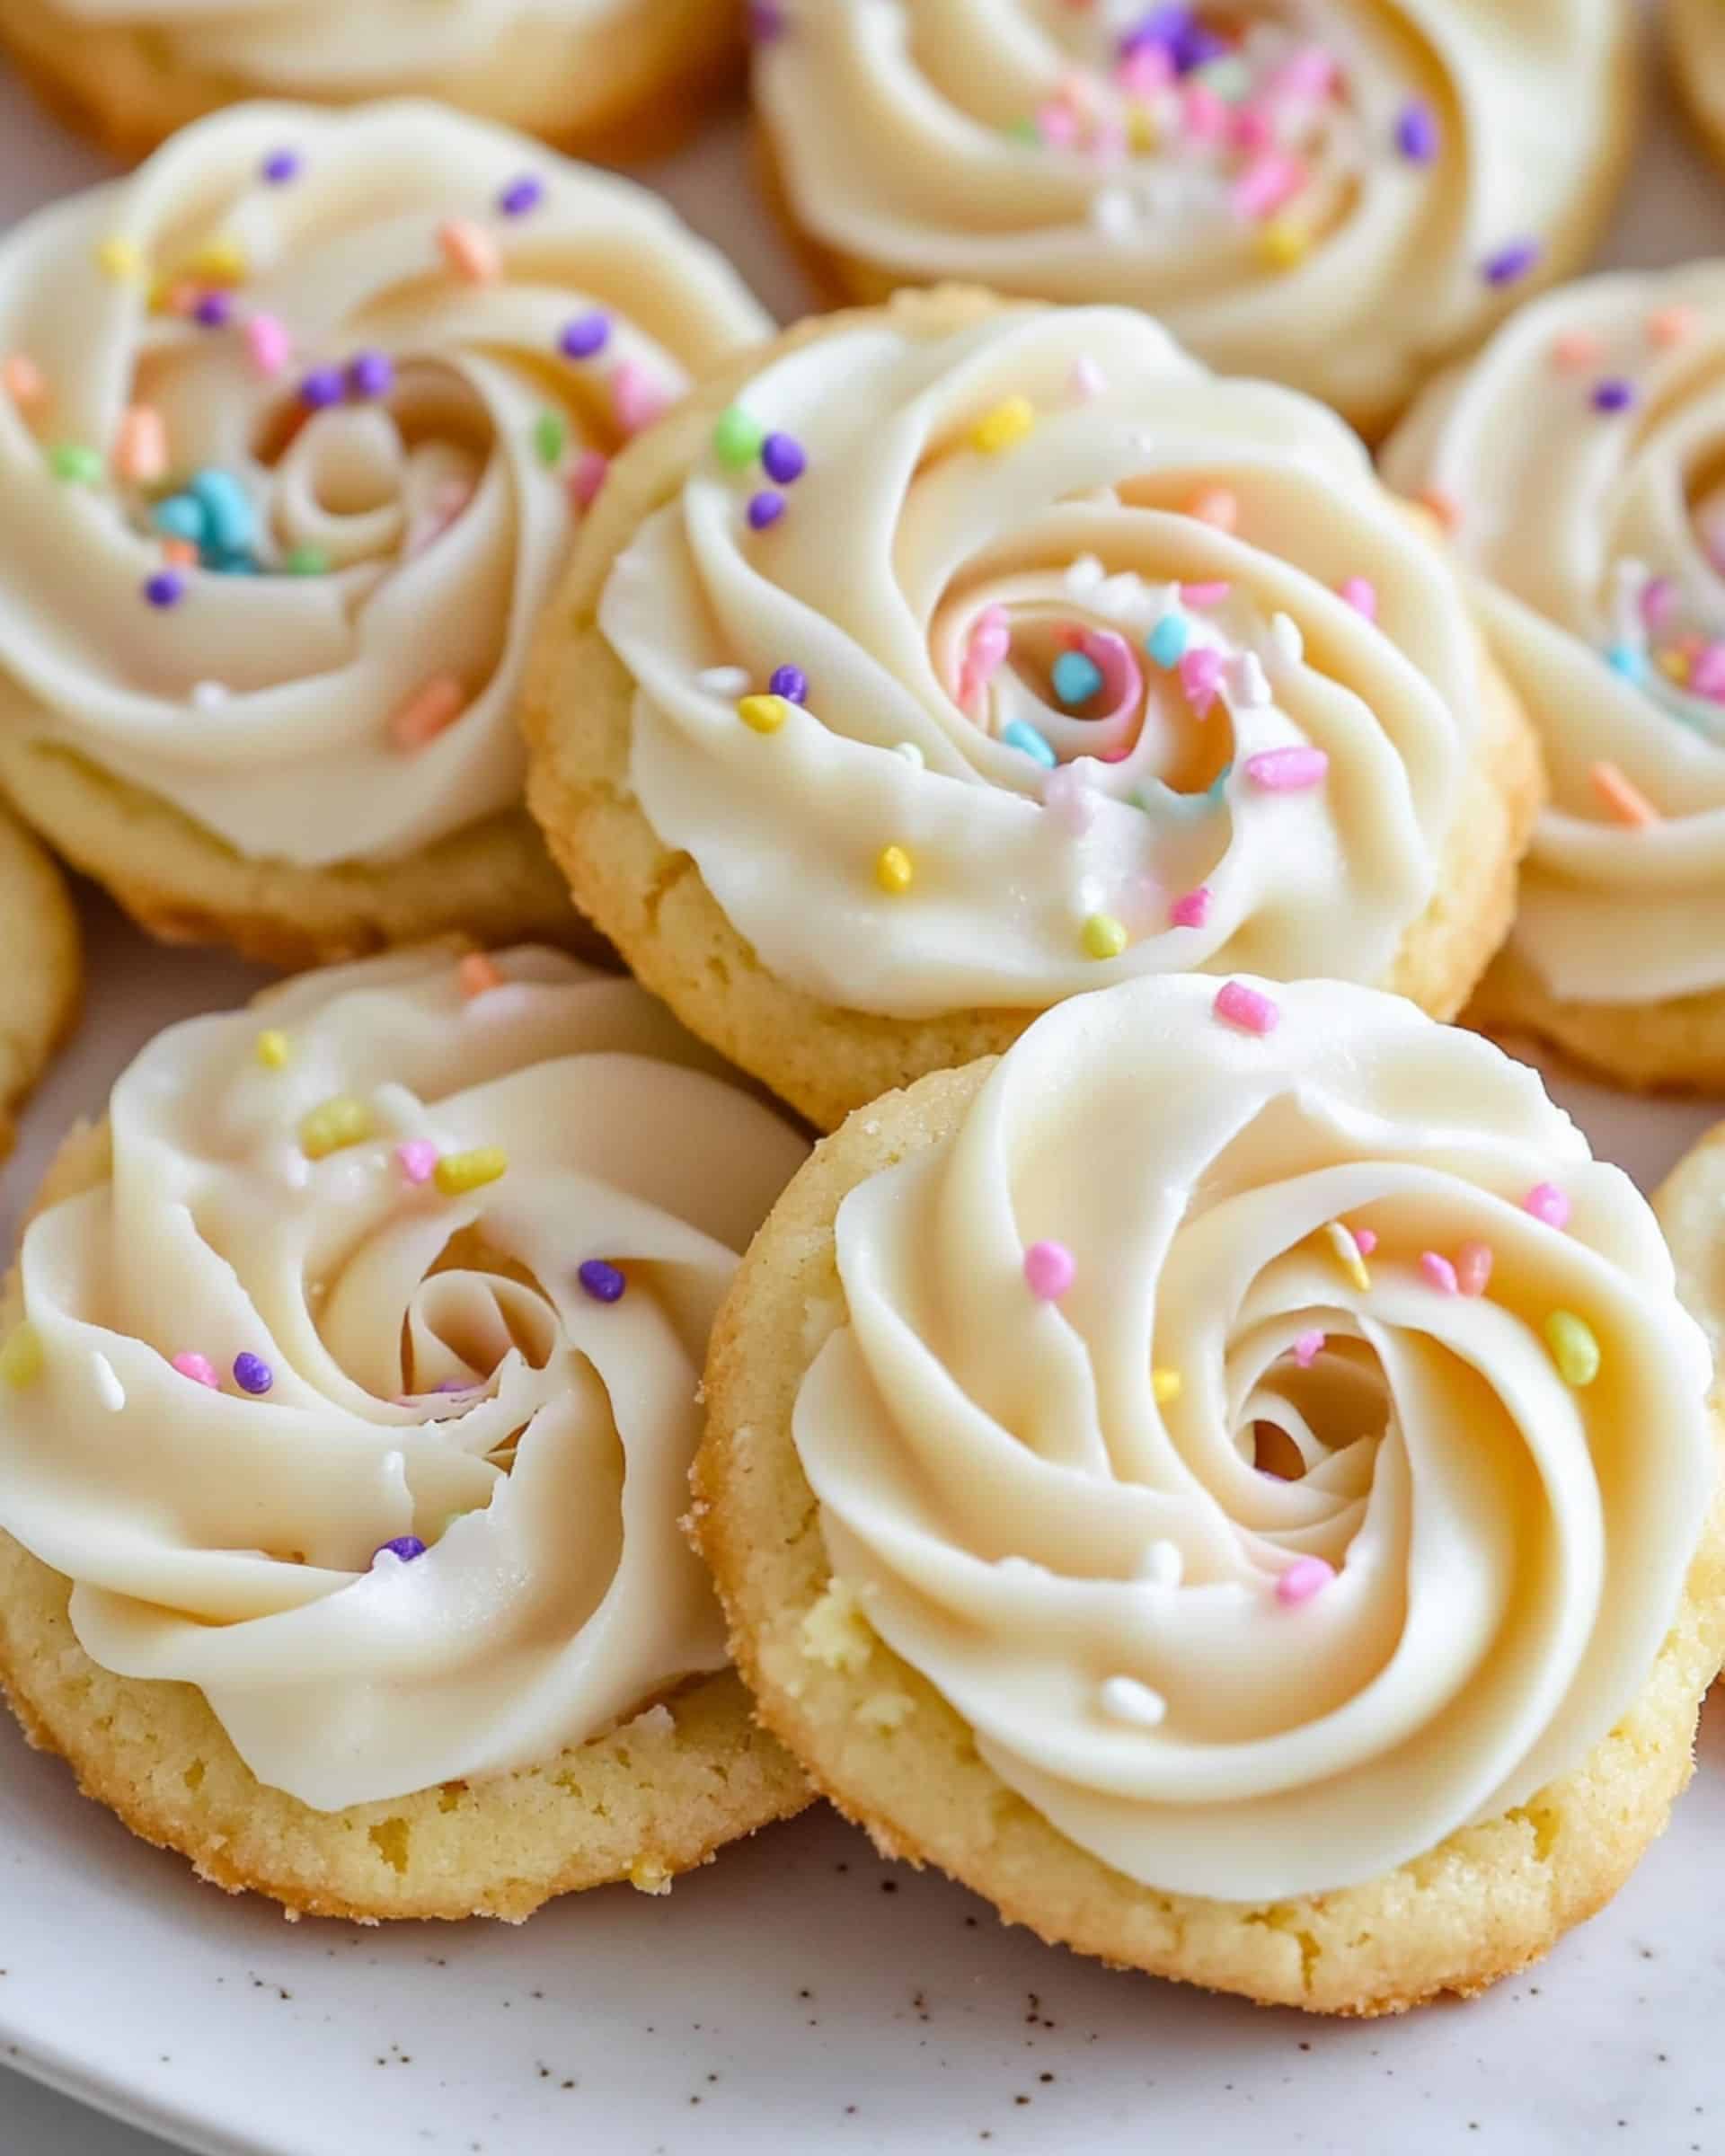
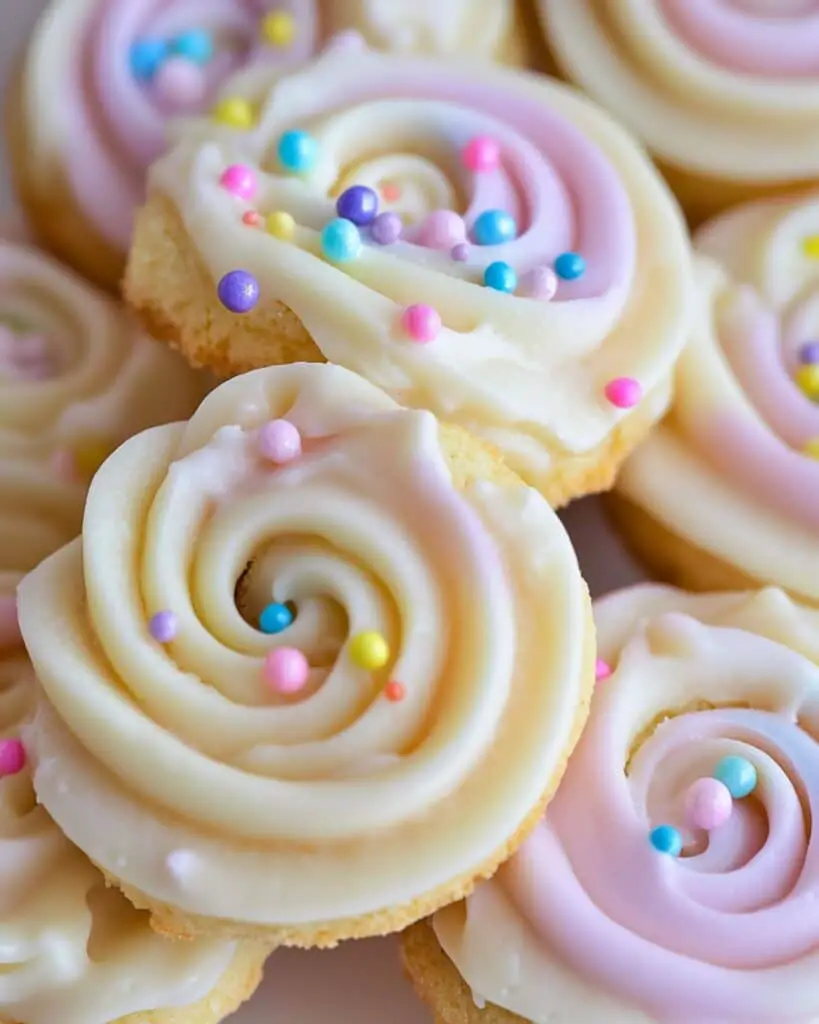
These Springtime Butter Cookies are pure joy in every bite – delicate, buttery rounds adorned with smooth white chocolate and festive pastel sprinkles. Perfect for Easter gatherings, spring celebrations, or simply brightening an ordinary afternoon tea. The beautiful piped design creates an impressive presentation that belies how truly simple they are to make!
Why You’ll Love This Recipe
- Impressive Yet Simple: These cookies look like they came from a fancy bakery, but the piping technique is surprisingly manageable, even for beginners.
- Versatile: Perfect for spring celebrations, Easter, baby showers, or any time you need a touch of elegance and color in your cookie jar.
- Make-Ahead Friendly: Prepare the dough ahead of time or freeze baked cookies for whenever your sweet tooth strikes.
- Customizable: Change up the sprinkle colors to match any holiday or celebration throughout the year.

Ingredients You’ll Need
- Butter: The star of the show providing that melt-in-your-mouth richness. Make sure it’s at room temperature for proper creaming.
- Granulated Sugar: Sweetens the cookies while helping create that tender, crumbly texture we all love.
- Vanilla Extract: Adds that classic warm flavor that pairs perfectly with butter cookies.
- Salt: Just a touch to balance the sweetness and enhance all other flavors.
- Egg: Acts as a binder and adds moisture and structure to the cookies.
- All-Purpose Flour: The foundation of our cookies, giving them structure while keeping them tender.
- White Chocolate: Creates a sweet, creamy coating that serves as the perfect canvas for sprinkles. Use good quality chocolate for the best taste and melting properties.
- Pastel-Colored Sprinkles: Adds that springtime pop of color and a delightful bit of texture. You can switch colors based on the season!
Note: You’ll find the complete list of ingredients, along with their exact measurements, in the printable recipe card at the bottom of this post.
Variations
Flavor Twists
- Citrus Brightness: Add 1 tablespoon of lemon, orange, or lime zest to the cookie dough for a refreshing twist.
- Almond Joy: Replace vanilla extract with almond extract for a nutty flavor profile.
- Chocolate Lover’s Dream: Substitute dark or milk chocolate for the white chocolate dip.
Decorative Options
- Sandwich Style: Spread a thin layer of jam between two cookies for a fancy treat.
- Double Dip: Try half-dipping the cookies in white chocolate and half in dark chocolate for visual contrast.
- Texture Play: Mix sprinkles with crushed freeze-dried strawberries or finely chopped pistachios for added dimension.
How to Make Springtime Butter Cookies
Step 1: Prepare the Dough
Preheat your oven to 350°F. Cream the butter and sugar together for 2 minutes until the mixture becomes light and fluffy and the sugar is nearly dissolved. A stand mixer works wonderfully here, but a hand mixer works just as well.
Step 2: Add Wet Ingredients
Add the salt and vanilla extract to your butter mixture, then mix in the egg just until combined. Don’t overmix after adding the egg or you’ll incorporate too much air.
Step 3: Incorporate Flour
Gradually add the flour, about 1/2 cup at a time, mixing on low speed just until combined. The dough should be smooth and hold together well but not sticky.
Step 4: Pipe the Cookies
Transfer your cookie dough to a decorating bag fitted with a Wilton 1M star tip. Pipe circular cookies on a parchment-lined baking sheet, starting from the center and working outward. If the dough doesn’t release easily from the tip, gently press it off and tuck the end into the side of the cookie.
Step 5: Bake to Perfection
Bake in your preheated oven for about 15 minutes. Look for light browning on the edges, but watch carefully as they can darken quickly once they start to brown. Let them cool completely on a wire rack.
Step 6: Dip and Decorate
Melt the white chocolate in the microwave, starting with 30 seconds, then stirring and continuing with 10-second bursts until smooth. Dip one side of each cooled cookie into the melted chocolate, then immediately sprinkle with your pastel sprinkles before the chocolate sets. Place on parchment paper until the chocolate hardens completely.
Pro Tips for Making the Recipe
- Room Temperature Ingredients: Make sure your butter and egg are at room temperature for the smoothest dough texture.
- Piping Technique: If you’re new to piping, practice on a piece of parchment paper first. You can scrape that dough back into the piping bag once you feel confident.
- Chocolate Consistency: If your white chocolate seems too thick for dipping, add a teaspoon of vegetable shortening or coconut oil to thin it slightly.
- Sprinkle Strategy: Have your sprinkles ready in a small bowl before dipping, and work with just a few cookies at a time so the chocolate doesn’t set before you add the sprinkles.
- Cookie Spacing: Leave about 2 inches between cookies on the baking sheet as they will spread slightly during baking.
How to Serve
These Springtime Butter Cookies are versatile entertainers that shine in many settings:
Perfect Pairings
- Serve with afternoon tea or coffee for an elegant treat
- Pair with fresh strawberries and whipped cream for a light dessert
- Offer alongside vanilla ice cream for a textural contrast
Display Ideas
- Stack in a clear cookie jar tied with pastel ribbon for a beautiful gift
- Arrange on a tiered stand for spring brunches or baby showers
- Place in individual cellophane bags with ribbon as party favors
Make Ahead and Storage
Storing Leftovers
Store your finished cookies in an airtight container at room temperature for up to 1 week. Because of the white chocolate coating, refrigerating is recommended in warmer weather, but allow them to come to room temperature before serving for the best flavor and texture.
Freezing
For longer storage, these cookies freeze beautifully! Place completely cooled cookies (either plain or chocolate-dipped) in a freezer-safe container with parchment paper between layers to prevent sticking. They’ll maintain their quality for up to 3 months.
Make-Ahead Options
The cookie dough can be made ahead and refrigerated for up to 3 days. Bring it back to room temperature before piping, or you can pipe the cookies and freeze them unbaked on a sheet pan, then transfer to a freezer bag once solid. Bake directly from frozen, adding just a minute or two to the baking time.
FAQs
-
Can I make these cookies without a piping bag?
Yes! While the piping creates that lovely decorative edge, you can also roll the dough into 1-inch balls and flatten slightly with the bottom of a glass dipped in sugar. The texture will be slightly different, but they’ll still be delicious.
-
Why did my cookies spread too much while baking?
This typically happens when the butter is too warm or the dough wasn’t chilled enough. If your kitchen is warm, try refrigerating the piped cookies for 15 minutes before baking to help them hold their shape.
-
Can I use colored white chocolate instead of adding sprinkles?
Absolutely! You can color white chocolate with oil-based food coloring (regular water-based food coloring will make chocolate seize). This creates a beautiful solid-colored finish, and you can still add sprinkles on top for extra texture.
-
My white chocolate seems grainy after melting. What happened?
White chocolate is sensitive to heat. Try melting at 50% power in the microwave and stir frequently. If it’s already seized or become grainy, sometimes adding a teaspoon of vegetable oil and stirring vigorously can help smooth it out.
Final Thoughts
These Springtime Butter Cookies bring a touch of joy and elegance to any occasion. The buttery, melt-in-your-mouth texture combined with sweet white chocolate and colorful sprinkles creates a treat that’s as delightful to look at as it is to eat. Don’t be intimidated by the piping – once you try it, you’ll be amazed at how satisfying it is to create such professional-looking cookies right in your own kitchen. Give these a try for your next gathering, or simply to brighten someone’s day with a sweet, homemade gift!
Print
Springtime Butter Cookies Recipe
- Prep Time: 10 minutes
- Cook Time: 15 minutes
- Total Time: 25 minutes
- Yield: 8 servings
- Category: Desserts
- Method: Baking
- Cuisine: American
Description
Delightfully buttery and rich, these Springtime Butter Cookies are a treat that melts in your mouth. With beautifully piped shapes, a touch of white chocolate, and pastel sprinkles, these cookies bring a festive and elegant touch to your dessert table while being simple to make!
Ingredients
For the cookies:
- 1 cup butter
- 1/2 cup granulated sugar
- 1 and 1/2 teaspoons vanilla
- 1/4 teaspoon salt
- 1 large egg
- 2 cups all-purpose flour
For the topping:
- 200g white chocolate, good quality
- 1/4 cup pastel-colored sprinkles
Instructions
- Preheat your oven.
Begin by preheating your oven to 350°F. This ensures the oven is at the right temperature when the cookies are ready to bake. - Cream butter and sugar.
In a stand mixer or a large mixing bowl, cream together the butter and sugar for about 2 minutes until smooth. The texture should be light and the sugar almost dissolved. - Add flavorings and egg.
Add the salt and vanilla extract, then mix in the egg. Stir the mixture just until all ingredients are well combined. - Incorporate the flour.
Gradually mix in the flour, adding 1/2 cup at a time. Use a low-speed setting to prevent overmixing and ensure a soft, tender cookie dough. - Prepare your piping bag.
Transfer the dough to a decorating bag fitted with a Wilton 1M piping tip. This step allows you to create those lovely flower-like swirls. - Pipe the cookies.
Line a baking sheet with parchment paper. Starting from the center, pipe your dough into a circular swirl. For finishing the circle, gently press the dough to the edge of the design to form a complete shape. - Bake the cookies.
Bake in the preheated oven for 15 minutes. Watch closely to ensure only light browning on the edges, as the cookies can darken quickly. Once done, allow them to cool completely on a wire rack before adding the topping. - Melt the white chocolate.
Break the white chocolate into pieces and melt it in the microwave. Heat for 30 seconds initially, stir, then continue heating in 10-second increments until smooth and fully melted. - Dip and decorate.
Dip one side of each cooled cookie into the melted chocolate. While the chocolate is still wet, sprinkle with pastel-colored sprinkles for a beautiful finish. Place the cookies on parchment paper to set.
Notes
- Storage Instructions:
- Store the cookies in an airtight container at room temperature for up to 1 week.
- For cookies dipped in chocolate, storing them in the refrigerator is recommended. Let them come to room temperature before serving.
- Freezing Instructions:
- The plain cookies (without white chocolate) can be frozen in an airtight, freezer-safe container for up to 3 months. Ensure they are cooled completely before freezing. The flavor may slightly degrade over time if stored longer.
Nutrition
- Serving Size: 1 serving
- Calories: 135
- Sugar: 8g
- Sodium: 50mg
- Fat: 8g
- Saturated Fat: 5g
- Unsaturated Fat: 3g
- Trans Fat: 0g
- Carbohydrates: 14g
- Fiber: 1g
- Protein: 1g
- Cholesterol: 0mg


