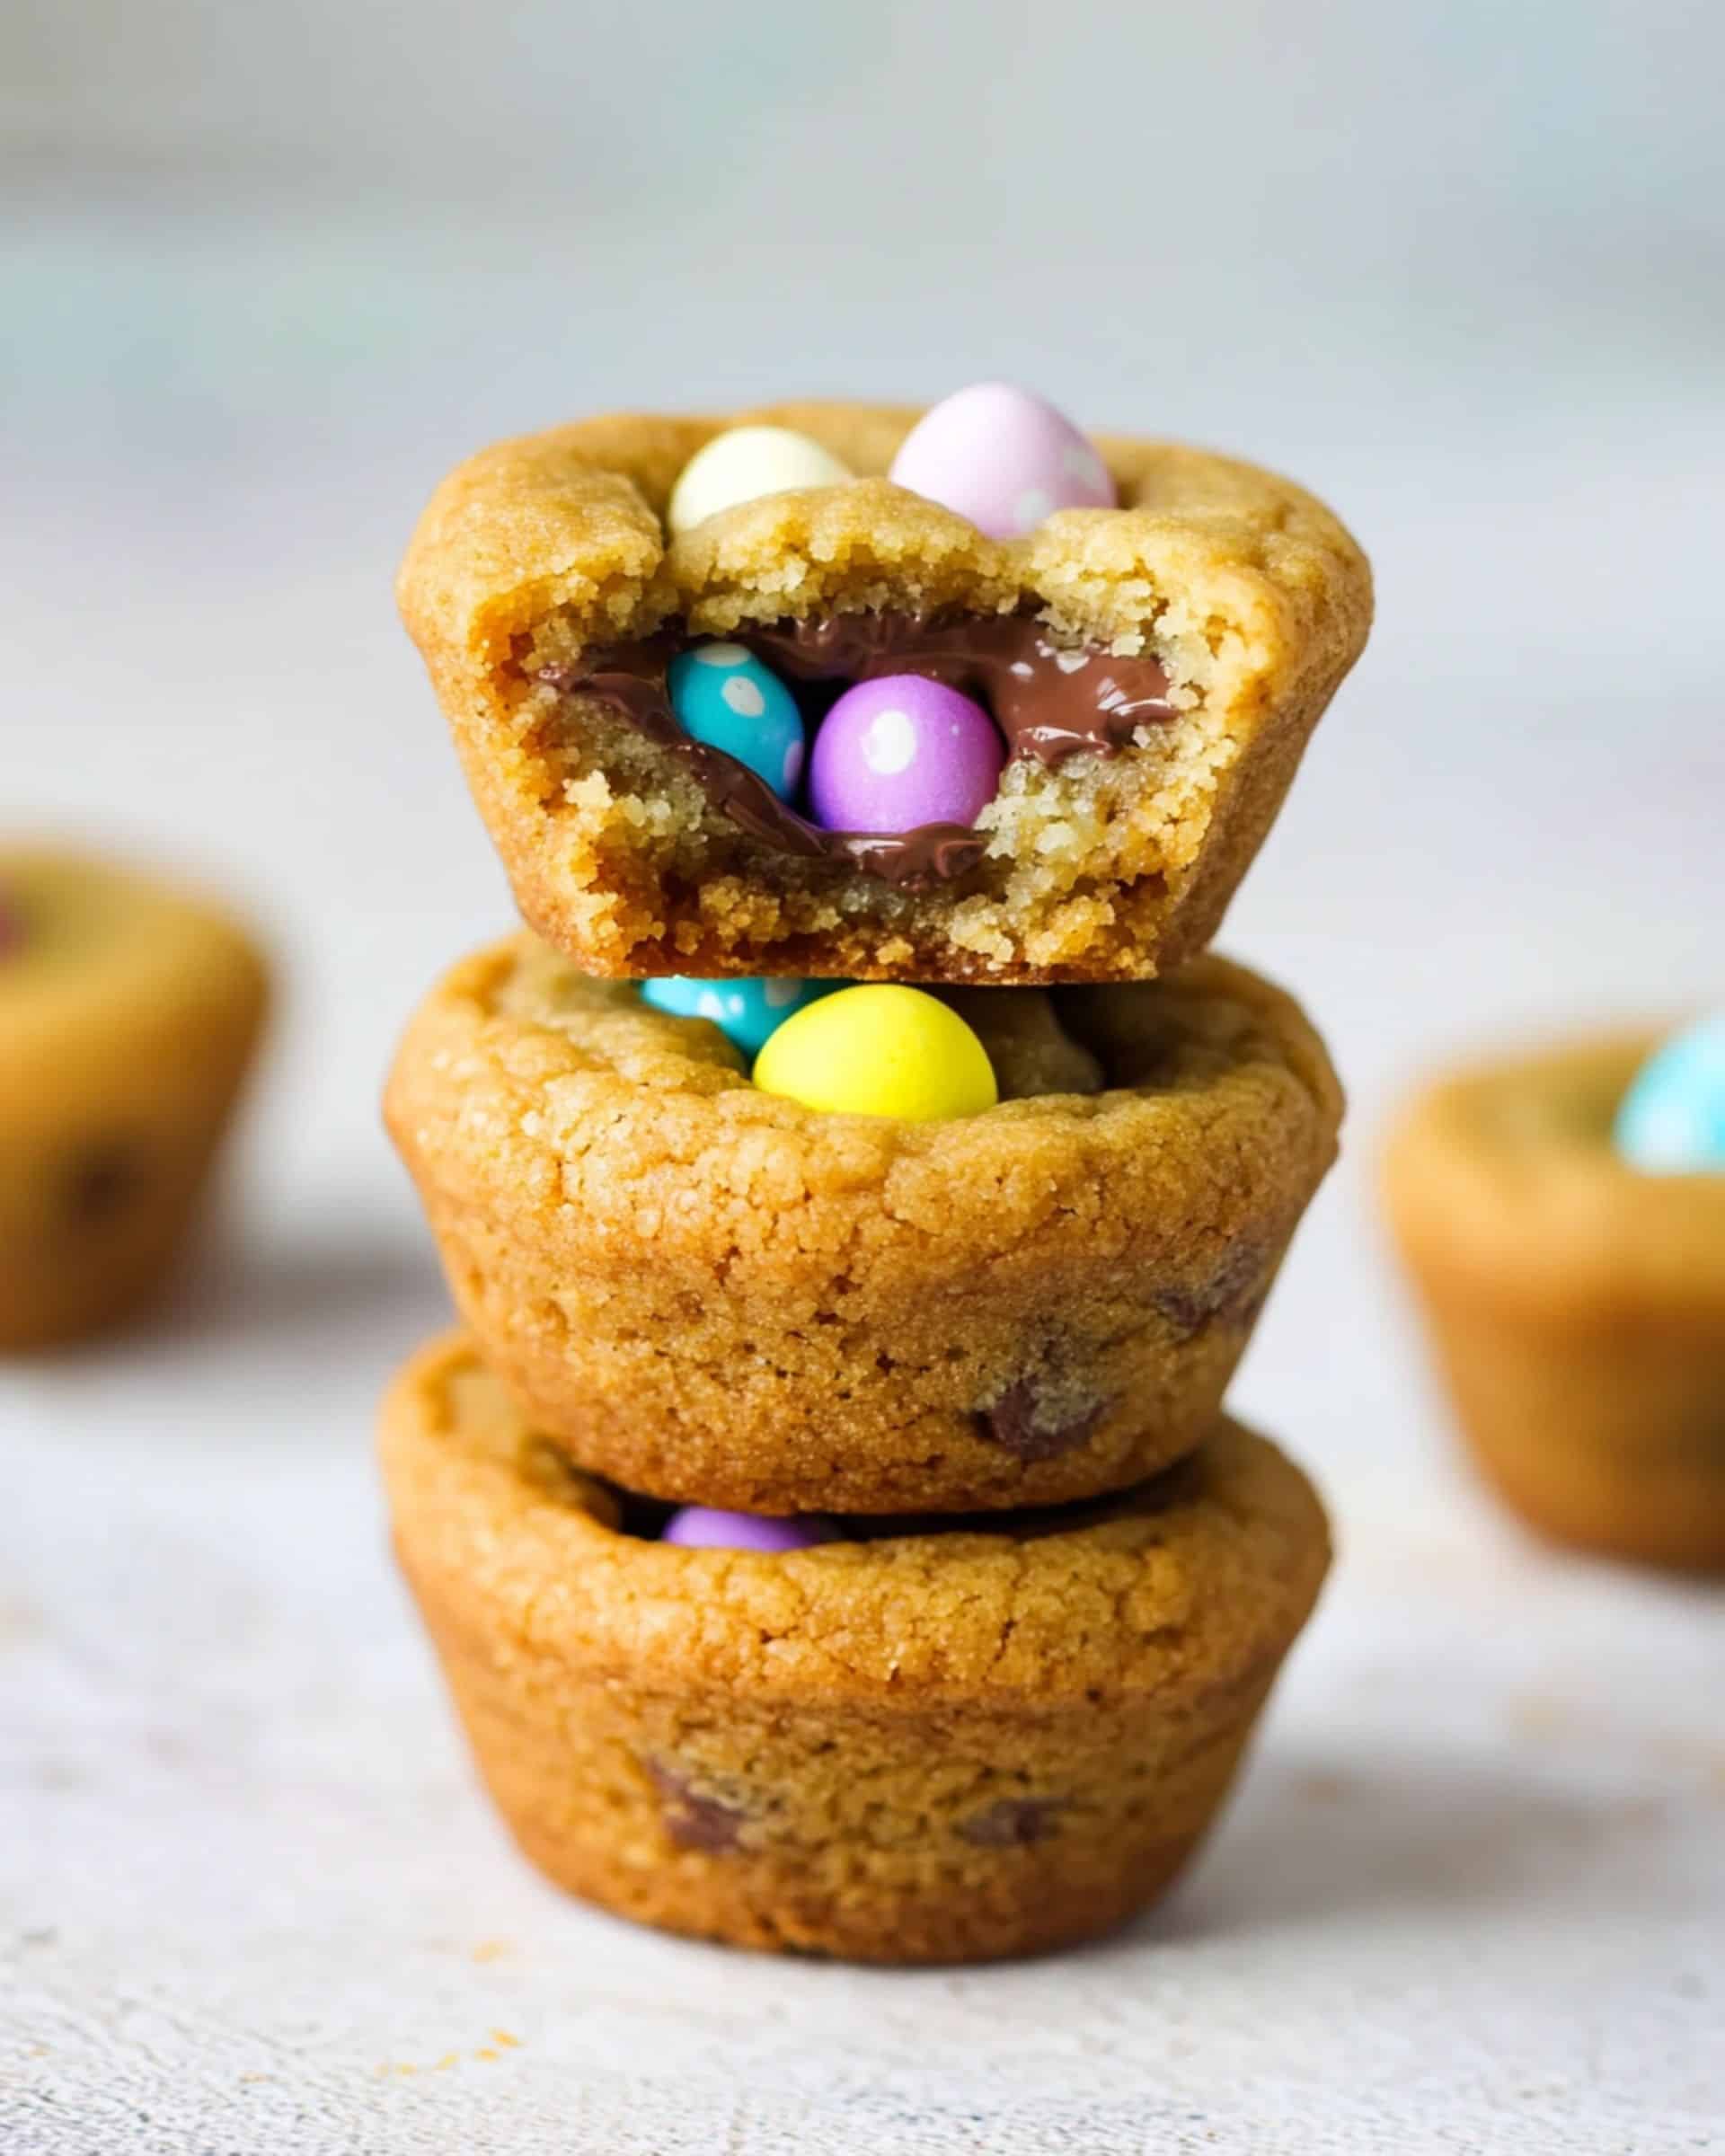
These Easter Egg Chocolate Chip Cookie Cups are a delightful twist on traditional cookies, perfect for celebrating spring! Imagine the classic taste of chocolate chip cookies transformed into adorable little cups, each one cradling colorful mini Easter eggs. They’re incredibly simple to make, requiring just 20 minutes from start to finish, making them an ideal treat for those busy holiday preparations or when you need a quick dessert that will absolutely wow your guests.
Why You’ll Love This Recipe
- Perfect Holiday Treat: These cookie cups combine the classic comfort of chocolate chip cookies with festive Easter flair.
- Quick and Simple: With just 20 minutes total time, you can have these adorable treats ready for any gathering or family celebration.
- Kid-Friendly: Children love helping to press the mini eggs into the warm cookies, making this a perfect family baking activity.
- Impressive Presentation: These look like you spent hours in the kitchen, but they’re actually incredibly simple to make!

Ingredients You’ll Need
- Unsalted Butter: The foundation of any good cookie, providing richness and that melt-in-your-mouth texture. Make sure it’s properly softened for the best creaming results.
- Brown Sugar: Adds moisture and a deeper, caramel-like flavor that makes these cookies irresistible.
- Granulated Sugar: Works with the brown sugar to create the perfect sweetness level and helps give the cookies their structure.
- Vanilla Extract: Enhances all the other flavors in the cookie. Pure vanilla extract will give you the best flavor profile.
- Eggs: Act as a binder and provide structure. Room temperature eggs incorporate much better than cold ones.
- All-Purpose Flour: The main structure of your cookies. Measure it carefully—too much and you’ll end up with dry cookies!
- Baking Soda: The leavening agent that helps the cookies rise slightly and gives them those lovely cracked tops.
- Salt: Balances the sweetness and enhances all the flavors. Don’t skip this, even though it seems small!
- Chocolate Chips: The star of any chocolate chip cookie! Use high-quality chips for the best melty goodness.
- Mini Eggs: These create the festive Easter touch and add a wonderful candy-coated chocolate flavor and crunch to contrast with the soft cookie.
Note: You’ll find the complete list of ingredients, along with their exact measurements, in the printable recipe card at the bottom of this post.
Variations
Flavor Twists
Try white chocolate chips instead of regular chocolate chips for a sweeter flavor profile. Or go for a mix of semi-sweet, milk, and white chocolate chips for a triple chocolate experience!
Seasonal Adaptations
You can easily adapt this recipe for other holidays. Use red and green M&Ms for Christmas, heart-shaped candies for Valentine’s Day, or orange and brown candies for Halloween.
Add Some Nuts
Fold in 1/2 cup of chopped walnuts or pecans to add a wonderful crunchy texture contrast to the soft cookies.
Make Them Fancy
After the cookies have cooled completely, drizzle with melted white chocolate for an extra special touch that looks beautiful on a dessert table.
How to Make Easter Egg Chocolate Chip Cookie Cups
Step 1: Prepare Your Equipment
Preheat your oven to 350°F. Spray two muffin pans lightly with cooking spray. This is crucial for easy removal of your cookie cups later!
Step 2: Create Your Cookie Base
In a large bowl, cream together the softened butter with both brown and granulated sugars until the mixture becomes light and fluffy. This usually takes about 2-3 minutes with an electric mixer.
Step 3: Add Wet Ingredients
Mix in the vanilla extract, then add the eggs one at a time, making sure each is fully incorporated before adding the next. The mixture should look smooth and slightly lighter in color.
Step 4: Incorporate Dry Ingredients
In a separate bowl, whisk together the flour, baking soda, and salt. Gradually add this mixture to your wet ingredients, mixing just until combined. Over-mixing at this stage can make your cookies tough.
Step 5: Add Chocolate Magic
Fold the chocolate chips into your cookie dough until they’re evenly distributed throughout. This ensures chocolate in every bite!
Step 6: Form and Bake
Using a cookie scoop, divide the batter evenly among the prepared muffin cups. Press down slightly with the back of a spoon to create a more even surface. Bake for 13-15 minutes until the tops are golden brown.
Step 7: Add the Easter Touch
After removing from the oven, let the cookies rest for 1-2 minutes (they’ll be too soft immediately). Press three mini eggs into the center of each warm cookie cup. Allow them to sit for another 2-3 minutes to set slightly.
Step 8: Cool Completely
Carefully transfer your cookie cups to wire racks to cool completely. The mini eggs will secure themselves into the cookie as they cool.
Pro Tips for Making the Recipe
- Temperature Matters: Make sure your butter is softened but not melted. If it’s too warm, your cookies might spread too much.
- Don’t Overmix: Mix the dry ingredients just until combined to ensure tender cookies.
- Uniform Sizing: Use a cookie scoop to ensure all your cookie cups are the same size and will bake evenly.
- Watch Carefully: Oven temperatures vary, so start checking at the 12-minute mark. The edges should be set but the center still slightly soft.
- Timing Is Key: Press the mini eggs in while the cookies are still warm but not straight from the oven. This allows them to stick without sinking completely into the cookie.
How to Serve

These Easter Egg Chocolate Chip Cookie Cups are versatile treats that can be presented in numerous delightful ways!
For Easter Celebrations
Arrange them on a festive Easter-themed platter surrounded by Easter grass for a beautiful holiday dessert table centerpiece.
With Ice Cream
Serve slightly warm with a scoop of vanilla ice cream for an elevated dessert experience. The contrast between the warm cookie and cold ice cream is absolutely divine!
As Part of a Dessert Spread
Include these cookie cups on a spring dessert board alongside fresh fruit, pastel-colored macarons, and other Easter treats for a impressive display.
Gift Them
Place a few cookie cups in decorative Easter bags or boxes tied with pastel ribbon for a heartfelt homemade gift for teachers, neighbors, or friends.
Make Ahead and Storage
Storing Leftovers
Store completely cooled cookie cups in an airtight container at room temperature for up to 5 days. Place a piece of parchment paper between layers if you need to stack them to prevent the mini eggs from getting damaged.
Freezing
Freeze the baked cookie cups (without the mini eggs) in an airtight container for up to 3 months. When ready to serve, thaw at room temperature and add mini eggs to the tops by attaching them with a small dab of melted chocolate.
Make Ahead Options
The cookie dough can be prepared up to 3 days in advance and stored covered in the refrigerator. You can also scoop the dough into the muffin tins, cover with plastic wrap, and refrigerate overnight before baking the next day.
FAQs
-
Can I use regular-sized muffin tins or mini muffin tins for this recipe?
Both work great! For regular muffin tins, follow the recipe as written. For mini muffin tins, reduce the baking time to 8-10 minutes and use just one mini egg per cookie cup. The mini version makes adorable bite-sized treats perfect for parties.
-
What if I can’t find mini eggs? Can I substitute something else?
Absolutely! You can use any festive candy that matches your occasion. M&Ms, Hershey’s Kisses, or even colored chocolate chips would work beautifully. Just press them into the cookies while they’re still warm from the oven.
-
Why did my cookie cups sink in the middle?
A slight depression in the middle is normal and actually perfect for holding the mini eggs! If they sink too much, your oven temperature might be too low or the cookies were slightly underbaked. Next time, try baking a minute or two longer.
-
Can I make these gluten-free?
Yes! Simply substitute the all-purpose flour with your favorite cup-for-cup gluten-free flour blend. The texture might be slightly different, but they’ll still be delicious. Just make sure your other ingredients, especially the mini eggs, are also gluten-free.
Final Thoughts
These Easter Egg Chocolate Chip Cookie Cups combine the comforting familiarity of chocolate chip cookies with festive spring charm. They’re quick to make, guaranteed to impress, and bring that special touch to your Easter celebrations. Whether you’re an experienced baker or trying something new, this recipe strikes the perfect balance between simplicity and wow-factor. The joy on everyone’s faces when they see (and taste!) these adorable treats will make them worth every minute spent in the kitchen!
Print
Easter Egg Chocolate Chip Cookie Cups Recipe
- Prep Time: 7 minutes
- Cook Time: 13 minutes
- Total Time: 20 minutes
- Yield: 24 cookies
- Category: Desserts
- Method: Baking
- Cuisine: American
Description
This Easter Egg Chocolate Chip Cookie Cups recipe is the perfect treat to celebrate the season. Buttery, soft, and loaded with chocolatey goodness, these cookie cups are topped with festive mini eggs to make your holiday extra special. Perfect for parties or a fun family baking activity!
Ingredients
Wet Ingredients
- 1 cup unsalted butter, softened
- 3/4 cup brown sugar
- 3/4 cup granulated sugar
- 1 tsp vanilla extract
- 2 large eggs
Dry Ingredients
- 2 1/4 cups all-purpose flour
- 1 tsp baking soda
- 1 tsp salt
Add-ins
- 2 cups chocolate chips
- Mini eggs (approx. 36 for topping)
Instructions
- Preheat the Oven
Preheat your oven to 350°F (175°C). Lightly spray two muffin pans with cooking spray and set them aside. This will ensure the cookie cups release easily once baked. - Cream Wet Ingredients
In a large mixing bowl, combine the softened butter, brown sugar, and granulated sugar. Cream them together using a hand mixer or stand mixer until light and fluffy, about 2-3 minutes. - Add Vanilla and Eggs
Mix in the vanilla extract, followed by the eggs one at a time. Beat well after each addition to fully incorporate the eggs into the mixture. - Combine Dry Ingredients
In a separate medium-sized bowl, whisk together the all-purpose flour, baking soda, and salt. This ensures even distribution of the leavening agent. - Mix Dry with Wet
Slowly add the dry ingredients into the butter mixture. Mix on a low speed until just combined. Avoid overmixing to ensure soft cookie cups. - Fold In Chocolate Chips
Gently fold in the chocolate chips using a spatula, ensuring they are evenly distributed throughout the dough. - Assemble and Bake
Use a cookie scoop to divide the dough into the prepared muffin pans. Press each portion gently with the back of a spoon to flatten slightly. Bake in the preheated oven for 13-15 minutes, or until the tops are golden. - Add Mini Eggs
Once removed from the oven, let the cookies rest for 1-2 minutes in the muffin pan. Gently press 3 mini eggs into the center of each cookie cup. Let them sit for another 2-3 minutes before transferring to a wire rack to cool completely.
Notes
- If you don’t have mini eggs, you can substitute with any small chocolate candy for a similar effect.
- Ensure the butter is softened for easy creaming; cold butter may result in uneven mixing.
- Avoid overbaking as the cookie cups will continue cooking slightly while cooling in the pan.
- Using a cookie scoop helps achieve evenly-sized portions, which ensures even baking.
Nutrition
- Serving Size: 1 cookie
- Calories: 210
- Sugar: 18g
- Sodium: 180
- Fat: 10g
- Saturated Fat: 6g
- Unsaturated Fat: 3g
- Trans Fat: 0g
- Carbohydrates: 28g
- Fiber: 1g
- Protein: 2g
- Cholesterol: 30mg


