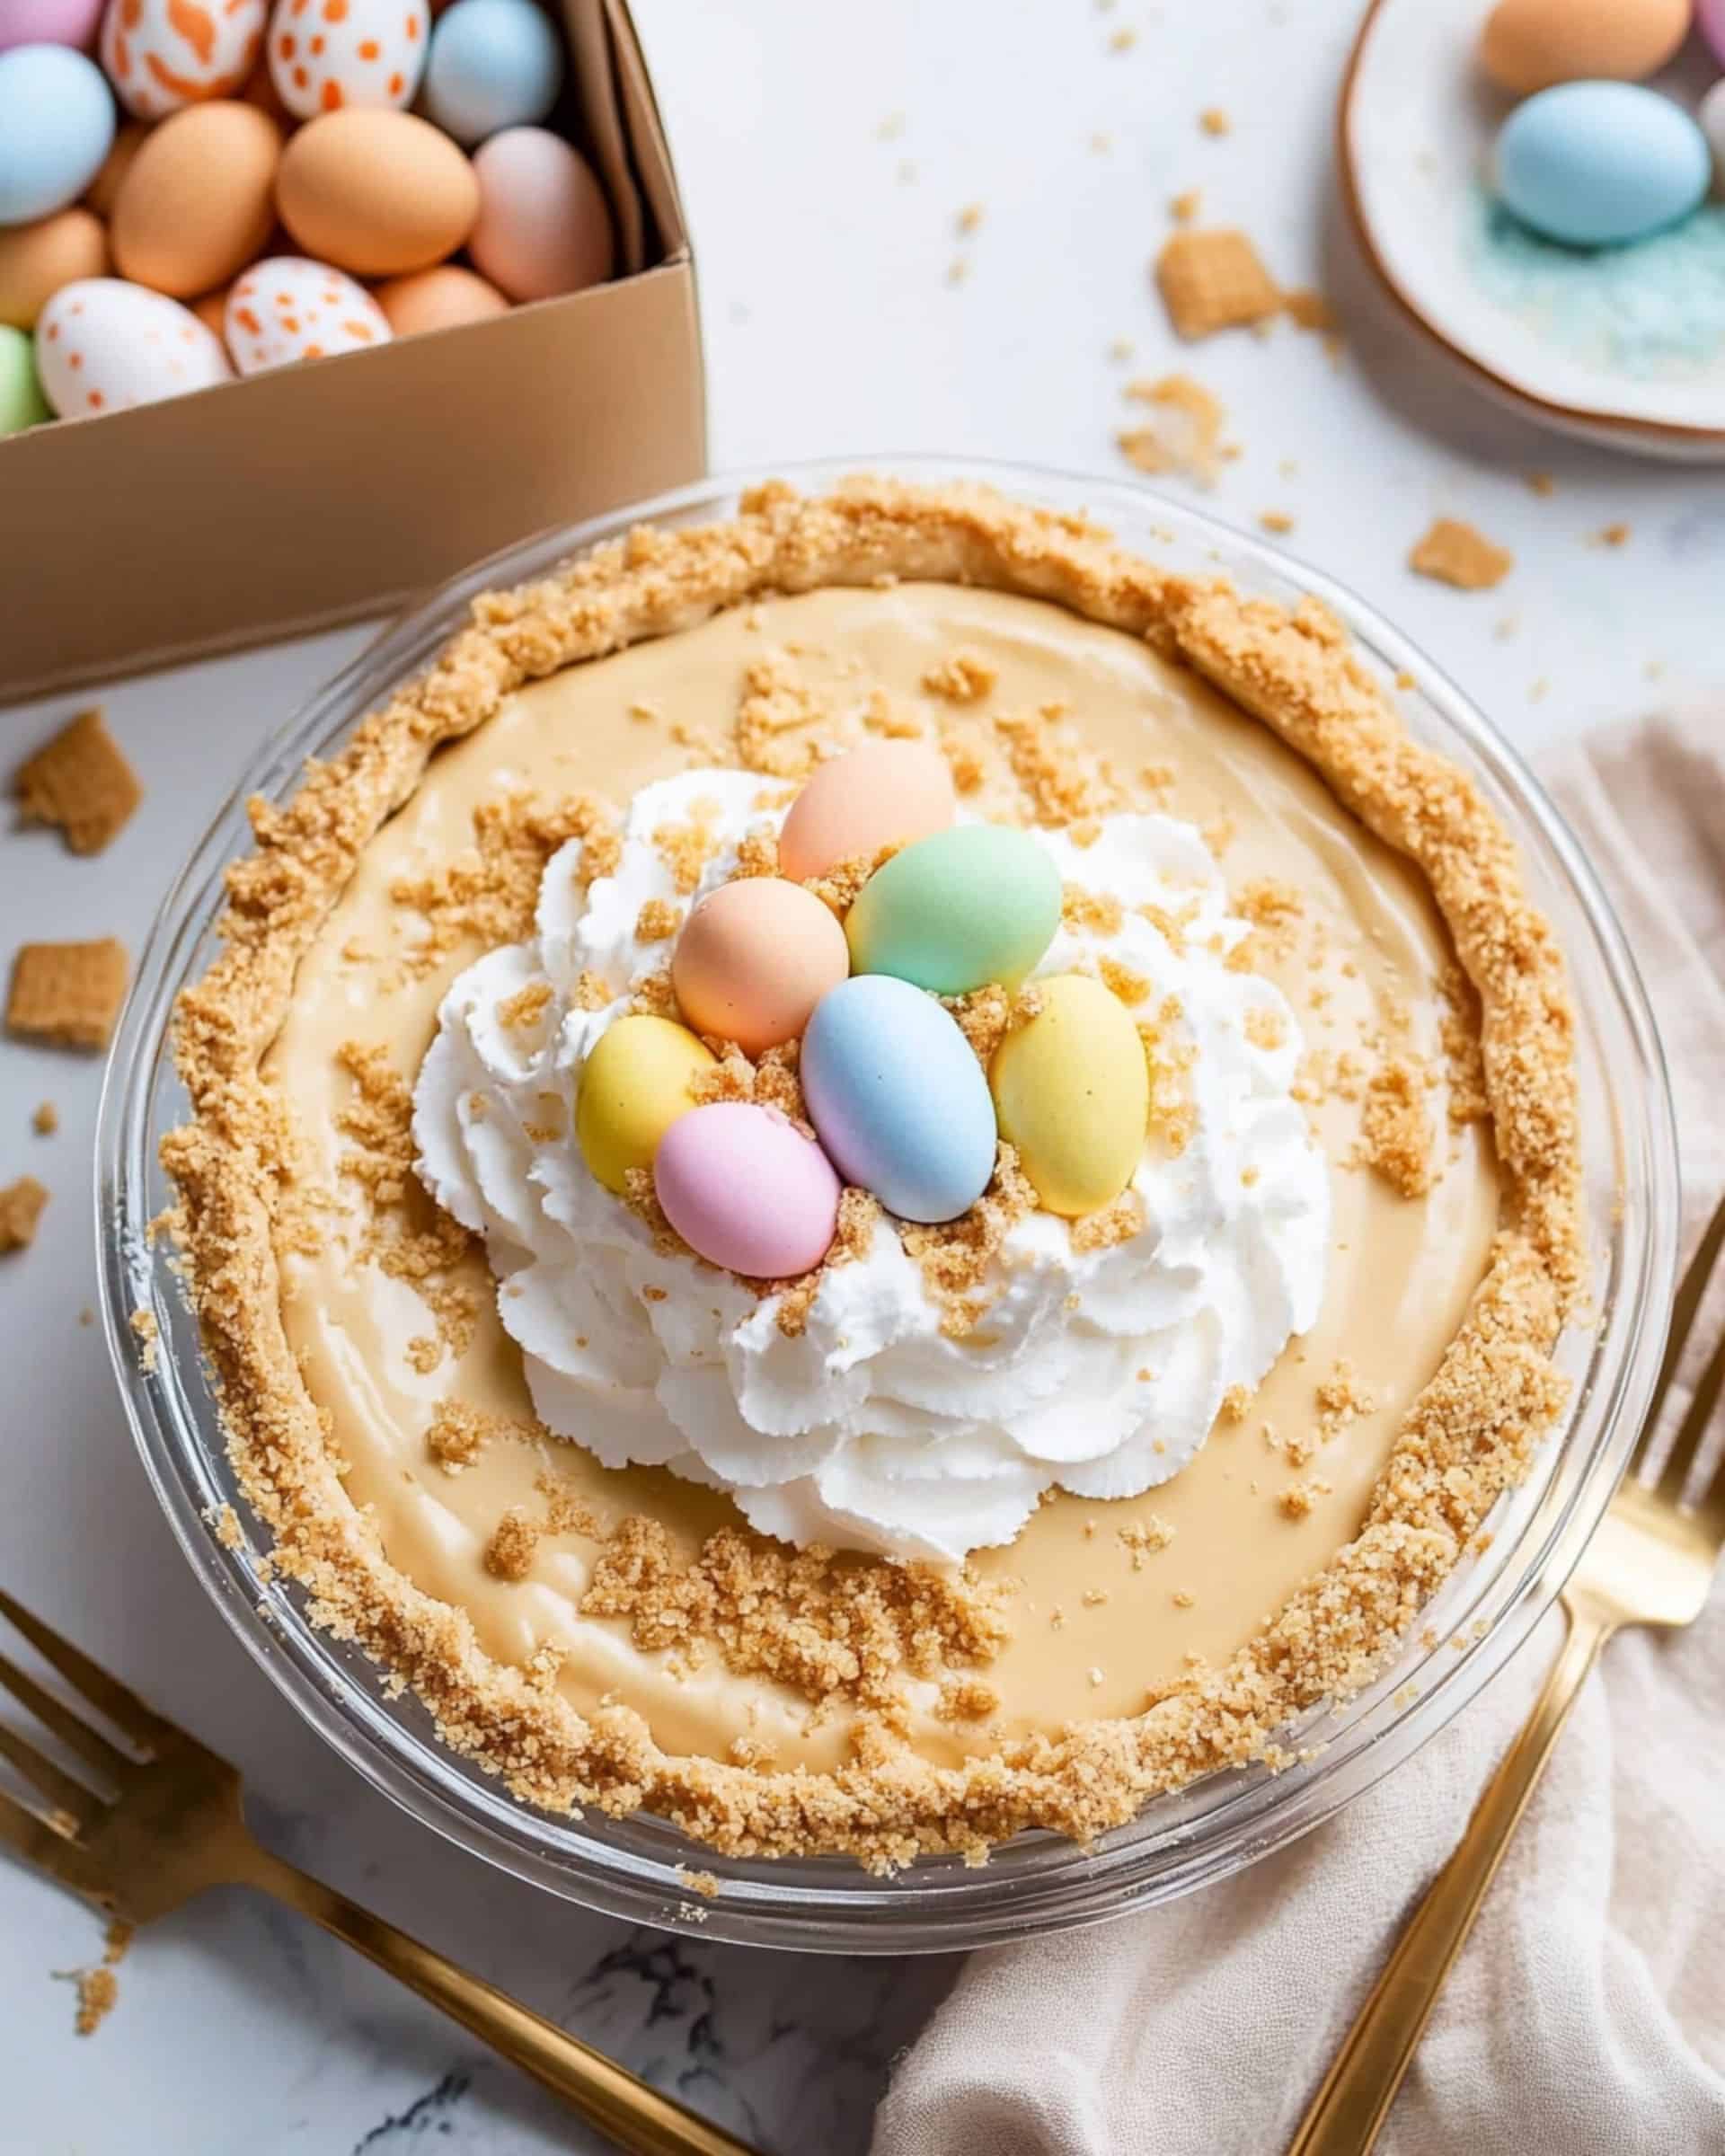
This Easter Peanut Butter Pie is a showstopper dessert that combines the irresistible flavors of creamy peanut butter and cream cheese in a crunchy Nilla Wafer crust, all topped with fluffy whipped cream and festive chocolate egg candies. Perfect for your holiday table, this no-bake pie requires minimal hands-on time but delivers maximum impact with its delicious layers and adorable Easter nest decoration on top!
Why You’ll Love This Recipe
- No Baking Required (except the crust): The filling comes together without turning on your oven – perfect for busy holiday prep when oven space is at a premium!
- Make-Ahead Friendly: This pie actually tastes better when made a day ahead, giving you one less thing to worry about on Easter day.
- Kid-Approved: The combination of peanut butter and chocolate eggs makes this a hit with children, while the sophisticated flavor profile satisfies adult palates too.
- Impressive Presentation: The nest of crushed wafers and colorful egg candies creates a festive Easter centerpiece that looks like you spent hours on it (when it actually takes minutes!).

Ingredients You’ll Need
For the Nilla Wafer Crust:
- Nilla Wafers: These vanilla-flavored cookies create the perfect sweet base for our pie. Their subtle vanilla flavor complements the peanut butter filling beautifully.
- Granulated Sugar: Adds just the right amount of sweetness to the crust while helping it hold together.
- Butter: The glue that binds our crust together. Make sure it’s fully melted for easy mixing with the cookie crumbs.
For the Peanut Butter Filling:
- Cream Cheese: Provides a tangy richness that balances the sweetness. Make sure it’s properly softened for a smooth, lump-free filling.
- Peanut Butter: The star of the show! Use creamy peanut butter for the smoothest texture. I recommend using a commercial brand like Jif or Skippy rather than natural peanut butter, which can separate.
- Powdered Sugar: Sweetens the filling while maintaining a silky texture.
- Whipped Topping: Lightens the filling and adds a cloud-like texture. The filling uses half a tub, and you’ll save the other half for the topping.
For the Topping:
- Whipped Topping: Creates a beautiful blank canvas for our Easter decorations.
- Nilla Wafers: Crushed wafers create a “nest” effect in the center of the pie.
- Chocolate Egg Candies: These colorful eggs complete our Easter theme and add a chocolate element that pairs perfectly with peanut butter.
Note: You’ll find the complete list of ingredients, along with their exact measurements, in the printable recipe card at the bottom of this post.
Variations
- Chocolate Lover’s Version: Add a layer of chocolate ganache between the crust and peanut butter filling.
- Nutty Twist: Mix 1/4 cup finely chopped peanuts into the filling for added texture and enhanced peanut flavor.
- Chocolate Crust: Substitute chocolate sandwich cookies for the Nilla Wafers in the crust for a chocolate-peanut butter combination.
- Seasonal Adaptations: This pie works beautifully year-round! Simply change the decorative topping – use red and blue candies for July 4th, orange and black for Halloween, or colorful sprinkles for birthdays.
How to Make Easter Peanut Butter Pie
Step 1: Prepare the Crust
Preheat your oven to 350°F. Spray a pie plate with non-stick cooking spray. Pulse Nilla Wafers in a food processor until they form fine crumbs. In a medium bowl, combine the crumbs with melted butter and sugar until well mixed. Press the mixture firmly into the bottom and up the sides of your pie plate. Bake for 10 minutes until the edges turn slightly golden. Allow the crust to cool completely before adding the filling.
Step 2: Create the Peanut Butter Filling
In a medium bowl, beat cream cheese and peanut butter together until completely smooth and well-blended. Add powdered sugar and beat until the mixture is fully incorporated and silky. With a light touch, fold in 1½ cups of whipped topping just until combined – don’t overmix or you’ll lose the fluffiness. Pour this luscious filling into your cooled crust and spread evenly with a spatula.
Step 3: Add the Topping
Spread the remaining 1½ cups of whipped topping over the peanut butter layer, leaving a small border of the peanut butter filling visible around the edges for a pretty layered look. Gently crush about 5 Nilla Wafers in a plastic bag and sprinkle them in the center of the pie to create a nest-like appearance. Arrange your chocolate egg candies on top of the crushed cookie “nest” for that perfect Easter touch.
Step 4: Chill
Refrigerate your masterpiece for at least 4 hours, though overnight is even better. This chilling time allows the flavors to meld and the pie to set properly for clean slicing.
Pro Tips for Making the Recipe
- Room Temperature Cream Cheese: Make sure your cream cheese is properly softened before mixing to avoid lumps in your filling.
- Don’t Skimp on Chill Time: The full 4+ hours of refrigeration is crucial for the pie to set properly.
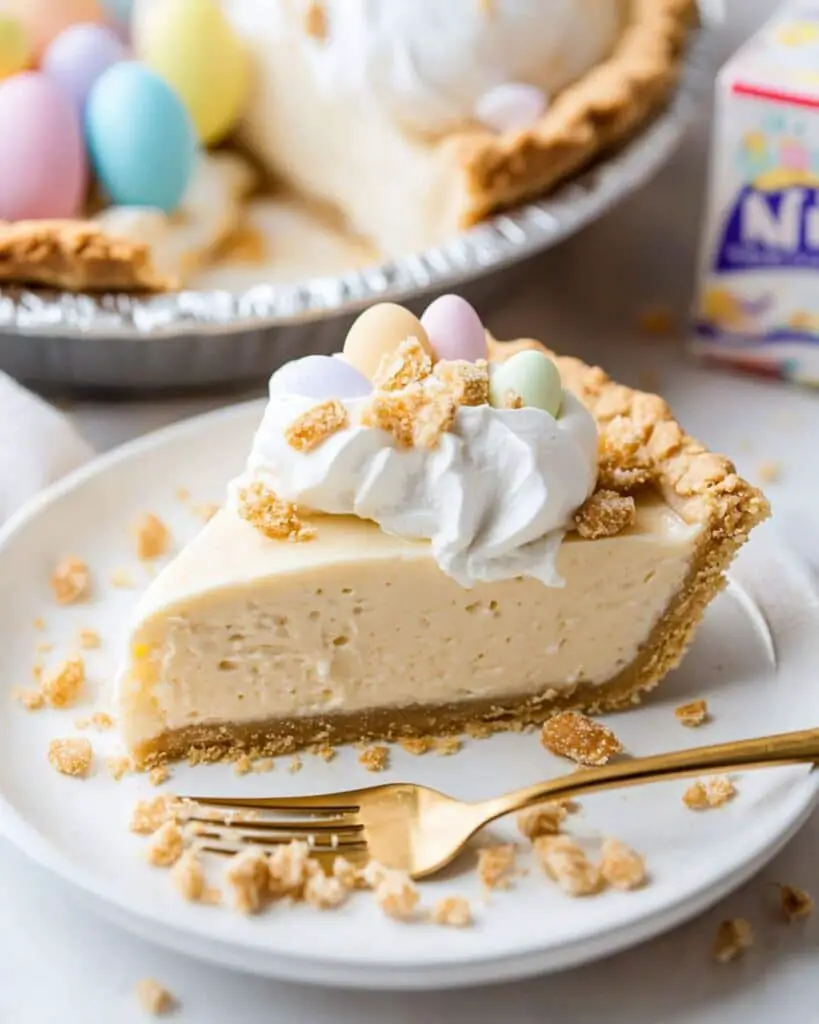
- Neat Slicing: Dip your knife in hot water and wipe clean between cuts for picture-perfect slices.
- Cookie Crumb Technique: For the perfect crust texture, pulse the cookies in short bursts. You want fine crumbs but not powder.
How to Serve
This Easter Peanut Butter Pie makes a beautiful centerpiece for your holiday dessert table. For the perfect presentation:
Special Occasion Serving:
Serve slices on dessert plates with a dollop of extra whipped cream and a light dusting of crushed Nilla Wafers. A drizzle of melted chocolate or caramel sauce takes it to the next level.
Beverage Pairings:
This rich pie pairs beautifully with coffee, milk, or even a dessert wine like Port. For the kids, a glass of cold milk complements the peanut butter perfectly.
Make Ahead and Storage
Storing Leftovers
Cover any leftover pie with plastic wrap or transfer slices to airtight containers. The pie will keep beautifully in the refrigerator for up to 4 days.
Freezing
This pie freezes remarkably well! Freeze the whole pie or individual slices (without the candy eggs) for up to 2 months. Wrap tightly in plastic wrap followed by aluminum foil or place in freezer-safe containers.
Reheating
No reheating necessary! Simply thaw frozen pie in the refrigerator overnight. For the best texture, add fresh whipped topping and decorations after thawing.
FAQs
Can I use natural peanut butter for this recipe?
While natural peanut butter works in a pinch, I recommend using commercial creamy peanut butter brands like Jif or Skippy. Natural peanut butter tends to separate and can make the filling less stable. If using natural, make sure it’s well-stirred and at room temperature.
What can I substitute for Nilla Wafers if I can’t find them?
Graham crackers make an excellent substitute for the crust. You’ll need about 1½ cups of graham cracker crumbs. Another good option is shortbread cookies, which provide a similar buttery vanilla flavor.
Can I make this pie without a food processor?
Absolutely! Place the Nilla Wafers in a sealed plastic bag and crush them with a rolling pin until finely ground. This method might give you slightly coarser crumbs, but the result will still be delicious.
How far in advance can I make this pie?
This pie actually improves with time! You can make it up to 2 days ahead of serving. I recommend adding the crushed wafer “nest” and candy eggs shortly before serving to keep them looking fresh.
Final Thoughts
This Easter Peanut Butter Pie combines nostalgic flavors with holiday charm to create a dessert that’s both impressive and approachable. The contrast between the crunchy crust, creamy peanut butter filling, and fluffy topping creates a texture adventure in every bite. Whether you’re hosting a holiday gathering or simply want to treat your family to something special, this pie is sure to become a new tradition at your table. Happy baking and happy Easter!
Print
Easter Peanut Butter Pie Recipe
- Prep Time: 30 minutes
- Cook Time: 10 minutes
- Total Time: 40 minutes
- Yield: 8 servings
- Category: Desserts
- Method: Baking
- Cuisine: American
Description
This Easter Peanut Butter Pie is a decadent and creamy dessert that combines the delicious flavors of peanut butter, cream cheese, and a buttery Nilla Wafer crust. Topped with whipped cream, crushed wafers, and festive candy eggs, it’s a perfect no-bake treat for your holiday celebrations or any special gathering.
Ingredients
Nilla Wafer Crust
- 60 Nilla Wafers
- 1/4 cup granulated sugar
- 1/3 cup butter, melted
Peanut Butter Filling
- 1 (8 oz.) package cream cheese, softened
- 1 cup creamy peanut butter
- 1 cup powdered sugar
- 1 1/2 cups whipped topping, thawed (half a tub of whipped topping)
Topping
- 1 1/2 cups whipped topping, thawed (the other half of a tub of whipped topping)
- 5 Nilla Wafers, roughly crushed
- 15 candy-coated milk chocolate egg candies
Instructions
- Prepare the Crust
Preheat your oven to 350°F (175°C). Spray a pie plate with non-stick cooking spray and set aside. Pulse the Nilla Wafers in a food processor until fine crumbs form. Transfer the crumbs to a medium-sized mixing bowl and combine them with melted butter and sugar, ensuring it’s well-mixed. Press the mixture firmly into the bottom and sides of your prepared pie plate. Bake the crust for 10 minutes or until the edges turn golden brown. Allow the crust to cool completely before proceeding. - Make the Peanut Butter Filling
In a medium-sized mixing bowl, beat softened cream cheese and peanut butter together until smooth and creamy. Gradually add the powdered sugar and mix until fully incorporated. Gently fold in 1½ cups of the whipped topping until just combined to keep the filling light and airy. Pour the filling into the cooled crust and spread it evenly with a spatula. - Add the Whipped Topping
Spread the remaining whipped topping (about 1½ cups) evenly over the top of the peanut butter filling. For a decorative touch, leave a small visible border of peanut butter filling around the edges. - Finish with Toppings
Sprinkle the middle of the pie with crushed Nilla Wafers to mimic the look of a bird’s nest. Decorate with candy-coated milk chocolate eggs for an Easter-inspired finish. - Chill and Serve
Cover the pie and chill it for a minimum of 4 hours or overnight to set. Once ready, slice and serve this creamy Easter indulgence!
Notes
- To save time, you can use pre-made graham cracker crust instead of Nilla Wafers.
- If you prefer a no-bake crust, skip the baking step and refrigerate the crust for at least an hour before adding the filling.
- For a richer flavor, drizzle melted chocolate or peanut butter on top before serving.
- Always ensure the whipped topping is fully thawed before use for the creamiest results.
Nutrition
- Serving Size: 1 slice
- Calories: 520
- Sugar: 28g
- Sodium: 350
- Fat: 34g
- Saturated Fat: 15g
- Unsaturated Fat: 19
- Trans Fat: 0g
- Carbohydrates: 41g
- Fiber: 2g
- Protein: 8g
- Cholesterol: 35mg


